background image

2.3 ICA-HM125 Installation

é

è

ç

ê

å

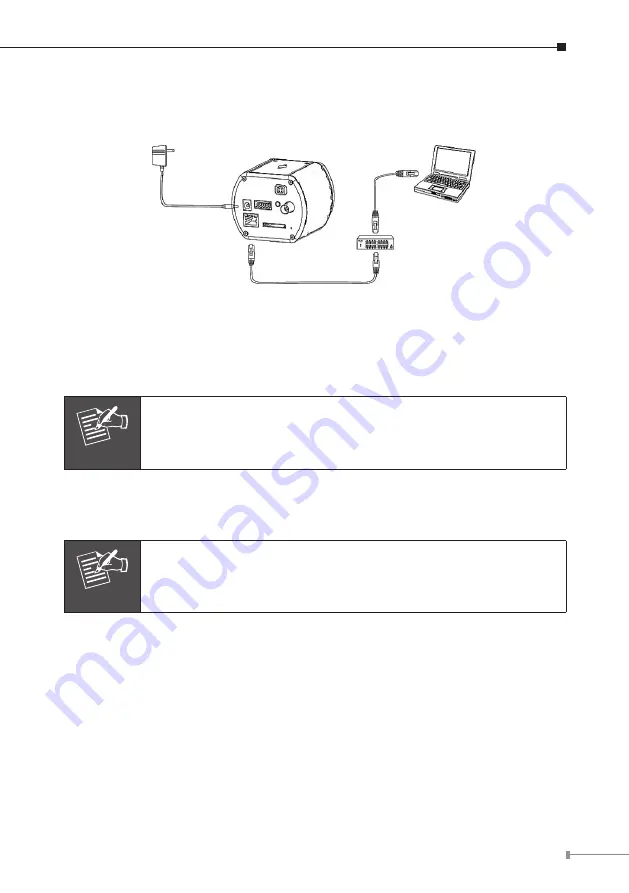
Step 1.  Prepare a PC with Ethernet link to the network

Step 2.  Connect an Ethernet cable


Connect  LAN  port  (RJ-45)  of  the  IP  Camera  to  a  network  switch.  When 
this switch is a PoE device, you can ignore the next step.

Note

If there has an IEEE 802.3af PoE switch in your network, you 
can connect the IP Camera LAN cable to this PoE switch to obtain 
power. The power adapter is unnecessary when IP Camera is 
connected to a PoE switch.

Step 3.  Attach the power supply


Plug  in  power  adapter  to  IP  Camera  and  connect  another  end  to  power 
outlet.

Note

Only use the power adapter supplied with IP Camera otherwise, the 
product may be damaged.

Step 4.  Check LED status 


The  Power  LED  is  defined  to  identify  IP  Camera  status.  When  IP  Camera 
booting the LED will be flashing and while IP Camera is ready the LED will 

be green.

Step 5.  Attach BNC connector and speaker to IP Camera (option)


Connect  the  video  BNC  connector  to  a  monitor  set  if  necessary  check  IP 
Camera viewing angle and focus. And if user needs not only video stream 
but also audio stream, then the speaker should be attached to IP Camera.

Содержание ICA-HM125

Страница 1: ...2 Mega Pixel H 264 Box IP Camera ICA HM125 Quick Installation Guide Version 1 0...

Страница 2: ...pter 2 Physical Description and Installation 4 2 1 ICA HM125 Package Content 4 2 2 ICA HM125 Physical Details 4 2 3 ICA HM125 Installation 7 Chapter 3 Camera Windows Utility 8 3 1 Network Configuratio...

Страница 3: ...PLANET IP Camera support multiple video profile can stands for simultaneously video streams The IP Cameras can generate H 264 and M JPEG streaming simultaneously to different clients Moreover the reso...

Страница 4: ...25 Package Content IP Camera Unit x 1 Power Adapter x 1 Camera Mount Kit x 1 User s Manual CD ROM x 1 Quick Installation Guide x 1 Note If any of the above items are missing please contact your dealer...

Страница 5: ...hole located on the front panel 2 DC Iris The connector provides DC power can drive most DC Iris lens for betterment of the image quality 3 Audio Output It allows this IP Camera to output audio Connec...

Страница 6: ...ted to a IEEE 802 3af PoE switch Otherwise the product may be damaged when IP Camera is connected to a PoE switch and power adapter simultaneously 7 LAN Socket The LAN socket is a RJ 45 connector for...

Страница 7: ...Step 3 Attach the power supply Plug in power adapter to IP Camera and connect another end to power outlet Note Only use the power adapter supplied with IP Camera otherwise the product may be damaged...

Страница 8: ...M drive When the welcome web page appears please click your IP Camera name on the IP Camera list i e ICA HM125 Then click on the utility IPInstaller to start the program 3 1 Network Configuration Plea...

Страница 9: ...3 Double click the item to open the Property Page or click the menu bar View Property 4 After filling the desired settings in the properties click on Set button to complete the configuration settings...

Страница 10: ...t will prompt for User Name and Password please enter both of admin to continue Web Management Confirm the installa tion as it is required to view the video stream and some operations If difficulty is...

Страница 11: ...tup ActiveX to use the IP Camera If not able to get the ActiveX download properly user must temporarily lower your security settings to perform a one time only installation of the ActiveX component on...

Страница 12: ...12 Further Information This guide is used to help you startup your IP Camera settings It is also recommended to check the user manual in CD disk for more details of the system and user configuration...

Отзывы: