background image


23 

Audio: 

Enable Audio function by selecting this option. Please note that this function re-
quires an external microphone attached to the MIC IN port of ICA-101 series.


Apply/Cancel: 

After making sure all settings in the Image are correct, click on the 

Save


icon to 

store the settings for ICA-101 series. You can alternatively click on the 

Cancel


icon 

to restore all settings to the values last saved to or retrieved from ICA-101 series. 

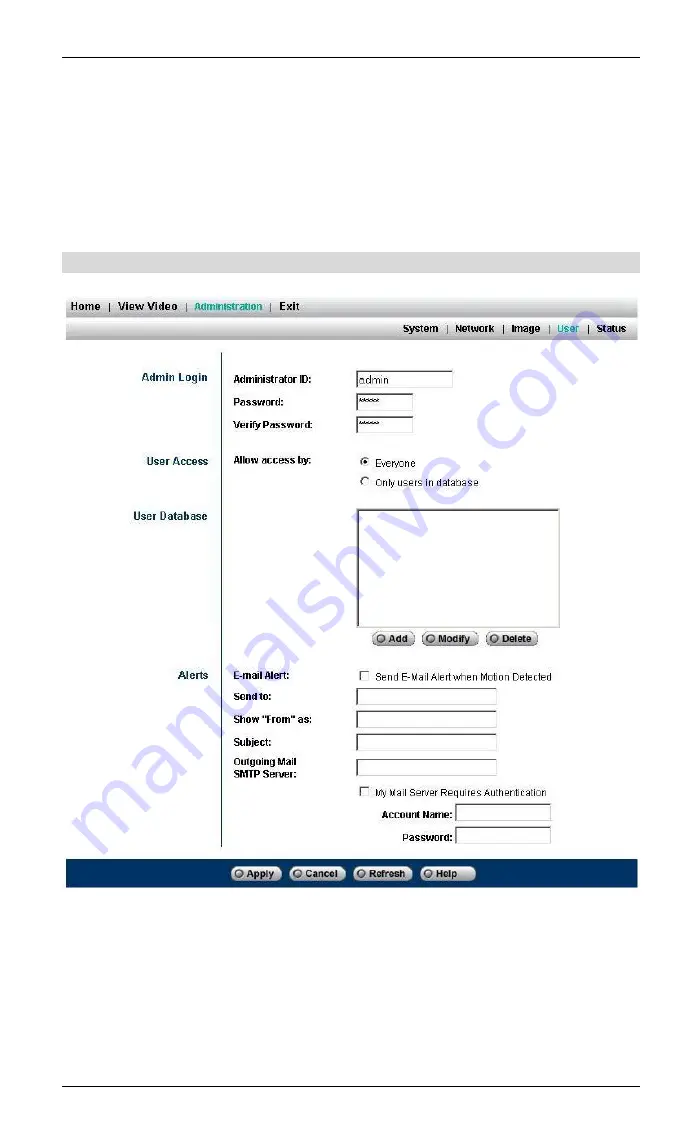
User 


Admin Login: 

These fields are used for entering the Administrator ID along with the password to 
access the Administration settings. Be sure to enter the password twice to confirm the 
details, once in the Password field and again in the Verify Password field. The default 
settings for Administrator ID and Password are both admin. 

User Access: 

You can set the access privileges for users here. The default setting is 

Allow access 

by everyone

. The alternative option is 

Allow access by only users in database

. If you 

Содержание ICA-101

Страница 1: ...Internet Camera ICA 101 ICA 101W User s Manual ...

Страница 2: ... s Manual is accurate PLANET dis claims liability for any inaccuracies or omissions that may have occurred Information in this User s Manual is subject to change without notice and does not represent a commitment on the part of PLANET PLANET assumes no responsibility for any inaccuracies that may be contained in this User s Manual PLANET makes no commitment to update or keep current the informatio...

Страница 3: ...s to the Camera Stand 5 Hardware Install Procedure 6 CHAPTER 3 INITIAL SETUP 7 Preparation 7 Procedures 7 CHAPTER 4 WEB USER INTERFACE 12 Introduction 12 Login 12 View Video 12 Administration 15 CHAPTER 5 CLIENT UTILITY 26 Install Procedure 26 Using Viewer Recorder Utility 28 APPENDIX A FREQUENTLY ASKED QUESTIONS 33 APPENDIX B TROUBLE SHOOTING 34 APPENDIX C SPECIFICATION 36 ...

Страница 4: ......

Страница 5: ...lessly complete network deployment in just minutes ICA 101 ICA 101W Features Simple to use Plug N Watch capability to simplify system integration in an existing network environ ment Suitable for home business or public facilities The ICA 101 family can be deployed in many different situations and reduce the cost of human resources offering flexibility affordability and reliability for surveillance...

Страница 6: ...era If the gateway has a dynamic IP address DDNS Dy namic DNS is required Since many gateways do not support DDNS this function is incorporated into ICA 101 family Audio support With an external microphone attached audio can be recorded with live images Package Contents The following items should be included Internet Camera unit Camera Stand Accessory Power Adapter CD ROM Quick Installation Guide ...

Страница 7: ... definition PWR On Internet Camera is powered on ACT Blink Internet Camera is active LAN On LAN port is active Blink Data is transferring via LAN port WLAN On Wireless interface is active Blink Data is transferring via wireless interface Rear Panel Button definition ...

Страница 8: ...utton This button has two 2 functions When pressed and released Internet Camera will reset restart When reset button is pressed over 3 seconds and then release ALL data will be clear and restore ALL settings to the factory default values ...

Страница 9: ...in 98 SE Win 2000 Win Me Win XP System Hardware CPU Pentium III 450 MHz or above Memory Size 128 MB 256 MB recommended VGA card resolution 800x600 or above Connecting ICA 101 series to the Camera Stand ICA 101 series comes with a camera stand accessory with a swivel ball screw head that can be attached to ICA 101 series bottom screw hole Attach the camera stand to ICA 101 series and station it for...

Страница 10: ...e network device hub or switch If you want to use wireless connection for ICA 101W you can skip this step 2 Attach the external power supply Connect the provided power adapter to the ICA 101 s connector labeled 5VDC on rear panel 3 Check the LEDs The PWR would flash for few seconds to detect network connection The network indication LEDs LAN or WLAN would be on depending on which network type is a...

Страница 11: ...ra must be installed and powered ON If the Internet Camera s default IP Address 192 168 0 20 is already used by another device the other device must be turned OFF until the Internet Camera is allocated a new IP Address during configuration Procedures 1 Insert the CD ROM into the CD ROM drive to initiate the autorun program Once completed a menu screen would appear as follow 2 Click on Setup Wizard...

Страница 12: ...re click Next 5 A password verification screen will pop up Please key in administrator name and password for login The default strings are admin admin 6 In the next screen you can select Fixed IP Address or Dynamic IP Address Fixed IP Address is recommended and can always be used Dynamic IP Ad dress can only be used if your LAN has a DHCP Server If you select Dynamic IP Address please go to step 8...

Страница 13: ... using ICA 101 please skip to step 10 This screen allows you to config ure wireless settings Mode Authentication Type ESSID Domain and Channel Enter appropriate values in each field then click Next 9 WEP key settings are used to secure your wireless connection Enter the suitable settings in each field then click Next ...

Страница 14: ...ed changes then click Next to con tinue 11 The Save settings screen displays all the details of your camera Click Save if all settings are correct or click Back to modify incorrect values 12 After saving all settings the follow screen appears You can click the Web UI to connect to the camera using your Web Browser or click Exit to close Setup Wizard ...

Страница 15: ...11 13 Click on Web UI to access the web interface of ICA 101 series Please refer to chapter 4 for more information about web UI Click on Exit to close Setup Wiz ard ...

Страница 16: ...ries The lower right of the page shows information of Device Name Description and IP Address There are four options which are available for all screens Home return to Welcome page View Video view live images Administration access the management screens Exit close the current screen and terminate the connection to camera View Video You can view live video via web browser by selecting View Video opt...

Страница 17: ...13 2 Select Security tab choose Internet zone Click Custom Level button ...

Страница 18: ...ption to Prompt 4 Click OK button 5 Click Yes while Warning dialog box appears 6 Click Apply then OK button to finish the setting After the setting is done a Security Warning dialog box would appear while you select View Video Ensure the path and the ocx file name is correct then click Yes to continue ...

Страница 19: ...s successfully finished you will see the live video immediately Administration Once you click Administration option a dialog box will pop up Please enter default username password as admin admin to access the management screens ...

Страница 20: ...ge User and Status System System Settings Device Name This field displays the name of your ICA 101 series It cannot be changed Description This field is used for entering a descriptive name for the location used by ICA 101 series Time Enter the current time Date Enter the current date Timezone ...

Страница 21: ...the Time Server in this field M Note Please find below NTP server web address for your reference to set the time server http www eecis udel edu mills ntp clock1 htm http www eecis udel edu mills ntp clock2 htm Update Schedule This option determines how often ICA 101 series synchronizes its time with time server Apply Cancel After making sure all settings in the System are correct click on the Appl...

Страница 22: ...e to use a vacant IP address when you assign the IP ad dress for ICA 101 series This will prevent errors from occurring if the IP address is overlapped Obtain Address Automatically DHCP If your network already exists a DHCP server you can select this option for ICA 101 series to get an IP address automatically Fixed IP Address You can select this option and directly enter the network settings ...

Страница 23: ...ture mode To connect ICA 101W to a specific access point on the network make sure to set ESSID of ICA 101W the same as the AP s ESSID for communication Type any string up to 32 characters long spaces symbols and punctuation are not al lowed in the ESSID box To connect ICA 101W to an Ad hoc wireless workgroup make sure to set the same wireless channel and ESSID to match with the PC Notebook wireles...

Страница 24: ...ly Default Key Specify a key value as default WEP key Key Value If WEP Encryption is enabled you must enter at least one key value All transmissions are encrypted with Default Key Other wireless stations must use the same key value in the same position of their key table It does not have to be selected as the default key The other key values are optional and are used only for decrypting data This ...

Страница 25: ...ll broadcast its availability using UPnP UPnP compatible systems such as Windows XP will then be able to detect the presence of ICA 101 series Second Port This option allows you to open a second port for ICA 101 series The HTTP con nections using your Web Browser can use the port number you specified below instead of the standard HTTP port 80 The configurable port range is 1024 65534 Apply Cancel ...

Страница 26: ...elect proper value for ICA 101 Adjustment Exposure Select Automatic or Manual as required If manual exposure is selected an exposure value option will appear in the right The default value is 32 Red Green Blue Adjust the respective color settings with default setting at 32 Defaults Click Defaults button to restore Exposure and Red Green Blue values back to de fault Options Time Stamp Enable this o...

Страница 27: ...to the values last saved to or retrieved from ICA 101 series User Admin Login These fields are used for entering the Administrator ID along with the password to access the Administration settings Be sure to enter the password twice to confirm the details once in the Password field and again in the Verify Password field The default settings for Administrator ID and Password are both admin User Acce...

Страница 28: ...er e mail address in the field Show From as Enter the sender e mail address in the field This field must be entered with a valid e mail format Subject Enter the subject of outgoing mail Outgoing Mail SMTP Server Enter the address of SMTP server used to send the mail Please ensure the server is using SMTP protocol and able to relay mails for you Some SMTP server may require authentication You can s...

Страница 29: ...rrupt the upgrading procedure during proceeding or the inner component might be permanently damaged System Log ICA 101 series will record the system events here You can use these logs for diagno sis Refresh Click Refresh button to renew the system log Restart Click Restart button to reboot your camera Restore Factory Defaults Click Restore Factory Defaults button to load default settings to camera...

Страница 30: ...corder Application click on the Viewer Recorder hyper link to activate the installation procedure for the application program If the above screen is not shown you can start the installation as follows 1 Click on Start Menu Run 2 Enter D Utility setup exe in the appeared box where D is the letter of your CD ROM drive 3 Click on OK button STEP 3 The Welcome screen will appear Click on the Next butto...

Страница 31: ...ion or click on Browse to select another location After specifying the desired destination location click on Next to proceed further STEP 5 The Select Program Folder prompt will appear providing information of where the application will be located click on Next to continue Click on Back can return to the previous screens ...

Страница 32: ... in has been installed to your computer STEP 7 Once the setup is complete the following message box pops up Click OK button to close the screen Using Viewer Recorder Utility After successfully installing the utility this icon will be added to the desktop Double click on it to launch the program ...

Страница 33: ...ding activity in progress Add Camera Click Add Camera button the utility will search available cameras in LAN automati cally Once it finds the camera the detailed information will be displayed If the camera has enabled User Access control you have to enter the authorized Name and Pass word in Login field Then click Add button the camera will be added to the Camera List immediately ...

Страница 34: ...uired Click Test button to check the connection to the camera and click Add to add the camera to Camera List Modify Camera If a camera s IP address or port number has been changed you can use this option to rebuild the connection Select an existing camera from Camera List click Modify Camera button After modifying you can click Test button to check the connection Click Save to save the changes ...

Страница 35: ...the selected camera will pop up immediately There are three control buttons available in this screen is for play is for re cording and is for stop Files Click Files button to check the files which have been recorded in your computer Select a file and click Play your computer will use Media Player program to play the file Select a file and click Delete to delete it Click Explore button to open the ...

Страница 36: ...e To schedule a recording session click Schedule button The screen displays all scheduled recordings Click Add button and select desired parameters then click Save button The new schedule will be added to the list immediately To modify an existing schedule select the schedule and click Modify Change the parameters to desired values then click Save To delete an existing schedule select the schedule...

Страница 37: ...ce can go up to 100 meters indoors and up to 300 meters outdoors The range is limited by the number of walls ceilings or other objects that the wireless signals must pass through Typical ranges vary depends on the types of materials and background Radio Frequency RF noise in your home or business and the configuration setting of your network environment Internet Camera Installation Q Can ICA 101 s...

Страница 38: ...ered ON and startup is complete Ensure that your PC and the Wireless Ethernet Network Camera are on the same network segment If you don t have a router this must be the case Ensure that your PC has the TCP IP network protocol loaded In Windows this is done by using Control Panel Network If an entry for TCP IP Network card is not listed use Add Protocol Microsoft TCP IP to add it You then need to s...

Страница 39: ...e is a poor image quality how can I improve the image A1 A possible cause might be the incorrect display properties configuration for your desktop You need to open the Display Properties on your desktop and configure your display to show at least 65 000 colors for example at least 16 bit M Note Applying only 16 or 256 colors on your computer will produce dithering artifacts in the image A2 The con...

Страница 40: ...ension 164 x 88 x 53 mm Operating temperature 0 40 degree C Storage temperature 10 70 degree C Humidity 5 95 non condensing Video Specifications Image sensor CMOS 1 4 inch VGA resolution Lens Fixed focus Resolution 160 x 120 320 x 240 Focus extension 70cm Compression MPEG 4 Management Features Management Web interface Utility Additional Features Image recording NTP Support Email auto send System e...

Отзывы: