Planet Audio P9752B Скачать руководство пользователя страница 12

11

24

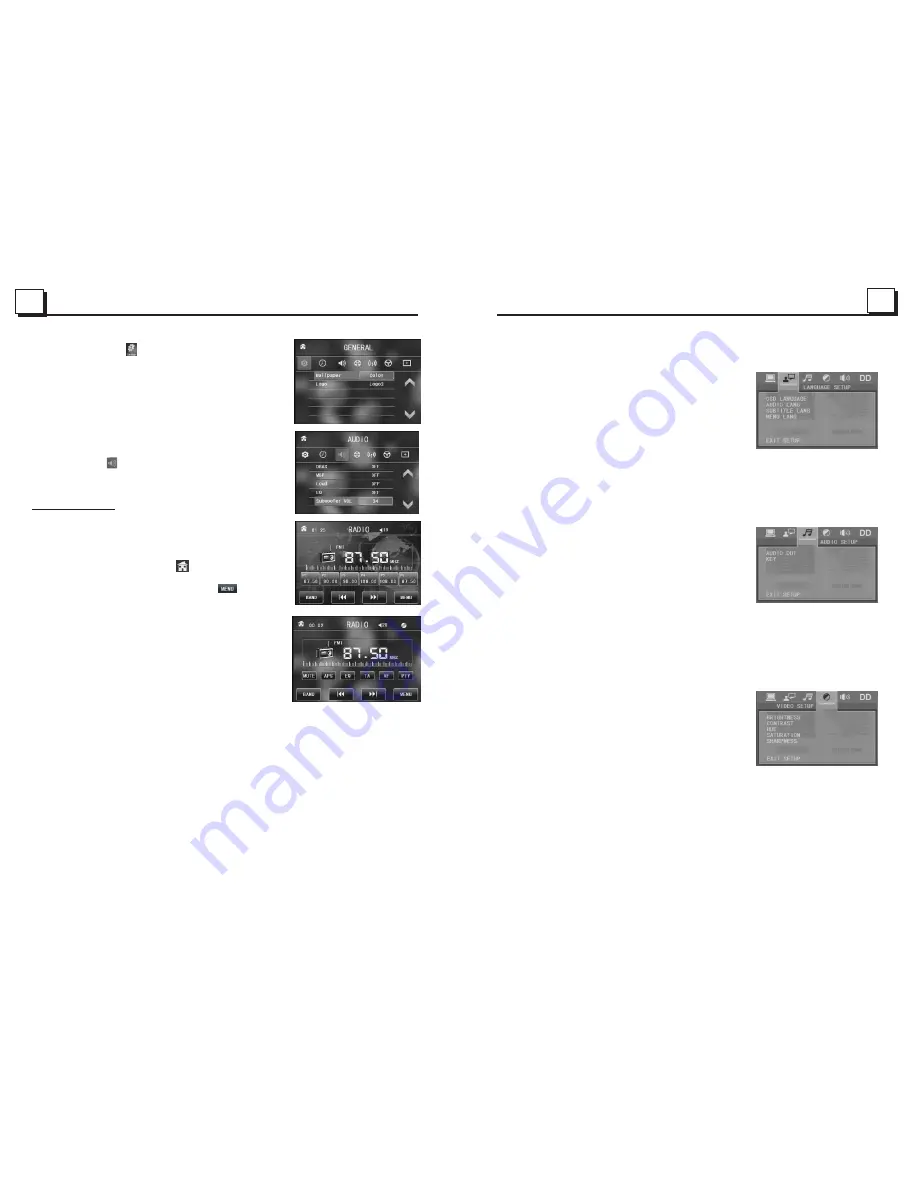
5.23.2  LANGUAGE SETUP          
             
OSD LANGUAGE  
This item is for selecting the language of the 
SYSTEM MENU and all operating prompt 
interface displayed during playback.  

AUDIO LANG 
This item is for selecting a audio language. 
 
SUBTITLE LANG
This item is for selecting a subtitle language. 

MENU LANG
This item is for selecting a disc menu language.

5.23.3  AUDIO SETUP          
           
AUDIO OUT
there is only ANALOG mode, i.e. SPDIF/OFF,
 not optional.

KEY 
It is for selecting your desired basic music tone
(from low to high).  

5.23.4  VIDEO SETUP       
           
BRIGHTNESS 
It is for adjusting the brightness of the video output.  

CONTRAST 
It is for adjusting the contrast of the video output.  

HUE 
It is for adjusting the hue of the video output.   

SATURATION 
It is for adjusting the saturation of the video output.
  
SHARPNESS 
It is for adjusting the sharpness of the video output. 

10.To do setup
     To do setup, tap the      icon in the Main Menu to turn to 
     SETUP interface as right.
     

3.   Radio Operation

1.  Enter RADIO mode
     When you use MENU button or Mode Menu to enter RADIO 
     mode,  it will display RADIO interface as right.

     In RADIO interface, tapping the       icon can enter Mode 
     Menu;  during playback ,press and hold the mode button
     can turn on or off TFT display; tapping the          icon can 
     turn to frequency interface as right; the other icons are 
     same as ones in the unit panel or in the Remote Control. 

     In menu set interface, you can adjust MUTE, APS, EQ,
     TA, AF, PTY as right.
2.  BAND BUTTON
     In RADIO mode, press the BAND button on the remote 
     control to select your desired radio band of FM1, FM2, FM3, 
     AM1 and AM2, 

3.  TUNE/SEEK UP/DOWN BUTTONS
     In RADIO mode:
 1) Press and hold the >>|/|<< button to automatically search 
     up/down for an available station from current frequency. 
 2) Briefly press the >>| / |<< button to manually search up or down with step by step for your
     desired station from the current frequency.  
4.  APS BUTTON
     In RADIO mode:
 1)When pressing and holding the APS button,the radio searches from the lowest frequency
     and checks the signal strength level until 1 cycle search is finished. And then the 6 strongest 
     stations are preset to the corresponding preset number memory bank. The AS operation is
     implemented in the each bank of the selected band. When the AS operation is finished, it 
     will scan each preset station for 5 seconds in FM or AM band from M1 as briefly pressing 
     APS button. After  finishing a circle of scanning , it will resume broadcasting on the M1.
     (It can store 3x6  stations for FM and 2x6 stations for AM in all) 
 2) When briefly pressing the APS button, the radio will scan each preset station for 5 
     seconds in FM or AM band from M1.  After finishing a circle of scanning, it will resume 
     

In the interface, select one of GENERAL, TIME, AUDIO, 

     VIDEO ,RADIO , STEERING WHEEL CONTROL,
     CALIBRATE by tapping them, then set them by tapping 
     some icons on the right side accordingly.
     STEERING WHEEL CONTROL: press one button on the
     steering wheel then the LCD will show KEY 1 setting, select
     the function (such as vol control ,seeking, mute ,power
     etc)and then tap it to confirm. It can support mostly  6
     shortcut keys. Press reset can cancel all the setting.
     AUDIO: Tap the      icon to pop up the AUDIO setup interface
      as right. you can adjust the Subwoofer VOL here. 
     

Note: In radio mode, the password is 888888.

and the selected band will be displayed on

     the small monitor of the front panel.

Содержание P9752B

Страница 1: ......

Страница 2: ...34 1 To ensure safety while driving and to comply with laws drivers should not watch video or operate the video device while driving...

Страница 3: ...e 2 Do not touch the power plug with wet hand 3 Switch off the main power when the unit is not in use Disconnect the power plug from the power outlet when you do not intend to use the unit for a prolo...

Страница 4: ...Root PBC Menu 16 5 7 Playback with Speed 17 5 8 Playback with Slow Speed 17 5 9 Display Still Frame Step by Step 18 5 10 Playback Repeatedly 18 5 10 1 One All Repeat 18 5 10 2 A B Repeat 18 5 11 Play...

Страница 5: ...o not allow the speaker wires to be shorted together when the unit is switched on Otherwise it may overload or burn out the power amplifier 4 Do not install the detachable panel before connecting the...

Страница 6: ...the power switch is on Ensure that the wall inlet is ok Ensure that the power cord is not damaged or the fuse is not blown Ensure that the power plug is connected to the inlet tightly NO SOUND BUT HA...

Страница 7: ...res 1 Input telephone number with number buttons 0 9 Press CLEAR button briefly to cancel the wrongly input number if necessary 2 Press TEL briefly to execute the dialling 5 3 To redial the last phone...

Страница 8: ...LCD of the car audio system will show LINK OK when pairing is failed press and hold the PAIR button on the remote control to enter pairing mode then the LCD will display PAIR START then pair and conn...

Страница 9: ...esia etc Region 4 Australia New Zealand Central South America South Pacific Inlands Region 5 Russia Mongolia Indian Peninsula Middle Asia East Europe North Korea North Africa North west Asia etc Regio...

Страница 10: ...t to entry Parental Control setup menu and then set a equal or higher rating level than one of current disc So that you can playback the disc NOTE For the factory preset password of the DVD player ple...

Страница 11: ...ning on LOUD mode it will enhance bass level immediately when bass is not enough 9 To reset the player When the monitor display wrongly or some buttons are not available or sound is distorted press th...

Страница 12: ...UP DOWN BUTTONS In RADIO mode 1 Press and hold the button to automatically search up down for an available station from current frequency 2 Briefly press the button to manually search up or down with...

Страница 13: ...on 3 flashing AF switching mode on but RDS information is not received yet 2 There are 6 setup pages in all for the System Menu Press the or button to select an desired setup page 3 Press the or v but...

Страница 14: ...on to display the image in full screen from the selected IMAGE file 3 During IMAGE playback press one of the v buttons to change the angle of viewing picture that is displaying as follows 90 deg cw 90...

Страница 15: ...ters tracks in DVD VCD MP3 WMA CD to play 1 During playback press the PROG button to enter a program interface as follows 2 Use the direction buttons to move cursor onto the desired place for inputtin...

Страница 16: ...e of the v buttons to select the area you want to enlarge 5 16 Change the Caption Language In the state of DVD playing press the SUBTITLE button repeatedly to select the language of the caption or tur...

Страница 17: ...NT button to play the previous 15 seconds part of each track on the disc Press the INT button again to resume normal playback 2 In the state of DVD IMAGE playing the INT button is not available 5 12 P...

Страница 18: ...d title and then press the OK or PLAY button to open the root menu of the selected title 3 Press the direction buttons to select your desired chapter finally press the OK or PLAY button to play the se...

Отзывы: