


R1224 Regulator
Installation Instruction
24-30-01
12-1001
Page: 6-14
Rev. M
: 01 Dec. 2021
© 2021 - Hartzell Engine Technologies - All rights reserved
6.16 Regulator Installation Guide-M
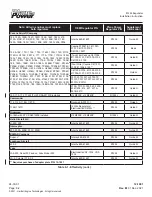
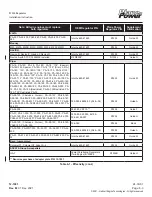
A. General
INTERAV:
These are installed on aircraft, which have been converted to an alternator from a generator by
STC SA334SW.
Use R1224.
Labeling the wires is important for reconnection:
(1)
Remove Interav regulator and over voltage relay. The R1224 has internal over voltage protection, so the
Interav over voltage relay is no longer needed.
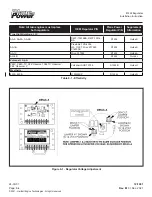
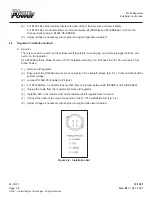
(2) Ensure that the R1224 jumpers are set for 14V (Fig. 6-1). Add a jumper between SENSE and AUX on
both R1224B regulators.
(3) Install R1224 in the location from which the InterAv regulator was removed.
(4) Remove the wires on both terminals of the ALTERNATOR switch (on the aircraft panel). Connect one
terminal of the switch to the 5A breaker where the wire to “Red-Pos” of the Interav OV Relay was
connected. Connect the other terminal of the switch to R1224 #3 (Enable).
(5) Connect the GND (Ground) wire to R1224 #1 (GRND).
(6) Connect the Field terminal of the alternator to R1224 #2 (FLD).
(7) Jumper R1224 #3 (Enable) to #4 (AUX). For R1224 Rev C and later: Ensure that there is a jumper
between R1224 #8 (SENSE) and #3 (ENABLE).
(8) Remove all disconnected and unused wires.
(9) If a warning lamp is incorporated, connect one terminal of the lamp to R1224 #5 (Lamp) and the other
terminal of the lamp to the aircraft bus through a 1A fuse or breaker. Be sure the lamp is a 100-milliamp
bulb or it will not work properly.
(10)
Adjust voltage as necessary with engine running and alternator enabled.
The installation is complete after testing.


