background image


3

Unpacking Instructions 


Remove the LED LCD Monitor out of the package and take off the plastic bag and Polystyrene 
Foam.   


Pull the base from Parallel versus Panel to Vertical. 


Adjust the Panel between -5° leaning forward and 20° leaning backward. 


Safety Precautions 

Follow all warnings, precautions and maintenance as recommended in this user’s manual to 

maximize the life of your unit. 
 

Do: 


Turn off the product before cleaning. 


Touch screen surface may be cleaned using a soft clean cloth moistened with mild window 

glass commercial cleaners or 50/50 mixture of water and isopropyl alcohol. 


Use a soft cloth moistened with mild detergent to clean the display housing. 


Disconnect the power plug from AC outlet if the product is not going to be used for an 

extended period of time. 


Don’t: 


Do not touch the LED Display screen surface with sharp or hard objects. 


Do not use abrasive cleaners, waxes or solvents for your cleaning. 


Do not operate the product under the following conditions: 

Extremely hot, cold or humid environment. 

Areas susceptible to excessive dust and dirt. 

Near any appliance generating a strong magnetic field. 

In direct sunlight. 


If smoke, abnormal noise or odor emits from your LED LCD Monitor, remove the power cord 
immediately and call your service center. 


Never remove the rear cover of your LED LCD Monitor. The display unit inside contains 
high-voltage parts and may cause electric shock.


Never try to repair your LED LCD Monitor yourself. Always call your service center or a 
qualified technician to fix it.


Due to safety concerns, if the VESA mounting kit is purchased separately, please 
make sure the mounting kit is UL-listed, and replaceable only by service personnel.


Содержание PXL2470MW

Страница 1: ...www planar com USER S GUIDE LED LCD Monitor PXL2470MW...

Страница 2: ...st Setup 6 Front View of the Product 7 Rear View of the Product 8 Quick Installation 9 Basic Operation and Calibration Reset Instructions 10 Advanced Operation OSD Menu 12 Supporting Timing Modes 15 T...

Страница 3: ...rticular installation If this LED LCD Monitor does cause serious interference to radio or television reception resetting may correct it Moreover users are encouraged to reduce interference by doing on...

Страница 4: ...ces en appliquant une ou plusieurs des d marches suivantes R orientez ou d placez l antenne de r ception Placez le moniteur et le r cepteur plus loin l un de l autre Connectez le moniteur une prise di...

Страница 5: ...for an extended period of time Don t Do not touch the LED Display screen surface with sharp or hard objects Do not use abrasive cleaners waxes or solvents for your cleaning Do not operate the product...

Страница 6: ...ttoyage abrasifs de la cire ou des solvants pour le nettoyage N utilisez pas le produit dans les conditions suivantes o Environnement extr mement chaud froid ou humide o Endroits poussi reux ou sales...

Страница 7: ...Package Overview LED LCD Monitor Base AC DC Power Adapter Power Cord AC 100 240V Input DC 12V Output VGA Signal Cable Audio in Cable Display Port Cable User s Guide 5...

Страница 8: ...monitor the other hand attach the base to the stand 3 Stand the LED LCD Monitor up Disconnecting the stand base 1 Lay the LED LCD Monitor flat on a table with the LED screen face down To prevent the L...

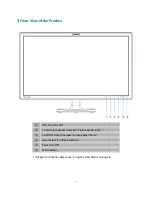
Страница 9: ...SD Turn On Off Scroll Down Adjust Decrease Picture Mode Auto Scroll UP Adjust Increase Audio Adjust Mute Input select Confirm Selection Power On Off LED Indicator Hot keys Instructions please see Usin...

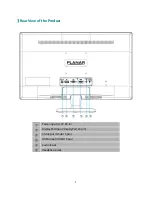
Страница 10: ...Rear View of the Product Power Input 12V DC In DisplayPort Input DisplayPort 20 pin VGA Input D Sub 15 pin HDMI input HDMI 19 pin Audio Input Headphone Jack 8...

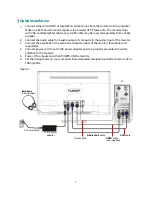
Страница 11: ...ter to the audio input of the monitor 3 Connect the earphone to the earphone output terminal of the monitor Earphone sold separately 4 Connect power cord to an AC DC power adapter and to a properly gr...

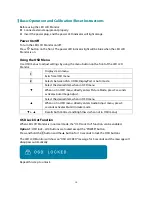
Страница 12: ...uto mode Select the desired item when in OSD menu When not in OSD menu directly enters Picture Mode press 3 seconds activates Auto Image Adjust Select the desired item when in OSD menu When not in OSD...

Страница 13: ...he POWER button are locked Press and hold the 1 button and the button for 10 seconds to lock all 5 buttons The LED LCD Monitor will show a POWER BUTTON LOCKED message for 3 seconds and the message wil...

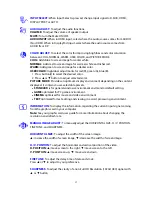
Страница 14: ...he screen CONTRAST To adjust the foreground white level of screen image increase contrast decrease contrast BRIGHTNESS To adjust the luminance of the video increase brightness decrease brightness ECO...

Страница 15: ...ntent displayed It contains 4 user selectable presets STANDARD is for general windows environment and monitor default setting GAME optimized for PC game environment CINEMA optimized for movie and vide...

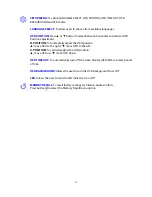
Страница 16: ...djust the OSD position move OSD to the right move OSD to the left V POSITION To vertically adjust the OSD position move OSD up move OSD down OSD TIME OUT To automatically turn off On Screen Display OS...

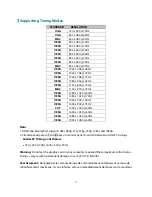
Страница 17: ...400 x 1050 60Hz VESA 1600 x 1200 60Hz VESA 1680 x 1050 60Hz VESA 1920 x 1080 60Hz Note 1 HDMI and DisplayPort supports 480i 480p 576i 576p 720p 1080i and 1080p 2 Simultaneously press 1 and 2 keys on m...

Страница 18: ...ll HD 1920 x 1080 max Vertical Frequency 60Hz max Pixel Dimension 0 2715 x 0 2715 mm Display Color 16 7M Tilt 5 20 Active Display Area 521 28 mm x 293 22 mm Temperature Operating 0 C 40 C Storage 20 C...

Страница 19: ...hinge 4 Remove the stand Attaching The Optional Wall Mount Arm not supplied Follow these steps to finish installing the wall mounting arm 1 Place the wall mounting arm onto the back of the LED LCD Mon...

Страница 20: ...nal cables are installed Power on but no screen image Make sure the video cable supplied with the LED LCD Monitor is tightly secured to the video output port on back of the computer If not tightly sec...

Страница 21: ...http www planar com support for operations manuals touchscreen drivers warranty information and access to Planar s Technical Library for online trouble shooting To speak with Planar Customer Support...

Страница 22: ...2013 2001132429T...

Отзывы: