background image

22


|

PLANAR SUPPORT

Cables, Replacement Lamps, Accessories 

To find cables, replacement lamps and accessories for your Planar projector, LCD monitor, 
touch screen or other Planar products visit our online store at www.PlanarOnline.com or find 
other stores who carry Planar products at http://www.planar.com/howtobuy

Technical Support 

Visit Planar at http://www.planar.com/support for product registration, operations manuals, 
touch screen drivers, warranty information and access to Planar's Technical Library for online 
troubleshooting. 
To speak with Planar Customer Support please have you model and serial number available 
and dial:  

Planar Support 

Tel: 1-866-PLANAR1 (866-752-6271) or +1 503-748-5799 outside the US. 
Hours: 24 hours a day, 7 days a week. 

Toll or long distance charges may apply. 

Содержание PXL225 MW

Страница 1: ...PXL225 MW LED LCD Monitor...

Страница 2: ...ghts are reserved No part of this document may be reproduced translated to another language or stored in a retrieval system or transmitted by any means electronic mechanical photocopying recording or...

Страница 3: ...RS 7 ADJUSTING THE VIEWING ANGLE 8 OPERATING INSTRUCTIONS 9 GENERAL INSTRUCTIONS 9 FRONT PANEL CONTROL 10 HOW TO ADJUST A SETTING 11 ADJUSTING THE PICTURE 12 PLUG AND PLAY 14 TECHNICAL SUPPORT FAQ 15...

Страница 4: ...he equipment off and on the user is encouraged to try to correct the interference by one or more of the following measures 1 Reorient or relocate the receiving antenna 2 Increase the separation betwee...

Страница 5: ...home consult your dealer or local power company The monitor is equipped with a three pronged grounded plug a plug with a third grounding pin This plug will fit only into a grounded power outlet as a...

Страница 6: ...image of the previous screen may remain after switching the image when the same image is displayed for hours In this case the screen is recovered slowly by changing the image or turning off the Power...

Страница 7: ...monitor It may cause damage Unplug the monitor before removal or installation to avoid electric shock or damage Installation 1 Put a piece of soft cloth on the table beforehand to prevent the monitor...

Страница 8: ...er input socket The AC power cord may be connected to either a wall power outlet or the power outlet socket on your PC depending on the type of power cord supplied with your LCD monitor SIGNAL CABLE C...

Страница 9: ...erence Hold the stand so you do not topple the monitor when you change the monitor s angle You are able to adjust the monitor s angle from 4 to 18 Figure 3 NOTES Do not touch the LCD screen when you c...

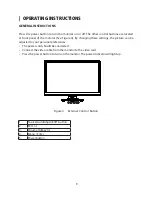
Страница 10: ...e 4 By changing these settings the picture can be adjusted to your personal preferences The power cord should be connected Connect the video cable from the monitor to the video card Press the power bu...

Страница 11: ...locked except POWER button To lock the OSD press and hold the MENU button while the monitor is off and then Press power button to turn the monitor on To un lock the OSD press and hold the MENU button...

Страница 12: ...ghted press the MENU button to activate it If the function selected has a sub menu press or again to navigate through the sub menu functions Once the desired function is highlighted press MENU button...

Страница 13: ...40 Contrast 50 Brightness Contrast Grayed Nonadjustable Game Brightness 60 Contrast 50 Brightness Contrast Grayed Nonadjustable Movie Brightness 80 Contrast 50 Brightness Contrast Grayed Nonadjustable...

Страница 14: ...ut signal Demo Demonstrates Color Boost Enhancements in the left half of screen Picture Boost Frame Size Adjust the Size of the Frame Contrast Contrast Adjustment for Enhance Area Brightness Brightnes...

Страница 15: ...ng a time out period will automatically switch to an OFF mode This reduces the monitor s internal power supply consumption After the video input signal is restored full power is restored and the displ...

Страница 16: ...Inspect monitor s video cable and make sure none of the pins are bent Make sure computer is operational by hitting the CAPS LOCK key on the keyboard while observing the CAPS LOCK LED The LED should e...

Страница 17: ...he picture has horizontal disturbances in light picture For FOCUS and CLOCK adjustment use dot pattern or win 95 98 2000 ME XP Win 7 shut down mode pattern ERROR MESSAGE POSSIBLE SOLUTION NO SIGNAL 1...

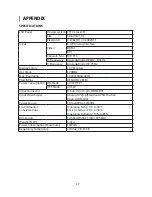
Страница 18: ...170MHz Max Resolution 1920X1080 60Hz Plug Play VESA DDC2BTM Power Consumption ON Mode 21W TYP OFF Mode 0 5W Input Connector D Sub mini 15 pin HDMI DVI Input Video Signal Analog 0 7Vp p Standard 75 Pos...

Страница 19: ...31 469 70 087 800 x 600 35 156 56 25 800 x 600 37 879 60 317 800 x 600 48 077 72 188 SVGA 800 x 600 46 875 75 Mac SVGA 832 x 624 49 726 74 551 1024 x 768 48 363 60 004 1024 x 768 56 476 70 069 1024 x...

Страница 20: ...Clock 8 B Ground 24 Pin Color Display Signal Cable PIN NO DESCRIPTION PIN NO DESCRIPTION 1 TMDS Data 2 13 TMDS Data 3 2 TMDS Data 2 14 5V Power 3 TMDS Data 2 4 Shield 15 Ground for 5V 4 TMDS Data 4 16...

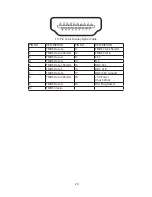
Страница 21: ...Data 2 11 TMDS Clock Shield 2 TMDS Data 2 Shield 12 TMDS Clock 3 TMDS Data 2 13 CEC 4 TMDS Data 1 14 N C 5 TMDS Data 1 Shield 15 DDC SCL 6 TMDS Data 1 16 DDC CLK 7 TMDS Data 0 17 DDC CEC Ground 8 TMDS...

Страница 22: ...n on a towel or blanket 3 Remove the Plastic Covers from the back of the LCD display 4 Remove the four screws attaching the base Screw dimension M4 x 14mm 5 Remove the Rubber Plugs from inside the fou...

Страница 23: ...planar com howtobuy Technical Support Visit Planar at http www planar com support for product registration operations manuals touch screen drivers warranty information and access to Planar s Technical...

Страница 24: ...Q41G22M193509A...
Отзывы: