background image

English

10

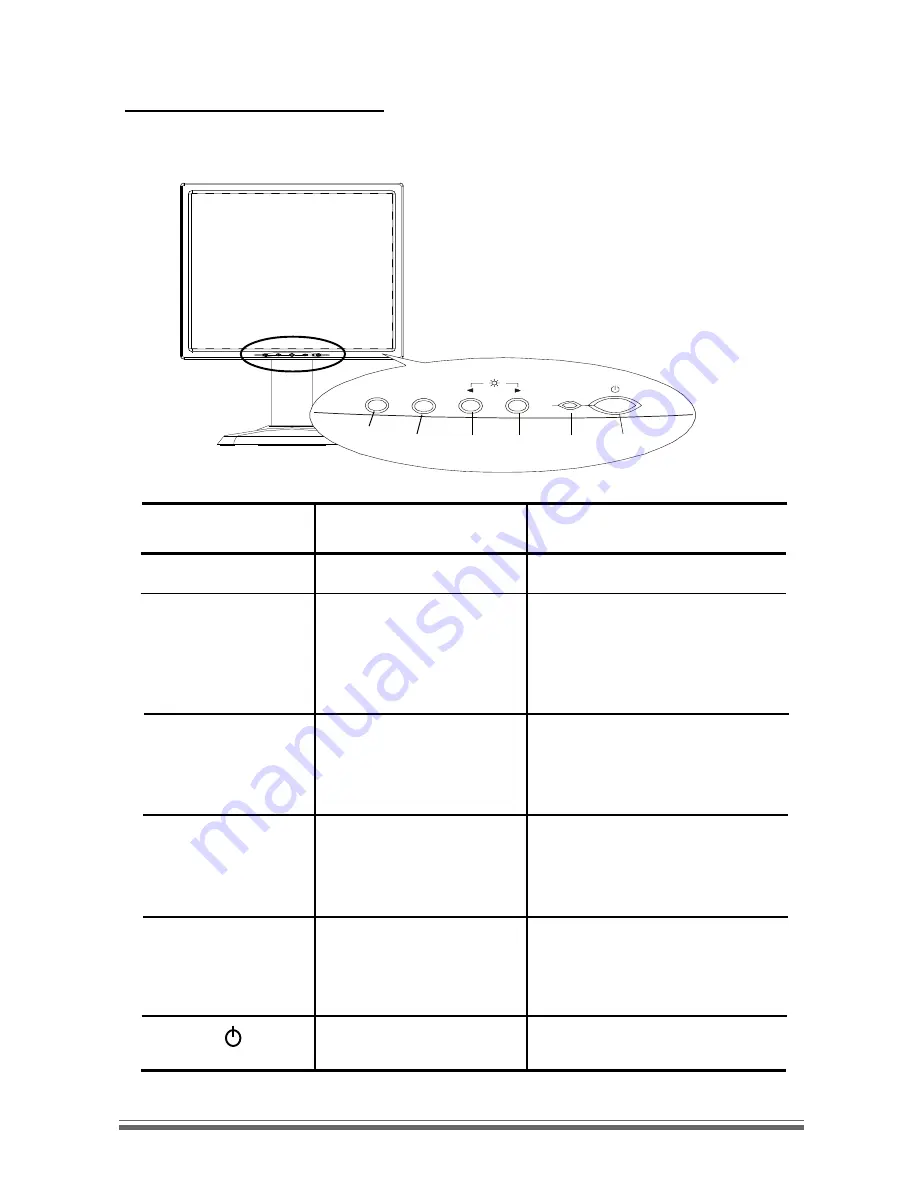
User Controls

Front Panel Controls


Œ  Ž   ‘

No./ Icon

  Control

      Function

Œ

MENU

  Menu button

To pop up the OSD menus.



SELECT/AUTO   Select/Auto

Select- To select the adjust-

ment items from OSD menus.

Auto-To activate the “Auto

Adjustment” function to obtain

an optimum image.

Ž

3

  Brightness Minus/Minus 1.Decreases the brightness of

the display image.

2.Decreases value of the

adjustment items.



4

  Brightness Plus/Plus

1.Increases the brightness of

the display image.

2.Increases value of the

adjustment items.



  Power LED

1.Green indicates the display

is turned on.

2. Amber indicates the display

in power-saving mode.

‘

  Power Switch

Switches on/off the power of

the LCD display.

Содержание PX191

Страница 1: ...PLANAR LCD MONITOR PX191MANUAL www planar com...

Страница 2: ...ge Overview 4 Installation Product Overview 5 Connecting the Display 7 User Controls Front Panel Controls 10 How to Use the OSD Menus 11 On Screen Display Menus 12 Appendices Troubleshooting 16 Warnin...

Страница 3: ...en cleaning the LCD panel surface q Use a soft cloth moistened with mild detergent to clean the display housing q Use only high quality and safety approved AC DC power adapter q Disconnect the power p...

Страница 4: ...Analog and Digital signal input q Active matrix TFT LCD technology q 1280 x 1024 addressable pixels q 19 diagonal screen size q 31 5 80 kHz horizontal scan q 56 75 Hz refresh rate q VESA wall mountabl...

Страница 5: ...English 4 Package Overview LCD Display VGA Signal Cable Power Adapter Power Cord DVI D Cable User s Manual Quick Start Guide Planar Product Family CD...

Страница 6: ...5 English Installation Product Overview u Front View uRear View Connector Ports Kensington Lock Panel Controls Stand LCDDisplay VGA Input DC Power In Digital Port...

Страница 7: ...cal Mounting Interface Standard which defines a physical mounting interface for flat panel monitors and corresponding standards for flat panel monitor mounting devices such as wall and table arms The...

Страница 8: ...or the PC with DVI digital output Connect the DVI signal cable to the connector of the display card in your computer connect the other side to the DVI D input port of your display Tighten the screws w...

Страница 9: ...English 8 Figure 8 1 VGA Cable Power Adapter Power Cord DVI D Cable...

Страница 10: ......

Страница 11: ...function to obtain an optimum image 3 Brightness Minus Minus 1 Decreases the brightness of the display image 2 Decreases value of the adjustment items 4 Brightness Plus Plus 1 Increases the brightnes...

Страница 12: ...een menu and to select between the four Main Menus 2 Choose the adjustment items by pressing the S button 3 Adjust the value of the adjustment items by pressing the or button 4 Once you don t operate...

Страница 13: ...l position of the image 4 Vertical Position Changes the vertical position of the image 4 Clock Changes the display data frequency to match the frequency of your graphic card When you are experiencing...

Страница 14: ...on vertical refresh and horizontal scan of the current mode 4 OSD Off Time Adjusts the time period for OSD menu disappear 4 Language Chooses the language you need 4 Sharpness Adjust the sharpness of t...

Страница 15: ...English 14 Third OSD Menu 4 Input Select It allows you to select the type of signal...

Страница 16: ...e color temperature 4 Color Adjustment Red It allows you to adjust the red color of the display 4 Color Adjustment Green It allows you to adjust the green color of the display 4 Color Adjustment Blue...

Страница 17: ...e resolution of your computer to make it less than or equal to 1280 x 1024 Problem Image has vertical flickering line bars 4 Use Frequency to make an adjustment 4 Check and reconfigure the display mod...

Страница 18: ...on but it cannot receive any signal from the computer graphic card Check all the power switches power cables and VGA signal cable 4Going to Sleep This message means that the LCD display is under the...

Страница 19: ...English 18 Product Dimensions Front View Side View 417 78mm 16 45 508 74mm 20 03 Top View 59mm 2 32 215 40mm 8 48...

Страница 20: ...A S E V 0 0 6 x 0 0 8 0 6 9 7 3 A G V S A S E V 0 0 6 x 0 0 8 2 7 1 8 4 A G V S A S E V 0 0 6 x 0 0 8 5 7 9 6 4 A G X A S E V 8 6 7 x 4 2 0 1 0 6 4 8 4 A G X A S E V 8 6 7 x 4 2 0 1 0 7 5 6 5 A G X A...

Страница 21: ...3 2003...

Отзывы: