Planar PR2010 Скачать руководство пользователя страница 34

DLP

®

 Projector – User’s Manual 
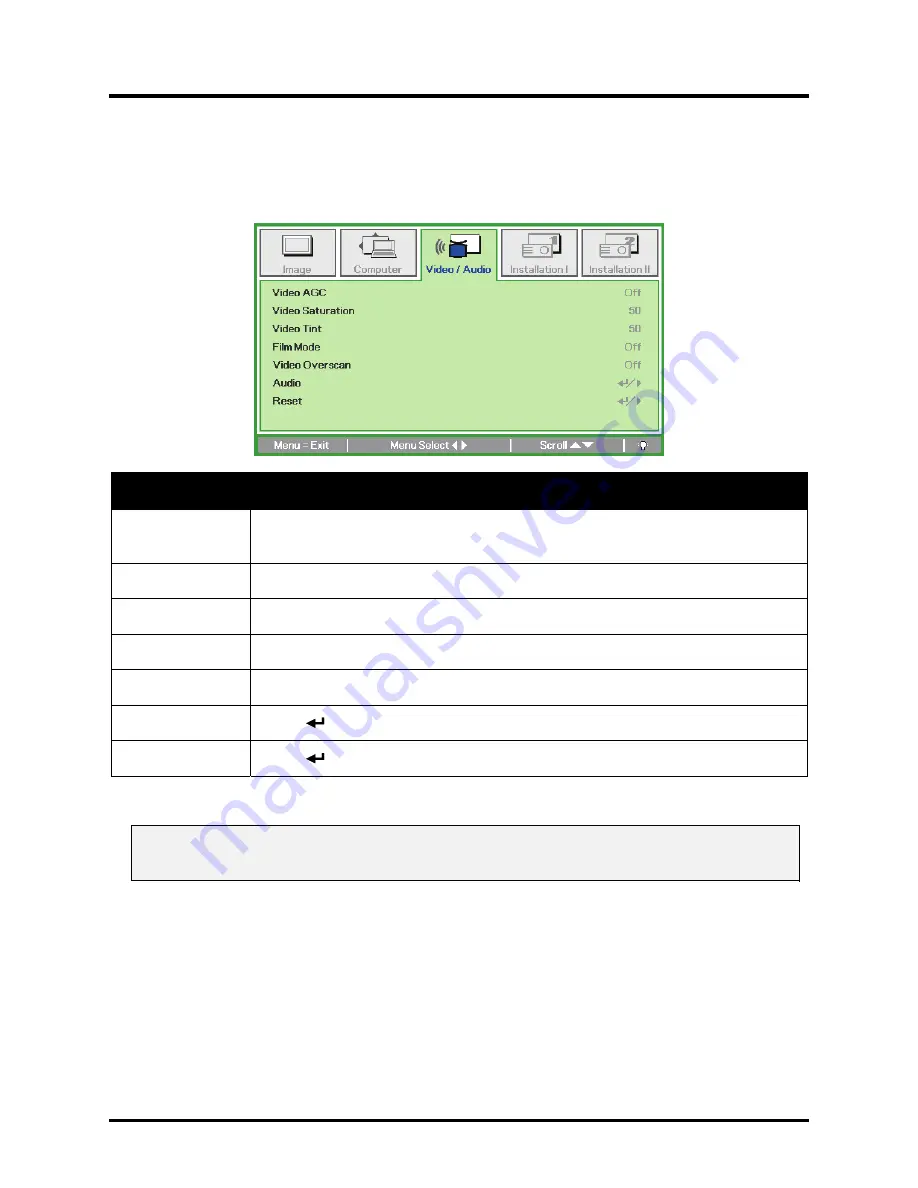
Video/Audio Menu 

Press the 

Menu

 button to open the 

OSD

 menu. Press the cursor 

◄►

 button to move to the 

Video/Audio

 menu. Press the cursor 

▲▼

 button to move up and down in the 

Video/Audio

 menu. 

Press 

◄►

 to change values for settings.


Item 

Description 

Video AGC 

Press the 

◄►

 buttons to enable or disable the Automatic Gain Control for 

video source. 

Video Saturation 

Press the 

◄►

 buttons to adjust the video saturation. 

Video Tint 

Press the 

◄►

 buttons to adjust the video tint/hue. 

Film Mode 

Press the 

◄►

 buttons to select a different film mode.  

Video Overscan 

Press the 

◄►

 buttons to enable or disable video over scan. 

Audio Press 

 (Enter) / 

 to enter the Audio menu. See 

Audio

 on page 27. 

Reset Press 

 (Enter) / 

 to reset all settings to default values. 


Note:


Video jagging may occur when playing interlace video. To overcome this issue, open the  
Video / Audio menu and adjust the Film Mode feature.  

– 26 –


Содержание PR2010

Страница 1: ......

Страница 2: ...6271 http www planar com support 24 7 Technical Support Planar Systems In Corporate Headquarters 1195 NW Compton Drive Planar Cu Telephone US 1 866 PLANAR1 866 75 Outside US 503 748 5799 E mail Plana...

Страница 3: ...h respect to the contents hereof and specifically disclaims any implied warranties of merchantability or fitness for any particular purpose The manufacturer reserves the right to revise this publicati...

Страница 4: ...ns that may damage the unit Warning Alerts you to situations that may damage the unit create a hazardous environment or cause per sonal injury Throughout this manual component parts and items in the O...

Страница 5: ...cury This product may contain other electronic waste that can be hazardous if not disposed of properly Recycle or dispose in accordance with local state or federal Laws For more information contact th...

Страница 6: ...your Planar product today Visit our website to register your product at http www planar com support product_registration html Cables Replacement Lamps and Accessories To find cables replacement lamps...

Страница 7: ...THE VOLUME 17 ON SCREEN DISPLAY OSD MENU SETTINGS 18 OSD MENU CONTROLS 18 Navigating the OSD 18 SETTING THE OSD LANGUAGE 19 OSD MENU OVERVIEW 20 OSD SUB MENU OVERVIEW 21 IMAGE MENU 22 Advanced Featur...

Страница 8: ...CTOR SERVICED 41 SPECIFICATIONS 42 Input Connectors 42 PROJECTION DISTANCE VS PROJECTION SIZE 42 Projection Distance and Size Table 42 TIMING MODE TABLE 43 PROJECTOR DIMENSIONS 45 REGULATORY COMPLIANC...

Страница 9: ...25 battery RGB cable Power cord RGB to Component Adapter Optional CD ROM This User s manual Contact your dealer immediately if any items are missing appear damaged or if the unit does not work It is r...

Страница 10: ...er 3 Height adjuster Adjusts level of projector 15 4 Lens cap Covers lens to protect when not in use 5 Lens Remove lens cap before use 6 Focus ring Focuses the projected image 16 7 Function keys See T...

Страница 11: ...vigates and changes settings in the OSD Quick Menu For Volume 18 On System over temperature 6 OVER TEMP LED Off Normal State Orange Lamp is ready to be powered on 7 READY LED Flashing Lamp not ready W...

Страница 12: ...eo device 4 Video Connect the video cable from a video device 5 Audio in Connect the audio cable from the input device 6 RGB Connect the RGB cable from a computer and components 10 7 Security Lock Sec...

Страница 13: ...ting the projector on a ceiling 2 Tilt adjustor Rotate adjuster lever to adjust angle position 15 3 Lamp cover Remove when changing the lamp 34 4 Height adjustor Adjuster drops down when adjuster butt...

Страница 14: ...e nothing obstructs the path between the remote control and the projector If the path between the remote control and the projector is obstructed you can bounce the signal off certain reflective sur fa...

Страница 15: ...lume 6 Volume Decrease volume 17 7 Mute Mutes the built in speaker 8 Freeze Freeze unfreezes the on screen picture 9 Source Detects the input device 10 10 Auto Auto adjustment for frequency tracking s...

Страница 16: ...r level If the projector does not respond to the remote control move a little closer Projector and Remote Control Buttons The projector can be operated using the remote control or the buttons on the t...

Страница 17: ...er in the di rection of the arrow A Pull out the cover B 2 Insert the battery with the positive side facing up 3 Replace the cover Caution 1 Only use a 3V lithium battery CR2025 2 Dispose of used batt...

Страница 18: ...riate output connector Item Label Description A USB Connect the USB cable from a computer service only B S video Connect the S video cable from a video device C Video Connect the video cable from a vi...

Страница 19: ...POWER button to turn on the projector The projector splash screen displays and connected devices are de tected See Setting an Access Password Security Lock on page 13 if security lock is enabled 4 If...

Страница 20: ...ess Power again message appears press the POWER button The pro jector turns off Caution 1 Be sure to remove the lens cap before starting projector 2 Do not unplug the power cord until the READY LED st...

Страница 21: ...on page 19 for help on using OSD menus Important Keep the password in a safe place Without the password you will not be able to use the projector If you lose the password contact your reseller for inf...

Страница 22: ...ve Press the cursor buttons in any order to set the password Push the MENU button to exit the dialog box 6 The password confirm menu appears when user presses the power on key in case the Security Loc...

Страница 23: ...en Ensure the cables are in a safe location You could trip over them 1 To raise the level of the projector lift the projector A and press the height adjuster button B The height adjuster drops down C...

Страница 24: ...mage focus control on the projector only to sharpen the projected image 2 Use the KEYSTONE buttons on the projec tor or the remote control to correct im age trapezoid wider top or bottom effect Remote...

Страница 25: ...ess the Volume buttons on the remote control The volume control appears on the display 2 Press the Left or Right Cursor buttons on the keypad to adjust Volume 3 Press the MUTE button to turn off the v...

Страница 26: ...ing buttons on the re mote control and on the projector 1 To enter the OSD press the MENU button 2 There are five menus Press the cursor button to move through the menus 3 Press the cursor button to m...

Страница 27: ...preference before continuing 1 Press the MENU button Press the cursor button to navigate to Installation I 2 Press the cursor button until Language is highlighted 3 Press the cursor button until the l...

Страница 28: ...DLP Projector User s Manual OSD Menu Overview Use the following illustration to quickly find a setting or determine the range for a setting 20...

Страница 29: ...DLP Projector User s Manual OSD Sub Menu Overview 21...

Страница 30: ...Mode Brilliant Color Press the cursor button to adjust the Brilliant Color value Brightness Press the cursor button to adjust the display brightness Contrast Press the cursor button to adjust the dis...

Страница 31: ...up and down in the Advanced menu Item Description Color Space Press the cursor button to adjust the color space Range Auto RGB YPbPr YCbCr Color Temperature Press the cursor button to adjust the color...

Страница 32: ...lue Select to enter the Blue Color Manager Press the buttons to adjust the Hue Saturation and Gain Cyan Select to enter the Cyan Color Manager Press the buttons to adjust the Hue Saturation and Gain M...

Страница 33: ...r settings Item Description Horizontal Position Press the cursor button to adjust the display position to left or right Vertical Position Press the cursor button to adjust the display position to up o...

Страница 34: ...ol for video source Video Saturation Press the buttons to adjust the video saturation Video Tint Press the buttons to adjust the video tint hue Film Mode Press the buttons to select a different film m...

Страница 35: ...Projector User s Manual Audio Press Enter to enter the audio submenu Item Description Volume Press the buttons to adjust the audio volume Range 0 8 Mute Press the buttons to turn on or off the speaker...

Страница 36: ...Blank Screen Press the cursor button to select different color to blank the screen Projection Press the cursor button to choose from four projection methods Security Lock Press the cursor button to en...

Страница 37: ...lamp when no signal Auto Power On Press the cursor button to enable or disable automatic power On when AC power is supplied Fan Speed Press the cursor button to toggle between Normal and High fan spe...

Страница 38: ...Advanced menu Press to change values for settings Item Description OSD Menu Set ting Press Enter to enter the OSD setting menu See page 31 for more infor mation on OSD Menu Setting Peripheral Test Pr...

Страница 39: ...ound translucent level Menu Display Press button to select OSD timeout delay Peripheral Test Item Description Remote Control Test Press Enter to test the IR remote controller for diagnostic USB Test P...

Страница 40: ...DLP Projector User s Manual Lamp Hour Reset Please refer to Resetting the Lamp on page 36 to reset the lamp hour counter 32...

Страница 41: ...and Security Lock Status Press the cursor button to move up and down in the Installation II menu Select the Installation II sub menu and press Enter to enter the Status sub menu Item Description Activ...

Страница 42: ...this product contains a small amount of mercury b Do not dispose this product with general household waste c Disposal of this product must be carried out in accordance with the regulations of your lo...

Страница 43: ...module handle to remove the lamp module 6 Reverse steps 1 to 5 to in stall the new lamp module While installing align the lamp module with the connector and ensure it is level to avoid damage Note The...

Страница 44: ...NU button to open the OSD menu 2 Press the cursor button to move to the Installation II menu Press the cursor button to move down to Advanced 3 Press the cursor button to move down to Lamp Hour Reset...

Страница 45: ...ojector serviced Cleaning the Lens You can purchase optic lens cleaner from most camera stores Refer to the following to clean the pro jector lens 1 Apply a little optic lens cleaner to a clean soft c...

Страница 46: ...th the Kensington slot and a security cable Note Contact your vendor for details on purchasing a suitable Kensington security cable The security lock corresponds to Kensington s MicroSaver Security Sy...

Страница 47: ...attached Ensure the attached device is turned on Ensure a connected PC is not in suspending mode Ensure a connected notebook computer is configured for an external display This is usually done by pre...

Страница 48: ...uto button on the remote control or projector 5 Ensure the projector to screen distance is within the 10 meter 33 feet specified range 6 Check that the projector lens is clean Problem The image is wid...

Страница 49: ...ote sensor on the projector 2 Ensure the path between remote and sensor is not obstructed 3 Turn off any fluorescent lights in the room 4 Check the battery polarity 5 Replace the batteries 6 Turn off...

Страница 50: ...Size Projection Distance and Size Table PR2010 PR2020 Fix Zoom m 1 22 3 25 4 06 10 00 Distance feet 4 00 10 66 13 32 32 80 Diagonal inches 30 80 100 246 Keystone degree 13 50 13 50 13 50 13 50 mm 457...

Страница 51: ...CAM 15 625 50 0 O 640 x 350 37 9 85 0 O 640 x 400 37 9 85 0 O 720 x 400 37 9 85 0 O 640 x 480 31 5 60 0 O 640 x 480 37 9 72 0 O 640 x 480 37 5 75 0 O 640 x 480 43 3 85 0 O 800 x 600 35 2 56 0 O 800 x...

Страница 52: ...75 06 O 480i 15 734 60 O SDTV 576i 15 625 50 O 480p 31 469 60 O EDTV 576p 31 25 50 O 720p 37 5 50 O 720p 45 0 60 O 1080i 33 8 60 O HDTV 1080i 28 1 50 O O Frequency supported Frequency not supported Di...

Страница 53: ...DLP Projector User s Manual Projector Dimensions 45...

Страница 54: ...unica tions Operation of this equipment in a residential area is likely to cause harmful interference in which case the user will be required to correct the interference at his her own expense Changes...

Страница 55: ...S 503 748 5799 E mail PlanarSupport planar com Online Technical Library http www planar com support 24 7 Technical Support 2008 Planar Systems Inc Planar is a registered trademark of Planar Systems In...

Отзывы: