background image

Troubleshooting


Before sending your LCD monitor for servicing, please check the troubleshooting list below to 


(VGA Mode)


Problems

Current Status

Remedy

No Picture

LED ON

Using OSD, adjust brightness and contrast to 
maximum or reset to their default settings.

LED OFF

Check the power switch.

Check if AC power cord is properly connected to the 
monitor.

LED displays amber color

Check if video signal cable is properly connected to 
the monitor.

Check if the power of computer system is ON.

Abnormal 
Picture

Unstable Picture

Check if the specification of graphics adapter and 

Display is missing, center shift, 
or too small or too large in 
display size

Using OSD, adjust RESOLUTION, CLOCK, CLOCK-
PHASE, H-POSITION and V-POSITION with non-
standard signals.

Using OSD, in case of missing full-screen image, 
please select other resolution or other vertical refresh 
timing.

Wait for a few seconds after adjusting the size of the 
image before changing or disconnecting the signal 
cable or powering OFF the monitor.

see if you can self-diagnose the problem.

17

(DVI Mode)


Problems

Current Status

Remedy

No Picture

LED ON

Using OSD, adjust brightness and contrast to 
maximum or reset to their default settings.

LED OFF

Check the power switch.

Check if AC power cord is properly connected to the 
monitor.

LED displays amber color

Check if video signal cable is properly connected to 
the monitor.

Check if the power of computer system is ON.

Содержание PL1910W

Страница 1: ...PL1910W...

Страница 2: ......

Страница 3: ...Position Adjustment 9 Preparing The Monitor For Wall Mounting 8 Connecting Cables 10 Lock Function 12 OSD Operation 13 Supported Timing 16 Warning 1 Safety Precaution 3 Display Controls 11 Front Panel...

Страница 4: ...ful interference to radio communications However there is no guarantee that interference will not installation If this equipment does occur in a particular television reception which can cause harmful...

Страница 5: ...iel Important Recycle Instruction Lamp s inside this product contain mercury This product may contain other electronic waste that can be hazardous if not disposed of properly Recycle or dispose in acc...

Страница 6: ...penings of the monitor for proper heat dissipation Always put the monitor in a place where there is adequate ventilation Avoid placing the monitor against a bright background or where sunlight or othe...

Страница 7: ...nch wide color TFT LCD monitor 18 5 TFT Color LCD monitor 16 9 Widescreen Recommended resolution 1366 x 768 60Hz Direct analog signal input Direct digital signal input Auto adjustment function Multili...

Страница 8: ...cking User Guide LCD Monitor AC Power Cord 15 pin D Sub Cable DVI Cable 5 PJ19W Please check that the following items are present when you unpack the box We recommend you save the packaging for future...

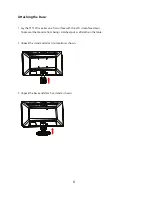
Страница 9: ...T LCD monitor on a flat surface with the LCD screen face down To prevent the monitor from being scratched put a soft cloth on the table 2 Unpack the stand and attach to monitor as shown 3 Unpack the b...

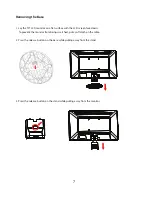
Страница 10: ...ace with the LCD screen face down To prevent the monitor from being scratched put a soft cloth on the table 2 3 Press the release button on the stand while pulling away from the monitor Press the rele...

Страница 11: ...ixture to the back of the monitor with screws not supplied 3 Follow the instructions included with the mounting fixture to ensure that the monitor is safely attached The four threaded holes that are o...

Страница 12: ...Screen Position Adjustment In order to optimize the best viewing position you can adjust the tilt of the monitor as shown in the figure below 9...

Страница 13: ...mputer are turned off b Connect the VGA video cable to the computer b Connect the DVI cable to the computer 2 Connect power cord Connect the power cord to the monitor then to a properly grounded AC ou...

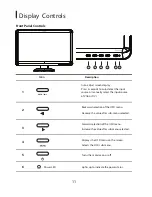
Страница 14: ...manually select the input source of VGA or DVI Backward selection of the OSD menu Decease the value after sub menu selected Forward selection of the OSD menu Increase the value after sub menu selecte...

Страница 15: ...or All Unlock messa ge for 3 seconds and it will ge for 3 seconds and it will disappear disappear automatically automatically OSD Power button lock all 5 buttons including the POWER button are locked...

Страница 16: ...Item Content Content OSD Operation Pressing the MENU button brings up the first level menu This menu button is also used to enter the sub Item Content Picture Brightness Adjusts brightness Contrast A...

Страница 17: ...us Language English Deutsch Fran ais Espa ol Italiano Reset Input Select Resets monitor to original setting Select the input source for VGA or DVI Simplified Chinese Chinese traditional Japanese Shows...

Страница 18: ...splay Colors 16 7M Resolution 1366x768 60 Hz max Interface Analog RGB Digital RGB Input Connector VGA DVI Physical Specification Dimension H x W x D 329 x 447 x 162 mm Net Weight 3 2 kg Power Power Sa...

Страница 19: ...0x480 75Hz VGA 720x400 70Hz VESA 800x600 56Hz VESA 800x600 60Hz VESA 800x600 72Hz VESA 800x600 75Hz VESA 1024x768 60Hz VESA 1024x768 70Hz VESA 1024x768 75Hz CEA 1280x720 60Hz CVT 1280x800 60Hz VESA 13...

Страница 20: ...oo small or too large in display size Using OSD adjust RESOLUTION CLOCK CLOCK PHASE H POSITION and V POSITION with non standard signals Using OSD in case of missing full screen image please select oth...

Страница 21: ...or touch screen or other Planar products visit our online store at www PlanarOnline com or find other stores who carry Planar products at http www planar com howtobuy Technical Support Visit Planar at...

Страница 22: ......

Страница 23: ......

Страница 24: ...10 49 7G901 001...

Отзывы: