background image

Chapter 1

3

the connection of USB compliant devices. The upstream USB port must be connected to your PC
for the downstream ports to function.

4.


Audio Line-in (optional)

Connect your PC’s line-out to this jack to listen the PC’s audio on the LCD monitor’s stereo
speakers. (You can also connect your CD-ROM’s line-out to this jack.)

5.


VGA Cable Connector

This 15-pin D-Sub VGA connector is used to connect to your PC’s VGA card.

6.


DVI (Digital Visual Interface) Cable Connect (optional)

This 24-pin DVI connect is used to connect to you PC’s Graphic card which has a DVI conector

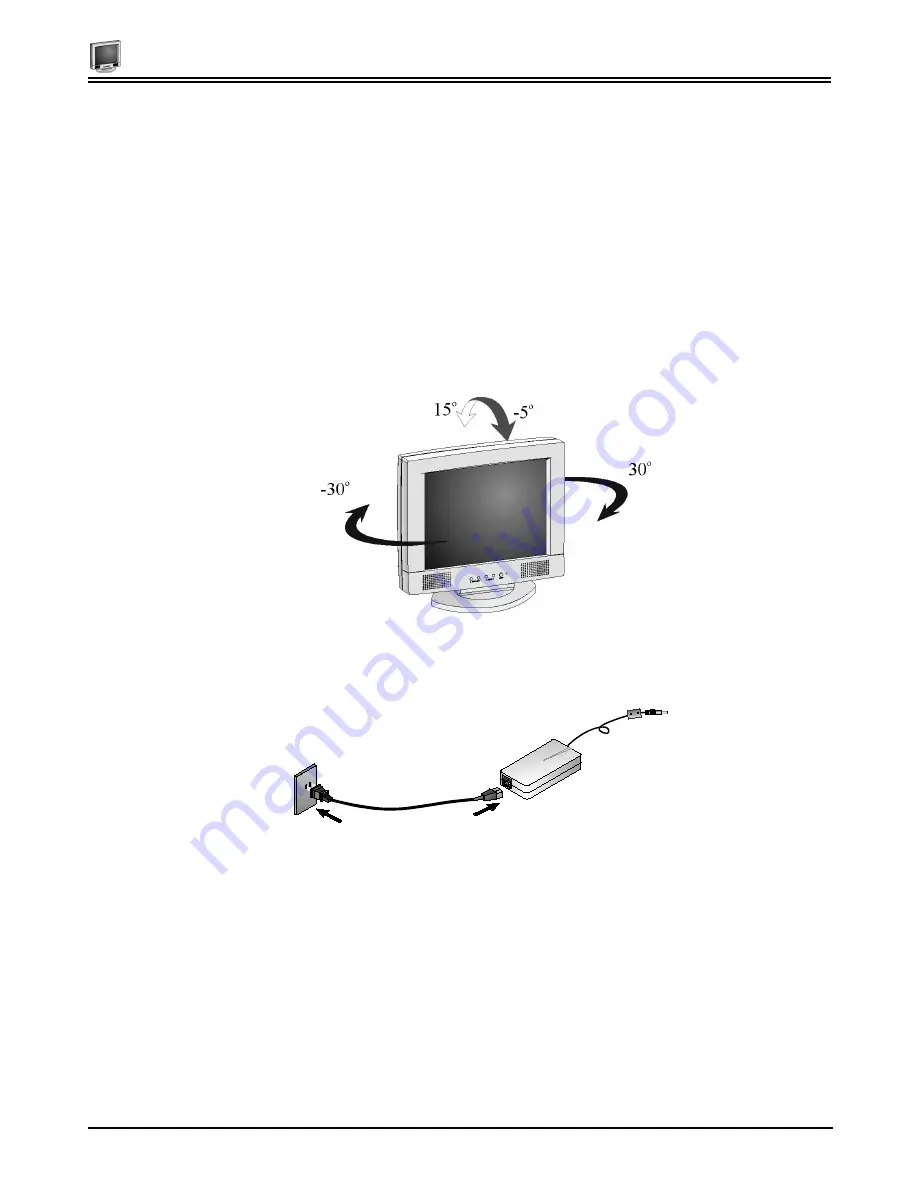
Adjusting the Viewing Angle

Your LCD Monitor is designed to allow you to adjust it to a comfortable viewing angle. The LCD Monitor’s tilt angle
setting range is from -5

°

 to 15

°

, and swivel angle setting is from -30

°

 to 30

°

.

Connecting AC Power

1.


Plug the female end of the power cable into the AC-adapter.  Plug the male end of the power cord into a wall
socket.  The plug on the power cable will vary according to the electrical standard in your area.

2.


Connect the power connector of the adapter into the jack of the LCD Monitor. The DC power jack is located
at the rear of the Monitor.

Содержание CT1904Z

Страница 1: ...PLANAR LCD MONITOR CT1904Z MANUAL www planar com ...

Страница 2: ......

Страница 3: ...requency energy and if not installed and used in accordance with the instructions may cause harmful inerference to radio communications However there is no guarantee that interference will not occur in a particular installation If this equipment does cause harmful interference to radio or television reception which can be determined by turning the equipment off and on the user is encouraged to try...

Страница 4: ...screen with a slightly dampened rag 2 Do not place your LCD monitor near a window Exposing the monitor to rain water moisture or sunlight can severely damage it 3 Do not place anything on top of the monitor to PC signal cord Make sure the cord is placed in an area where it will not be stepped on 4 Do not apply pressure to the LCD screen Excessive pressure may cause permanent damage to the display ...

Страница 5: ...ting the Viewing Angle 3 Connecting AC Power 3 Connecting Video 4 Connecting the Stereo Speakers 4 Power Management System 5 CHAPTER 2 6 Your New Planar LCD Monitor s Display Controls 6 Adjusting the Monitor s Display 6 OSD Main Menu Analog mode 6 OSD Main Menu Digital mode 10 APPENDIX A 13 TFT LCD Monitor Specifications 13 APPENDIX B 14 APPENDIX C 15 Troubleshooting Procedures 15 ...

Страница 6: ......

Страница 7: ...er you unpack your LCD monitor make sure the following items are included in the box and in good condition Standard Items LCD Monitor Monitor to PC signal cable 15 pin Monitor to PC Digital signal cable 24 pin USB cable optional Stereo Jack Audio Cable Power cord AC DC adapter This user s manual If you find that any of these items are missing or appear damaged contact your dealer immediately Do no...

Страница 8: ...deo signal The LED will blink slowly when the LCD monitor is in power saving mode Hot Buttons for Quick Adjustment of Monitor Settings OSD Menu access button Press Function button to access the OSD Menu Auto Adjust button Press Function button to enter the Auto adjust feature Contrast adjust button Press Adjust button to adjust the contrast of the display Use the Adjust buttons to change the contr...

Страница 9: ...onal This 24 pin DVI connect is used to connect to you PC s Graphic card which has a DVI conector Adjusting the Viewing Angle Your LCD Monitor is designed to allow you to adjust it to a comfortable viewing angle The LCD Monitor s tilt angle setting range is from 5 to 15 and swivel angle setting is from 30 to 30 Connecting AC Power 1 Plug the female end of the power cable into the AC adapter Plug t...

Страница 10: ... Digital 24 pin DVI signal cable optional 4 Make sure the signal cable heads are securely connected to the VGA ports of your PC and Monitor Tighten the connecting screws to ensure a secure connection 5 Turn on your LCD Monitor and computer Connecting the Stereo Speakers Please refer to the following instructions for connecting the LCD Monitor s stereo speakers 1 Connect the 1 5M sound cable to the...

Страница 11: ...wer Management System The LCD monitor complies with the VESA DPMS power management proposal The VESA DPMS proposal provides power saving modes by detecting the horizontal or vertical sync signal When the LCD monitor is in power saving mode or detects an incorrect timing the monitor screen will be blank and the power LED indicator starts blinking ...

Страница 12: ...either the right or left Function keys to scroll between the main menu choices The option that is currently selected is highlighted in yellow and indicated by a pointer Each main menu has an associated submenu and is further described To access the OSD Main Menu simply press the Function button The following screen will appear The 7 topline menus are The Auto Adjust option lets the monitor determi...

Страница 13: ...te Once finished the OSD menu will disappear after a short time out period The Monitor Control Option Pressing the Adjust key while the Monitor Control icon is selected activates the Monitor Control submenu Use the Function select buttons to scroll between the submenu items You should only use this menu item if the results of the Auto Adjust function are not satisfactory H Position Press the Adjus...

Страница 14: ...mation The Information submenu displays the current resolution vertical refresh rate and monitor firmware version Exit Press the Adjust button to exit the Misc Control submenu Graphic Control Option Pressing the Adjust key while the Graphic Control icon is selected activates the Graphic Control submenu Use the Function select buttons to scroll between the submenu items Contrast Press the Adjust bu...

Страница 15: ...Chapter 2 9 Exit Press the Adjust button to exit the Graphic Control submenu ...

Страница 16: ...llowing screen will appear The Digital 5 topline menus are The Monitor Control option allows you to Select the input port The OSD Control option allows you to adjust the position of the monitor s On Screen Display The MISC Control option allows you to select the desired text language of the OSD adjust the monitor speaker volume and to display the current video information being sent to the monitor...

Страница 17: ...D Control submenu Misc Control Option Pressing the Adjust key while the Misc Control icon is selected activates the Misc Control submenu Use the Function select buttons to scroll between the submenu items Language Press the Adjust buttons to select the desired OSD display language Languages supported English German French Spanish and Italian Audio Volume Press the Adjust buttons to increase or dec...

Страница 18: ...ess Press the Adjust buttons to adjust the intensity of the monitor backlight Exit Press the Adjust button to exit the Graphic Control submenu OSD Exit Pressing the Adjust key while the Exit icon is selected deactivates the OSD menu ...

Страница 19: ...yp Pixel Pitch mm 0 294 x 0 294 Viewing Angle Horizontal 85 85 L R Vertical 85 85 U D Display Colors Dithering 16M Video Interface Analog port VGA Compatible Analog RGB 15 pin D Sub Separate Sync Composite Digital port DDWG compliant Single Link Tmds Digital Visual Interface DVI Scanning Frequency H V Hz Analog mode 24 80kHz 50 75 Scanning Frequency H V Hz Digital mode 30 80kHz 50 75 Power Managem...

Страница 20: ...00x600 36 00 56 25 35 16 A D 12 SVGA 800x600 40 00 60 32 37 88 A D 13 VESA 800x600 50 00 72 19 48 08 A D 14 VESA 800x600 49 50 75 00 46 88 A D 15 VGA 720x400 28 32 70 09 31 47 A 16 XGA 1024x768 65 00 60 00 48 36 A D 17 VESA 1024x768 75 00 70 07 56 48 A D 18 VESA 1024x768 78 75 75 03 60 02 A D 19 1024x768 71 64 66 13 53 96 A D 20 VESA 1152x864 108 00 75 00 67 50 A D 21 1152x870 100 75 06 68 68 A D ...

Страница 21: ...ther Adjustment Control button until the lines disappear and you have a clear display PROBLEM There is no LCD Display If there is no display on the LCD refer to the following 1 Make sure that the power indicator on the LCD monitor is lit all connections are secure and the system is running on the correct timing Refer to the Addendum for information on timing 2 Turn off the LCD monitor and then tur...

Отзывы: