TECHNOLOGIE FÜR DEN HAUSHALT
TECHNOLOGY FOR DOMESTIC USE
22.11.2019
Bedienungsanleitung
Instruction Manual
E
INBAU
-B
ACKOFEN
B
UILT
-
IN OVEN
EBO8 DPY
Deutsch
Seite
2
English
Page
62
www.pkm-online.de
Страница 1: ...TECHNOLOGIE F R DEN HAUSHALT TECHNOLOGY FOR DOMESTIC USE 22 11 2019 Bedienungsanleitung Instruction Manual EINBAU BACKOFEN BUILT IN OVEN EBO8 DPY Deutsch Seite 2 English Page 62 www pkm online de...
Страница 2: ...ter 5 1 2 Sicherheitsanweisungen 5 2 Installation 11 2 1 Entpacken und Wahl des Standorts 12 2 2 Einbau des Backofens 12 2 3 Elektrischer Anschluss 15 3 Ger tebeschreibung 17 3 1 Backofen 17 3 1 1 Zub...
Страница 3: ...blembehandlung 55 8 1 Fehlercodes 57 9 Technische Daten 59 10 Entsorgung 60 11 Garantiebedingungen 61 Entsorgen Sie dieses Ger t nicht zusammen mit ihrem Hausm ll Das Ger t darf nur ber eine Sammelste...
Страница 4: ...WEISUNGEN GR NDLICH DURCH Die darin enthaltenen Informationen dienen dem Schutz Ihrer Gesundheit Die Nichtbeachtung der Sicherheitshinweise und Sicherheitsanweisungen kann zu schweren Beeintr chtigung...
Страница 5: ...FAHR verweist auf eine Gefahrensituation die wenn sie nicht abgewendet wird eine unmittelbare Gef hrdung f r Leben und Gesundheit zur Folge hat WARNUNG verweist auf eine Gefahrensituation die wenn sie...
Страница 6: ...ndeiner Fehlfunktion aufgrund eines technischen Defekts kommen trennen Sie das Ger t umgehend von der Stromversorgung entsprechende Haussicherung abschalten Kontaktieren Sie den Kundendienst oder das...
Страница 7: ...in berpr fen keine Garantieleistung 6 S mtliche Arbeiten die zum Anschluss des Ger tes an die Stromversorgung notwendig sind d rfen nur von einer qualifizierten Fachkraft Elektrotechniker in durchgef...
Страница 8: ...ebung sich brennbare Materialien wie Benzin Gas oder Farben befinden Dieser Warnhinweis bezieht sich auch auf die D mpfe die durch diese Materialien freigesetzt werden 20 Dunstabzugshauben m ssen ents...
Страница 9: ...ie kein Kochgeschirr und keine Backbleche direkt auf den Boden des Backofeninnenraums Decken Sie den Boden des Backofeninnenraums nicht mit Aluminiumfolie ab 4 Halten Sie die Backofent r beim Betrieb...
Страница 10: ...8 Entfernen Sie s mtliches Verpackungsmaterial bevor Sie das Ger t an die Stromversorgung anschlie en Benutzen Sie keine aggressiven Reinigungsmittel um Reste von Transportsicherungen zu entfernen 9 W...
Страница 11: ...nstalliert ist w hrend des Betriebs des Ger tes widerstehen k nnen WARNUNG Achten Sie beim Entpacken unbedingt darauf dass die Bestandteile der Verpackung Polyethylent ten Polystyrenst cke nicht in di...
Страница 12: ...nnerhalb und au erhalb des Backofens 8 Das Ger t muss ordnungsgem mit der Stromversorgung verbunden sein Schlie en Sie das Ger t ausschlie lich an einer ordnungsgem geerdeten Sicherheitssteckdose an s...
Страница 13: ...chublade des Einbaum bels installiert wird muss zwischen der Schublade und dem Backofen ein fester Zwischenboden montiert werden EINBAU 1 Schalten Sie den Strom mittels der entsprechenden Sicherungen...
Страница 14: ...an das Stromnetz an Beachten Sie unbedingt die Anweisungen im Kapitel 2 3 ELEKTRISCHER ANSCHLUSS 6 Setzen Sie den Backofen vorsichtig in die vorbereitete ffnung ein und richten Sie ihn aus Das Netzans...
Страница 15: ...keine Steckdosenleisten Mehrfachsteckdosen oder Verl ngerungskabel WARNUNG Das Ger t muss an einer ordnungsgem geerdeten Steckdose angeschlossen werden Verwenden Sie ausschlie lich eine entsprechende...
Страница 16: ...er hren und muss dergestalt verlegt werden dass seine Temperatur 750 C nicht bersteigt Wenn die Netzsteckdose nach der Installation des Ger tes f r den Benutzer nicht mehr zug nglich ist muss bei der...
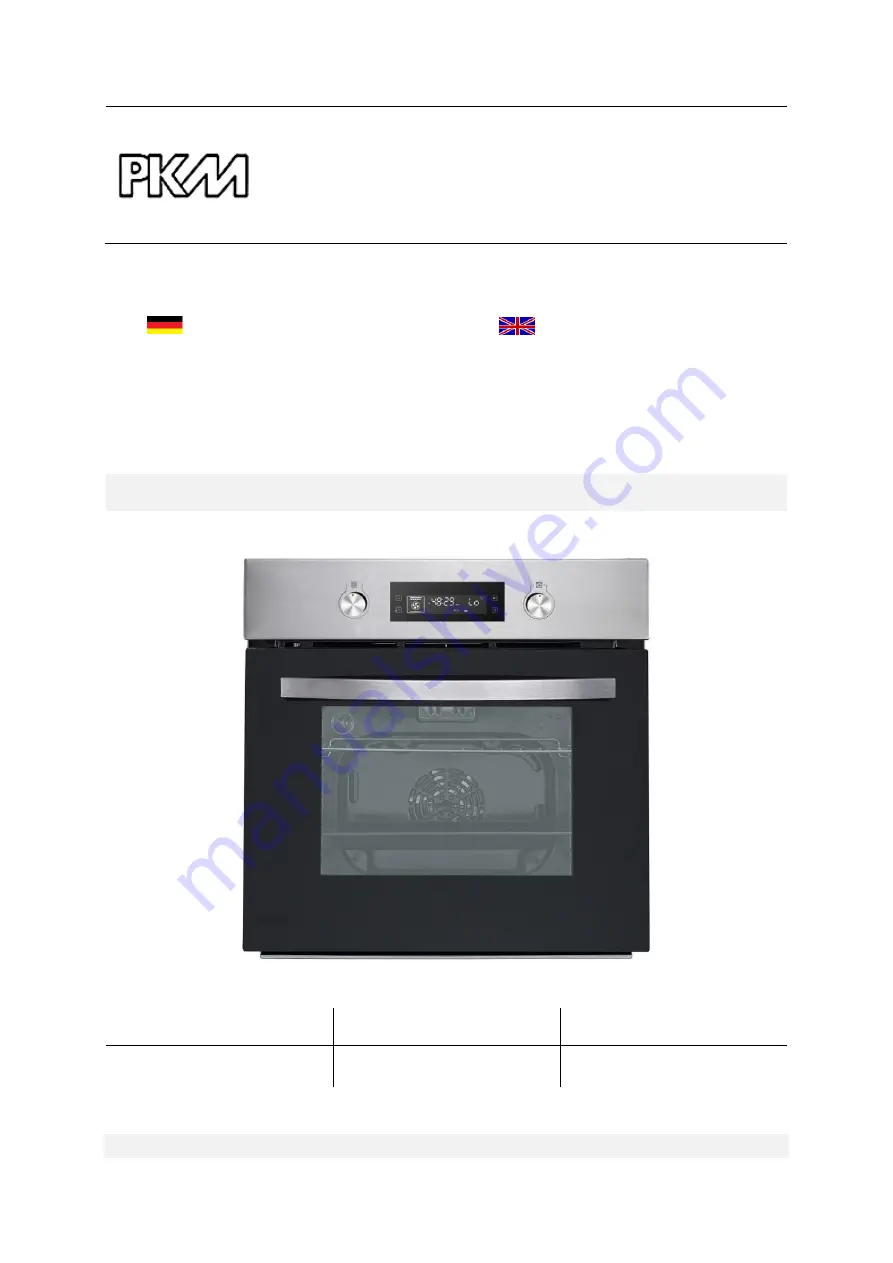
Страница 17: ...ionen sind m glich 1 BEDIENFELD s Kapitel 3 2 BEDIENFELD und 3 3 DISPLAY 2 T R des Backofens 3 T RGRIFF 4 GRILLROST4 5 TROPFSCHALE Ofenpfanne 5 6 SEITLICHER GRIFF zum Bewegen des Ger tes an beiden Sei...
Страница 18: ...nd einem weichen Tuch Wenn die Einschubelemente z B Grillrost Tropfschale Backblech hei werden k nnen sie sich verformen Sobald die Zubeh rteile abgek hlt sind nehmen sie wieder ihre urspr ngliche For...
Страница 19: ...t cken etc geeignet Wenn Sie direkt auf dem Grillrost grillen sollten Sie die Tropfschale bzw Backofenpfanne ebenfalls verwenden um das von dem Grillgut abtropfende Fett aufzufangen BACKBLECH TIEFE BA...
Страница 20: ...as Backblech in die bis zu f nf7 unterschiedlichen Einschubh hen des Seitenracks einsetzen s Abb unten So k nnen Sie ganz nach Ihren Bed rfnissen auf verschiedenen Einschubh hen backen braten oder gri...
Страница 21: ...BSTREINIGUNGSPROGRAMM B DREHKNOPF TEMPERATUR ZEIT zur Einstellung der TEMPERATUR erh hen vermindern zur Einstellung der ZEIT erh hen vermindern C TASTE START Taste zum STARTEN des Kochvorgangs D TASTE...
Страница 22: ...rhitze Grill pyrolytisches Selbstreinigungsprogramm etc 2 ANZEIGE Einstellung DAUER DER KOCH BACKZEIT ausgew hlt 3 ANZEIGE Einstellung ENDE DER KOCH BACKZEIT ausgew hlt 4 ANZEIGE DER ZEIT Stunden Minu...
Страница 23: ...b nehmen Beachten Sie hierbei besonders die Sicherheits und Warnhinweise Entfernen Sie alle Schutzfolien die sich noch an dem Ger t befinden k nnen 4 1 Vor der ersten Benutzung Fabrikationsr ckst nde...
Страница 24: ...bsvorgang der durch eine Schutzimpr gnierung gegen Korrosionssch den w hrend des Transports verursacht wird HINWEIS Reinigen Sie den Innenraum des Backofens nur mit etwas warmem Wasser und Sp lmittel...
Страница 25: ...DES GER TES AN DIE STROMVERSORGUNG Wenn Sie das Ger t zum ersten Mal an die Stromversorgung anschlie en leuchten alle Anzeigen f r 1 Sekunde auf Das Display zeigt 12 00 an und die Stundenanzeige 12 b...
Страница 26: ...ionen sind von 0 0 C bis 250 0 C individuell einstellbar Die Temperatur des pyrolytischen Selbstreinigungsprogramms ist werkseitig voreingestellt und kann nicht ver ndert werden siehe auch Kapitel 4 7...
Страница 27: ...gt HINWEIS Benutzen Sie dieses Programm ausschlie lich zur Reinigung des Backofens 4 2 2 Standby Modus Im STANDBY MODUS zeigt das Display die eingestellte Uhrzeit Systemzeit an und die Anzeige UHRZEIT...
Страница 28: ...NDBY MODUS Vergewissern Sie sich dass die eingestellte Uhrzeit Systemzeit der aktuellen Uhrzeit entspricht Falls die Uhrzeit Systemzeit nicht innerhalb von 20 Sekunden nach Anschluss des Ger tes an di...
Страница 29: ...ingestellte Uhrzeit Systemzeit an und die Anzeige UHRZEIT SYSTEMZEIT leuchtet 2 Dr cken Sie die Taste TIMER PARAMETER um die Einstellung des TIMERS zu aktivieren 3 Der Stundenwert der Zeitanzeige blin...
Страница 30: ...eine COUNTDOWN ZEIT einstellen bei der nach Ablauf der Zeit der Backofen automatisch ausgeschaltet wird DAUER DER KOCH BACKZEIT Die maximal einstellbare Countdown Zeit betr gt 10 Stunden DAUER DER KOC...
Страница 31: ...it Dauer der Koch Backzeit einzustellen drehen Sie den Drehknopf TEMPERATUR ZEIT bis die gew nschte Koch Backzeitdauer auf der Zeitanzeige angezeigt wird 8 Dr cken Sie innerhalb von 10 Sekunden die Ta...
Страница 32: ...peraturanzeige des Displays LO an Falls Sie keine Temperatur oder keine Koch Backzeitdauer einstellen oder nach dem Einstellen die Taste START nicht innerhalb von 10 Sekunden dr cken wechselt das Ger...
Страница 33: ...eratureinstellung zu aktivieren dr cken Sie die Taste Timer Parameter bis die Temperaturanzeige und das Symbol blinken 5 Um die Temperatur einzustellen drehen Sie den Drehknopf TEMPERATUR ZEIT bis die...
Страница 34: ...Backofen automatisch ausgeschaltet werden soll Dr cken Sie die Taste ZEIT wiederholt um zwischen Stunden und Minuteneinstellung zu wechseln 14 Wenn die gew nschte Uhrzeit auf dem Display angezeigt wi...
Страница 35: ...keine Temperatur oder keine Koch Backzeitdauer einstellen oder nach dem Einstellen die Taste START nicht innerhalb von 10 Sekunden dr cken wechselt das Ger t automatisch in den STANDBY MODUS Dr cken...
Страница 36: ...ngen gel scht und das Ger t wechselt in den STANDBY MODUS ODER Wenn sich der Backofen im Arbeitsmodus befindet dr cken Sie die Taste PAUSE L SCHEN 2 mal 1 mal dr cken Pause 2 mal dr cken L schen um de...
Страница 37: ...er Gebrauch ist nicht zul ssig und beeintr chtigt die Garantieanspr che Das Ger t ist mit einem pyrolytischen Selbstreinigungsprogramm ausgestattet welches Ihnen die Reinigung des Backofeninnenraums e...
Страница 38: ...hei Kinder m ssen deshalb w hrend der Benutzung des Ger tes von diesem ferngehalten werden Das Ger t w hrend seines Betriebs zu ber hren kann zu schweren Verbrennungen f hren Benutzen Sie nach Beendig...
Страница 39: ...t drehen Sie den Drehknopf TEMPERATUR ZEIT um die voreingestellte Zeitdauer des Programms zu ndern Die einstellbare Zeitdauer betr gt mind 1 Stunde bis max 2 Stunden 5 Die voreingestellte Temperatur d...
Страница 40: ...unten 11 Sobald die Temperatur im Inneren des Backofens weniger als 300 0 C betr gt wird die T rverriegelung des Ger tes deaktiviert Die Anzeige der T rverriegelung erlischt s Abb unten 12 Nach der Ve...
Страница 41: ...ngestellte Temperatur erreicht und ein Temperatursensorfehler vorliegt wenn der Backofen sich im Standby Modus befindet und der Temperatursensor einen offenen Schaltkreis oder einen Kurzschluss aufwei...
Страница 42: ...erriegelung ist deaktiviert Die T r des Backofens kann vorsichtig ge ffnet werden WARNUNG Seien Sie vorsichtig wenn Sie die Backofent r ffnen Kommen Sie nicht in Kontakt mit den hei en Bereichen oder...
Страница 43: ...d die Koch Backzeit angezeigt 3 Um die aktuelle Uhrzeit Systemzeit auf dem Display anzuzeigen dr cken Sie die Taste ZEIT einmal 4 Die Zeitanzeige des Displays zeigt nun die aktuelle Uhrzeit Systemzeit...
Страница 44: ...noch einmal dr cken um zu der Anzeige der Uhrzeit Systemzeit zur ckzukehren 4 7 Backofenfunktionen und Selbstreinigungsprogramm FUNKTION SYMBOL BESCHREIBUNG 1 SCHNELLES VORHEIZEN Der innere und u ere...
Страница 45: ...s innere Grillelement ist geeignet zum Grillen von kleinen Portionen z B von Speck Toast kleineren Fleisch Fischportionen etc 5 GRILL UMLUFT VOLLST NDIGES GRILLELEMENT Der Grill oberes Heizelement und...
Страница 46: ...ntensiviert das Br unen und erlaubt das Zubereiten gr erer Portionen z B von W rstchen Steaks Fisch etc 8 Eco ENERGIESPARENDE GRILLFUNKTION INNERES GRILLELEMENT Der innere Teil des Grillelements obere...
Страница 47: ...gramm starten z B Grill rost Tropfschale Backblech Seitenrack s etc 13 ansonsten kann das Zubeh r durch die hohe Temperatur irreversibel besch digt werden Die werkseitig voreingestellte TEMPERATUR des...
Страница 48: ...ie Backofent r nicht unn tig oft Schalten Sie den Backofen rechtzeitig ab und nutzen Sie die Restw rme Benutzen Sie den Backofen nur zur Zubereitung gr erer Mengen Fleisch mit einem Gewicht von unter...
Страница 49: ...k nnen aufgrund der durch die Lebensmittel weitergeleitete Hitze hei werden Verwenden Sie immer Topflappen oder Backofenhandschuhe zum Umgang mit Ihrem Essgeschirr Kochgeschirr 6 1 Hinweise f r das Ba...
Страница 50: ...chenden H he in das Ger t Wenn Sie auf dem Rost grillen schieben Sie ein Blech darunter um das abtropfende Fett aufzufangen und den Backofen sauber zu halten 4 Halten Sie die Ofent r beim Grillen imme...
Страница 51: ...fens nur mit warmem Wasser und ein wenig Sp lmittel Nehmen Sie dazu einen Schwamm oder ein weiches Tuch Benutzen Sie niemals aggressive und tzende Reinigungsmittel 3 Wischen Sie nach der Reinigung das...
Страница 52: ...n H nden HINWEIS Benutzen Sie niemals einen Schraubendreher um die Abdeckung zu entfernen Entfernen Sie die Abdeckung nur von Hand BESCH DIGUNGSGEFAHR 1 Trennen Sie das Ger t von der Stromversorgung S...
Страница 53: ...Scharniere nach oben s Abb rechts 2 Schlie en Sie die T r nur leicht 3 Heben Sie die T r an und ziehen Sie diese vorsichtig in Ihre Richtung heraus EINSETZEN DER BACKOFENT R 1 Um die T r wieder zu in...
Страница 54: ...cheibe fest und ziehen Sie sie dann vorsichtig heraus s Abb rechts EINSETZEN DER GLASSCHEIBE 1 Setzen Sie die innere Glasscheibe in die zugeh rige Rillennut ein 2 Richten Sie beide Seiten der Glassche...
Страница 55: ...ef hrt werden k nnen zu ernsthaften Verletzungen und Sch den f hren Falls Ihr Ger t nicht ordnungsgem funktioniert kontaktieren Sie den Kundendienst REGELM IGE KONTROLLEN 1 Kontrollieren Sie regelm ig...
Страница 56: ...rem Wohngebiet vor DAS GER T HEIZT NICHT Sie haben keine Temperatur eingestellt Stellen Sie eine Temperatur ein Sie haben den Timer18 nicht eingestellt Stellen Sie den Timer ein Das Heizelement ist de...
Страница 57: ...t haben das Problem aber nicht behoben werden konnte setzen Sie sich bitte mit dem Kundendienst in Verbindung 8 1 Fehlercodes FEHLERCODE FEHLER BESCHREIBUNG URSACHEN SENSORFEHLER Kurzschluss des Senso...
Страница 58: ...ler der T rverriegelung T r nicht ordnungsgem geschlossen schlie en Sie die T r ordnungsgem Ein akustisches Signal ert nt 10 mal 1 mal pro Sekunde Dr cken Sie die Taste PAUSE L SCHEN um das Ger t in d...
Страница 59: ...l oberes vollst ndiges Heizelement Umluft Grill oberes inneres Heizelement Unterhitze Grill oberes vollst ndiges Heizelement Eco Automatische Programme Pyrolytisches Selbstreinigungs programm Grill Um...
Страница 60: ...anach das Stromanschlusskabel am Ger t abschneiden und direkt mit dem Netzstecker entfernen und entsorgen Demontieren Sie immer die komplette T r damit sich keine Kinder einsperren und in Lebensgefahr...
Страница 61: ...Beschaffenheit die auf den Gebrauchswert des Produkts keinen Einfluss haben 3 Sch den infolge Betriebs und Bedienungsfehler 4 Sch den durch aggressive Umgebungseinfl sse Chemikalien Reinigungsmittel 5...
Страница 62: ...npacking and positioning 70 2 2 Installation of the oven 71 2 3 Electrical connection 74 3 Description of the appliance 75 3 1 Oven 75 3 1 1 Accessories 76 3 2 Control panel 79 3 3 Display 80 4 Operat...
Страница 63: ...s 115 Do not dispose of this appliance together with your domestic waste The appliance must be disposed of at a collecting centre for recyclable electric and electronic appliances Do not remove the sy...
Страница 64: ...an authorized professional All connections and energy leading components incl wires inside a wall must be checked by a qualified professional All modifications to the electrical mains to enable the i...
Страница 65: ...ualified professional Do not modify the energy supply The connection must be carried out in accordance with the current local and legal regulations 3 Switch off the power supply fuse box of your house...
Страница 66: ...from the mains before you clean or maintain it 3 Connect the appliance to a properly grounded socket only Use a safety socket to minimize any risk of electric shock 4 The technical data of your energy...
Страница 67: ...he drawer 19 Do not install the appliance in rooms or at areas which contain flammable substances as petrol gas or paint This warning also refers to the vapour these substances release 20 Cooker hoods...
Страница 68: ...oven Do not cover the base inside the oven with aluminium foil 4 Keep the door of the oven always closed if you use one of the oven functions 5 Do not put any cookware directly on the base inside the...
Страница 69: ...o the mains unless all packaging and transit protectors have been removed Do not use any aggressive detergents to remove the transit protectors 9 When the seal of the oven door is damaged it must be r...
Страница 70: ...ety CAUTION To avoid any damage the sandwich layer and adhesive must resist heat The customer is responsible for the installation If the manufacturer s help is needed to repair any damage due to impro...
Страница 71: ...before you install the appliance and before you connect it to the mains RISK OF ELECTRIC SHOCK All dimensions in the following figures are given in millimetres Use the embedded handles or wire handle...
Страница 72: ...72 FIG 1...
Страница 73: ...ven near the installation opening 4 Ensure that the power supply is switched off fuse box of your household power supply 5 Connect the oven to the mains Strictly observe the instructions in chapter 2...
Страница 74: ...ot use an extension cord socket strips or a multiple socket WARNING Connect the appliance to a properly grounded socket only Use a safety socket to minimize any risk of electric shock The appliance is...
Страница 75: ...cting devices are switches with a contact opening distance of at least 3 mm These include LS switches fuses and protectors EN 30335 When installing the appliance contact protection must be ensured If...
Страница 76: ...sides INTERIOR VIEW 7 INTERNAL LIGHT 8 GRILL ELEMENT 9 FAN MOTOR behind a steel plate 3 1 1 Accessories Depending on model a grilling grate a drip tray oven pan and or a baking tray deep oven pan are...
Страница 77: ...rilling grate directly always use the drip tray or the baking tray to catch the dripping grease of the food to be grilled GRILLING GRATE The grilling grate is suitable for the grilling roasting and ba...
Страница 78: ...ell as the drip tray is suitable to catch the dripping grease of the food to be grilled SIDE RACK S You can insert the grilling grate the drip tray and the baking tray in the different insertion heigh...
Страница 79: ...KNOB TEMPERATURE TIME Rotary knob for the setting of the OVEN TEMPERATURE increase decrease Rotary knob for the setting of the TIME increase decrease C BUTTON START Button for the STARTING of the coo...
Страница 80: ...ons are possible 1 INDICATOR of the set OVEN FUNCTION bottom heat grill self cleaning programme etc 2 INDICATOR DURATION OF THE COOKING BAKING TIME is selected 3 INDICATOR END OF THE COOKING BAKING TI...
Страница 81: ...AMIC INDICATOR BAR indicates the WORKING STATUS of the oven 4 Operation Read the complete instruction manual before you operate the appliance for the first time Strictly observe the safety instruction...
Страница 82: ...works NOTICE Clean the oven with warm water and washing up liquid only NOTICE Ensure that the complete packaging material inside and outside of the appliance has been removed before initial operation...
Страница 83: ...time hours is not set the appliance changes to the minute setting after approx 10 seconds without using any operating buttons If still no time setting is carried out the appliance returns to STANDBY...
Страница 84: ...rature an acoustic signal sounds for 2 seconds If the temperature inside the oven falls below 30 0 C the indicator of the temperature displays Lo After the oven has been in operation for about 15 minu...
Страница 85: ...STEM TIME is on 2 Press the button TIME once to activate the setting mode of the time system time 3 The hour indicator on the display goes on und the hour value of the time indicator flashes once per...
Страница 86: ...cted oven function the TIME INDICATOR displays the default time and the TEMPERATURE INDICATOR displays the default temperature of the selected function If you select the oven function ECO the time ind...
Страница 87: ...The countdown starts the decimal point symbol flashes and the indicator of the TIMER is on 10 When the set countdown time has elapsed an acoustic signal sounds once per second and the indicator of th...
Страница 88: ...desired temperature is displayed on the temperature indicator If you have selected an oven function without individual temperature setting you can set the desired countdown time duration of the cookin...
Страница 89: ...tion the cooling fan still continues to run for a while approx 35 minutes even if the appliance itself is switched off When the temperature inside the oven falls below 100 0 C the cooling fan is switc...
Страница 90: ...oven function is displayed s chapter 4 7 OVEN FUNCTIONS AND SELF CLEANING PROGRAMME Depending on the selected oven function the TIME INDICATOR displays the default time and the TEMPERATURE INDICATOR...
Страница 91: ...ting 12 The minute value of the time indicator flashes 13 Turn the rotary knob TEMPERATURE TIME to set the minute value 0 59 of the desired time by which the cooking baking process should be finished...
Страница 92: ...onds after you have carried out the settings the appliance returns to standby mode automatically Press the button PAUSE CANCEL once to pause the cooking process The indicators of the temperature and t...
Страница 93: ...e you press the button START the settings are cancelled and the appliance returns to STANDBY MODE OR When the oven is in working mode press the button PAUSE CANCEL twice press once pause press twice c...
Страница 94: ...hermo chemical cleavage of organic compounds by high temperatures The pyrolytic self cleaning programme works with intense heat When the pyrolytic self cleaning programme is started the oven heats up...
Страница 95: ...ROLYTIC SELF CLEANING PROGRAMME CLEANING OF THE OVEN WITH HEAT The default temperature of the self cleaning programme is factory set and cannot be changed The default duration of the self cleaning pro...
Страница 96: ...is also displayed 4 and 6 here as an example 60 minutes d the temperature indicator displays the self cleaning programme 7 e The indicator of the door locking 10 hoes on 9 When the set time has elapse...
Страница 97: ...emove the remaining residues after the self cleaning programme has finished Simply remove the residues using a microfibre cloth NOTICE This programme must be used for the cleaning of the oven only 4 5...
Страница 98: ...lly you have to force this deactivation Proceed as follows 1 The oven must be in STANDBY MODE In STANDBY MODE the display indicates the time system time and the indicator TIME SYSTEM TIME is on 2 Pres...
Страница 99: ...SYSTEM TIME 1 The oven is in operation working mode 2 The time indicator displays the cooking baking time 3 To indicate the current time system time on the display press the button TIME once 4 The ti...
Страница 100: ...ystem time 4 7 Oven functions and self cleaning programme FUNCTION ICON DESCRIPTION 1 RAPID PREHEATING The inner and outer part of the grill element complete top heating element the bottom heat and th...
Страница 101: ...d Suitable for the fast browning of food e g steaks burgers Maintains the juiciness of the food e g of steaks burgers etc 6 GRILL BOTTOM HEAT INNER GRILL ELEMENT The inner part of the grill element to...
Страница 102: ...apter 4 4 PYROLYTIC SELF CLEANING PROGRAMME Dirt particles are burned at high temperature and remain in the oven as ash After cooling down the ash can be removed easily using a microfibre cloth Always...
Страница 103: ...promote the sustainable reuse of material resources responsibly supply the appliance to a recycling centre 5 2 Environmental protection energy saving Do not open the oven door unnecessarily often Swi...
Страница 104: ...recommend to use the supplied baking tray provided with your appliance It is also possible to bake in cake tins and trays bought somewhere else For baking it is better to use black trays which conduc...
Страница 105: ...aged NOTICE Do not place the drip tray oven pan or the baking tray deep oven pan 32 in the upper levels 4 533 of the oven The intense heat in the upper levels of the oven can warp the material of the...
Страница 106: ...CK NOTICE If you use a special oven detergent check that the detergent is suitable for your appliance instructions on the packaging of the detergent NOTICE Any damage that is caused to the appliance b...
Страница 107: ...minant 6 Screw the new illuminant in Check its proper position in the socket 7 Replace the lamp cover 8 Remove the dishcloth and switch on the corresponding fuse in the fuse box of your household powe...
Страница 108: ...ce it on a piece of cloth to protect the glass from scratches etc 2 Push with one hand on the outer glass pane and pull with the other hand on the inner glass pane be careful in doing so Hold the glas...
Страница 109: ...rouble shooting DANGER Never try to repair the appliance yourself Repairs carried out by unauthorized persons can cause serious damage If the appliance does not operate properly please contact the aft...
Страница 110: ...r place of residence THE APPLIANCE DOES NOT HEAT You have not set a temperature Set a temperature You have not set the timer36 Set the timer The heating element is defective Please contact the aftersa...
Страница 111: ...d all items on the above schedule but the problem still exists please contact the aftersales service 8 1 Error codes ERROR CODE ERROR DESCRIPTION MEASURES SENSOR ERROR Short circuit of the sensor Open...
Страница 112: ...or locking error door not properly closed close the door properly An acoustic signal sounds 10 times once per second Press the button PAUSE CANCEL to return the appliance to STANDBY MODE If any error...
Страница 113: ...t grill top heating element complete fan grill top inner heating element bottom heat grill top heating element complete Eco Cleaning programme Pyrolytic self cleaning programme Grill Fan Hot air Full...
Страница 114: ...f the entire power cord Dispose of the power cord and the plug immediately Remove the door completely so children are not able to get into the appliance as this endangers their lives 4 Dispose of any...
Страница 115: ...eir authorized condition if they do not influence the utility value of the product 3 damage caused by handling errors or false operation 4 damage caused by aggressive environmental conditions chemical...
Страница 116: ...finden alle Informationen zum Kundendienst auf der Einlage in dieser Bedienungsanleitung Aftersales service information on the leaflet inside this instruction manual nderungen vorbehalten Subject to a...