background image

(The above pictures are for illustration only and the physical accessories shall govern.)

1

2

4

3

 Before connecting the LCD monitor to PC, please power the PC and the monitor

Model with inbuilt power supply 

* Warning: Always use the power
                 cord of standard configuration.

2

4

3

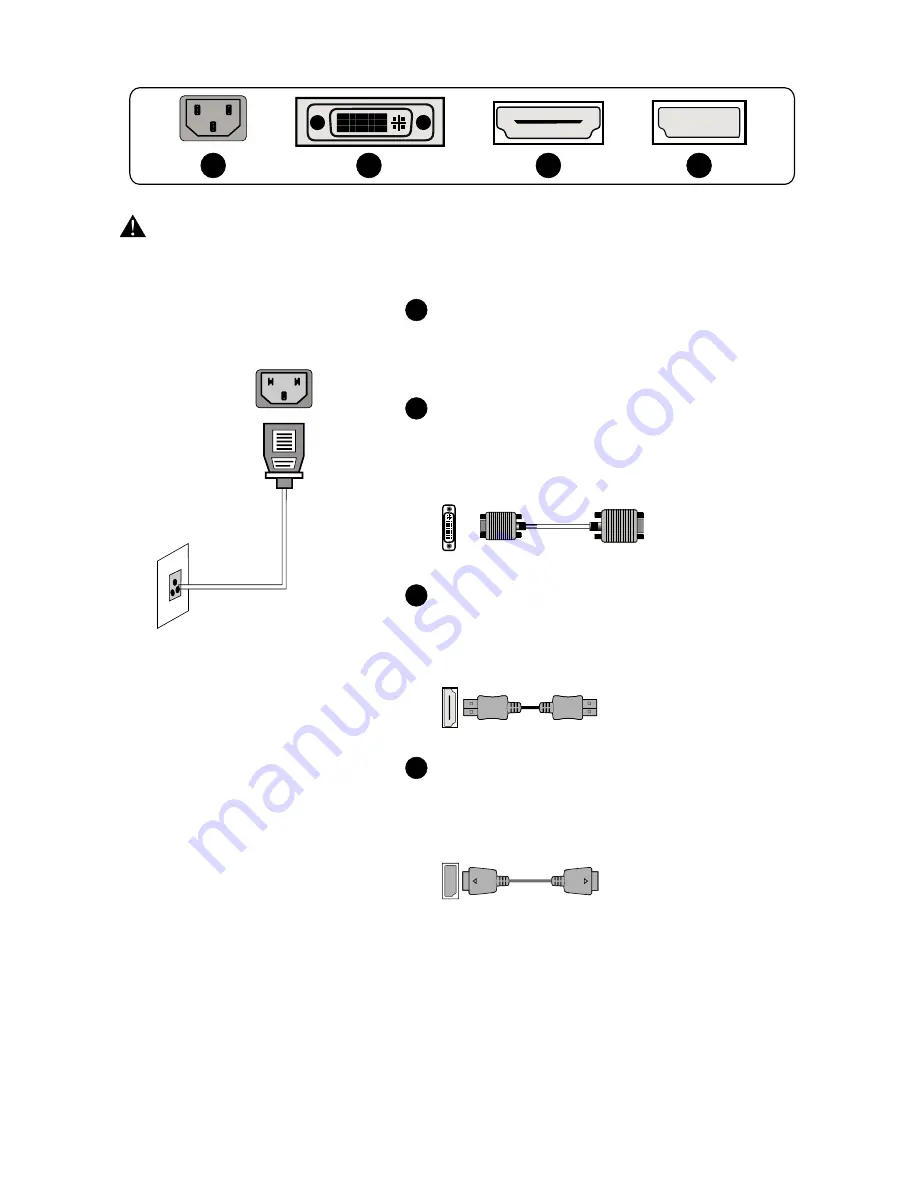
Power Plug
Connect the power cord of the monitor into
the POWER port in the back of the monitor.

DVI Port
Connect the DVI cable into the DVI IN port
in the back of the monitor (this needs the
support of the monitor).

HDMI Port
Connect the HDMI cable into the HDMI IN
port into the back of the monitor (this needs
the support of the monitor).

DP Port
Connect the DP cable into the DP IN port of
the monitor (this needs the support of the
monitor).

1

-3-

III. Connect the Monitor to PC

All specifications and informations are subject to change without notice.

All manuals and user guides at all-guides.com

Содержание PX347c Prime

Страница 1: ...All manuals and user guides at all guides com a l l g u i d e s c o m ...

Страница 2: ...All manuals and user guides at all guides com ...

Страница 3: ... person to fix it The authorized disassembly of this device may result in electric shock or fire When cleaning the device be sure to remove the power plug use a piece of soft cloth rather than industrial chem ical to clean the device be sure not to let water enter the device In case of rare smell or noise out of this device be sure to im mediately cut off the power supply and ask a professional se...

Страница 4: ... 2 2 When adjusting the angle of the monitor be sure not to touch or press the area of the screen The above pictures are for illustration only and the physical accessories shall govern II Installation Instructions 1 Accessories 2 1 The screen can be adjusted by inclining forward and backward however the specific adjustment depends on the specific model of the device Generally it may be inclined 5 ...

Страница 5: ...OWER port in the back of the monitor DVI Port Connect the DVI cable into the DVI IN port in the back of the monitor this needs the support of the monitor HDMI Port Connect the HDMI cable into the HDMI IN port into the back of the monitor this needs the support of the monitor DP Port Connect the DP cable into the DP IN port of the monitor this needs the support of the monitor 1 3 III Connect the Mo...

Страница 6: ...ly the value of the progress bar When the menu is activated used as the right function selection key and increases progressively the value of the progress bar when the menu is inactivated used as the specified shortcut mode hot key FPS RTS mode If the menu is activated chooses the corresponding function Power switch Powers on off the monitor Blue in normal switch on state flickering in blue in pow...

Страница 7: ...ature Set as warm color temperature Fine tuning of green color temperature Fine tuning of blue color temperature Return to the previous menu Exit from the whole menu Automatically adjust picture aspect ratio Picture in 21 9 mode Picture in 4 3 mode Return to the previous menu Exit from the whole menu DVI digital signal input HDMI digital signal input Display port digital signal input Return to the...

Страница 8: ...he whole menu Return to the previous menu Exit from the whole menu Automatically turn of f after saving power for 1s Inactivate the function of timed switch of f Return to the previous menu Exit from the whole menu Reset to factory setup Exit from this function Activate OD function this needs the support of the monitor Inactivate OD function this n eedsthe supportofthe monitor Return to the previo...

Страница 9: ...efer to the Basic Setup and OSD Menu sections of the manual Picture in Picture Additional Input Source DP HDMI DVI Window Swap picture mode 1 Main screen input source When using the PBP function certain resolution settings are recommended in order to prevent image deformation or other undesired visual effects 1680x1050p is the recommended resolution setting for each window 7 DP HDMI DVI All specif...

Страница 10: ...t brightness and contrast There may be electrical appliances or equipment with electronic disturbance Check if the PC display card is inserted properly Check if the signal cable of the monitor is correctly connected with the PC Check the signal cable plug of the monitor and make sure every pin has no bending Observe the indicator light by pressing the Caps Lock key on the PC keyboard and check if ...

Страница 11: ...erating System Windows 7 Windows 8 Windows 10 64 bit latest service pack or higher Processor CPU Intel Core i5 or AMD Phenom II X3 or higher Graphics Card NVIDIA GeForce GTX 950 or AMD Radeon R9 380 or higher Memory 6 GB RAM 21 9 34 WQHD Preset resolution Refresh rate 3440x1440 60Hz 2560x1080 60Hz 1920x1080 60Hz 1680x1050 60Hz 1440x900 60Hz 1280x1024 60Hz 1024x768 60Hz 800x600 60Hz 640x480 60Hz Di...

Страница 12: ...All manuals and user guides at all guides com ...

Отзывы: