Pixel 50D1400 Скачать руководство пользователя страница 11


Connections and Setup

Initial Setup

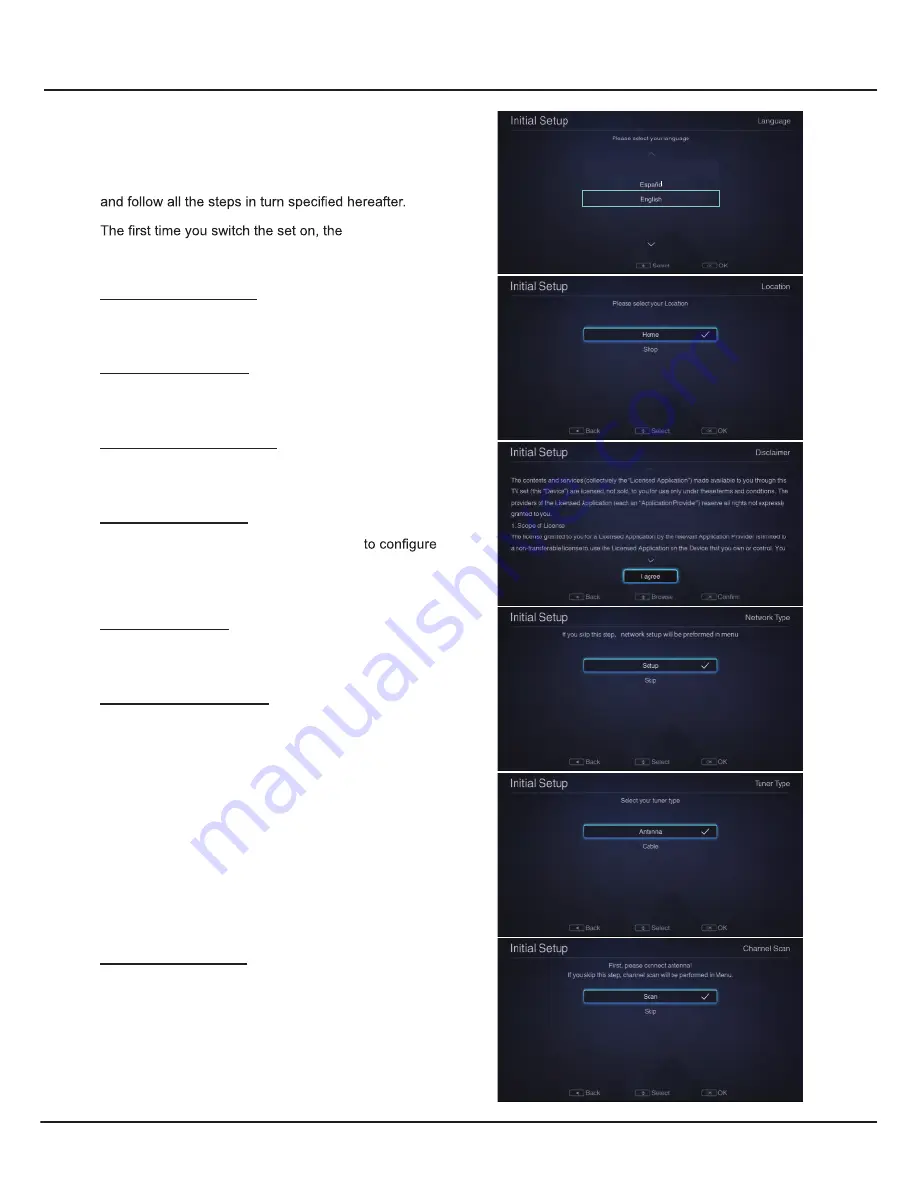
Initial setup involves selecting all the settings required to 
be able to search for and store all the channels you can 
receive. Make sure that the television is switched on 

Initial Setup


menu appears, which guides you through the initial 
setup process. Press 

OK

 to enter.

Step 1 Select Language

P

ress ▲/▼ to select your preferred language for the 

menu system, and then press 

OK

 to enter the next step.

Step 2 Select Location

Press ▲/▼

 to select your location: 

Home

 or 

Shop

 and 

then press 

OK

 to enter the next step.

Step 3 Agree to Disclaimer

Press

 ▲/▼

 to select 

I agree

 and then press 

OK

 to enter 

the next step.

Step 4 Set up Network

Press ▲/▼ to select 

Setup

 and press

 OK 

the network. For details, refer to 

Network Settings

 on 

page 9. You can also select 

Skip

 to skip this step 

and perform network settings later.

Step 5 Select Tuner

Press ▲/▼ to selec

Antenna

 or 

Cable

 and press

 OK 

to enter the next step.

Step 6 Scan for Channels

Press

 ▲/▼ to select 

Scan 

and press

 OK 

to start the 

search automatically. All available TV channels are 
stored. This operation takes a few minutes. The display 
shows the progress of the search and the number of 
programs found. You can also select 

Skip

 to skip this 

step and perform channel scan later.

Note: To prevent the channel setup process from being 
interrupted, wait for the message indicating that the 
setup is complete.

During the setup, user can follow the hint available 
at the bottom of the screen to return to the last step 
by pressing 

◄, or press 

EXIT

 to interrupt the search 

halfway. 

Initial Setup Complete

After initial setup is complete, press 

OK

 to exit. The 

channels are arranged in a preset order. If you wish to 
skip channels, or organize channels, press 

SETTING

 to 

display the main menu, select 

Channel >


Channel Edit 

and press 

OK

 to enter.

11

Содержание 50D1400

Страница 1: ...MODEL 50D1400...

Страница 2: ...ture Sound Channel Time Settings Lock 8 8 9 9 Choose Your Connections Network Connections Network Settings Chapter 4 System Settings Menu Chapter 5 Special Function Chapter 6 Other Function 21 Trouble...

Страница 3: ...4 pcs of type M6 screws are required for installing the wall mount bracket to your TV...

Страница 4: ...ne or more of the following measures R eorient or relocate the receiving antenna I ncrease the separation between the equipment and receiver C onnect the equipment into an outlet on a circuit differen...

Страница 5: ...xcellent picture quality because the video is separated into three separate parts The L and R socket be used to connect a range of equipment including video recorders camcorders satellite receivers DV...

Страница 6: ...page CH CHANNEL UP DOWN Scans up or down through the current channel list Goes to the homepage Note This button may be for some models and goes to the Golive homepage Goes to the browser homepage SETT...

Страница 7: ...ch as sunshine or the like SLEEP Repeatedly press to set the TV to turn off after a given amount of time To cancel the sleep timer press until Off appears GUIDE Toggles the Electronic Programme Guide...

Страница 8: ...8...

Страница 9: ...9 ATSC YPBPR...

Страница 10: ...ching is complete select an accessible wireless network to connect For some wireless network you need to input the right password to access Wireless input Choose Bass station to enter and then press t...

Страница 11: ...and perform network settings later Step 5 Select Tuner Press to select Antenna or Cable and press OK to enter the next step Step 6 Scan for Channels Press to select Scan and press OK to start the sear...

Страница 12: ...ng to the prompt on the smart phone and the TV screen The options are as follows Media Sharing After a smart phone is connected played on it Note Figures and illustrations in this User Manual are prov...

Страница 13: ...ptions may not be available for certain signal sources Some options may appear on the next page you can press to switch APPS TV GOLIVE Use to focus on each item TV Window Settings Favorite Source Sett...

Страница 14: ...TV phone tablet or box Our unique technology ensures an optimized viewing experience that is adapted to suit a range of Internet speeds broadcasting high quality streams of the programs and events you...

Страница 15: ...the shape of the Gamma curve Use lower Gamma values for bright ambient lighting and higher values when it is dark Color Temperature Adjusts the color temperature of the picture Press to select the co...

Страница 16: ...setup has changed you can do this from this menu Press to display the main menu and select Channel then press OK to confirm The Channel options are as follows Balance Press to balance the sound betwee...

Страница 17: ...ronha Northeast South and Southeast North and West respectively SETTINGS Closed Caption to choose Closed Caption Many programs are encoded with closed captioning information which allows you to displa...

Страница 18: ...omatically power on when you power on CEC device e g DVD with the device s remote Select On to enable this function Auto Standby Enables all CEC devices to automatically go to the standby mode when yo...

Страница 19: ...A Video coding format H 264 H 265 MPEG 2 MPEG 4 VC1 Notes Some USB keys and USB products like digital cameras or mobile phones are not fully compatible with USB 2 0 standard so it may not work with th...

Страница 20: ...try a similar device If it does not work contact your local dealer 1 Fail to link to the network Check if your TV is connected with the network Reboot your TV if access of your router is supported Ref...

Страница 21: ...me case loss of contrast in the picture Find out and remove the radio interference source To bring you better visual experience please remove all labels from TV front panel and screen before use No pi...

Отзывы: