background image

15

PITTASOFT


Pitta IP Utility and Pitta Web View

@

e

T

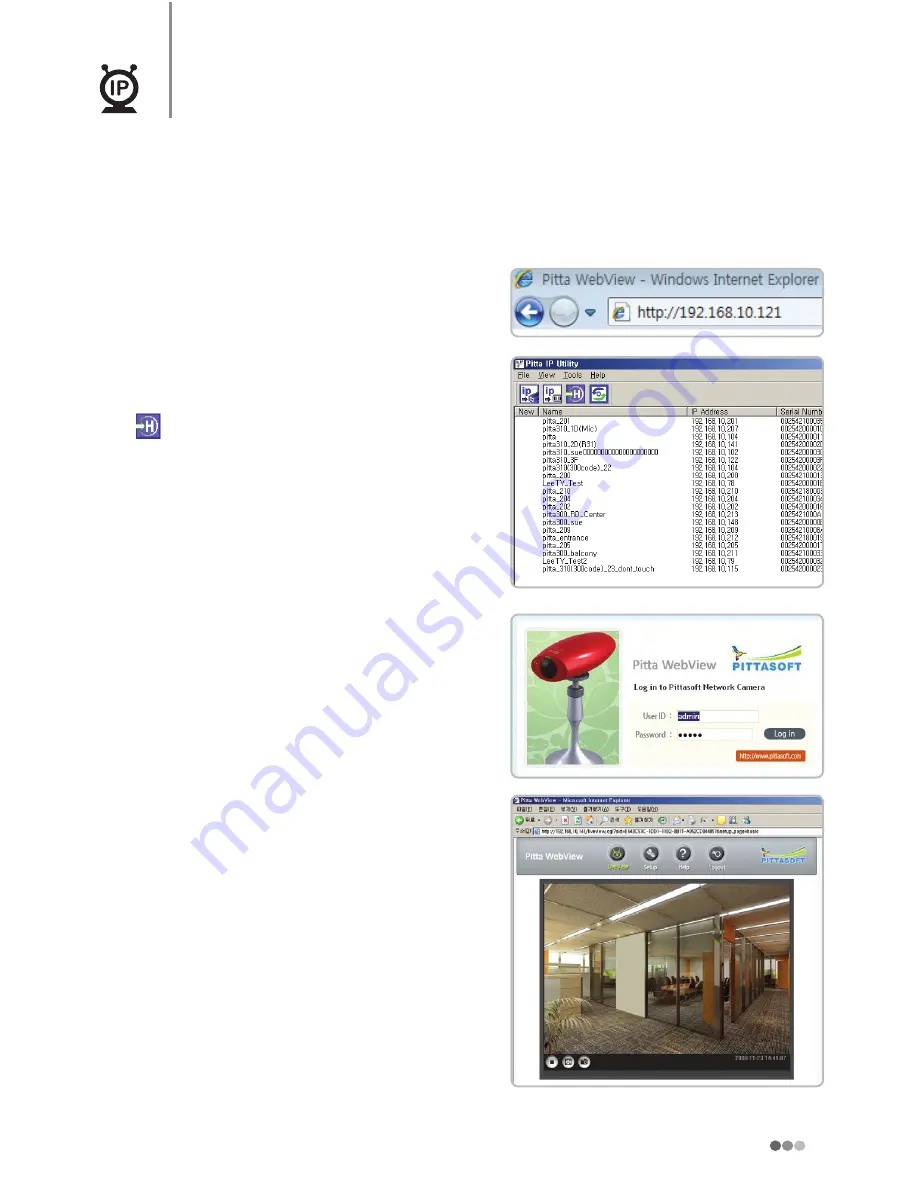
Pitta WebView Log-in

Pitta WebView is the role of each camera's homepage. Set the camera or live view is 
possible through the internet. 

Connect to the camera's homepage. 


x

Method 1: To open Login page, enter IP 
address in the address bar of your web 
browser and press Enter.


x

Method 2: Select the camera and press the 

 button in Pitta IP Utility.

-  Double-click on the camera or click the 

mouse right button and choose 'Home Page' 
then you can go to the login page.

-  Select the 'View → Home page' from Menu 

bar then you can go to the login page.

Enter user ID and Password and press 'Log in' 
button. 


x

Default initial values of administrator's ID and 
Password are admin/admin


x

If you login to Live View at first time, a yellow 
bar will appear at the top of the screen. 
Please click on the yellow bar and continue 
to install the 'PTAMME_X ActiveX Control 
Module'.

]

If you have accessed by administrator account, 

you may change the password of administrator to 

ensure the security of the system.


(

T✎

page 19)

]

In this case, the access by the Guest should 
be approved by the administrator. 

(

T✎

page 19)

Содержание Pitta300

Страница 1: ...IP NETWORK CAMERA PITTA 300 SERIES Pitta300 Pitta300R Pitta300D Pitta300DR user manual Ver 2 00...

Страница 2: ......

Страница 3: ...Pitta 300 5 Installing the Pitta 300 7 Installing the Software 10 Chapter 2 Pitta IP Utility and Pitta Web View Pitta IP Utility guide 12 Changing IP address 13 Pitta WebView Log in 15 Pitta WebView...

Страница 4: ...ugh all printed documentation and ensure that your system is compatible for your product x x Pittasoft will continue to add new functions and enhancements and apply new technologies to this product An...

Страница 5: ...h and storage Support WDR Wide Dynamic Range Built in progressive CMOS image sensor and support better image in backlight environment than normal sensor Pitta 300R 300DR supports only Motion Detection...

Страница 6: ...e product package x x If there is any problem with the accessories contact your local product distributor x x The accompanied accessories can be changed without prior notice Pitta 300 300R Pitta 300D...

Страница 7: ...blinking Firmware upgrading 2 DC IN DC 5V 1 0A power terminal 3 LAN Connect the 10 100 Mbps Ethernet cable Make sure that use RJ 45 connector Supports PoE IEEE 802 3af 4 DATA Data Terminal 5 POWER LE...

Страница 8: ...differ from the actual appearances of the product 1 RESET Press the reset button for 3 seconds then all the settings will be changed to initial settings Checking the main body of the Pitta 300 Gettin...

Страница 9: ...cable and power must be figured at the intended place 3 Connect the LAN cable to the LAN port Use a cross cable for a direct connection between the PC and the camera only Use direct LAN cable for usin...

Страница 10: ...Getting Ready Installing the Pitta 300 Pitta 300D 300DR 1 Turn the dome cover counterclockwise and detach it 2 Detach the shield case 3 Position the lock holder in the desired location 4 Assemble the...

Страница 11: ...dome cover 7 Connect the LAN cable to the LAN port Use a cross cable for a direct connection between the PC and the camera only Use direct LAN cable for using a router or switch hub 8 Connect the AC a...

Страница 12: ...stallation CD into the CD drive Double click the Setup exe file on the CD You can download this file from Pittasoft homepage www pittasoft com 2 Follow the instructions on the installation program to...

Страница 13: ...AS HDD Space Minimum 80GB Free O S Windows XP SP2 Windows Vista Re installation If reinstallation is needed current software has to be uninstalled 1 To uninstall the software click on uninstall button...

Страница 14: ...us Bar Displays current status 4 Home Page Go to Pitta WebView home page Properties This feature is an additional plan Refresh Refresh the camera list Tools Assign IP address to the selected device Ch...

Страница 15: ...rs 3 Enter User ID and Password Default initial values of administrator s ID and Password are admin admin You can change ID Password in Pitta WebView T page 19 4 Assign the IP address x x Obtain an IP...

Страница 16: ...setting is the DHCP mode IP address will be automatically assigned If you use Pitta IP Utility with cross cable connection you must assign the static IP Please do not use DHCP option with cross cable...

Страница 17: ...oose Home Page then you can go to the login page Select the View Home page from Menu bar then you can go to the login page 2 Enter user ID and Password and press Log in button x x Default initial valu...

Страница 18: ...he live view mode NO Item Features 1 Address You can check the IP address of the camera 2 Homepage shortcut Open Pittasoft homepage 3 Live view Live view screen 4 Current Time Displays current time Ti...

Страница 19: ...on Basic setting page For more information see page 18 26 Help Press button Pitta WebView help page Press the Help button on the setup page to get help and tips for the current page Logout Press butto...

Страница 20: ...he display by 180 x x 0 floor 180 Invert Night Mode Use this to get the better video quality in dark places Video Quality Use this to choose video display quality x x Highest 3Mbps High 2Mbps Normal 1...

Страница 21: ...admin All the settings will be changed to initial setting 2 Network Settings 2 1 IP and Ports Camera IP address setting page It s equivalent to IP Utility setting T pages 13 14 Also use this setting f...

Страница 22: ...referred DNS server and Alternate DNS server If you are not sure which IP addresses to use check with your network administrator or Internet service provider If the video is not visible when connected...

Страница 23: ...ng Use this to set the compression ratio of images to be uploaded to the FTP server or attached to the email x x Compression Ratio 0 100 Use this to set the compression ratio The size of the image bec...

Страница 24: ...images when shooting in dark places x x Priority Framerate Image Quality Adjust video images by giving priority to either frame rate or image quality x x Night Mode Image become brighter as the value...

Страница 25: ...h Included and Excluded windows Overlap with Excluded window and Included window area does not detect motion 3 Adjust the size and location of the window 4 Adjust the sensitivity x x Object Size Use t...

Страница 26: ...e Upload interval value upon detecting motion Weekly Allows transmitting images at the time set according to the Upload interval value upon detecting motion Never Stops transmitting images Default set...

Страница 27: ...ally Standard Date and Time format is 2009 02 22 09 00 00 YYYY MM DD HH MM SS 6 2 LED Setting Pitta 300 300R supports only Set the status of LED x x Normal Allows turning on the LED lamp on the front...

Страница 28: ...during upgrade The camera will automatically restart when upgrade is completed 4 Upgrade is completed Press OK button 5 Reconnect to Pitta WebView Make sure that the upgrade is complete properly When...

Страница 29: ...the dynamic IP is the hidden internal IP by the router In this case if you use port forwarding provided by the router then you will be able to access the dynamic IP The router s port forwarding is th...

Страница 30: ...trast feature of the monitor x x Please adjust the Sensor Color Setting in Pitta WebView The Motion Detection function is not working x x Please check the Enable Motion Detection mode is turned on in...

Страница 31: ...lens fixed focus Focal length F 4 4mm 800mm infinity Field of view 67 F number F2 0 Interface Ethernet 10 100 Base TX RJ 45 Protocol TCP IP HTTP DHCP SMTP FTP DNS DDNS Button Reset Cable type UTP CAT...

Страница 32: ...on Configurable compression ratio User list Maximum 7 users 1 admin with full access and 6 viewers access password entry Event configuration Motion detection 4 included excluded windows supported with...

Страница 33: ...31 PITTASOFT Appendix e T Pitta 300 300R Dimension 1 69 inch 43 2 79 inch 71 5 31 inch 135 Front Top Right...

Страница 34: ...32 PITTASOFT Pitta 300D 300DR Dimension Appendix 2 52 inch 64 2 68 inch 68 3 23 inch 82 0 71 inch 18 3 40 inch 86 5...

Страница 35: ...MEMO...

Страница 36: ...MEMO...

Страница 37: ...Model Warranty Period Purchase Date YY MM DD 1 year After the Purchase Warranty Period Until YY MM DD Customer Name Contact Number Seller Name Contact Number...

Страница 38: ...Pittasoft Head Office Address 1113 Newticastle 429 1 Gasan dong Geumcheon gu Seoul 153 779 Korea Hompage www pittasoft com Email product pittasoft com TEL 02 2626 8800 FAX 02 2626 8805 AS 02 2626 8804...

Отзывы: