

3. Connect to the outside world
Follow the relevant section below for the connection method you‘ve chosen:
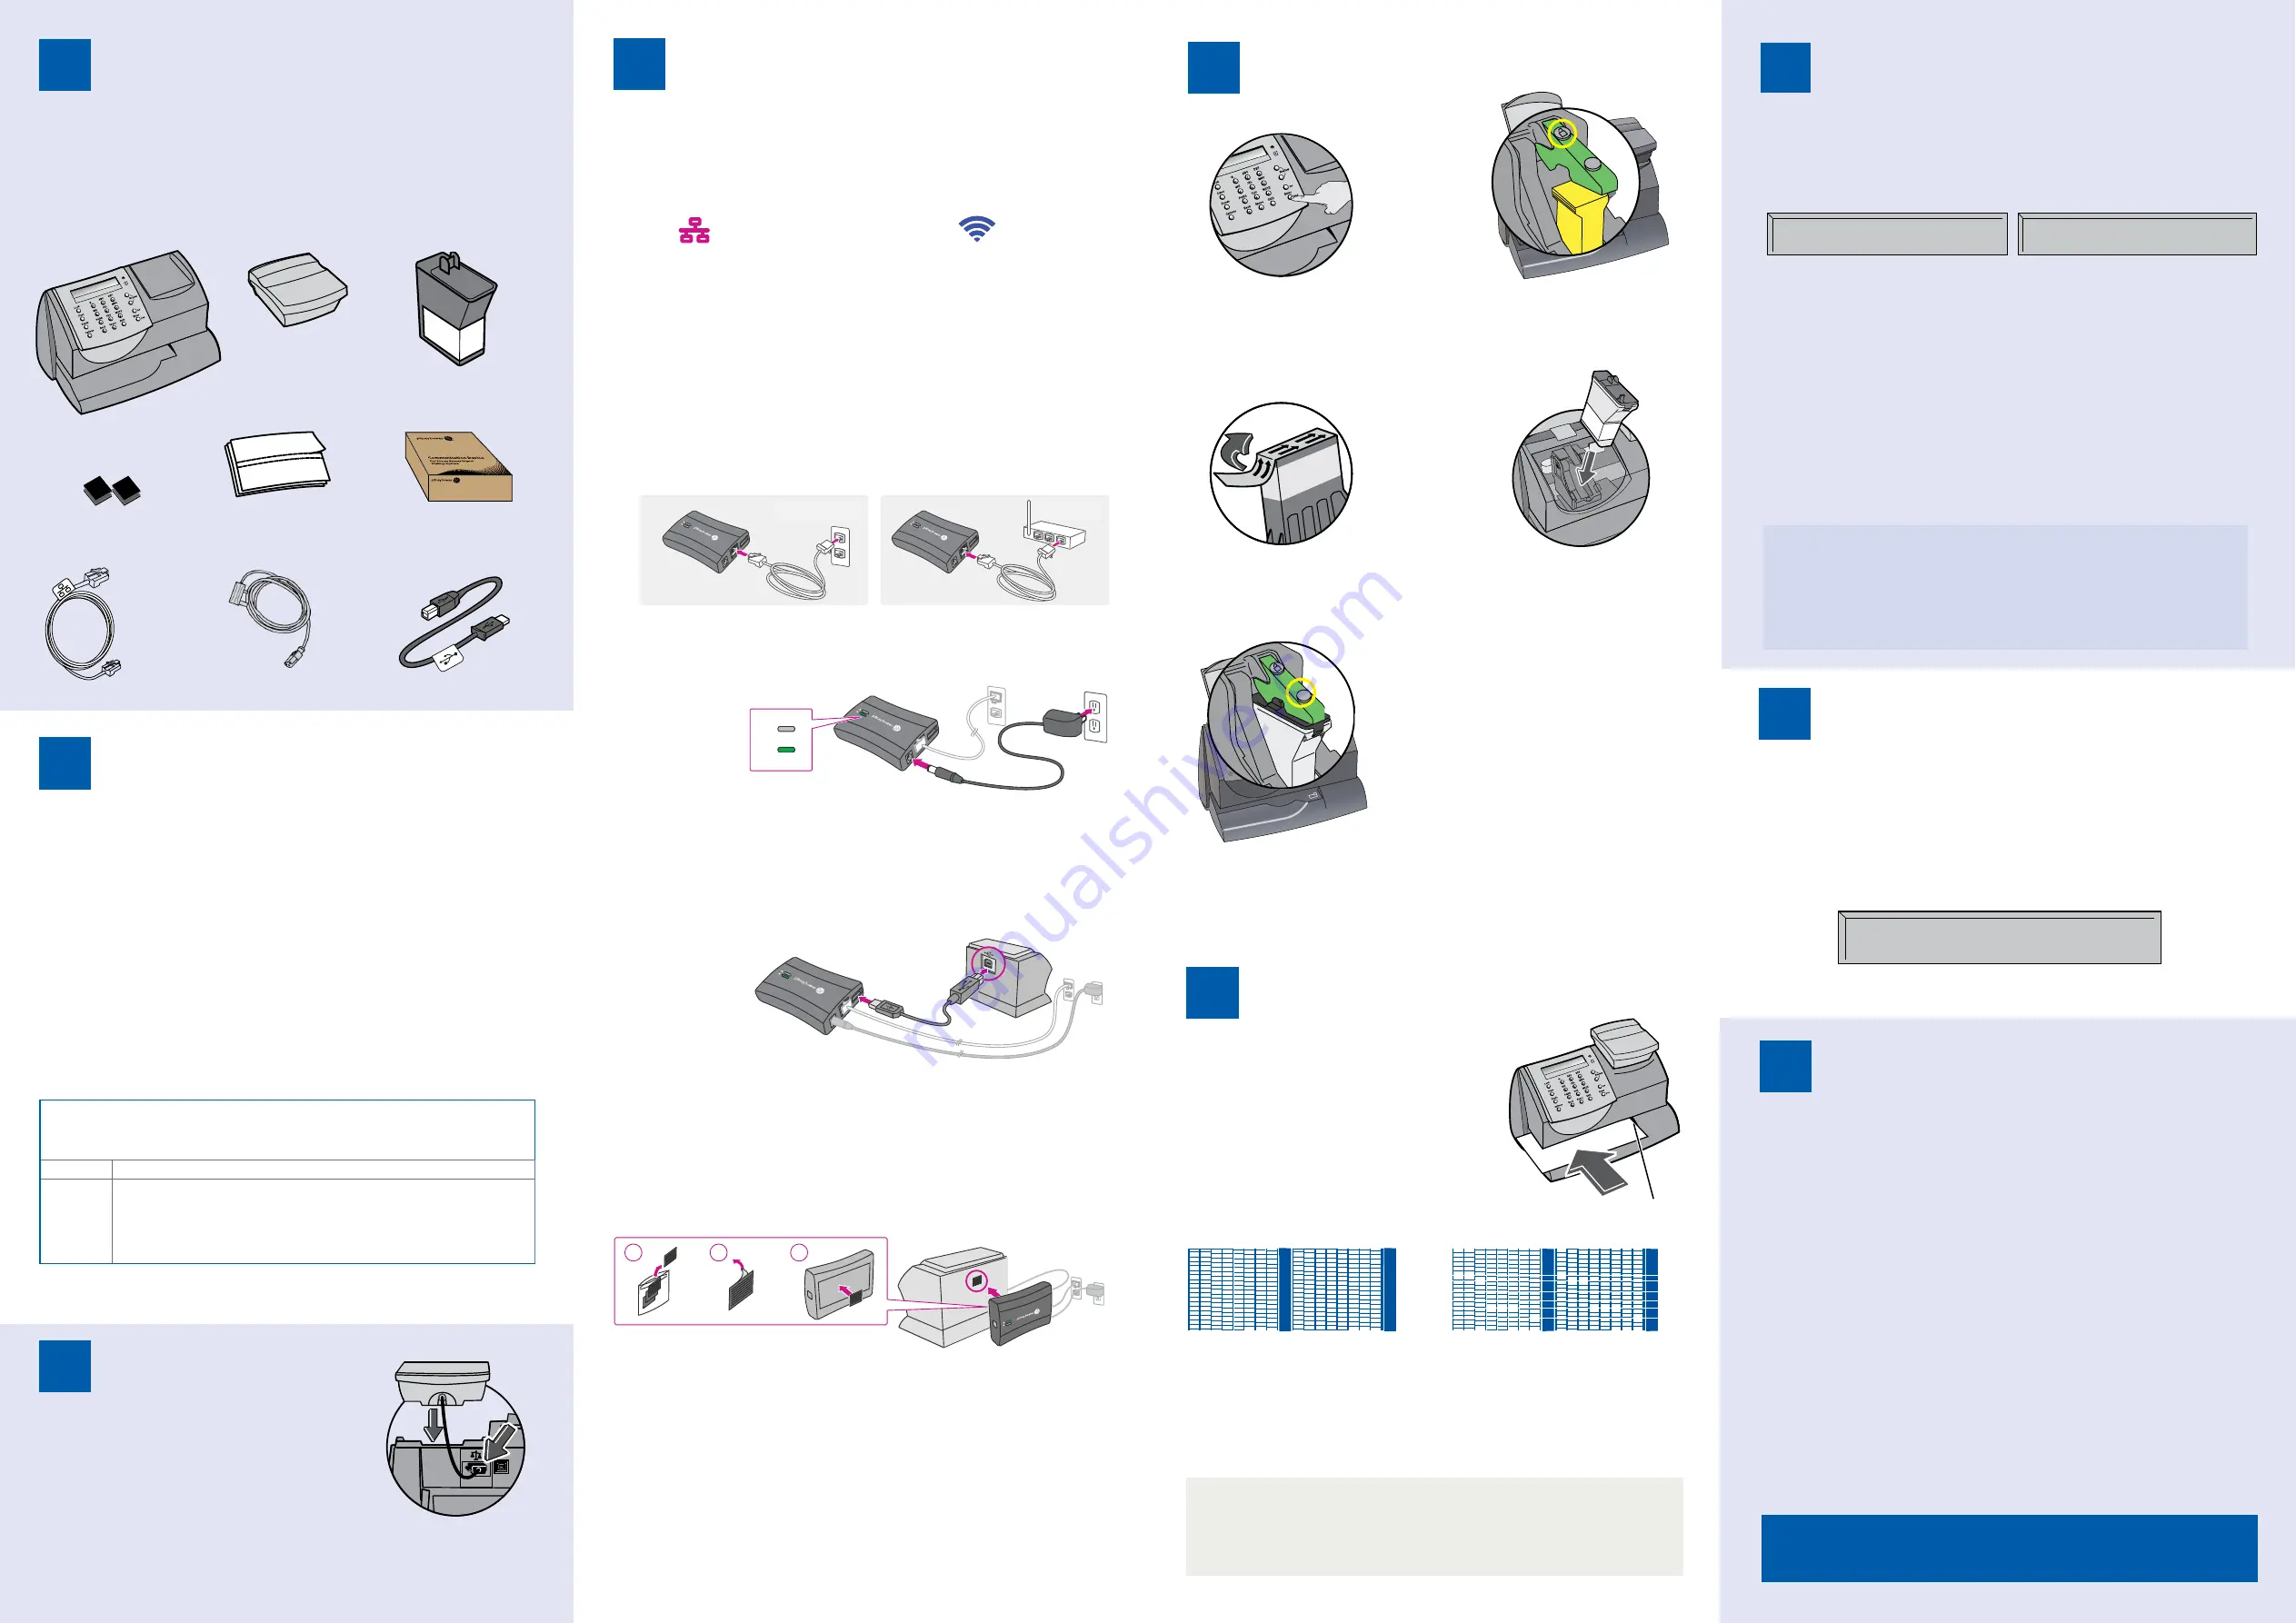
4a. SmartLink™ device connection
Note-
If you are installing your SmartLink™ using a wireless connection you should
connect your power cord to the back of your franking machine and power up
now
before proceeding to the connection instructions below.
Wired?
or
Wireless?
6. Carry out a test print
When prompted, insert a spare envelope or tape/
label strip for a test print. Insert the item into the
franking machine from the front, making sure it
is pushed up to the right registration wall. The
franking machine automatically begins printing. Do
not remove the item until the printing has finished.
Review the quality of the test print.
Good quality – press
Enter/Yes
.
Poor quality – press
No
, the franking machine goes through another set-up cycle
and will clean the print nozzles. When this is complete you should try the test print
again.
8. Check for updates
Your franking machine now automatically checks and installs any new software,
including any new Envelope Messages associated with your account. The display
shows the status of the update.
Once the updates have been completed, your franking machine requires a final
connection. Press
Enter/Yes
when you see
‘Connection Required - Press Enter’.
Once complete, the Home Screen displays and your franking machine is ready to
be used.
7. Add postage funds
You need to add funds to your franking machine before you can use it.
Connect to Pitney Bowes Data Centre
The franking machine automatically connects with the Data Centre and, after a
short delay, displays your account balance:
Adding funds
You now need to add postage to your franking machine.
• Press
Enter/Yes
- an amount will be suggested. To accept this amount, press
Enter/Yes
or press
Clear/Back
to change it.
• If you pressed
Clear/Back
you will be prompted to enter a new amount. Enter the
amount and then press
Enter/yes
.
Important- This new refill amount must be in increments of £10 /
€
10.
• Confirm the amount to add by pressing
Enter/yes
again.
• The franking machine communicates with the Data Centre to add postage and
confirms when complete. Press
Enter/yes
.
• The display asks if you would like a receipt. Press
Enter/Yes
and print an envelope
or label as you did for the test print at step 6.
Get Started-
Franking an envelope
Let’s now create your first piece of franked mail...
• Place your item of mail on the scale and the display will show the cost, weight,
class and date.
• If you want to change the Class, press the Class button and scroll to highlight the
Class you wish to use and then press
Enter/yes
.
• Envelope Messaging (advert or message) prints alongside your frank. To select
your preferred Envelope Message, press the down
Review
▼
key until
‘Ad’
displays, then press
Enter/yes
. Scroll to the required Envelope Message using the
Review
▼▲
keys, then press
Enter/yes
. (To ensure your Envelope Message prints
automatically in future, see
Pre-setting Options
, overleaf).
• Insert the item of mail into the franking machine (exactly as you did at step 6- test
print) to create your first piece of franked mail.
Problems?
•
Can’t see the personalised Envelope Message (advert) you ordered?
See
Envelope
Messaging
overleaf.
•
Want to pre-set the franking machine to automatically print your preferred
Envelope Message?
See
Pre-setting Options
overleaf.
•
Want to learn more about using you new franking machine?
See
Using your
franking machine
overleaf.
Prepaid: £xxxxx.xx
x.xx
0 g
postal class
date
IMPORTANT
Once you have printed the receipt, check the Postage by Phone account
number on the receipt and ensure it matches the account number on the
dispatch note received with the franking machine. If the numbers do NOT
match, do not go any further with this installation and contact Pitney Bowes
on
(UK) 08444 992992 or (ROI) 01 4808700 .
IMPORTANT
It is very important that the print from your franking machine is of a good
quality. If you do not have a good quality print, your Postal Authority may refuse
or be unable to read the information automatically, this might result in a delay in
delivering your post.
Right Registration Wall
1 Open the box and unpack
Here’s a diagram and explanation of the items you should find in your box, if
anything is missing give us a call on
(UK) 08444 992992 or (ROI) 01 4808700
.
Depending on how you install your franking machine, you might not need all of
these items.
If you have any problems during this installation, refer to ‘Troubleshooting’ overleaf.
Franking Machine
Scale
Ink Cartridge
Postage Meter
Labels
USB Cables
(1 short, 1 long)
Network Cable
Velcro Pads
Power Cord
SmartLink™
1
7
8
9
6
Good print
- no broken lines in the
centre of the test print
Bad print
- broken lines in the centre
of the test print
3. Fit the Scale
Remove all shipping tape from the machine, including
the tape on the underside of the machine which holds
the slide-out tray in position.
Position the scale on the franking machine and plug in
the scale connector as shown in the diagram. Tighten
the connector screws.
3
4
Decide where to site your
system and how to connect it
Please
DO NOT
connect power until instructed.
You must ensure that the franking machine is located on a sturdy and flat surface,
has a constant power supply and that you have space around it to work.
Your franking machine has to connect to the Pitney Bowes Data Centre to add
postage funds, get software updates, and carry out the required Postal Authority
inspections.
SmartLink
™
Connection is made via the internet. If you are connecting via a
SmartLink™
device please go straight to
Step 3
to install your scale and then proceed to
Step
4a
and follow the instructions to continue your SmartLink™ setup.
2
PCMC Connection (Internet connection via your PC)
If you have a PC with an internet connection nearby, you can install the free Pitney Bowes
PC Meter Connect™ (PCMC) software and use the PC’s internet connection (
see step 4b)
.
Benefits
Requirements
Backup
connection
method if
LAN not
possible.
Requires a PC with an active internet connection to be nearby and turned
on.
The PC must run Windows Vista or 7 and have Pitney Bowes PCMC software
installed.
PCMC is not available for Mac.
As a backup and only if you cannot provide a direct connection to your network
,
you can use the free Pitney Bowes PC Meter Connect™ (PCMC) software to
connect via any PC with an internet connection.
If you cannot meet the requirements of any connection method described above,
give us a call on
(UK) 08444 992992 or (ROI) 01 4808700
.
Communication Device
For Pitney Bowes Digital
Mailing System
5 . Install the ink cartridge
1
2
3
4
5
6
7
8
9
C
0
.
Sperre
n
Versandart
en
Zählerstän
de
Einstellungen
Eingabe
blättern vor/zurück
Nein
Ja
*#_
ABC
DEF
GHI
JKL
MNO
PQRS
TUV
WXYZ
zurück
Leertast
e Eingab
e
1
2
3
4
5
6
7
8
9
C
0
.
Lock
Class
Funds
Options
Enter
Review
no
yes
*#_
ABC
DEF
GHI
JKL
MNO
PQRS
TUV
WXYZ
Clear/Back
Space
Shift
PitneyBowes
5.2 When prompted, lift the top cover
and press the unlock symbol on
the cartridge latch. Remove and
discard the yellow packaging
material.
5.3 Open the packaging for the ink
cartridge and take off the protective
tape from the bottom.
5.6 Close the top cover and press
Enter/yes
. When you see
‘IMPORTANT – is the ink cartridge
installed?’
displayed, press
Enter/
yes
again.
The franking machine will now
go through a set-up cycle which
takes up to 2 minutes.
5
5.1 When the display shows ‘
Add ink
cartridge
’, press
Enter/yes
.
5.4 Insert the ink cartridge. Insert the
base of the cartridge first before
pushing the top back.
5.5 Press the ink cartridge latch down
until it clicks and holds the cartridge in
place.
Turn over for further information on Envelope Messaging,
Pre-setting Options, Troubleshooting and Using your
Franking Machine.,
4b. PCMC Connection (Internet connection via your PC)
Before you connect your franking machine to your PC, you need to install our
FREE PC Meter Connect
™
software
. To do this, you must have administrator rights
on your PC which may require you to contact your IT department. Please note that
the software is not Mac compatible.
To install, visit
pitneybowes.com/uk/setup-pcmc
and choose the ‘Run’ option.
Select ‘English (United Kingdom)’ as your installation language and follow the
on-screen instructions. This process installs the software and powers up and tests
your franking machine connection. When complete, you are asked to return to this
guide to complete the franking machine installation.
•
Installation takes about 10 minutes.
•
Requires an available internet port
and power socket.
•
Follow the instructions below to
connect.
•
Installation takes about 15 minutes.
•
Requires a computer and access to a
wireless network.
•
For wireless connection please go to
pitneybowes.com/uk/smartlinksetup
Do not proceed with the below
instructions.
•
Please see note above.
•
Once installed return to step 5 on this
instruction.
Wired instructions
1. Connect the SmartLink
™
device to either a wall internet port or a router with
the included internet cable.
Inte rnet jack
Route r
Note-
Lights on the device will remain off.
2. Plug the power adapter into the into the SmartLink
™
device. Now connect the
power lead to the wall socket.
•
The SmartLink
™
device’s lights will change colour.
•
Once the device has connected to the internet the connectivity light will flash green.
•
Also the SmartLink
™
Device Ethernet port light will show green for successful
connection and yellow for network activity.
3. Plug the USB cable into your SmartLink™ Device and into the back of your
Franking machine.
4. Now connect the power cord to your Franking machine and connect to power.
5. Attach the SmartLink™ device to your meter with the included adhesive
fastener strips.
•
The USB cable is the short cable.
•
The SmartLink
™
device’s lights will again change colour.
•
Once a network connection has been established the SmartLink™ device’s USB
Connectivity light will turn green and it’s Network Connectivity light will blink green.
1
2
3
Now your SmartLink™ connection is established, please proceed to Step 5.
Congratulations! Your Franking machine is now ready to use.
Internet port
Router
Prepaid:
€
xxxxx.xx


