background image


Operation 


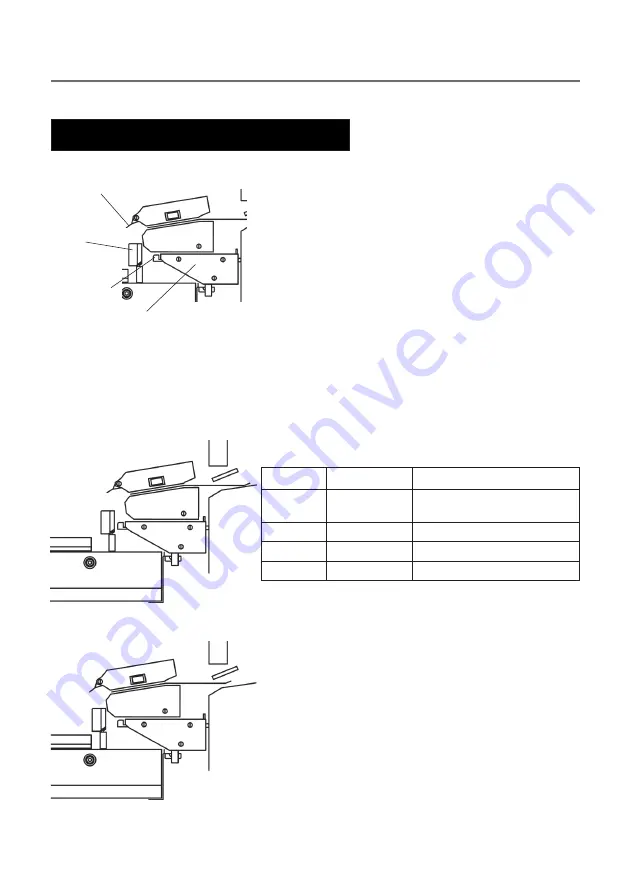
paper 

deflector 


paper 

guide 


adjustment 

lever 

output module 

bracket 


output module locked in the 

innermost position 


output module in the outermost 

position (adjustment lever in pos. 1) 


The purpose of the output module is to ensure that 

the set from the collator is fed correctly to the inserter 

document table. To achieve this, the position of the 

output module is adjustable to match different paper 

sizes and how the set is orientated. 


On the output module bracket there is an adjustment 

lever and a scale. The adjustment lever can be 

placed in five different positions, where a higher 

number places the output module closer to the 

collator. To change position of the adjustment lever, 

first  push  the  output  module  towards  the  collator 

until it locks in the innermost position. 


The recommendations in the table below are 

guidelines. The adjustments can vary depending on 

paper quality, paper weight etc. 


Paper size  Feed direction  Adjustment lever position 

A4 

Portrait 

Output module in innermost 

position. 

A4 

Landscape 

8.5" x 11" 

Portrait 

8.5" x 11" 

Landscape 

Note:  Before moving the adjustment lever, push 

the output module towards the collator 

until it locks and the adjustment lever 

moves freely. 


The  leading  edge  of  the  set  should  land  between 

the feeding belts on the inserter document table. 

When necessary, adjust the paper deflector. 


Change the position of the adjustment lever if: 

•  The set bounces back, up on the inserter 

document table side guide - move the adjustment 

lever to a higher number. 

•  The set stays on the paper guide -  move the 

adjustment lever to a lower number. 

4.3  Adjusting the output module 

Содержание DI875

Страница 1: ...Operating Guide F612 F615 Collator ...

Страница 2: ...dicators 9 4 5 Correcting counter and stacker position 9 4 6 Setting the total counter to zero 9 4 7 Programming preset counter 10 and sheet insertion program 4 8 LED indications third party device 10 4 9 Disabling stacker motion 11 4 10 Collator speed adjustment 11 4 11 Disengaging bin s with defective sensors 11 5 Maintenance 5 1 Cleaning feed rollers and paper separator pad 12 6 Problem solving...

Страница 3: ... is not used the following information applies 1 An approved mains lead for the country concerned must be used 2 The wires in the supplied mains lead are coloured in accordance with the following code Green and Yellow Earth Blue Neutral Brown Live 3 As the colours of the wires in the mains lead of this equipment may not correspond with the coloured markings identifying the terminals in your plug p...

Страница 4: ... into a suitable power source Make sure that the collator is plugged in securely 2 INSTALLATION 2 1 Connect Power WARNING This equipment must be earthed The socket outlet should be near to the equipment and should be easily accessible ...

Страница 5: ...ustable side guide in each bin 3 Load lever 4 Power switch 5 Rear side guide in each bin 6 Bin extension tray 7 Power cord receptacle 8 Third party receptacle 9 Conveyor door 10 Adjustable stacker guide side 11 Adjustable stacker guide length 3 GETTING TO KNOW THE COLLATOR 3 1 Main components ...

Страница 6: ...e priority change in On line mode 5 Counter display 6 Counter reset button 7 Test calibration button 8 Misfeed or bin empty Shown by bin indicators flashing 9 Clear button conveyor belt transport connected unit 10 Bin indicators 11 Stacker full or load lever out of position 12 Set counter 13 Selection programming mode 14 Preset counter 15 Sheet insertion program only in stacking mode 16 Start stop...

Страница 7: ...lator 1 5 2 6 3 7 4 1 Output module top cover 2 Paper deflector 3 Output module adjustment lever 4 Docking studs 5 Top cover release device on each side 6 Output module 7 Output module bracket 3 3 Output Module ...

Страница 8: ... Set the on off switch to on position The counter display will show HEJ to confirm that the collator is OK 2 Select output mode Offset straight stacking mode On line mode 3 Select stacking mode if set to stacking Straight stacking Offset stacking 4 Set the adjustable stacker guide side to the selected paper size 5 Set the adjustable stacker guide length to the paper size 6 Press test calibration b...

Страница 9: ...the output module towards the collator until it locks in the innermost position The recommendations in the table below are guidelines The adjustments can vary depending on paper quality paper weight etc Paper size Feed direction Adjustment lever position A4 Portrait Output module in innermost position A4 Landscape 3 8 5 x 11 Portrait 5 8 5 x 11 Landscape 3 Note Before moving the adjustment lever p...

Страница 10: ... fast Comes on after the calibration cycle The bin sensor that is flashing is incapable of sensing double sheets but is operational and still capable of detecting misfeeds The other bins are OK and calibrated Step Description Action Notes 1 Reduce the total counter value by 1 set Press and release Counter reset button In offset stacking mode the stacker will cycle once Step Description Action Note...

Страница 11: ...Selection programming mode to change the setting Press Counter reset button to confirm the setting and access the second digit Repeat this for the remaining 2 digits starting with pressing Selection programming mode After adjusting the last digit press Counter reset button to confirm the settings made Repeat these two steps Display shows 000 LED Indication Description Notes Continuous light On lin...

Страница 12: ...wo 2 seconds the bin LED will go out The counter will now display the counter value Step Description Action Notes 1 Isolate defective bin sensors and disengage these bins Press and hold Test and calibration for more than five 5 seconds The electronics check all bin sensors and disengages the bins with defective sensors 2 Re engagebins after correction of the problem Press and hold Test and calibra...

Страница 13: ...ve the feed roller assembly shaft by pressing it to the left side The right end of the feed roller assembly will now be released and the assembly can be removed 2 Clean the feed rollers and the separator pad with an alcohol based liquid paper separator pad Lift out this side 5 MAINTENANCE 5 1 Cleaning feed rollers and paper sensor pad feed rollers Press to the left ...

Страница 14: ... Correct problem in third party device Repeated misfeeds double feeds Feed rollers need cleaning Paper separator pad needs cleaning Check clean see section 5 1 Check clean see section 5 1 Sheets not fanned enough ink powder cutting burrs etc will make this a very important step Check fan sheets Paper quality out of specification Check specifications Incorrect double feed jam indication Different p...

Страница 15: ...es sensor in each bin Misfeed detection Yes Empty bin detection Yes Paper jam detection Yes Stacker full detection Yes Set counter Yes Preset counter Yes Sheet inserting program Yes Receiving tray Offset straight stacking Height 700 mm Width 575 mm Depth 525 mm Weight 65 kg Voltage 230 240V 50Hz The machine design and specifications are subject to change without notice Depending on paper quality a...

Страница 16: ...15 Notes ...

Страница 17: ...16 Notes ...

Страница 18: ... 22 Pitney Bowes Limited 2022 Printed in England FOR SERVICE AND SUPPLIES We have made every reasonable effort to assure the accuracy and usefulness of this guide however we cannot assume responsibility for errors or omissions or liability for the misuse or misapplication of our products ...

Отзывы: