background image

2E4

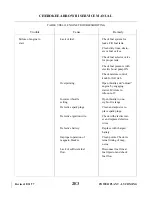
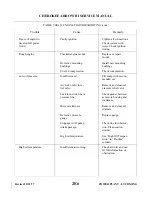
TABLE VIIIA-II. ENGINE TROUBLESHOOTING (cont.)

Failure of engine to

Internal failure.

Check oil screens for

start. (cont.)

metal particles. If
found, complete over-
haul of engine may be
indicated.

Failure of engine to

Incorrect idle mixture.

Adjust mixture.

idle properly.

Leak in the induction

Tighten all connections

system.

in the induction sys-
tem. Replace any parts
that are defective.

Incorrect idle adjust-

Adjust throttle stop to

ment.

obtain correct idle.

Uneven cylinder com-

Check condition of pis-

pression.

ton rings and valve
seats.

Faulty ignition system.

Check entire ignition
system.

Insufficient fuel pres-

Adjust fuel pressure.

sure.

Lower power and uneven

Mixture too rich; indi-

Readjustment of fuel in-

running.

cated by sluggish en-

jector by authorized

gine operation, red ex-

personnel is indicated.

haust flame at night.
Extreme cases indi-
cated by black smoke
from exhaust.

Mixture too lean; indi-

Check fuel lines for

cated by overheating

dirt or other restric-

or backfiring.

tions. Check fuel in-
jection nozzles.

Trouble

Cause

Remedy

Revised: 8/31/77

CHEROKEE ARROW III SERVICE MANUAL

POWER PLANT - LYCOMING

Содержание ARROW III

Страница 1: ...ARROW III TURBO ARROW III ARROW SERVICE MANUAL CARD 1 OF 3 PA 28R 201 201T PIPER AIRCRAFT CORPORATION PART NUMBER 761 639 1A1 Courtesy of Bomar Flying Service www bomar biz...

Страница 2: ...elling punctuation indexing the physical location of the material or complete page additions are not identified by revision lines Revisions to Service Manual 761 639 issued December 15 1976 are as fol...

Страница 3: ...RFACE CONTROLS 1F6 VI HYDRAULIC SYSTEM 1H5 VII LANDING GEAR AND BRAKE SYSTEM 1I22 AEROFICHE CARD NO 2 VIII POWER PLANT CONTINENTAL 2A9 VIIIA POWER PLANT LYCOMING 2C18 IX FUEL SYSTEM 2E8 X INSTRUMENTS...

Страница 4: ...THIS PAGE INTENTIONALLY LEFT BLANK 1A4...

Страница 5: ...t Continental Power Plant Propeller and Control Pivot Points 1C22 2 22 Lubrication Chart Back Up Extender 1C23 2 23 Lubrication Chart Air Conditioning Condenser 1C24 4 1 Aileron and Flap Installation...

Страница 6: ...yne 1H15 6 4 Tests and Adjustments of Hydraulic Pump 1H16 6 5 Checking Aligning Brackets of Gear Back Up Extender Actuator 1H21 6 6 Gear Back Up Extender Actuator 1H22 6 7 Nose Gear Actuating Cylinder...

Страница 7: ...B12 8 17 Engine Timing Marks 2B13 8 18 Removing Spring From Lead Assembly 2B15 8 19 Assembly Tool 2B17 8 20 Assembly Tool Application 2B17 8 21 Measuring Lead Assembly Length 2B17 8 22 Ferrule Seating...

Страница 8: ...d Over For Installation of Eyelet 2D23 8A 29 Removing Spark Plug Frozen to Bushing 2E1 9 1 Fuel System Diagram PA 28R 201 2E11 9 1a Fuel System Diagram PA 28R 201 S N s 37001 and up 2E12 9 2 Fuel Syst...

Страница 9: ...32 Temminal Assembly 2H17 11 33 Slip Ring End Bearing Assembly 2H18 11 34 Testing Alternator 2H18 11 35 Brush Installation 2H19 11 36 Internal Wiring Diagram 2H19 11 37 Exploded View of Gear Reductio...

Страница 10: ...Testing Oxygen System 3C3 14 18 Oxygen Tubing Installations 3C4 14 19 Installation of Swageloc Fittings 3C7 14 20 Portable Oxygen Installation 3C14 LIST OF TABLES Aerofiche Table Grid No II I Leading...

Страница 11: ...tity Indicators 2G11 X XIV Oil Temperature Indicators 2G12 X XV Cylinder Head Temperature Gauge 2G14 XI I Alternator Belt Tension 2H10 XI II Alternator Specifications 2H18 XI III Starting Motor Servic...

Страница 12: ...THIS PAGE INTENTIONALLY LEFT BLANK 1A12...

Страница 13: ...ion 1A14 1 4 Wing 1A14 1 5 Empennage 1A14 1 6 Fuselage 1A14 1 7 Landing Gear 1A14 1 8 Hydraulic System 1A15 1 9 Brake System 1A15 1 10 Engine 1A15 1 11 Propeller 1A15 1 12 Fuel System 1A15 1 13 Flight...

Страница 14: ...ction of this manual For detailed operating instructions refer to the Pilot s Information Manual for the airplane Section II of this manual also gives leading particulars and principal dimensions alon...

Страница 15: ...wl with fuel screen and electrical auxiliary fuel pump and an engine driven fuel pump 1 13 FLIGHT CONTROLS The flight controls are conventional equipment consisting of a control wheel which operates t...

Страница 16: ...ng 1B7 2 13 Weighing 1B9 2 14 Leveling 1B9 2 15 Mooring 1B10 2 16 Locking Airplane 1B10 2 17 Parking 1B10 2 18 Towing 1B10 2 19 Taxiing 1B11 2 20 External Power Receptacle 1B11 2 21 Operation of Exter...

Страница 17: ...Inspection 1B19 2 51 Installation of Air Filter 1B19 2 52 Propeller 1B19 2 53 Servicing Propeller 1B19 2 54 Fuel System 1B19 2 55 Servicing Fuel System 1B19 2 56 Filling Fuel Tanks 1B20 2 57 Draining...

Страница 18: ...fuselage vertical stabilizer and rudder is 20 5 inches below the cabin floor as measured at the rear wing spar with the airplane level 2 4 WEIGHT AND BALANCE DATA When figuring various weight and bal...

Страница 19: ...Figure 2 1 Three View of PA 28R 201T Issued 12 15 76 1A19 CHEROKEE ARROW III SERVICE MANUAL HANDLING AND SERVICING...

Страница 20: ...Figure 2 2 Three View of PA 28R 201 Issued 12 15 76 1A20 CHEROKEE ARROW III SERVICE MANUAL HANDLING AND SERVICING...

Страница 21: ...Figure 2 3 Station Reference Lines of PA 28R 201T Issued 12 15 76 1A21 CHEROKEE ARROW III SERVICE MANUAL HANDLING AND SERVICING...

Страница 22: ...Figure 2 4 Station Reference Lines of PA 28R 201 Issued 12 15 76 1A22 CHEROKEE ARROW III SERVICE MANUAL HANDLING AND SERVICING...

Страница 23: ...Figure 2 5 Access Plates and Panels Interim Revision 2 21 95 1A23 CHEROKEE ARROW III SERVICE MANUAL HANDLING AND SERVICING...

Страница 24: ...8 in Oil SAE Number See Table II III See Table II III Oil Sump Capacity 8 U S quarts 8 U S quarts Oil Consumption Maximum 010 lb bhp hr 009 above 75 power Fuel Aviation Grade Minimum and Specified Oct...

Страница 25: ...m in 73 0 72 5 75 0 Blade Angle Low Pitch 12 5 0 2 14 0 0 2 14 4 0 2 Blade Angle High Pitch 29 8 0 5 29 2 29 1 0 Governor Control and Model Hartzell F 2 7 AZ Hartzell E 5 or Woodward G210681 Measured...

Страница 26: ...essure Main 30 PSI 30 PSI FUEL SYSTEM Fuel Tanks Capacity each 38 5 gal 38 5 gal Unusable Fuel each 2 5 gal 2 5 gal Total Capacity 77 gal 77 gal Total Unusable Fuel Refer to Owner s Handbook Pilot s I...

Страница 27: ...ufacturer If the bolt or nut is specified to be lubricated prior to tightening the torque range should be reduced 50 percent 3 Use a bolt length long enough to prevent bearing loads on the threads The...

Страница 28: ...AN 525 NK525 MS 27039 NUTS Steel Tension Steel Shear AN 310 AN 320 AN 315 AN 364 AN 363 NAS 1022 AN 365 MS 17826 NAS 1021 MS 20364 MS 17825 MS 21045 MS 20365 MS 20500 NAS 679 Nut bolt Torque Limits To...

Страница 29: ...AS 679 NAS 1291 Nut bolt Torque Limits Torque Limits Torque Limits Torque Limits Torque Limits Torque Limits size in lbs in lbs in lbs in lbs in lbs in lbs Min Max Min Max Min Max Min Max Min Max Min...

Страница 30: ...drag torque for all self locking fasteners as specified in the friction drag torque table For non self locking fasteners assume the friction drag torque to be zero d For bolt sizes other than those m...

Страница 31: ...nd avoid pushing on the trailing edge of the ailerons for this will result in an out of trim condition 2 12 JACKING Jacking the airplane is necessary to service the landing gear and to perform other s...

Страница 32: ...Figure 2 6 Jacking Arrangement Figure 2 7 Weighing Arrangement Issued 12 15 76 1B8 CHEROKEE ARROW III SERVICE MANUAL HANDLING AND SERVICING...

Страница 33: ...s or while the wheels are on the ground To level the airplane for purposes of weighing or rigging the following procedures may be used a To longitudinally level the airplane partially withdraw the two...

Страница 34: ...cted against adverse weather conditions and presents no danger to other aircraft When parking the airplane for any length of time or overnight it is recommended that it be morred as in Paragraph 2 15...

Страница 35: ...terial that may cause damage to the propeller blades 2 20 EXTERNAL POWER RECEPTACLE 2 21 OPERATION OF EXTERNAL POWER RECEPTACLE The external power receptacle is located on the right side of the fusela...

Страница 36: ...em c Allow the solvent to remain on the gear from five to ten minutes then rinse the gear with additional solvent and allow to dry d Remove the cover from the wheel and remove the catch pan e Lubricat...

Страница 37: ...dle soap or mild soap and water 2 28 CLEANING CARPETS Use a small whisk broom or vacuum to remove dirt For soiled spots use non inflammable dry cleaning fluid 2 29 SERVICING 2 30 INTRODUCTION OF SERVI...

Страница 38: ...Figure 2 10 Servicing Points PA 28R 201 Revised 8 31 77 1B14 CHEROKEE ARROW III SERVICE MANUAL HANDLING AND SERVICING...

Страница 39: ...Figure 2 11 Servicing Points PA 28R 201T Issued 12 15 76 1B15 CHEROKEE ARROW III SERVICE MANUAL HANDLING AND SERVICING...

Страница 40: ...ined at proper strut tube exposures for best oleo action The nose gear strut must have approximately 2 75 inches of piston tube exposed while the main gear strut requires approximately 2 0 inches of t...

Страница 41: ...bubbles cease to flow through the hose compress the strut fully and remove the hose from the valve stem 5 With the strut compressed remove the filler plug to determine that the fluid level is visible...

Страница 42: ...RAKE CYLINDER RESERVOIR The brake cylinder reservoir should be filled to the level marked on reservoir with the fluid specified in Table II I The reservoir located on the left side of the firewall in...

Страница 43: ...emoval instructions 2 52 PROPELLER 2 53 SERVICING PROPELLER The spinner back plate and propeller surfaces should be cleaned and inspected frequently for nicks scratches corrosion and cracks Minor nick...

Страница 44: ...rain each tank through its individual quick drain located at the lower inboard rear corner of the tank making sure that enough fuel has been drained to insure that all water and sediment is removed b...

Страница 45: ...s well as the operation of all lights general condition of the alternator and starter All electrical wires should be inspected for chafing and bare wires For detailed information on this system refer...

Страница 46: ...that oil filter complies with specifications of Continental Aircraft Engine Service Bulletin M75 7 Warranty effectivity is dependent on the use of Continental engine parts per Continental Aircraft En...

Страница 47: ...ed oil passages When an engine has been operating on straight mineral oil and is known to be in excessively dirty condition the switch to additive or compounded oil should be deferred until after the...

Страница 48: ...APPLICATION GREASE Care must be taken when lubricating bearings and bearing surfaces with a grease gun to insure that gun is filled with new clean grease of the grade specified for the particular appl...

Страница 49: ...a number the type of lubricant and the frequency of application Special instructions are listed at the beginning of the lubrication charts and with the applicable component illustration NOTE When the...

Страница 50: ...245 F 1 C to 32 C 82 C 118 C SAE 30 0 F to 70 F 170 F 225 F 17 C to 20 C 77 C 107 C SAE 20 Below 10 F 160 F 210 F 12 C 71 C 99 C PA 28R 201T Average Average Ambient Grade Oil Air Temperature SAE 50 A...

Страница 51: ...ize Graphite Petrolatum Landing Gear Air Valve 6PB Parker Oil MIL G 6032 Lubricating Grease Gasoline and Oil Resistant Pitot and Static TT A 580 JAN A 669 Anti Seize Compound White Lead Base NOTE Lubr...

Страница 52: ...es to Millimeters Refer to Table II V A Example Convert 1 5 inches to millimeters 1 Read down inches column to 1 inches 2 Read across top inch column to 0 5 3 Read down and across to find millimeters...

Страница 53: ...04 0 330 0 355 0 381 0 406 0 431 0 457 0 482 0 02 0 508 0 533 0 558 0 584 0 609 0 635 0 660 0 685 0 711 0 736 0 03 0 762 0 787 0 812 0 838 0 863 0 889 0 914 0 939 0 965 0 990 0 04 1 016 1 041 1 066 1...

Страница 54: ...6 20 78 74 81 28 83 82 86 36 88 90 91 44 93 98 96 52 99 06 4 101 60 104 14 106 68 109 22 111 76 114 30 116 84 119 38 121 92 124 46 5 127 00 129 54 132 08 134 62 137 16 139 70 142 24 144 78 147 32 149...

Страница 55: ...0 32 0 143 33 290 554 0 12 22 10 50 0 148 89 300 572 0 6 67 20 68 0 154 44 310 590 0 1 11 30 86 0 160 00 320 608 0 4 44 40 104 0 165 56 330 626 0 10 00 50 122 0 171 11 340 644 0 15 56 60 140 0 176 67...

Страница 56: ...B AVDP 264 17 GAL 28 35 GRAMS 999 97 LITERS 437 5 GRAINS FEET 0 3048 METERS OUNCES FLUID 29 57 CU CM 12 000 MILS 1 805 CU IN 304 8 MM 0 3333 YARDS LB AVDP 453 6 GRAMS 7000 GRAINS FT LB 0 1383 M KG 16...

Страница 57: ...0 111 2 8194 63 0 037 0 9398 23 64 0 3593 9 1262 13 64 0 2031 5 1594 35 0 110 2 794 64 0 036 0 9144 T 0 358 9 1281 7 0 201 5 1054 7 64 0 1093 2 7781 65 0 035 0 899 S 0 346 8 7884 8 0 199 5 0546 36 0...

Страница 58: ...New York New York 10020 Texaco Aircraft Engine Texaco Inc 135 East 42nd St Oil Premium AD New York New York 10017 PA 28R 201 Lycoming MIL L 6082 Formula LB 1123 Atlantic Richfield Company Lubricating...

Страница 59: ...Building Washington D C 20005 Shell Alvania EP Shell Oil Company 50 West Grease 2 50th St New York New York 10020 Grease High Low Temperature Aero Lubriplate Fiske Bros Refining Company Waterproof Ma...

Страница 60: ...ompany 165 N Canal Gear and Actuator Screw No A72832 Chicago lllinois 60606 Royco 27A Royal Lubricants Company River Road Hanover New Jersy 07936 Aeroshell Grease 7 Shell Oil Company 50 West 50th St N...

Страница 61: ...BRICATING NOTES 1 SEE THE LATEST REVISION OF LYCOMING SERVICE INSTRUCTIONS NO 1014 FOR USE OF DETERGENT OIL WITH LYCOMING ENGINE CAUTIONS 1 DO NOT USE HYDRAULIC FLUID WITH A CASTOR OIL OR ESTER BASE 2...

Страница 62: ...R DOOR CONTROL ROD ENDS MIL L7870 100 HRS 7 MAIN GEAR SIDE BRACE LINK ASSEMBLY MIL LG 23827 100 HRS 8 UPPER SIDE BRACE SWIVEL FITTING MIL G 23827 100 HRS 9 MAIN GEAR DOWNLOCK ASSEMBLY RETRACTION FITTI...

Страница 63: ...IL EP2 GREASE 100 HRS 7 NOSE GEAR DRAG LINK ASSEMBLIES MIL L 7870 100 HRS 8 NOSE GEAR TORQUE LINK ASSEMBLY AND STRUT HOUSING MIL G 23827 100 HRS 9 DOWNLOCK ROLLER TENSION SPRING SHIMMY DAMPENER AND AL...

Страница 64: ...L 7870 100 HRS 5 CONTROL CABLE PULLEYS MIL L 7870 100 HRS 6 TRIM CONTROL WHEEL MIL L 7870 100 HRS 7 O RING CONTROL SHAFT BUSHING PARKER O RING LUBRICANT AS REQUIRED 8 TEE BAR PIVOT POINT MIL L 7870 10...

Страница 65: ...PIVOT POINT LOCK MECHANISM AND TURNBUCKLE END MIL L 7870 100 HRS 4 FLAP RETURN AND TENSION CHAINS MIL L 7870 100 HRS 5 AILERON CONTROL ROD END BEARINGS MIL L 7870 100 HRS 6 AILERON BELLCRANK CABLE END...

Страница 66: ...100 HRS 2 TOE BRAKE CYLINDER ATTACHMENTS MIL L 7870 100 HRS 3 RUDDER TUBE CONNECTIONS MIL L 7870 100 HRS 4 BRAKE ROD ENDS MIL L 7870 100 HRS Figure 2 17 Lubrication Chart Control System cont Issued 1...

Страница 67: ...LATE OR MAG 1 FISKE BROS REFINING CO 100 HRS 3 STABILATOR SCREW TAB LINKS MIL L 7870 100 HRS 4 STABILATOR HINGE POINTS MIL L 7870 100 HRS 5 RUDDER TRIM ASSEMBLY MIL L 7870 100 HRS Figure 2 18 Lubricat...

Страница 68: ...BROS REFINING CO 500 HRS 4 SEAT TRACK ROLLERS STOP PINS AND REAR SEAT AERO LUBRIPLATE OR LEG RETAINER CLIP AND CAM MAG 1 FISKE BROS REFINING CO 100 HRS 5 SEAT LATCH STOP PIVOT POINT COPILPT MIL L 7870...

Страница 69: ...E OIL FILTERS 50 HRS 3 AIR FILTERS CLEAN AS OFTEN AS NECESSARY EVERYDAY UNDER SEVERE CONDITIONS 4 PROPELLER ASSEMBLY MIL G 23827 100 HRS 5 ENGINE CONTROL AND ENVIRONMENTAL CONTROL PIVOT POINTS MIL L 7...

Страница 70: ...NECESSARY EVERYDAY UNDER SEVERE CONDITIONS 4 ALTERNATE AIR DOOR MIL L 7870 100 HRS 5 PROPELLER ASSEMBLY MIL G 23827 100 HRS 6 ENGINE CONTROL AND ENVIRONMENTAL CONTROL PIVOT POINTS MIL L 7870 100 HRS 7...

Страница 71: ...CK UP EXTENDER LNKS AND CONTROL ARM PIVOT POINTS MIL L 7870 100 HRS 3 BACK UP EXTENDER SPRING ATTACHMENT POINTS MIL L 7870 100 HRS 4 ACTUATING ROD CONTACT POINTS AERO LUBRIPLATE 100 HRS OR MAG 1 Figur...

Страница 72: ...SER HINGE AND ACTUATORS MIL L 7870 100 HRS 2 CONDENSER DOOR ACTUATING TRANSMISSION MIL G 23827 500 HRS Figure 2 23 Lubrication Chart Air Conditioning Condenser Issued 12 15 76 1C24 CHEROKEE ARROW III...

Страница 73: ...troduction 1D2 3 2 Recommended Lubrication 1D2 3 3 Inspection Periods 1D2 3 4 Inspection Requirements 1D2 3 5 Preflight Inspection 1D3 3 6 Overlimits Inspection 1D3 3 7 Special Inspection 1D3 3 8 Serv...

Страница 74: ...ocedure is broken down into eight major groups which are Propeller Engine Cabin Fuselage and Empennage Wing Landing Gear Operational Inspection and General The first column in each group lists the ins...

Страница 75: ...ng navigation and cabin instrument lights are all operating r The fuel selector valve is operating properly s The throttle mixture and propeller controls are all operating properly t All systems are o...

Страница 76: ...ove propeller and clean sludge from propeller and shaft O O 10 Inspect complete propeller assembly for security chafing deterioration wear and correct installation O O O 11 Overhaul propeller per manu...

Страница 77: ...O O O 14 Inspect magneto or oil seal leakage O O O 15 Inspect breaker felts for proper lubrication O O O 16 Inspect distributor block for cracks burned areas or corrosion and height of contact springs...

Страница 78: ...O O O 38 Inspect engine mounts for cracks and loose O O O 39 Inspect rubber engine mount bushings for deterioration replace as reqd or at engine overhaul O O O 40 Inspect all engine baffles and seals...

Страница 79: ...security and safety O O O O 8 Run up engine and check all instruments for smooth steady response O O O O 9 Remove all turbocharger components from the engine Inspect and repair or replace as necessar...

Страница 80: ...acuum pump s with cleaning fluid Cap all openings Refer to latest revision of Lycoming Service Instruction 1221 11 Clean engine O O O 12 Inspect condition of spark plugs clean and adjust as required R...

Страница 81: ...ines Read Note 5 O 32 Clean gascolator bowl and screens O O O O 33 Inspect fuel system for leaks O O O O 34 Inspect condition and operation of fuel pump s engine driven and electric O O O 35 Overhaul...

Страница 82: ...of engine or replace with factory rebuilt Read Note s 5 and 28 O O O 60 Install the engine cowl O O O O E CABIN GROUP WARNING Read Note 28 before completing this inspection group 1 Inspect cabin entr...

Страница 83: ...O 9 Inspect hydraulic pump lines and hoses for damage and leaks O O O 10 Inspect for obstructions and contamination in inlet of backup landing gear extender actuator inlet head if applicable Read Not...

Страница 84: ...er 820 O O O 33 Clean and lubricate all exterior needle bearings O O O 34 Lubricate per lubrication chart in Service Manual Section II O O O O 35 Inspect rotating beacon for security and operation O O...

Страница 85: ...uid and air levels as required O O O O 2 Inspect nose gear steering control and travel O O O 3 Inspect wheels for alignment O O O 4 Lift aircraft on jacks Refer to Service Manual Section II O O O 5 In...

Страница 86: ...ate air operation O O O O 7 Check parking brake operation O O O O 8 Check engine driven vacuum gauge indication O O O O 9 Check gyros for noise and roughness O O O O 10 Check cabin heater operation O...

Страница 87: ...f the valve tips valve keepers springs and spring seals If any indications are found the cylinder and all of its components must be removed including the piston and connecting rod assembly and inspect...

Страница 88: ...ystem installed as standard equipment 28 When servicing or inspecting vendor equipment installed in Piper aircraft it is the user s responsibility to refer to the applicable vendor service publication...

Страница 89: ...Installation of Wing 1E1 4 16 Empennage Group 1E2 4 17 Stabilator 1E2 4 18 Removal of Stabilator 1E2 4 19 Installation of Stabilator 1E3 4 20 Stabilator Trim Tab 1E4 4 21 Removal of Stabilator Trim T...

Страница 90: ...oor Lock Assembly 1E13 4 53 Removal of Baggage Door Hinge 1E14 4 54 Installation of Baggage Door Hinge 1E14 4 55 Structural Repairs 1E14 4 55a Baggage Compartment Inspection Hole and Cover Plate 1E15...

Страница 91: ...ght wing with a key lock installed Each wing panel is an all metal full cantilever semi monocoque type construction with a removable wing tip Installed in each wing ahead of the main spar is a metal f...

Страница 92: ...ers and bolt from the rod end bearing To simplify installation note location of washers removed b Remove the attaching screws with nuts from the hinges at the leading edge of the aileron and remove th...

Страница 93: ...Figure 4 1 Aileron and Flap Installation Issued 12 15 76 1D21 CHEROKEE ARROW III SERVICE MANUAL STRUCTURES...

Страница 94: ...Figure 4 2 Wing Installation Revised 2 13 89 1D22 CHEROKEE ARROW III SERVICE MANUAL STRUCTURES...

Страница 95: ...Figure 4 2 Wing Installation cont Revised 11 21 80 1D23 CHEROKEE ARROW III SERVICE MANUAL STRUCTURES...

Страница 96: ...some identifying manner and attach a line where applicable to cables before drawing them through the fuselage or wing h Disconnect the aileron balance and control cables at the turnbuckles that are lo...

Страница 97: ...ter the nut is torqued h Torque the bolt heads on the upper spar cap and the nuts on the lower spar cap 360 to 390 inch pounds Be certain that the bolts nuts and washers are installed in accordance wi...

Страница 98: ...he fuel valve and check for leaks and flow t Check the operation of all electrical equipment and pitot systems u Remove the airplane from jacks v Install the cockpit trim panel assembly spar box carpe...

Страница 99: ...t revision of Piper Service Bulletin 856 NOTE A clearance of 25 06 of an inch between the stabilator and the side of the fuselage and 18 of an inch minimum between all parts of the stabilator and the...

Страница 100: ...t section of the fuselage c Relieve the cable tension from the rudder control system by loosening one of the cable turnbuckles in the aft section of the fuselage d Disconnect the two control cables fr...

Страница 101: ...Figure 4 4 Empennage Group Installation Revised 11 21 80 1E5 CHEROKEE ARROW III SERVICE MANUAL STRUCTURES...

Страница 102: ...Figure 4 4 Empennage Group Installation cont Revised 11 21 80 1E6 CHEROKEE ARROW III SERVICE MANUAL STRUCTURES...

Страница 103: ...es the leading edge of the fin to the fuselage c Install the stabilator trim assembly and aft trim cable per instructions given in Installation of Stabilator Trim Assembly Section V d Install the rudd...

Страница 104: ...Figure 4 5 Windshield Installation Typical Issued 12 15 76 1E8 CHEROKEE ARROW III SERVICE MANUAL STRUCTURES...

Страница 105: ...inyl tape on the underside of the collar molding install and secure i Seal with sealant any areas around windshield that may allow water to penetrate past the windshield j Remove excess exposed sealer...

Страница 106: ...the door insert the necessary washer combination between the cabin door hinge and fuselage bracket assembly b Additional adjustments may be made by tapping out the serrated door hinge bushings and ro...

Страница 107: ...Figure 4 7 Skin Materials and Thickness Issued 12 15 76 1E11 CHEROKEE ARROW III SERVICE MANUAL STRUCTURES...

Страница 108: ...e the latch assembly into position for installation b Replace the pan and install the five screws and handles c Check the latch assembly for operation and be certain that it is free of rubbing on the...

Страница 109: ...ct maximum curing 7 Remove masking tape if used and clean off excessive adhesive using a clean cloth and mineral spirits or Toluol 8 Install the striker plate 9 Reposition the windlace and secure with...

Страница 110: ...the regulations set forth in FAA Advisory Circular 43 13 lA To assist in making repairs and or replacements Figure 4 7 identifies the type and thickness of various skin material used never make a skin...

Страница 111: ...close out panel 2 Rear close out panel 3 Carpeting from baggage compartment floor c Determine and mark a reference center line running through baggage compartment Refer to Figure 4 8a for measurements...

Страница 112: ...es Using the screw holes in the cover scribe the position for the screw holes on the baggage compartment floor b Drill a 0 120 inch hole in baggage compartment floor at each position layed out in step...

Страница 113: ...of resin fibers and catalyst into the damaged area using the sharp point of a putty knife or stick to press it into the bottom of the hole and to puncture any air bubbles which may be present Fill the...

Страница 114: ...patch and they should all be worked out to the edge Remove excess resin before it gels on the part Allow patch to cure completely j Remove cardboard or aluminum sheet from outside of hole and rough s...

Страница 115: ...ay Compound and Matting Nonslip included in Piper Part No 179 872 4 63 APPLICATION OF LIQUID SAFETY WALK COMPOUND Liquid safety walk compound shall be applied in an area free of moisture for a period...

Страница 116: ...st be maintained in their neutral positions 4 66 CHECKING CONTROL SURFACES FREE PLAY The following checks are recommended before balancing to ascertain the amount of free play in the stabilator stabil...

Страница 117: ...Figure 4 9 Control Surface Balance Tool Issued 12 15 76 1E21 CHEROKEE ARROW III SERVICE MANUAL STRUCTURES...

Страница 118: ...een centered by adjustment of the movable weight 4 68 BALANCING AILERONS Refer to Figure 4 10 Position the aileron on the balancing fixture in a draft free area and in a manner which allows unrestrict...

Страница 119: ...ibed in Paragraph 4 67 Read the scale when the bubble level has been centered by adjustment of the movable weight and determine the static balance limit If the static balance is not within the limits...

Страница 120: ...V I BALANCE SPECIFICATIONS FLIGHT CONDITIONS STATIC BALANCE LIMITS IN LBS SURFACE Leading Edge Heavy Trailing Edge Heavy Ailerons 5 to 13 Stabilators 5 to 40 Rudders 0 to 10 5 Issued 12 15 76 1E24 CHE...

Страница 121: ...trim tab Calibrate the tool as described in Paragraph 4 67 Read the scale when the bubble level has been centered by adjustment of the movable weight and determine the static balance limit If the stat...

Страница 122: ...III Hose clamp tightening initial installation Types of clamps Types of hose Worm screw type All other types Self sealing Finger tight plus Finger tight plus 2 complete turns 2 1 2 complete turns All...

Страница 123: ...ocked stem may damage the sheets It is recommended that a small center drill be used to provide a guide for a larger drill on top of the rivet stem and the tapered portion of the stem be drilled away...

Страница 124: ...Figure 4 15 Identification of Aircraft Fluid Lines Added 5 1 80 1F4 CHEROKEE ARROW III SERVICE MANUAL STRUCTURES...

Страница 125: ...used Refer to Figure 4 16 T Torque desired at the part A Basic lever length from center of wrench shank to center of handle or stamped on wrench or listed for that model wrench B Length of adapter ext...

Страница 126: ...im Control 1F24 5 18 Removal of Stabilator Trim Assembly Forward 1F24 5 19 Installation of Stabilator Trim Assembly Forward 1G1 5 20 Removal of Stabilator Trim Assembly Aft 1G2 5 21 Installation of St...

Страница 127: ...to the control column From the connecting point cables are routed around a series of pulleys down under the floor and aft to the tail section of the airplane The aft end of the cables connect to the...

Страница 128: ...TABLE V I CONTROL SURFACE TRAVEL AND CABLE TENSION Revised 10 l8 83 1F8 CHEROKEE ARROW III SERVICE MANUAL SURFACE CONTROLS...

Страница 129: ...TABLE V I CONTROL SURFACE TRAVEL AND CABLE TENSION cont Issued 12 15 76 1F9 CHEROKEE ARROW III SERVICE MANUAL SURFACE CONTROLS...

Страница 130: ...TABLE V ll CABLE TENSION VS AMBIENT TEMPERATURE Revised 2 13 89 1F10 CHEROKEE ARROW III SERVICE MANUAL SURFACE CONTROLS...

Страница 131: ...Figure 5 1 Control Column Assembly Revised 5 1 80 1F11 CHEROKEE ARROW III SERVICE MANUAL SURFACE CONTROLS...

Страница 132: ...Figure 5 la Method of Installing Rod End Bearings Added 12 11 78 1F12 CHEROKEE ARROW III SERVICE MANUAL SURFACE CONTROLS...

Страница 133: ...tems be installed in the control tube disconnect them at the quick disconnect terminals behind the instrument panel Draw the wires back into the tube and out through the forward end of the tube 4 Remo...

Страница 134: ...buckles located under the floor panel aft of the main spar as instructed in Paragraph 5 12 Before safetying the turnbuckle check that when the ailerons are neutral the control wheels will be neutral a...

Страница 135: ...Figure 5 2 Aileron Controls Revised 11 21 80 1F15 CHEROKEE ARROW III SERVICE MANUAL SURFACE CONTROLS...

Страница 136: ...lley 10 in the forward area of the floor opening aft of the main spar 7 Disconnect the cable 14 or 15 from the control chain 4 at the control column tee bar assembly by removing the cotter pin nut bol...

Страница 137: ...low the cable end to rotate freely on the bellcrank 3 If the primary control cable in the fuselage is installed connect the ends at the turnbuckle 12 or 16 located under the rear seat aft of the main...

Страница 138: ...ivot bolt 25 with the head up Install a washer and nut on the bolt and torque nut within 20 to 25 inch pounds Check that the bellcrank rotates freely with little up down play d Install and adjust cont...

Страница 139: ...with the aft end of the tool even with the trailing edge of the aileron This tool may be fabricated from dimensions given in Figure 5 19 3 With the aileron control rod connected between the bellcrank...

Страница 140: ...actor reading at neutral and up and neutral and down The bubble must be centered at each reading 3 Should the travel not be correct the travel may be set by rotating the bellcrank stops in or out Stop...

Страница 141: ...control cable 4 or 5 may be removed by the following procedure 1 Disconnect the cable end at the balance arm 18 of the stabilator by removing the cotter pin nut washer and bolt 8 2 Remove the cotter...

Страница 142: ...Figure 5 6 Stabilator Controls Revised 5 1 80 1F22 CHEROKEE ARROW III SERVICE MANUAL SURFACE CONTROLS...

Страница 143: ...e of the stabilator and determine that when the stabilator contacts its stops the bubble of the protractor is centered NOTE The stabilator should contact both of its stops before the control wheel con...

Страница 144: ...rim control wheel assembly and or the trim control cables first remove the panel to the aft section of the airplane b If the aft trim cable 12 is not to be removed block the cables at the pulleys 13 i...

Страница 145: ...el to the cable drum by aligning the long lug of the drum with the long slot of the wheel and pushing the two pieces together 3 Wrap the left trim cable on the drum by inserting the swaged ball of the...

Страница 146: ...SSEMBLY AFT Refer to Figure 5 8 a Wrap the trim barrel 20 by first laying the center as measured equally from each end to the center of the cable of the trim cable 12 in the slot of the barrel Bring t...

Страница 147: ...Figure 5 8 Stabilator Trim Control Issued 12 15 76 1G3 CHEROKEE ARROW III SERVICE MANUAL SURFACE CONTROLS...

Страница 148: ...ain correct travels if incorrect adjust by disconnecting the links 25 at the actuating arm rod end 26 and turning the end in or out as required Reconnect links to rod end k Secure the jam nut 27 on th...

Страница 149: ...Figure 5 9 Rudder and Steering Pedal Assembly Issued 12 15 76 1G5 CHEROKEE ARROW III SERVICE MANUAL SURFACE CONTROLS...

Страница 150: ...oles in the center area of the torque tube assembly install bolts washers and nuts 25 and 26 and tighten e Position the torque tube support bracket 35 on the floor tunnel and secure with bolts f Posit...

Страница 151: ...Figure 5 10 Rudder Controls Revised 12 11 78 1G7 CHEROKEE ARROW III SERVICE MANUAL SURFACE CONTROLS...

Страница 152: ...oving the block attaching screws 4 Remove the rudder trim knob and the cover attaching screws 5 Remove the tunnel plate just aft of the tee bar by removing enough carpet from the tunnel to allow the p...

Страница 153: ...12 or 13 in the aft section of the fuselage 4 Set cable tension and check rigging and adjustment per Paragraph 5 29 5 Install tail cone fairing and secure with screws c Install the access panel to th...

Страница 154: ...ition d Disconnect the housing lug from the arm on the rudder pedal torque tube by removing cotter pin nut washer and bolt 7 e Remove the threaded bushing 4 from the aft end of the mounting channel 8...

Страница 155: ...equal travel and hit rudder stops before bottoming out of the trim assembly e With the rudder pedals neutral and no pressure fore or aft on the clevis pin install the assembly cover 1 so that the ind...

Страница 156: ...e spring tension 3 Retract the flap Use caution as forward pressure will be on the handle with the spring disconnected 4 Disconnect the cable from the chain 20 by removing cotter pin nut clevis pin an...

Страница 157: ...Figure 5 15 Flap Controls Interim Revision 2 21 95 1G13 CHEROKEE ARROW III SERVICE MANUAL SURFACE CONTROLS...

Страница 158: ...22 Release the flap handle to the forward position 12 Connect the flap control tube 4 to the flap and or torque tube crank 11 and secure The bolt 12 and bushing that connects the control tube to the c...

Страница 159: ...n pressure on the top of the flap will not allow the flap to go down j Adjust the left stop screw to match the right then tighten its lock nut and remove the 0 125 inch spacer k To set the flap contro...

Страница 160: ...ion hole in each rod end to ascertain that there are sufficient threads remaining and a wire cannot be inserted through these holes Rod ends without check holes maintain a minimum of 375 of an inch th...

Страница 161: ...Figure 5 19 Fabricated Aileron and Flap Rigging Tool Issued 12 15 76 1G17 CHEROKEE ARROW III SERVICE MANUAL SURFACE CONTROLS...

Страница 162: ...Figure 5 20 Fabricated Stabilator Rigging Tool Issued 12 15 76 1G18 CHEROKEE ARROW III SERVICE MANUAL SURFACE CONTROLS...

Страница 163: ...Figure 5 21 Fabricated Rudder Rigging Tool Issued 12 15 76 1G19 CHEROKEE ARROW III SERVICE MANUAL SURFACE CONTROLS...

Страница 164: ...icate system wheel rotation properly Cable tension too high Adjust cable tension Refer to Paragraph 5 12 Control column hori Adjust chain tension zontal chain improperly Refer to Paragraph adjusted 5...

Страница 165: ...rovide clearance between pulleys and brackets Cables not in place on Install cables cor pulleys rectly Cables crossed or Check routing of control routed incorrectly cables Bent stabilator hinge Repair...

Страница 166: ...h 5 12 Correct aileron travel Incorrect rigging of Rig in accordance with cannot be obtained by aileron cables control Paragraph 5 12 adjusting bellcrank wheel and control rod stops Control wheel stop...

Страница 167: ...tighten or replace Trim control wheel System not lubricated Lubricate system moves with excessive properly resistance Cable tension too high Adjust in accordance with Paragraph 5 22 Pulleys binding or...

Страница 168: ...n RUDDER CONTROL SYSTEM Lost motion between Cable tension too low Adjust cable tension rudder pedals and per Paragraph 5 29 rudder Linkage loose or worn Check linkage and tighten or replace Broken pul...

Страница 169: ...ccordance with neutral when rudder incorrectly rigged Paragraph 5 29 is streamlined Incorrect rudder Rudder bellcrank stop Rig in accordance with travel incorrectly adjusted Paragraph 5 29 Nose wheel...

Страница 170: ...ont FLAP CONTROL SYSTEM cont Flaps not synchro Incorrect rigging Adjust flaps per in nized or fail to of system structions in Paragraph move evenly when 5 37 retracted Trouble Cause Remedy Issued 12 1...

Страница 171: ...lH3 INTENTIONALLY LEFT BLANK...

Страница 172: ...lH4 INTENTIONALLY LEFT BLANK...

Страница 173: ...H19 6 14a Operational Check of Retractable Landing Gear System 1H21 6 15 Nose Gear Actuating Cylinder 1H24 6 16 Removal of Nose Gear Actuating Cylinder 1H24 6 17 Disassembly of Nose Gear Actuating Cyl...

Страница 174: ...the instrument panel to the left of the control quadrant As the handle is selected to either the up or down position the pump directs fluid through a single line to a manifold and from that manifold...

Страница 175: ...diaphragm is provided in a mast mounted on the left side of the fuselage above the wing The emergency gear lever used for emergency extension of the gear manually releases hydraulic pressure to permi...

Страница 176: ...Figure 6 1 Schematic Diagram of Hydraulic System Prestolite Revised 2 13 89 1H8 CHEROKEE ARROW III SERVICE MANUAL HYDRAULIC SYSTEM...

Страница 177: ...Figure 6 la Schematic Diagram of Hydraulic System Oildyne Revised 2 13 89 1H9 CHEROKEE ARROW III SERVICE MANUAL HYDRAULIC SYSTEM...

Страница 178: ...Figure 6 2 Hydraulic System Installation Revised 2 13 89 1H10 CHEROKEE ARROW III SERVICE MANUAL HYDRAULIC SYSTEM...

Страница 179: ...Figure 6 2a Hydraulic System Installation S N s 2837001 PA 28R 201 and Up and S N s 2803001 PA 28R 201T and Up Revised 2 13 89 1H11 CHEROKEE ARROW III SERVICE MANUAL HYDRAULIC SYSTEM...

Страница 180: ...r the hydraulic pump has been removed from the airplane cap or plug all ports and clean the exterior of the pump with a dry type solvent to remove accumulated dust or dirt To disassemble any one of th...

Страница 181: ...commutator wear and excess bearing wear e Repairs are limited to O ring and brush replacement as follows 1 One brush holder has the winding wire attached Locate this wire and remove by using a solderi...

Страница 182: ...Figure 6 3 Hydraulic Pump Reservoir Exploded View Prestolite Revised 2 13 89 1H14 CHEROKEE ARROW III SERVICE MANUAL HYDRAULIC SYSTEM...

Страница 183: ...Figure 6 3a Hydraulic Pump Reservoir Exploded View Oildyne Revised 2 13 89 1H15 CHEROKEE ARROW III SERVICE MANUAL HYDRAULIC SYSTEM...

Страница 184: ...Figure 6 4 Test and Adjustments of Hydraulic Pump Prestolite Revised 2 13 89 1H16 CHEROKEE ARROW III SERVICE MANUAL HYDRAULIC SYSTEM...

Страница 185: ...uct motor operational check not to exceed 10 seconds running time 6 9 TEST AND ADJUSTMENT OF HYDRAULIC PUMP PRESTOLITE Refer to Figure 6 4 a Test Equipment 1 Hydraulic pump and mounting base 2 Pressur...

Страница 186: ...tomatic Reset Time 12 seconds max Location Automatic Reset Commutator end head of motor Mechanical Characteristics Prestolite Only Bearings Absorbent bronze Drive end bearing in upper pump and valve a...

Страница 187: ...on battery shelf e Check fluid level in pump Fill per instructions given in Section II f With the airplane on jacks operate the pump to purge the hydraulic system of air and check for leaks After oper...

Страница 188: ...THIS PAGE INTENTIONALLY LEFT BLANK Revised 2 13 89 1H20 CHEROKEE ARROW III SERVICE MANUAL HYDRAULIC SYSTEM...

Страница 189: ...hould they misalign it may be necessary to reform the main fuselage mounting bracket To reform the main fuselage mounting bracket an Aligning Tool may be used Refer to Figure 6 5 This tool may be fabr...

Страница 190: ...Figure 6 6 Gear Back up Extender Actuator Revised 2 13 89 1H22 CHEROKEE ARROW III SERVICE MANUAL HYDRAULIC SYSTEM...

Страница 191: ...position then the diaphragm is possible defective 2 If it is determined that the diaphragm is defective then remove the Back Up Extender per instructions given in paragraph 6 12 and install Piper Kit...

Страница 192: ...d to power OFF Gear unsafe light and horn will indicate when power is reduced At 120 KIAS for 28R 201T or 110 KIAS for 28R 201 slow the airplane at a rate of one 1 knot per second until 103 KIAS for P...

Страница 193: ...een gear extension and retraction Place the selector switch in the UP position at 107 KIAS In approximately S to 10 seconds all the gear indicating lights should be out indicating that the gear is fil...

Страница 194: ...icate when the throttle setting is less than 14 2 inches of manifold pressure or when flaps are set beyond 10 for aircraft that complied with Piper Service Bulletin 866A Part I and have the back up ex...

Страница 195: ...Figure 6 7 Nose Gear Actuating Cylinder Revised 2 13 89 1I3 CHEROKEE ARROW III SERVICE MANUAL HYDRAULIC SYSTEM...

Страница 196: ...parts with a suitable dry type solvent and dry thoroughly b Inspect the cylinder assembly for the following 1 Interior walls of the cylinder and exterior surfaces of the piston for scratches burrs co...

Страница 197: ...acks 6 21 MAIN GEAR ACTUATING CYLINDER 6 22 REMOVAL OF MAIN GEAR ACTUATING CYLINDER a Place the airplane on jacks Refer to Jacking Section II b Disconnect the hydraulic lines from the actuating cylind...

Страница 198: ...Figure 6 9 Main Gear Actuating Cylinder Revised 2 13 89 1I6 CHEROKEE ARROW III SERVICE MANUAL HYDRAULIC SYSTEM...

Страница 199: ...the exterior of the end gland 1 b Install O ring 3 and back up ring 2 in the interior of the end gland c Install O ring 8 on the body of the piston assembly d Lubricate the areas around the O rings wi...

Страница 200: ...ment panel until the gear is fully retracted The hydraulic pump should stop operating after full gear retraction d Place the gear in the DOWN position The gear should extend and lock in position and t...

Страница 201: ...30 SERVICING HYDRAULIC PUMP RESERVOIR The fluid level of the reservoir of the combination pump and reservoir should be checked every 50 hours by viewing the fluid through the filler plug hole in the P...

Страница 202: ...it wires broken Safety squat switch Readjust switch Refer out of adjustment to Adjustment of Safety Switch Section VII Squat switch Replace switch inoperative Pressure switch Replace switch inoperativ...

Страница 203: ...rating level Battery low or dead Check condition of battery Pressure head air passage obstructed Pressure head Reconnect hose hose off Split or hole in Replace unit diaphragm of auxiliary extender Can...

Страница 204: ...e pump can be heard to actuate when operating the gear selector switch it may be assumed that the gear control circuit is operating properly and the actuator circuit should be further checked Gear sel...

Страница 205: ...termine cause for overload Pressure switch out Remove and readjust of adjustment or replace switch Mechanical restriction Place airplane on jacks or obstruction in hy and run retraction draulic system...

Страница 206: ...ing cylinders for internal leakage Check for internal damage to hydraulic pump Extemal leakage Check back up extension of system unit valve or free fall valve for external leakage Check gear actuating...

Страница 207: ...Replace switch switch failed NOTE The out of adjustment or failed switch may be determined by noting which down light is not lit Pump running Leakage of high Remove pump and intermittently pressure c...

Страница 208: ...luid operating level All gears fail to Back up extension unit Check unit and valve free fall valve fails to open and replace Back up free fall Check valve and valve fails to open replace Gear free fal...

Страница 209: ...actuator arm Binding of diaphragm Clean all moving parts shaft caused by build up of sand or dirt Landing gear will not Restriction in pressure Disconnect hoses at retract after selecting head of gear...

Страница 210: ...reaker opens With override lever up Auto extension off Adjust switch Refer auto extension off light switch actuator out to Paragraph 6 2 for fails to operate of adjustment switch location by moving mo...

Страница 211: ...Figure 6 10 Gear Back Up Extender Actuator Aligning Tool Revised 2 13 89 1I19 CHEROKEE ARROW III SERVICE MANUAL HYDRAULIC SYSTEM...

Страница 212: ...GRIDS lI20 AND lI21 INTENTIONALLY LEFT BLANK Revised 2 13 89 1I20 CHEROKEE ARROW III SERVICE MANUAL HYDRAULIC SYSTEM...

Страница 213: ...djustment of Nose Gear Doors 1J21 7 19 Main Landing Gear System 1J21 7 20 Disassembly of Main Gear Oleo 1J21 7 21 Cleaning Inspection and Repair of Main Gear Oleo 1J22 7 22 Assembly of Main Gear Oleo...

Страница 214: ...emoval and Disassembly of Wheel Brake Assembly 1K13 7 55 Cleaning Inspection and Repair of Wheel Assemblies 1K14 7 56 Assembly and Installation of Wheel Brake Assembly 1K14 7 57 Brake Master Cylinder...

Страница 215: ...wn and locked position This circuit is controlled by the three paralleling down limit switches connected in series with a throttle switch see Figure 7 15 located in the control quadrant When the airpl...

Страница 216: ...le and may be used by pulling back on the handle and pushing forward on the button to the left of the handle To release the hand brake pull aft on the handle and allow it to swing forward Hydraulic fl...

Страница 217: ...per and lower cylinder bushings loose or turning in cylinder 6 Orifice plate for hole restriction 7 Fork tube for corrosion scratches nicks dents and misalignment 8 Air valve general condition c Repai...

Страница 218: ...Figure 7 1 Nose Gear Oleo Strut Assembly Revised 2 13 89 1J3 CHEROKEE ARROW III SERVICE MANUAL LANDING GEAR AND BRAKE SYSTEM...

Страница 219: ...Figure 7 1 Nose Gear Oleo Strut Assembly cont Revised 2 13 89 1J4 CHEROKEE ARROW III SERVICE MANUAL LANDING GEAR AND BRAKE SYSTEM...

Страница 220: ...strut to extend o Service the oleo strut with fluid and air Refer to Oleo Struts Section II p Check nose gear for alignment refer to paragraph 7 13 and gear operation 7 9 REMOVAL OF NOSE LANDING GEAR...

Страница 221: ...Figure 7 2 Nose Gear Installation Interim Revision 2 21 95 1J6 CHEROKEE ARROW III SERVICE MANUAL LANDING GEAR AND BRAKE SYSTEM...

Страница 222: ...lower drag links setting them on a surface table and ascertaining that when the stop surfaces of the two links touch linkage is not less than 062 to 125 nor more than 125 to 250 of an inch through cen...

Страница 223: ...hat the landing gear is lubricated per Lubrication Chart Section II h Check adjustment of the gear per Paragraph 7 12 or 7 13 i Install engine cowling The cowl support jacks located at each forward si...

Страница 224: ...er safety hole in actuator rod 6 Recheck 10 inch minimum rod travel remains to fill extension f Hook up cylinder rod end bearing and retract gear Recheck all adjustments and retighten the jam nut on t...

Страница 225: ...Figure 7 4 Nose Gear Adjustment PA 28R 201T Revised 2 13 89 1J10 CHEROKEE ARROW III SERVICE MANUAL LANDING GEAR AND BRAKE SYSTEM...

Страница 226: ...bearing with downlock hook 12 if connection can not be made loosen the jam nut that secures the rod end bearing and turn rod end bearing until hook up can be accomplished Tighten jam nut and check th...

Страница 227: ...parallel the straight edge with the chalk line l Install the nose wheel bungees in their neutral position no load on the bungee springs Adjust bungee rod ends as necessary m Place a bubble protractor...

Страница 228: ...Figure 7 7 Nose Gear Door Retraction Mechanism PA 28R 201 Revised 2 13 89 1J13 CHEROKEE ARROW III SERVICE MANUAL LANDING GEAR AND BRAKE SYSTEM...

Страница 229: ...RING TENSION 4 ARM ASSEMBLY 5 BOLT NUT 6 NUT BOLT WASHER BUSHING COTTER PIN 7 ROLLER 8 BRACKET Figure 7 8 Nose Gear Door Retraction Mechanism PA 28R 201T Revised 2 13 89 1J14 CHEROKEE ARROW III SERVIC...

Страница 230: ...Figure 7 9 Main Gear Oleo Strut Assembly Revised 2 13 89 1J15 CHEROKEE ARROW III SERVICE MANUAL LANDING GEAR AND BRAKE SYSTEM...

Страница 231: ...REFER TO PRECEDING PAGE FOR CALLOUTS Figure 7 9 Main Gear Oleo Strut Assembly cont Revised 2 13 89 1J16 CHEROKEE ARROW III SERVICE MANUAL LANDING GEAR AND BRAKE SYSTEM...

Страница 232: ...AMETER HARDWARE IS USED UPON REASSEMBLY STANDARD AN4 OR AN5 BOLTS ARE REPLACED BY ALTERNATE OVERSIZED BOLTS NAS3004 OR NAS3005 RESPECTIVELY WHEN OVERSIZED HARDWARE IS REQUIRED 2 WHEN NEW BUSHINGS P N...

Страница 233: ...Figure 7 10 Main Gear Installation cont Revised 2 13 89 1J18 CHEROKEE ARROW III SERVICE MANUAL LANDING GEAR AND BRAKE SYSTEM...

Страница 234: ...Figure 7 11 Aligning Main Gear Revised 2 13 89 1J19 CHEROKEE ARROW III SERVICE MANUAL LANDING GEAR AND BRAKE SYSTEM...

Страница 235: ...d tension below minimum allowable tolerance Reject springs if load tension is below 8 0 pounds pull at 4 75 inches for the PA 28R 201 or below 20 0 pounds pull at 4 00 inches for the PA 28R 201T e Che...

Страница 236: ...er to Figure 7 9 The main gear oleo assembly may be removed and disassembled from the gear oleo housing with the gear removed from or installed on the airplane a Place the airplane on jacks Refer to J...

Страница 237: ...er the snap ring 24 washer 23 lower bearing 20 with outer and inner O rings 19 and 21 and upper bearing 18 Align the two 125 diameter holes and the lock pin holes with the corresponding holes in the p...

Страница 238: ...side of the wing through the hole in the web and removing the bolt 48 that secures the tube in the housing Insert a hook through the bolt hole in the tube and slide it aft from the support fitting Rem...

Страница 239: ...described in Section II a Insert a gear support bearing 53 or 54 in each support fitting 1 or 16 and secure with snap ring 2 Check bearing 53 for excess end play shim as necessary with shim washers 49...

Страница 240: ...airplane laterally and longitudinally Refer to Leveling Section II c Disconnect the gear door actuating rods at either the door or the housing as desired by removing the rod attachment bolt Secure th...

Страница 241: ...emergency gear extension lever and moving the gear selector handle to the up position Retain the emergency extension lever in the up override position The piston of the cylinder should be bottomed Th...

Страница 242: ...lt connecting the upper and lower torque links and remove or add spacer washers to move the wheel in the desired direction Refer to the chart on the following page e Should a condition exist that all...

Страница 243: ...oor by removing nut washers and bolt b Remove the door from the wing panel by bending the door hinge pin straight and from the other end pulling out the pin c The door retraction rod may be removed fr...

Страница 244: ...ne on jacks Refer to Jacking Section II NOTE Do not bend the actuator springs mounted on the limit switches 7 33 ADJUSTMENT OF NOSE GEAR UP LIMIT SWITCH The gear up limit switch is mounted on a bracke...

Страница 245: ...ocated on the downlock hook and move it toward the switch until it is heard to actuate Retighten the actuator screws d Manually move the hook from the locked to the unlocked position and ascertain tha...

Страница 246: ...H SQUAT SWITCH The landing gear safety switch located on the left main gear housing is adjusted so that the switch is actuated within the last quarter of an inch of gear extension a Compress the strut...

Страница 247: ...Figure 7 14 Flap Torque Tube Cam Gear Warning Switch Installation Revised 2 13 89 1K8 CHEROKEE ARROW III SERVICE MANUAL LANDING GEAR AND BRAKE SYSTEM...

Страница 248: ...uadrant cover into position around the controls far enough to allow the cover reinforcement clip to be installed to the top underside of the cover and secure with screws e Install the cover and secure...

Страница 249: ...ess or failure c Check internal diameter of felt grease seals Replace the felt grease seal if surface is hard or gritty d Check tire for cuts internal bruises and deterioration e Check bearing cones a...

Страница 250: ...separated by first deflating the tire With the tire sufficiently deflated remove the wheel through bolts 16 Pull the wheel halves from the tire by removing the inner half 8 from the tire first and th...

Страница 251: ...inflate tire b Lubricate the bearing cones 6 or 10 and install the cones grease seals 4 or 11 seal retainer rings 2 or 13 and felt rings 3 or 12 Secure with snap rings 1 or 14 c Slide the wheel on the...

Страница 252: ...comes worn below 100 of an inch or unevenly worn 7 54 REMOVAL AND DISASSEMBLY OF WHEEL BRAKE ASSEMBLY Refer to Figure 7 18 a To remove the brake assembly first disconnect the brake line from the brake...

Страница 253: ...linder housing until flush with surface of housing b Slide the lining pressure plate onto the anchor bolts of the housing c Slide the cylinder housing assembly on the torque plate of the gear d Positi...

Страница 254: ...Figure 7 19 Removal of Anchor Bolt Revised 2 13 89 1K15 CHEROKEE ARROW III SERVICE MANUAL LANDING GEAR AND BRAKE SYSTEM...

Страница 255: ...Figure 7 20 Installation of Anchor Bolt Revised 2 13 89 1K16 CHEROKEE ARROW III SERVICE MANUAL LANDING GEAR AND BRAKE SYSTEM...

Страница 256: ...When installing teflon O ring 5 on piston it is recommended that it be installed with the use of a cone placed against the piston The cone may be constructed of plastic or metal with dimensions shown...

Страница 257: ...Figure 7 21 Brake System Installation Revised 2 13 89 1K18 CHEROKEE ARROW III SERVICE MANUAL LANDING GEAR AND BRAKE SYSTEM...

Страница 258: ...3 The piston rod assembly may be disassembled by first removing the retaining ring 2 and securing the sleeve and then the spring 4 piston 6 seal 7 fitting 8 and if desired the large return spring I 1...

Страница 259: ...Figure 7 23 Toe Brake Installation Revised 2 13 89 1K20 CHEROKEE ARROW III SERVICE MANUAL LANDING GEAR AND BRAKE SYSTEM...

Страница 260: ...Figure 7 25 Brake Cylinder 10 27 Toe Brake Revised 2 13 89 1K21 CHEROKEE ARROW III SERVICE MANUAL LANDING GEAR AND BRAKE SYSTEM...

Страница 261: ...stall on the rod 12 in order the roll pin 14 washer 13 spring 11 washer 9 packing gland 7 with O rings seal 5 piston assembly 3 with O ring spring 2 and roll pin 15 3 Insert the piston rod assembly in...

Страница 262: ...t the fluid reservoir and the bleeder fitting on the gear being bled it can be determined whether any air is left in the system If air bubbles are evident filling of the system shall be continued unti...

Страница 263: ...sure builds up in the system At this time crack the attaching B nuts at any of the hose connections of the replaced unit Most of the handle sponge feeling should be displaced by this action Retighten...

Страница 264: ...Figure 7 26 Bleeding Brakes Revised 2 13 89 1L1 CHEROKEE ARROW III SERVICE MANUAL LANDING GEAR AND BRAKE SYSTEM...

Страница 265: ...witch retracted Nose gear up limit Check gear up adjustment switch out of ad and readjust up limit justment switch Main gear not Check gear up retracting far adjustment enough to actuate switch Red ge...

Страница 266: ...r unsafe light and Indicator lights circuit Reset circuit breaker and all green lights out breaker open determine cause for open circuit breaker NOTE Ensure that Light circuit wire Check wiring naviga...

Страница 267: ...hode to terminal ends of wires G2S and G2U Green gear down lights Failed instrument panel Replace switch dim though position light control switch light switch is off and Lights grounding gear is down...

Страница 268: ...eplace tire if necessary Worn or loose wheel Replace and or adjust bearings wheel bearings Worn torque link bolts Replace bolts and or and or bushings bushings Excessive or uneven Incorrect operating...

Страница 269: ...en when sheared at top of roller landing gear extends strut Incorrect rigging of Check nose gear nose gear steering steering adjustment Nose gear fails to Centering guide roller Replace roller straigh...

Страница 270: ...e parts in strut Landing gear doors Landing gear not re Check adjustment of fail to completely tracting completely landing gear close Door retraction mechanism Check adjustment out of adjustment Red g...

Страница 271: ...p position with gear extended and throttle retarded Above condition on Defective safety squat Replace switch ground switch Above condition in Pressure switch open Replace switch the air Hydraulic pump...

Страница 272: ...Figure 7 27 Nose Gear Service Tolerances Revised 2 13 89 1L9 CHEROKEE ARROW III SERVICE MANUAL LANDING GEAR AND BRAKE SYSTEM...

Страница 273: ...7144 00 Drag link lower ID 3120 ID 3120 002 3130 3140 8 44386 2 Steering arm ID 4370 ID 4370 0015 4385 4385 9 14976 11 Bushing steering arm ID 312 ID 312 002 Press fit 313 314 10 67054 03 Trunnion hou...

Страница 274: ...3760 18 21831 04 Shimmy damper fitting ID 249 ID 247 003 bearing 251 252 19 20735 05 Torque link ID 312 ID 312 002 313 314 20 20735 00 Torque link ID 377 ID 377 002 3785 3790 21 452 366 Bearing torqu...

Страница 275: ...Figure 7 28 Main Gear Service Tolerances Revised 2 13 89 1L12 CHEROKEE ARROW III SERVICE MANUAL LANDING GEAR AND BRAKE SYSTEM...

Страница 276: ...4 support 4385 4395 7 65003 41 Bushing side brace ID 373 ID 372 004 support stud 375 376 8 67025 2 Link upperside brace ID 4945 ID 4925 4935 9 14843 16 2 Bushing side brace ID 376 ID 374 Press Fit Ins...

Страница 277: ...sting 19 402 960 Bolt Trunnion side OD 4991 OD 4972 NAS 464 brace attaching 0000 P8A 44 0009 20 67926 04 Trunnion housing ID 4410 ID 4410 67926 05 torque link attachment 4430 4440 21 67026 07 2 Bearin...

Страница 278: ...GRIDS 1L15 THRU 1L24 INTENTIONALLY LEFT BLANK Revised 2 13 89 1L15 CHEROKEE ARROW III SERVICE MANUAL LANDING GEAR AND BRAKE SYSTEM...

Страница 279: ...ARROW III TURBO ARROW III ARROW SERVICE MANUAL CARD 2 OF 3 PA 28R 201 201T PIPER AIRCRAFT CORPORATION PART NUMBER 761 639 2A1 Courtesy of Bomar Flying Service www bomar biz...

Страница 280: ...elling punctuation indexing the physical location of the material or complete page additions are not identified by revision lines Revisions to Service Manual 761 639 issued December 15 1976 are as fol...

Страница 281: ...RFACE CONTROLS 1F6 VI HYDRAULIC SYSTEM 1H5 VII LANDING GEAR AND BRAKE SYSTEM 1I22 AEROFICHE CARD NO 2 VIII POWER PLANT CONTINENTAL 2A9 VIIIA POWER PLANT LYCOMING 2C18 IX FUEL SYSTEM 2E8 X INSTRUMENTS...

Страница 282: ...gth 2B17 8 22 Ferrule Seating Tool 2B19 8 23 Measuring Wire From Top of Ferrule 2B19 8 24 Needle 2B19 8 25 Installing Grommet Over Lead Assemblies 2B19 8 26 Lead Assembly Installed in Grommet 2B20 8 2...

Страница 283: ...d Over For Installation of Eyelet 2D23 8A 29 Removing Spark Plug Frozen to Bushing 2E1 9 1 Fuel System Diagram PA 28R 201 2E11 9 1a Fuel System Diagram PA 28R 201 S N s 37001 and up 2E12 9 2 Fuel Syst...

Страница 284: ...32 Terminal Assembly 2H17 11 33 Slip Ring End Bearing Assembly 2H18 11 34 Testing Alternator 2H18 11 35 Brush Installation 2H19 11 36 Internal Wiring Diagram 2H19 11 37 Exploded View of Gear Reduction...

Страница 285: ...X VII Magnetic Compass 2G5 X VIII Manifold Pressure Indicator 2G6 X IX Tachometer 2G7 X X Engine Oil Pressure Gauge 2G8 X XI Fuel Pressure Gauge 2G9 X XII Turn and Bank Indicator 2G10 X XII Fuel Quan...

Страница 286: ...THIS PAGE INTENTIONALLY LEFT BLANK Revised 2 13 89 2A8...

Страница 287: ...r 2A17 8 15 Installation of Propeller Governor 2A18 8 16 Rigging and Adjustment of Propeller Governor 2A18 8 17 Engine 2A19 8 18 Removal of Engine 2A19 8 19 Installation of Engine 2A22 8 20 Engine Sho...

Страница 288: ...ugs 2B22 8 47 Inspection and Cleaning of Spark Plugs 2B23 8 48 Installation of Spark Plugs 2B23 8 49 Lubrication System 2B24 8 50 Description 2B24 8 51 Oil Filter Replacement 2C1 8 52 Engine Fuel Syst...

Страница 289: ...may be blocked off if lines are inadvertently installed with dust caps in the tube ends 4 Should any items be dropped into the engine the assembly process must stop and the item removed even though t...

Страница 290: ...e probable causes and suggested remedies When troubleshooting engine propeller or fuel system always ground the magneto primary circuit before performing any checks 8 4 ENGINE COWLING 8 5 REMOVAL OF E...

Страница 291: ...T OFF position a Remove the hardware that attaches the nose cowl and remove the cowl The top and side panels may be removed for greater accessibility b Remove the safety wire from the propeller mounti...

Страница 292: ...Figure 8 3 Propeller Installation Revised 8 31 77 2A14 CHEROKEE ARROW III SERVICE MANUAL POWER PLANT CONTINENTAL...

Страница 293: ...igure 8 4 for propeller blade care h Check the condition of the propeller mounting nuts and studs i Each blade face should be sanded lightly with fine sandpaper and painted when necessary with a flat...

Страница 294: ...0 Propeller RPM Setting Engine Static High RPM 2575 RPM max Propeller Torque Limits Description Required Torque Dry Spinner Bulkhead Aft 20 22 foot pounds Propeller Mounting 60 70 foot pounds Spinner...

Страница 295: ...ade down Center the tip and scribe a pencil line as before and check that lines are not separated more than 0625 inch c Propellers having excess blade track should be removed and inspected for bent bl...

Страница 296: ...remove lower cowl access plug See Figure 8 1 2 Adjust the governor by means of the fine adjustment screw for 2575 RPM To do this loosen the high RPM fine adjustment screw locknut and turn the screw i...

Страница 297: ...t contamination 1 Disconnect the magneto P leads at the magnetos m Disconnect the engine vent tube at the engine n Disconnect the engine oil temperature lead at the aft end of the engine o Untie the i...

Страница 298: ...Figure 8 6 Engine Installation Revised 12 11 78 2A20 CHEROKEE ARROW III SERVICE MANUAL POWER PLANT CONTINENTAL...

Страница 299: ...Filter Element Cylinder Head Temperature F No 2 cyl Max Continuous Horsepower Minimum 240 Normal Desired 300 400 Maximum 460 Magnetos Bendix 25 Series Left Bank Fires 20 BTC Lower Right Upper Left Ri...

Страница 300: ...04 to all male fuel system fittings Do not allow to enter system g Route and connect the electrical leads to the appropriate connections on the engine h Connect the tachometer drive cable i Connect ex...

Страница 301: ...Figure 8 7 Schematic Diagram of Turbocharger System Revised 8 31 77 2A23 CHEROKEE ARROW III SERVICE MANUAL POWER PLANT CONTINENTAL...

Страница 302: ...harger requires little attention between overhauls However it is recommended that the items outlined in the Inspection Report Section III be checked periodically 8 22a TURBOCHARGER NOMENCLATURE Many u...

Страница 303: ...will be seen Differential Pressure This controller uses a diaphragm rather than a bellows as is found in Controller the density controller It is used in conjunction with the density controller Its fun...

Страница 304: ...njunction with turbo machinery If you were to take all the air coming from a turbocharger compressor and duct it directly back into the turbine of the turbocharger it would be called a bootstrap syste...

Страница 305: ...tin No 844 NOTE Piper considers service bulletins of utmost importance and compliance mandatory 8 24 INSTALLATION OF TURBOCHARGER a Position turbocharger assembly on the mounting bracket and secure wi...

Страница 306: ...ine functioning excessive exhaust manifold leakage and oil leaks Repair as necessary j Install the upper cowling 8 25 ADJUSTMENT OF TURBOCHARGER Refer to Paragraph 8 61 Step b NOTE A complete inspecti...

Страница 307: ...dampened with clean solvent CAUTION Do not allow foreign materials to drop into or otherwise enter the filter box assembly outlet duct to the turbocharger Failure to take necessary precaution could ca...

Страница 308: ...te the door by operating the control lever in the cockpit to determine that it is not sticking or binding d Check the cockpit control cable for free travel 8 34 IGNITION SYSTEM 8 35 MAGNETOS CAUTION A...

Страница 309: ...ing vendor equipment installed in Piper Aircraft it is the user s responsibility to refer to the applicable vendor publication Figure 8 8a Magneto Assembly Revised 2 13 89 2B7 CHEROKEE ARROW III SERVI...

Страница 310: ...compartment If present it may mean a bad oil seal or oil seal bushing at the drive end Check the magneto manufacturer s overhaul procedure g Remove the breaker cover and harness securing screws and nu...

Страница 311: ...Blot excess oil from washer until flat surfaces take on a frosted appearance and seat washer in its recess in block k Check the capacitor mounting bracket for cracks or looseness Using the Bendix 11...

Страница 312: ...NOTE A true and accurate check of the clearance between flyweight and stop pin can only be obtained by pulling the flyweight outward as described above Do not attempt the check by pushing in on flywe...

Страница 313: ...Loosen the nut securing the drive plate to the magneto shaft sufficiently in order to install the Bendix 11 8465 Rotor Holding Tool under the nut and flat washer as shown in Figure 8 13 Tighten the n...

Страница 314: ...not be obtained 8 After timing is complete tighten breaker securing screws to 20 to 25 inch pounds and recheck settings Remove timing kit parts b The internal timing can be checked without a timing ki...

Страница 315: ...Replace breaker assembly if E gap tolerance and contact clearance cannot be obtained Tighten breaker screws to 20 to 25 inch pounds and recheck breaker settings 8 39 MAGNETO INSTALLATION AND TIMING PR...

Страница 316: ...each end Tighten the magneto attachment nuts and replace the plug in the inspection hole on top of the engine 8 40 HARNESS ASSEMBLY 8 41 INSPECTION OF HARNESS a Check the lead assemblies for nicks cu...

Страница 317: ...d connected to the magneto turn the engine slightly and repeat test to confirm the reading f A second acceptable method for performing an insulation check is with a high voltage direct current tester...

Страница 318: ...t length of conductor out of grommet and cable outlet plate 4 Using a 3 inch long 0 270 of an inch diameter drift applied at outer surface of plate drive out tapered ferrule and remaining pieces of in...

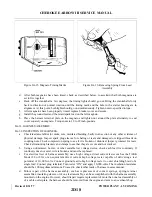
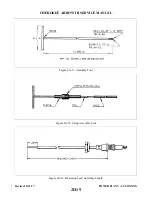
Страница 319: ...Figure 8 19 Assembly Tool Figure 8 20 Assembly Tool Application Figure 8 21 Measuring Lead Assembly Length Revised 8 31 77 2B17 CHEROKEE ARROW III SERVICE MANUAL POWER PLANT CONTINENTAL...

Страница 320: ...gh cable outlet plate until cleaned braid binds in the outlet well Position the Bendix 11 7074 Ferrule Seating Tool Figure 8 22 over the insulation and firmly seat the ferrule by tapping the seating t...

Страница 321: ...rule Seating Tool Figure 8 23 Measuring Wire From Top of Ferrule Figure 8 24 Needle Figure 8 25 Installing Grommet Over Lead Assemblies Revised 8 31 77 2B19 CHEROKEE ARROW III SERVICE MANUAL POWER PLA...

Страница 322: ...y the entire face of the grommet with a light coat of Plastic Mold Spray SM O O TH Silicone Spray or equivalent This will prevent the harness grommet from sticking to the magneto distributor block a P...

Страница 323: ...Figure 8 28 Ignition Schematic Revised 8 31 77 2B21 CHEROKEE ARROW III SERVICE MANUAL POWER PLANT CONTINENTAL...

Страница 324: ...ent torque must be used to unscrew the plug The higher torque in removal is not as detrimental as in installation since it cannot stretch the threaded section It does however impose a shearing load on...

Страница 325: ...deposits c Set the electrode at 015 to 018 inches d Test the spark plug both electrically and for resistance 8 48 INSTALLATION OF SPARK PLUGS Before installing spark plugs ascertain that the threads w...

Страница 326: ...to flow to the engine An oil temperature control unit allows oil to bypass the oil cooler when the oil is cold Some oil flows through the cooler to prevent congealing in cold weather When the oil temp...

Страница 327: ...uel flow to the manifold valve and nozzles thus controlling the fuel air ratio The fuel manifold valve is the central point for dividing fuel to the individual cylinders A diaphragm and plunger valve...

Страница 328: ...Figure 8 31 Schematic Diagram of Fuel Injection System Revised 8 31 77 2C2 CHEROKEE ARROW III SERVICE MANUAL POWER PLANT CONTINENTAL...

Страница 329: ...dean the nozzles immerse in fresh cleaning solvent use compressed air to dry CAUTION Do not use wire or other objects to clean orifices b Inspect the nozzles for cleanliness pay particular attention...

Страница 330: ...Figure 8 33 Engine Controls Revised 8 31 77 2C4 CHEROKEE ARROW III SERVICE MANUAL POWER PLANT CONTINENTAL...

Страница 331: ...ain the required operating limits and insure obtaining good setup results It is important that the following leak check be made before proceeding with any actual system adjustments a Leak Check Gauge...

Страница 332: ...tures must be avoided since setup temperature must closely parallel temperatures in flight 1 Remove the cap from the tee fitting on the right side of the throttle body Refer to Figure 8 34 2 Install a...

Страница 333: ...ly move the mixture control from the full rich position to the idle cut off The engine speed should increase 75 to 100 RPM before beginning to drop toward zero Upper cowling removed 4 If the engine sp...

Страница 334: ...40 9 in Hg manifold 2 Fuel flow should be 23 0 to 23 5 gallons per hour gph with the mixture controls in the full rich position 3 If adjustment is required loosen the jam nut on the adjusting screw l...

Страница 335: ...manifold pressure 2 Lean the engine to 25 F rich of peak exhaust gas temperature EGT 3 Fuel flow at these conditions should be 12 0 0 5 gph 4 With full rich mixture full throttle 2 575 25 RPM and 105...

Страница 336: ...Figure 8 36 Exhaust Bypass Screw CHART VIII I METERED FUEL ASSEMBLY CALIBRATION Revised 12 11 78 2C10 CHEROKEE ARROW III SERVICE MANUAL POWER PLANT CONTINENTAL...

Страница 337: ...CHART VIII II LIMITS FUEL FLOW VS BRAKE H P Revised 8 31 77 2C11 CHEROKEE ARROW III SERVICE MANUAL POWER PLANT CONTINENTAL...

Страница 338: ...l control in FULL RICH position turn fails to keep fuel manifold valve auxiliary pump ON check to be sure feed lines running and filters are not restricted Clean or replace defective components Defect...

Страница 339: ...ck fuel control for idle setting and adjustment Check fuel filters and screens for dirt Check for proper pump pressure and readjust as necessary Restricted fuel Remove and clean all nozzles nozzle Ign...

Страница 340: ...ct entire manifold system for possible leakage intake manifolding at connections Replace damaged components tighten all connections and clamps Fuel nozzles Inspect fuel nozzle vent manifold for leakin...

Страница 341: ...peration Incorrect fuel in Check and adjust using appropriate equipment jector pump adjust Replace defective pump ment and operation Defective fuel in Replace pump if cleaning and lapping valve does n...

Страница 342: ...rly purged lines Low oil pressure Insufficient oil in Add oil or change oil to proper viscosity on engine gauge oil sump oil dilu tion or using im proper grade oil for prevailing ambient temperature H...

Страница 343: ...replace in turbocharger oil supply line Poor engine idle Engine getting fuel Check fuel control for being in full IDLE CUTOFF cutoff position Check auxiliary pump for being OFF Check for leaking fuel...

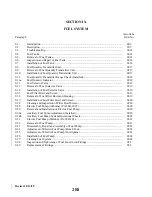
Страница 344: ...2D7 8A 18 Alternate Air Door 2D8 8A 19 Fuel Injector 2D8 8A 20 Fuel Injector Maintenance 2D8 8A 21 Adjustment of Idle Speed and Mixture 2D10 8A 22 Fuel Air Bleed Nozzle 2D10 8A 23 Removal of Fuel Air...

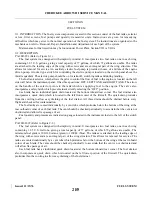
Страница 345: ...kwire washers nuts dirt dust etc This precaution applies whenever work is done on the engine either on or off the aircraft Suitable protective caps plugs and covers must be used to protect all opening...

Страница 346: ...under the engine The large muffler with a heater shroud provides heat for both the cabin and defrosting The engine is provided with a constant speed propeller controlled by a governor mounted on the...

Страница 347: ...Figure 8A 1 Propeller Installation Hartzell Revised 5 1 80 2C21 CHEROKEE ARROW III SERVICE MANUAL POWER PLANT LYCOMING...

Страница 348: ...ed as cracks sometimes start from such places Use fine emery cloth for finishing f Hartzell propellers require grease to the blade hub through zerk fittings Remove one of the two fittings for each pro...

Страница 349: ...ke travel making small marks with a pencil at each position Then center the tip between these marks and scribe a line on the board for the full width of the tip b Carefully rotate propeller by hand to...

Страница 350: ...nt screw will increase or decrease the engine speed approximately 20 RPM 3 Reinstall upper engine cowl and repeat Step b to ascertain proper RPM setting 4 After setting the proper high RPM adjustment...

Страница 351: ...hours time in service d Locate pins in upper cowling NOTE It should not be necessary to replace the pins unless bushing in lower cowling has worn enough to allow damage to the pin Any noticeable notc...

Страница 352: ...he bottom cowl d Remove the propeller Refer to Paragraph 8A 5 e Disconnect the starter positive and ground leads at the starter and their attachment clamps f Disconnect the governor control cable at t...

Страница 353: ...ing to obstruct its removal y Drain the engine oil if desired and then close drain z Remove the four engine mount assemblies and swing the engine free being careful not to damage any attaching parts 8...

Страница 354: ...Figure 8A4 Engine Installation PA 28R 201 Revised 10 18 83 2D4 CHEROKEE ARROW III SERVICE MANUAL POWER PLANT LYCOMING...

Страница 355: ...Figure 8A 4 Engine Installation PA 28R 201 cont Revised 11 21 80 2D5 CHEROKEE ARROW III SERVICE MANUAL POWER PLANT LYCOMING...

Страница 356: ...installing fittings in the oil coolers care should be used to prevent excessive torque being applied to the cooler When a rectangular fitting boss is provided a backup wrench should be used employing...

Страница 357: ...of an inch spring back on the instrument stop when in full rich position 3 Reconnect the rod end to the control arm and safety c Check security of cable casing attachments d Pull the throttle and mixt...

Страница 358: ...air stoppage it will be drawn open c Actuate the door by pushing in on it with the fingers to determine that it is not sticking or binding d Check the cockpit control cable for free travel e Check th...

Страница 359: ...Figure 8A 6 Schematic Diagram of RSA Fuel Injection System Revised 8 31 77 2D9 CHEROKEE ARROW III SERVICE MANUAL POWER PLANT LYCOMING...

Страница 360: ...If the above indicates that the idle adjustment is too rich or too lean turn the idle mixture adjustment in the direction required for correction and check this new position by repeating the above pr...

Страница 361: ...Figure 8A 7 Fuel Air Bleed Nozzle THIS SPACE INTENTIONALLY LEFT BLANK Revised 11 21 80 2D11 CHEROKEE ARROW III SERVICE MANUAL POWER PLANT LYCOMING...

Страница 362: ...nown to be in satisfactory condition and send the suspected unit to the overhaul shop for test and repair d Should this not be possible a visual inspection may disclose the source of trouble Remove th...

Страница 363: ...equivalent check capacitor for capacitance series resistance and leakage Capacitance shall be at least 0 30 microfarads i Check magneto to engine timing as follows 1 Connect Scintilla 11 851 Timing L...

Страница 364: ...assembly of the single breaker magnetos proceed as follows 1 Loosen the nut securing the drive plate to the magneto shaft sufficiently in order to install the Scintilla 11 8465 Rotor Holding Tool und...

Страница 365: ...position Reinstall the 11 8149 Pointer Assembly over 0 mark on timing plate Rotate magnet shaft in normal direction of rotation and check for opening of main contact points at E gap setting 15 2 c If...

Страница 366: ...urate check of the clearance between flyweight and stop pin can only be obtained by pulling the flyweight outward as described above Do not attempt the check by pushing in on flyweight at point A f In...

Страница 367: ...d engine mount the magnetos must be installed from the horizontal position to 20 above the horizontal as shown in Figure 8A 14 Improper installation of magnetos could cause damage or failure NOTE In o...

Страница 368: ...s Check compression spring to see if it is broken or distorted Inspect grommet for tears Check all mounting brackets and clamps to see that they are secure and not cracked b Using an ohmmeter buzzer o...

Страница 369: ...Figure 8A 17 Assembly Tool Figure 8A 18 Using Assembly Tool Figure 8A 19 Measuring Lead Assembly Length Revised 8 31 77 2D19 CHEROKEE ARROW III SERVICE MANUAL POWER PLANT LYCOMING...

Страница 370: ...c Work insulating sleeve and spring retainer assembly into position over the cable and unscrew the tool Install contact spring on cable terminal NOTE It may be necessary to lubricate cable and insulat...

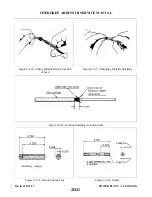
Страница 371: ...From End Figure 8A 21 Unbraiding Metallic Shielding of Lead Figure 8A 22 Forming Shielding Around Ferrule Figure 8A 23 Ferrule Seating Tool Figure 8A 24 Needle Revised 8 31 77 2D21 CHEROKEE ARROW III...

Страница 372: ...the unbraided strands of shielding Form strands of shielding evenly as shown in Figure 8A 22 and pull lead assembly back through cable outlet plate until ferrule binds in the outlet well Position the...

Страница 373: ...igure 8A 26 Installing Grommet Over Lead Ferrule Assemblies Figure 8A 27 Lead Assembly Installed in Grommet Figure 8A 28 Wire Doubled Over for Installation of Eyelet Revised 8 31 77 2D23 CHEROKEE ARRO...

Страница 374: ...easily in this manner the resisting contact between the neoprene collar and the barrel insulator will be broken by a rotary twisting of the collar Avoid undue distortion of the collar and possible sid...

Страница 375: ...the time the carbon dioxide is applied will aid in the removal of an excessively seized plug e Do not allow foreign objects to enter the spark plug hole 8A 38 INSPECTION AND CLEANING OF SPARK PLUG a V...

Страница 376: ...d returning the oil to the sump should the pressure become excessive This valve is not adjustable however particles of metal or other foreign matter lodged between ball and seat will result in a drop...

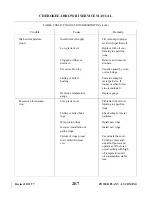
Страница 377: ...starter Mixture in idle cut off Incorrect throttle Open throttle to one setting eight of its range Defective spark plugs Clean and adjust or re place spark plugs Defective ignition wire Check with el...

Страница 378: ...e Uneven cylinder com Check condition of pis pression ton rings and valve seats Faulty ignition system Check entire ignition system Insufficient fuel pres Adjust fuel pressure sure Lower power and une...

Страница 379: ...ire with electric tester Replace de fective wire Defective spark plug Replace connectors on terminal connectors spark plug wire Failure of engine to Leak in the induction Tighten all connections devel...

Страница 380: ...ock or dirt in re Remove and clean oil lief valve pressure relief valve Leak in suction line or Check gasket between pressure line accessory housing and crankcase Dirty oil strainers Remove and clean...

Страница 381: ...en gine is indicated Defective temperature Replace gauge gauge Excessive oil consump Low grade of oil Fill tank with oil con tion forming to specifica tions Failing or failed bear Check sump for metal...

Страница 382: ...Bowl and Screen 2E19 9 16 Removal of Fuel Filter Bowl and Housing 2E19 9 17 Installation of Fuel Filter Bowl and Screen 2E20 9 18 Cleaning and Inspection of Filter Bowl Screen 2E20 9 19 Electric Fuel...

Страница 383: ...n Each tank has an individual quick drain located at the bottom inboard rear corner The fuel strainer also incorporates a quick drain which is located in the left front comer of the firewall The quick...

Страница 384: ...will be supplied for up to approximately 75 power Manual leaning to the correct fuel flow will be required at altitudes above 15 000 feet and for engine speeds less than 2300 RPM An absolute pressure...

Страница 385: ...Figure 9 1 Fuel System Diagram PA 28R 201 Issued 12 15 76 2E11 CHEROKEE ARROW III SERVICE MANUAL FUEL SYSTEM...

Страница 386: ...Figure 9 1a Fuel System Diagram PA 28R 201 S N 2837001 and up Revised 2 13 89 2E12 CHEROKEE ARROW III SERVICE MANUAL FUEL SYSTEM...

Страница 387: ...Figure 9 2 Fuel System Diagram PA 28R 201T Revised 2 13 89 2E13 CHEROKEE ARROW III SERVICE MANUAL FUEL SYSTEM...

Страница 388: ...ed with a mirror and inspection light through the filler neck Small scrapes in the film adjacent to the filler neck may be disregarded provided there is no indication of peeling b If peeling has occur...

Страница 389: ...Figure 9 3 Fuel Sender Units Installation Revised 2 13 89 2E15 CHEROKEE ARROW III SERVICE MANUAL FUEL SYSTEM...

Страница 390: ...8R 201T Inboard Outboard S N 28R 7703001 to 28R 7703380 inclusive PA 28R 201 S N 28R 7737162 and up PA 28R 201T Outboard Inboard S N 28R 7703381 and up Note Fuel quantity sender Piper P N 550 504 requ...

Страница 391: ...l sender location d Reaching through the access opening remove the five bolts and washers securing the sender unit to the rear surface of the tank 9 10 INSTALLATION OF TRANSMITTERS Refer to Figure 9 3...

Страница 392: ...fuel in the tank e Add fuel to the tank in the amount of five U S gallon increments until the tank is full and observe gauge readings NOTE It is permissible to adjust the float assembly to obtain spe...

Страница 393: ...tor cover with attaching screws e Install the valve control handle with attaching screws 9 15 FUEL FILTER BOWL AND SCREEN Refer to Figure 9 6 9 16 REMOVAL OF FUEL FILTER BOWL AND HOUSING a Ascertain t...

Страница 394: ...en the bail nut f Safety the bail nut and the bail wire assembly 9 19 ELECTRIC FUEL PUMP AIRBORNE PA 28R 201T 9 20 REMOVAL AND INSTALLATION OF ELECTRIC FUEL PUMP The electric rotary vane type fuel pum...

Страница 395: ...ure of 8 to 10 psi j Readjust power supply and LOW terminal to ensure a pump pressure of 8 to 10 psi at a power supply voltage of the previously recorded in step e k Secure the LOW terminal slider l C...

Страница 396: ...the pressure indicated on the calibrated pressure gauge The pressure on the gauge should be higher then that recorded in step c but not more than 24 5 psi e Switch off Master Switch and reconnect lea...

Страница 397: ...d as follows a Replacement of shaft seal 1 Separate the pump end assembly from the motor by removing the four machine screws Note the relationship of the pump and motor before separation 2 The shaft s...

Страница 398: ...he fuel selector on open the bypass valve on the test line and start the pump e When a steady flow of fuel is obtained close the bypass valve and check the reading on the pressure gauge It should read...

Страница 399: ...ead lube such as Slip Spray Lubricant DuPont or Ferrulube Parker Hannifin and torque the nut to the proper values as listed in step d If the union is unserviceable it must be replaced per instructions...

Страница 400: ...the union 2 Carefully align the tube into the union and snug up the nut using a wrench 3 Then using the wrench tighten the nut one to two flats 1 6 to 1 3 of a turn d If a repair is being made using a...

Страница 401: ...ector valve in Reposition as required improper position Damaged fuel selector Replace fuel selector valve valve Fuel quantity gauge Broken wire Check and repair fails to operate Gauge inoperative Repl...

Страница 402: ...e gauge Replace gauge Fuel selector valve in Reposition fuel selector improper position valve lever Low pressure or Obstruction in inlet Trace lines and pressure surges side of pump locate obstruction...

Страница 403: ...lve 2F18 10 14 Adjustment of Vacuum Regulator Valve 2F18 10 15 Removal and Replacement of Regulator Valve 2F18 10 16 Suction Gauge 2F20 10 17 General 2F20 10 18 Troubleshooting 2F20 10 19 Pitot Static...

Страница 404: ...52 General 2G8 10 53 Troubleshooting 2G8 10 54 Removal and Replacement 2G8 10 55 Fuel Pressure Gauge 2G8 10 56 General 2G8 10 57 Troubleshooting 2G9 10 58 Removal and Replacement 2G9 10 59 Electrical...

Страница 405: ...G13 10 79 General 2G13 10 80 Gyro Fitting Installation Procedure 2G13 10 81 Cylinder Head Temperature Gauge 2G13 10 82 General 2G13 10 83 Troubleshooting 2G14 10 84 Removal and Replacement 2G14 10 85...

Страница 406: ...and lines that connect these components Serial numbers 2837001 and up of the PA 28R 201 and serial numbers 2803001 and up of the PA 28R 201T have auxiliary electrically operated dry vacuum pumps inco...

Страница 407: ...then should the regulator be adjusted b Visually examine gauge performance as follows 1 When the engine not operating and no vacuum is applied to the gauge the pointer on the gauge should rest agains...

Страница 408: ...ge is not suspect NOTE Regulator malfunctions tend to increase vacuum power to the gyro instruments Although this excess of vacuum is applied a loss of vacuum does occur Gyro instruments themselves ac...

Страница 409: ...Figure 10 1 Instrument Panel Typical Revised 2 13 89 2F11 CHEROKEE ARROW III SERVICE MANUAL INSTRUMENTS...

Страница 410: ...Figure 10 1a Instrument Panel PA 28R 201 S N 2837001 and up Revised 2 13 89 2F12 CHEROKEE ARROW III SERVICE MANUAL INSTRUMENTS...

Страница 411: ...Figure 10 1b Instrument Panel PA 28R 201T S N 2803001 and up Revised 2 13 89 2F13 CHEROKEE ARROW III SERVICE MANUAL INSTRUMENTS...

Страница 412: ...Figure 10 2 Pitot Static System Revised 2 13 89 2F14 CHEROKEE ARROW III SERVICE MANUAL INSTRUMENTS...

Страница 413: ...ur retaining nuts g Remove all plugs and caps from the fittings and hoses and secure the hoses to the pump with clamps h After a functional operation check replace the top cowling 10 12 AUXILIARY VACU...

Страница 414: ...Figure 10 3 Vacuum Auxiliary Vacuum Installation Revised 2 13 89 2F16 CHEROKEE ARROW III SERVICE MANUAL INSTRUMENTS...

Страница 415: ...ct electrical leads at terminals of the pump motor assembly 4 Insulate and secure disconnected electrical leads 5 Loosen the band clamps and remove pump motor from firewall brackets 6 Locate the elaps...

Страница 416: ...mmended by Piper CAUTION Before any adjustments are made to the vacuum regulator verify that the system filters and lines are clean a Bend locking tabs up if applicable then loosen locking nut or remo...

Страница 417: ...ust regulator correct or a maximum pressure Normal vacuum indication Faulty instrument Replace instrument but sluggish operation of instruments Dirty or clogged filter or Replace filter vacuum line ki...

Страница 418: ...ions connections and terminals Check all wire for open breaks repair as needed AUX ON selected on Leak in vacuum system Tighten clamps and check ground check and little hoses Replace if necessary or n...

Страница 419: ...to drain moisture from the pressure line running between the pitot mast and the instrument panel When installed an alternate static source control valve is located below the instrument panel to the ri...

Страница 420: ...etc the directional gyro is only accurate for the heading it has been set for If the gyro is set on 270 for instance and the aircraft is turned to some other heading there can be a large error betwee...

Страница 421: ...airplane relative to pitch and roll axis A bar across the face of the indicator represents the horizon and aligning the miniature airplane to the horizon bar simulates the alignment of the airplane to...

Страница 422: ...on in lines Obstruction in pitot Clean lines and head head Pointer oscillates Leaks in static lines Disconnect all instruments connected to the static line Check individual instruments for leaks Recon...

Страница 423: ...has three pointers and dial scale the long pointer is read in hundreds of feet the middle pointer in thousands of feet and the short pointer in ten thousands of feet A barometric pressure window is l...

Страница 424: ...tly inoperative High or low reading Improper venting Eliminate leak in static pressure system and check alignment of airspeed tube Setting knob is hard Wrong lubrication or Replace instrument to turn...

Страница 425: ...h the air The airspeed indication is the differential pressure reading between pitot air to pressure and static air pressure This instrument has the diaphragm vented to the pitot air source and the ca...

Страница 426: ...should be swung whenever instruments or radios are changed and at least once a year 10 41a ADJUSTMENT OF COMPASS Before attempting to compensate compass every effort should be made to place the aircr...

Страница 427: ...ssive card Insufficient liquid Replace instrument oscillation Card sluggish Wear card magnet Replace instrument Excessive pivot friction Replace instrument or broken jewel Liquid leakage Loose bezel s...

Страница 428: ...ine in inches of mercury 10 45 TROUBLESHOOTING TABLE X VIII MANIFOLD PRESSURE INDICATOR Trouble Cause Remedy Excessive error at Pointer shifted Replace instrument existing barometric pressure Excessiv...

Страница 429: ...ose cable connections Tighten cable Pointer oscillates Rough spot on or Repair or replace excessively sharp bend in shaft Excessive friction in Replace instrument instrument Indicator changes in Exces...

Страница 430: ...ce instrument adjustment Excessive pointer Air in line or rough Disconnect line and fill oscillation engine relief with light oil Check for leaks If trouble persists clean and adjust relief valve Slug...

Страница 431: ...valve Air leak in intake lines Defective gauge Replace gauge Pressure low or Obstruction in inlet Trace lines and locate pressure surges side of pump obstruction Faulty bypass valve Replace Faulty dia...

Страница 432: ...ting attitude error 10 62 TROUBLESHOOTING TABLE X XII TURN AND BANK INDICATOR Trouble Cause Remedy Pointer fails to respond Foreign matter lodged in Replace instrument instrument Incorrect sensitivity...

Страница 433: ...ded incorrectly connection transmitter and electrical connections Float arm sticky Replace fuel transmitter Insulated transmitter Remove transmitter and grounded sealant Check for metal particles in s...

Страница 434: ...Alternator Section 10 75 REMOVAL AND REPLACEMENT Refer to Paragraph 10 76 of this section 10 76 REMOVAL AND REPLACEMENT OF FACE MOUNTED INSTRUMENTS 10 77 GENERAL Since all instruments are mounted in a...

Страница 435: ...of foreign particles and or residue before connecting lines to gyro NOTE Use of thread lube on fittings or in ports will create a warranty void condition a Carefully lay teflon tape on the threads all...

Страница 436: ...button test switch located on the upper left center portion of the instrument panel Two additional amber lights come with the PA 28R 201T model Refer to Figure 10 1 The panel monitors alternator outp...

Страница 437: ...r Capacitors 2H3 11 18 Removing Needle Bearing from End Shield 2H4 11 19 Installing Needle Bearing in End Shield 2H4 11 20 Removing Drive Pulley 2H5 11 21 Removing Drive End Bearing 2H5 11 22 Replacin...

Страница 438: ...7 Brush Holders 2H24 11 58 Gear and Pinion Housing PA 28R 201 2I1 11 59 Bendix Drive PA 28R 201 2I1 11 60 Assembly 2I1 11 61 Bench Tests 2I2 11 62 Starting Motor Control Circuit 2I2 11 63 Starting Mot...

Страница 439: ...ly 2I6 11 87 Troubleshooting Procedure 2I9 11 88 Instrument and Panel Lights 2I10 11 89 Removal of Dimmer Control Assembly 2I10 11 90 Installation of Dimmer Control Assembly 2I10 11 91 Annunciator Pan...

Страница 440: ...lectrical and avionics equipment in case of a regulator malfunction The loads from the electrical bus systems are protected by manual reset type circuit breakers mounted on the lower right hand side o...

Страница 441: ...ps it will result in a complete shutdown of power from the generating system After a one or two minute cool down period the breaker can be reset manually If tripping recurs and holding the breaker dow...

Страница 442: ...CURRENT DRAW Connect a test ammeter in series between a 12 volt battery positive post and the alternator field terminal Refer to Figure 11 3 Connect a jumper wire to a machined surface on one of the a...

Страница 443: ...brush assembly and the parts were either assembled wrong or damaged and short circuiting through to ground Inspect the brush holder and insulated washer Replace if damaged The stack of parts attachin...

Страница 444: ...se rectifier lead wires in the heat sink at the rectifiers The meter reading for each of the rectifiers should be the same Always contact the connection nearest the rectifiers Do not break the sealing...

Страница 445: ...d to the bare wire of the rectifier leads at the rectifiers in the end shield The meter will indicate the condition of the rectifier The test indications are the same for the negative case rectifiers...

Страница 446: ...fiers without damage NOTE Only new rectifiers should be installed It is not recommended to reinstall rectifiers once they have been removed The tool kit can be used on all Chrysler built alternators A...

Страница 447: ...STALLING RECTIFIERS Start the new rectifier as squarely as possible into the hole the old rectifier was removed from after first checking to be sure it is of the proper polarity The negative rectifier...

Страница 448: ...Use rosin core solder only The solder must be hot enough to flow and form a positive connection Cold solder joints will break open A good solder connection will be smooth while a poor solder joint col...

Страница 449: ...e stator is required 11 17 TESTING ALTERNATOR CAPACITORS Capacitors are used in connection with alternators to suppress any transient peak voltage that may occur It is essential therefore to test the...

Страница 450: ...ARING IN END SHIELD Refer to Figure 11 13 Support the end shield on the C 3925 tool and press the bearing into the end shield with tool SP 3381 Tool SP 3381 has a concaved end that is shaped to fit ov...

Страница 451: ...the rotor shaft with a soft hammer while holding the end shield Remove the drive end bearing from the rotor shaft with puller C 4068 and special adapters as follows a Position the center screw of too...

Страница 452: ...e solder lugs align with the rotor coil leads 2 Place assembly tool C 3900 over rotor shaft and slip ring 3 Position assembly in an arbor press and press the slip ring on the shaft until it bottoms on...

Страница 453: ...Figure 11 20 Insert the sealed drive end bearing in the drive end shield and install the bearing retainer Install the washers and nuts to hold the bearing in place on all early production Snap the spr...

Страница 454: ...bearing 11 28 ASSEMBLING END SHIELD SUB ASSEMBLIES Position the rotor and drive end shield assembly on the rectifier end shield Align the through bolt holes through the drive end shield stator and th...

Страница 455: ...nected to the alternator Adjust the load to obtain 15 volts Net output not including field current shall be not less than 49 0 amperes 11 30 BENCH HOT STABILIZATION OUTPUT TEST To determine the hot st...

Страница 456: ...100 hour inspection thereafter The torque method for checking alternator belt tension is given as follows a Apply a torque indicating wrench to the nut that attaches the pulley to the alternator and...

Страница 457: ...ke a continuity check to be sure the brushes are seated against the slip rings d Drive Pulley On PA 28R 201 torque the drive pulley retaining nut to 35 foot pounds 11 34 ALTERNATOR SERVICE PRECAUTIONS...

Страница 458: ...e voltage P I V minimum for transient voltage protection Three positive rectifiers are mounted in the rectifier mounting plate while the three negative rectifiers are mounted in the slip ring end head...

Страница 459: ...Remove the fan woodruff key and spacer from the shaft d Remove the four through bolts and tap the drive end head lightly to separate the drive end head and rotor as a unit from the stator and slip rin...

Страница 460: ...poles To test for shorted turns in the rotor windings connect a voltmeter ammeter and rheostat as shown in Figure 11 29 or use an ohmmeter Rotor current draw and resistance are listed in the Alternat...

Страница 461: ...e alternator to growl or be noisy during operation and will usually show some signs of overheating If all other electrical checks are normal and alternator fails to supply its rated output the stator...

Страница 462: ...he lip of the oil seal is toward the bearing Stake the seal in place Correct assembly of bearing seal inner race and spacer as shown in Figure 11 33 f Assemble the alternator and install the through b...

Страница 463: ...rnator on the engine NOTE Always refer to the wiring diagram when installing the alternator or testing the alternator CAUTION Do not test alternators used on PA 28R 201T at full rated output for more...

Страница 464: ...d Output 60 amperes 65 amperes Ground Polarity Negative Negative Rotation Bi Directional Bi Directional Rotor Current Draw 77 F 3 0 to 3 3 amps 12 0 volts 2 4 to 4 0 amps 12 0 volts Resistance 77 F 3...

Страница 465: ...ed wire at the regulator harness connector or terminal block Connect the negative voltmeter lead to the regulator housing Note Do not connect the voltmeter across the battery because the regulator is...

Страница 466: ...N On PA 28R 201 airplanes the gear reduction starting motor consists of six major components the commutator end head assembly the armature the frame and field assembly the gear housing the pinion hous...

Страница 467: ...sion have accumulated on the battery it should be cleaned with a solution of baking soda and water Be sure none of the solution enters the battery cells b The starting circuit wiring should be inspect...

Страница 468: ...re and after installing the drive end head d The starting motor should be operated for a few seconds with the ignition switch off This is to determine that the starter engages properly and that it tur...

Страница 469: ...e assembly off the shaft Do not attempt to disassemble the drive and do not dip it in cleaning solvent 4 To remove the roller bearings from the gear housing use an arbor press and the correct bearing...

Страница 470: ...ls a growler is used Refer to Figure 11 40 The armature is placed on the growler and slowly rotated by hand while a steel strip is held over the core so that it passes over each armature core slot If...

Страница 471: ...arbor press and the proper bearing arbor for installing graphitized bronze bearings Soak new absorbent bronze bearings in SAE 20 oil before installation Saturate the felt oiling pad in the commutator...

Страница 472: ...ross the switch contacts during normal starting If loss is in excess of 0 2 volts per 100 amperes the solenoid should be replaced c If solenoid fails to operate when the manual starting switch is turn...

Страница 473: ...is dimension is measured from the centerline of the mounting hole nearest the drive end head to the edge of the pinion 11 67 INSTALLATION OF BATTERY a Ascertain that the battery and battery box have b...

Страница 474: ...a consistency of thin cream The application of this mixture should be applied until all bubbling action has ceased CAUTION Do not allow soda solution to enter battery c Rinse the battery and box with...

Страница 475: ...e cowl The light is controlled by a switch to a 10 amp circuit breaker 11 73 REMOVAL a Remove the retaining bracket from the lamp b Pull lamp out and remove the two electrical leads from the back of t...

Страница 476: ...E LIGHT a Route the wires from the new lamp down through the hole in the navigation light bracket b Insert the wire terminals in the plastic plug supplied with the new lamp Wire according to the schem...

Страница 477: ...Figure 11 44 Strobe Light Connections Earlier Models Revised 2 13 89 2I7 CHEROKEE ARROW III SERVICE MANUAL ELECTRICAL SYSTEM...

Страница 478: ...Figure 11 44a Strobe Light Connections Later Models Revised 2 13 89 2I8 CHEROKEE ARROW III SERVICE MANUAL ELECTRICAL SYSTEM...

Страница 479: ...struction from overheating of the power supply This damage is sometimes not immediately apparent but will cause failure of the system in time b Check for malfunction in interconnecting cables 1 Ascert...

Страница 480: ...ugh a 5 amp fuse located behind the switch panel The VAC warning light is controlled by a vacuum sensor switch located at the firewall and is attached to the vacuum regulator The sensor switch will ac...

Страница 481: ...d with copper wire with suitable terminals 11 97 IGNITION SWITCH Refer to Figure 11 44b 11 98 REMOVAL OF IGNITION SWITCH Access to the ignition switch is gained by reaching up under the instrument pan...

Страница 482: ...Figure 11 44b Ignition Switch Revised 2 13 89 2I12 CHEROKEE ARROW III SERVICE MANUAL ELECTRICAL SYSTEM...

Страница 483: ...Figure 11 45 Terminal Block Revised 2 13 89 2I13 CHEROKEE ARROW III SERVICE MANUAL ELECTRICAL SYSTEM...

Страница 484: ...t breaker SA field terminals of master switch voltage regulator and alternator field terminal Interruption of voltage through any of these points isolates the faulty components or wire which must be p...

Страница 485: ...of alternator from field wiring and check for continuity from field terminal to ground with ohmmeter 20 100 ohms depending on brush contact resistance Pull propeller slowly by hand turning alternator...

Страница 486: ...be 13 5 volts minimum If voltage is below this value replace regulator High resistance Check visually for loose connections in field binding posts at the or output circuit various junction points in...

Страница 487: ...ut it can be assumed that a faulty rectifier exists See paragraphs titled Testing of Rectifiers or Inspection and Testing of Components Field circuit breaker Short circuit in field Disconnect field wi...

Страница 488: ...If there are no obvious signs of a physical short circuit at field terminal or brush holder replace alternator Note Intermittent short circuit Internal short circuiting of the field can occur at vari...

Страница 489: ...tall with correct polarity Battery charged Remove battery Connect backwards load such as landing light lamp or similar load and discharge battery Recharge with correct polarity and test each cell for...

Страница 490: ...tc Tighten all connections and replace faulty terminals High field circuit If problem persists jump resistance across terminals of the following components one at a time until the faulty unit is isola...

Страница 491: ...ssive side excessive side play play Binding brushes and brush boxes should be wiped clean with a gasoline undoped moistened cloth A new brush should be run in until at least 50 percent seated however...

Страница 492: ...umber 0000 sandpaper If too rough and pitted remove and turn down Blow out all particles Shorted grounded or Remove and replace with open armature an armature known to be in good condition Grounded or...

Страница 493: ...utator down on a lathe brushes Armature assembly Reface commutator not concentric Discharged battery Battery worn out Replace battery Low electrical Check voltage system voltage regulator voltage Stan...

Страница 494: ...Replace Compound on top of Charging rate too Reduce charging rate battery melts high Check voltage regulator voltage Electrolyte runs out Too much water added Drain and keep at proper of vent plugs t...

Страница 495: ...tested Battery consumes excessive Charging rate too high Correct charging rate water if in all cells Cracked jar one cell Replace battery only All warning lights fail Blown fuse Replace the 5 amp fuse...

Страница 496: ...ial bridged between terminals Defective sensor Replace OVER BOOST warning Bulb burned out Replace fails to operate Circuit in manifold Replace gauge pressure gauge defective OVER BOOST warning Press t...

Страница 497: ...ALT warning light fails Bulb burned out Replace to operate No current from bus Check all wire segments to resistor and connections ALT warning light fails Blown fuse Replace 5 amp fuse near to exting...

Страница 498: ...TABLE XI VI ELECTRICAL SYMBOLS Revised 2 13 89 2J4 CHEROKEE ARROW III SERVICE MANUAL ELECTRICAL SYSTEM...

Страница 499: ...TROL SURFACE E ENGINE INSTRUMENT F FLIGHT INSTRUMENT G LANDING GEAR H HEATER VENTILATING DEICING L LIGHTING P POWER Q FUEL OIL RP RADIO POWER RZ RADIO AUDIO INTERPHONE J IGNITION RG RADIO GROUND W WAR...

Страница 500: ...2J9 11 58 Avionics 2J10 11 59 Engine Gauges PA 28R 201 2J10 11 60 Engine Gauges PA 28R 201T 2J11 11 61 Instrument Lights PA 28R 201 2J11 11 62 Instrument Lights PA 28R 201T 2J12 11 63 Alternator and S...

Страница 501: ...ights Figure 11 47 Fuel Pump PA 28R 201 PA 28R 201 and 201T Figure 11 48 Landing Light Figure 11 49 Navigation Lights PA 28R 201 and 201T PA 28R 201 and 201T Revised 2 13 89 2J7 CHEROKEE ARROW III SER...

Страница 502: ...ghts Figure 11 51 Pitch Trim PA 28R 201 and 201T PA 28R 201 and 201T Figure 11 52 Pitot Heat PA 28R 201 and 201T Figure 11 53 Radio Lights PA 28R 201 and 201T Revised 2 13 89 2J8 CHEROKEE ARROW III SE...

Страница 503: ...Figure 11 55 Stall Warning PA 28R 201 and 201T PA 28R 201 and 201T Figure 11 56 Turn and Bank Figure 11 57 A C Blower PA 28R 201 and 201T PA 28R 201 and 201T Revised 2 13 89 2J9 CHEROKEE ARROW III SER...

Страница 504: ...Figure 11 58 Avionics PA 28R 201 and 201T Figure 11 59 Engine Gauges PA 28R 201 Revised 2 13 89 2J10 CHEROKEE ARROW III SERVICE MANUAL ELECTRICAL SYSTEM...

Страница 505: ...Figure 11 60 Engine Gauges PA 28R 201T Figure 11 61 Instrument Lights PA 28R 201 Revised 2 13 89 2J11 CHEROKEE ARROW III SERVICE MANUAL ELECTRICAL SYSTEM...

Страница 506: ...Figure 11 62 Instrument Lights PA 28R 201T Revised 2 13 89 2J12 CHEROKEE ARROW III SERVICE MANUAL ELECTRICAL SYSTEM...

Страница 507: ...Figure 11 63 Alternator and Starter PA 28R 201 Revised 2 13 89 2J13 CHEROKEE ARROW III SERVICE MANUAL ELECTRICAL SYSTEM...

Страница 508: ...Figure 11 64 Alternator and Starter PA 28R 201T Early Models Revised 2 13 89 2J14 CHEROKEE ARROW III SERVICE MANUAL ELECTRICAL SYSTEM...

Страница 509: ...Figure 11 64a Alternator and Starter Schematic PA 28R 201 S N s 2837001 up PA 28R 201T S N s 2803001 up Revised 2 13 89 2J15 CHEROKEE ARROW III SERVICE MANUAL ELECTRICAL SYSTEM...

Страница 510: ...Figure 11 65 Fuel Pump PA 28R 201T Revised 2 13 89 2J16 CHEROKEE ARROW III SERVICE MANUAL ELECTRICAL SYSTEM...

Страница 511: ...Figure 11 66 Landing Gear PA 28R 201 201T Revised 2 13 89 2J17 CHEROKEE ARROW III SERVICE MANUAL ELECTRICAL SYSTEM...

Страница 512: ...Figure 11 66a Landing Gear Without Backup Extender Functional or Installed PA 28R 201 and 201T Revised 2 13 89 2J18 CHEROKEE ARROW III SERVICE MANUAL ELECTRICAL SYSTEM...

Страница 513: ...Emergency Locator Transmitter 2J21 12 5 Emergency Locator Transmitter 2J21 12 6 Description 2J21 12 7 Battery Removal and Installation Communications Components Corp 2J21 12 8 Removal and Installatio...

Страница 514: ...ida 33310 305 776 4100 TWX 5109559884 Collins General Aviation Division Rockwell International Cedar Rapids Iowa 52406 319 395 3625 Telex 464421 Edo Corporation Avionics Division Box 610 Municipal Air...

Страница 515: ...Aerofiche published monthly by Piper Consult the aircraft s parts catalog for replacement parts NAME PIPER PART NO AutoControl I II and AltiMatic I II 753 798 AutoControl III and AltiMatic III and III...

Страница 516: ...on the right side of the airplane tail section ahead of the stabilator a Remove the access plate on the right side of fuselage aft of sta 228 30 b Rotate the ON ARM OFF switch to the OFF position c D...

Страница 517: ...the circuit board 10 Reinsert the control head section into the battery pack being careful not to pinch any wires and replace the four screws If the four holes do not line up rotate the battery pack 1...

Страница 518: ...ould be no longer than three audio sweeps 2 If the antenna is removed a dummy load should be substituted during the test 3 Test should be conducted only within the time period made up of the first fiv...

Страница 519: ...me precautions noted in paragraph 12 10 must be observed a Tune the aircraft communications receiver to 121 5 mHz and switch the receiver ON deactivate the squelch and turn the receiver volume up unti...

Страница 520: ...d by rotating the switch to the OFF position and then to the ARM position b If the transmitter is inadvertently activated through impact deactivate by pushing in on the OFF ARM ON switch NOTE As a rou...

Страница 521: ...Figure 12 1 ELT Schematic Typical Revised 2 13 89 2K3 CHEROKEE ARROW III SERVICE MANUAL ELECTRONICS NOTE AIRCRAFT POWER USED TO SHUT OFF THE ELT WITH REMOTE SWITCH...

Страница 522: ...Figure 12 2 ELT Portable Folding Antenna Narco Figure 12 3 ELT Using Fixed Aircraft Antenna Narco 2K4 CHEROKEE ARROW III SERVICE MANUAL ELECTRONICS...

Страница 523: ...ON XIII HEATING AND VENTILATING Aerofiche Paragraph Grid No 13 1 Introduction 2K6 13 2 Description 2K6 13 3 Heater Maintenance 2K6 13 4 Overhead Vent System 2K6 Revised 2 13 89 2K5 HEATING AND VENTILA...

Страница 524: ...r for both models is picked up from an inlet in the leading edge of each wing The air passes through the wings to individually controlled outlets located just forward of each seat An air vent is locat...

Страница 525: ...Figure 13 1 Cabin Heater and Defroster PA 28R 201 Revised 2 13 89 2K7 CHEROKEE ARROW III SERVICE MANUAL HEATING AND VENTILATING...

Страница 526: ...Figure 13 2 Cabin Heater and Defroster PA 28R 201T Revised 2 13 89 2K8 CHEROKEE ARROW III SERVICE MANUAL HEATING AND VENTILATING...

Страница 527: ...Figure 13 3 Overhead Vent System and Fresh Air System NOT AVAILABLE WITH AIR CONDITIONING Revised 2 13 89 2K9 CHEROKEE ARROW III SERVICE MANUAL HEATING AND VENTILATING...

Страница 528: ...INTENTIONALLY LEFT BLANK 2K10 THRU 2L24 2K10...

Страница 529: ...ARROW III TURBO ARROW III ARROW SERVICE MANUAL CARD 3 OF 3 PA 28R 201 201T PIPER AIRCRAFT CORPORATION PART NUMBER 761 639 3A1 Courtesy of Bomar Flying Service www bomar biz...

Страница 530: ...rial Revision lines indicate only current revisions with changes and additions to existing text and illustrations Changes in capitalization spelling punctuation indexing the physical location of the m...

Страница 531: ...RFACE CONTROLS lF6 VI HYDRAULIC SYSTEM lH5 VII LANDING GEAR AND BRAKE SYSTEM lI22 AEROFICHE CARD NO 2 VIII POWER PLANT CONTINENTAL 2A9 VIIIA POWER PLANT LYCOMING 2C18 IX FUEL SYSTEM 2E8 X INSTRUMENTS...

Страница 532: ...Valve 3B10 14 13 Components Installation 3B12 14 14 Adjustment of Air Conditioning Throttle Switch PA 28R 201 3B13 14 15 Air Conditioning Wiring Schematic 3B14 14 16 Oxygen Installation 3C2 14 17 Test...

Страница 533: ...of Partial Charge to System 3A18 14 18 Compressor Service 3A18 14 19 Compressor Removal 3A19 14 20 Compressor Installation 3A19 14 21 Checking Compressor Oil 3A20 14 22 Replacement of York Compressor...

Страница 534: ...s 3C2 14 59 Swageloc Fitting Installation 3C3 14 60 Application of Teflon Tape Thread Sealant 3C5 14 61 Leak Tests 3C6 14 62 Oxygen System Component Handling 3C6 14 63 Removal of Oxygen Cylinder 3C6 1...

Страница 535: ...aft during its takeoff flight conditions During maximum power demands the compressor is de clutched and the condenser door is automatically retracted 14 3 AIR CONDITIONING SYSTEM OPERATION The air con...

Страница 536: ...Figure 14 1 Air Conditioning System Installation Revised 2 13 89 3A8 CHEROKEE ARROW III SERVICE MANUAL ACCESSORIES AND UTILITIES...

Страница 537: ...75 22 4 22 144 76 23 1 23 148 77 23 8 24 152 78 24 6 25 156 79 25 3 26 160 80 26 1 27 162 81 26 8 28 165 82 27 6 29 167 83 28 4 30 170 84 29 2 31 172 85 30 32 175 86 30 9 33 177 87 31 7 34 180 88 32...

Страница 538: ...of mercury or 1 2 psi higher than the chart indicates It must be pointed out that the actual temperature of the air passing over the coils of the evaporator will be several degrees warmer allowing for...

Страница 539: ...cool water and protect with petroleum jelly 4 Do not discharge large quantities of R 12 into closed rooms It may displace most of the air in the room and this could cause oxygen starvation Gaseous R...

Страница 540: ...4 1 1 16 28 33 ft lbs 14 6 SERVICE VALVES The purpose of the service valve is to service the air conditioning system Testing Bleeding Evacuating and Charging This aircraft is equipped with service val...

Страница 541: ...gauge is a high pressure gauge used in the discharge side of the system The other is a low pressure gauge used in the suction side of the system The manifold is a device having fittings for both gaug...

Страница 542: ...Figure 14 4 Manifold Set Operation Revised 2 13 89 3A14 CHEROKEE ARROW III SERVICE MANUAL ACCESSORIES AND UTILITIES...

Страница 543: ...the low side manifold valve and open the high side manifold valve d Open the refrigerant container service valve and allow the pressure at the low side gauge to reach 50 psi at which time close the hi...

Страница 544: ...tion Refer to Figure 14 7 a Close all valves on charging station b Connect red high pressure charging line to high pressure Schrader valve at the evaporator fitting c Open valve 8 high pressure contro...

Страница 545: ...compound gauge reading will be about one inch lower numerically The following steps should be of help when performing this operation a Remove access panel at the rear of the cabin to gain access to t...

Страница 546: ...manifold hose from the vacuum pump k Proceed to charge the system in accordance with paragraph 14 14 NOTE The system should be charged as soon as it has been evacuated 14 14 CHARGING THE SYSTEM When t...

Страница 547: ...the charging stand Disconnect the high and low pressure charging lines from the aircraft system A small amount of refrigerant remaining in the lines will escape Replace lines on holder of charging st...

Страница 548: ...ug h The sight glass should be clear of any bubbles or foam If bubbles or foam are seen passing through the sight glass it is an indication of a low refrigerant charge in the system and more refrigera...

Страница 549: ...rigerant to the system Engine should be operating at 1000 rpm NOTE This should be done with OAT at 70 F or higher with the air conditioner operating k Shut off the air conditioner and engine Remove th...

Страница 550: ...he magnetic clutch on the compressor 4 Depressurize the air conditioning system 5 Remove the suction and discharge line from the service valves on the compressor NOTE All open lines should be capped i...

Страница 551: ...discharged a The following steps should be followed to perform York compressor oil check 1 It will be necessary to discharge the system Refer to paragraph 14 12 2 Fabricate an oil dipstick Refer to F...

Страница 552: ...een 2 6 and 4 4 fluid ounces 8 When oil is added Piper refrigerant oil PMS L2000 or equivalent 500 viscosity refrigerant oil must be used 9 When installing the oil filler plug make sure the sealing O...

Страница 553: ...14 8a Top Dead Center Casting Mark Sankyo Compressor Figure 14 8b Rotation of Clutch Front Plate Sankyo Compressor Oil Check Revised 2 13 89 3B1 CHEROKEE ARROW III SERVICE MANUAL ACCESSORIES AND UTIL...

Страница 554: ...by measuring the width of the starter ring gear plus the dimension from the forward machined surface of the ring gear to the forward edge of the compressor drive belt Refer to Figure 14 9a 3 The chec...

Страница 555: ...Figure 14 9a Compressor and Alternator Belt Installation Lycoming Revised 2 13 89 3B3 CHEROKEE ARROW III SERVICE MANUAL ACCESSORIES AND UTILITIES...

Страница 556: ...Figure 14 9a Compressor and Alternator Belt lnstallation Lycoming cont Revised 2 13 89 3B4 CHEROKEE ARROW III SERVICE MANUAL ACCESSORIES AND UTILITIES...

Страница 557: ...ound servicing the test area should be clean and free of any loose objects lying on the ramp Only the service valve located on the evaporator assembly should be used for testing 4 Shut down engine and...

Страница 558: ...outer flange of the pulley This can damage the pulley grooves or clutch bearings c Remove the four bolts securing the field assembly against the compressor bosses and remove the bolts washers and fie...

Страница 559: ...e bottom of the fuselage up thru the floor to the condenser and evaporator in the tail cone The discharge is in the right hat section and the suction in the left NOTE Before any of the hose couplings...

Страница 560: ...condenser in accordance with paragraph 14 35 f Seal all around cover panel and aft cover panel if removed with Permagum Bead No 576 purchased from Prestolite Engineering Company See Figure 14 11 WARNI...

Страница 561: ...Figure 14 11 Condenser Air Scoop Installation Revised 2 13 89 3B9 CHEROKEE ARROW III SERVICE MANUAL ACCESSORIES AND UTILITIES...

Страница 562: ...he receiver drier and the evaporator inlet The capillary coil is attached to the evaporator outlet line a Remove the necessary access panels and discharge system b Remove the capillary coil from the o...

Страница 563: ...on the flanges of the evaporator housing and attach the large end of the mounting gasket to the back of the housing b Install the housing through the access hole with the air duct outlet on top Mate t...

Страница 564: ...he fuselage where it connects to the blower motor pressure relief switch and the condenser actuating motor NOTE Newer models of the PA 28R 201T air conditioning throttle switch may appear different in...

Страница 565: ...in reel end shaft f Release harness and allowing it to wind up extend the harness a few times to check reel for smooth operation g With reel fully wound hold with inertia mechanism end up and pry off...

Страница 566: ...Figure 14 15 Air Conditioning Wiring Schematic Revised 2 13 89 3B14 CHEROKEE ARROW III SERVICE MANUAL ACCESSORIES AND UTILITIES...

Страница 567: ...spins freely b Position the cover over the motor plate with the motor wires protruding through the cover grommet c With the holes in the cover matching the holes in the motor plate secure the two par...

Страница 568: ...indicated by heavy is securely clamped to frosting on suction suction line If capillary line and compressor bulb OK replace expansion suction service valve valve Restriction in liquid Check for kinke...

Страница 569: ...porator valve inlet screen clogged lacks refrigerant Inoperative expansion Remove screen Clean valve Valve stuck closed with solvent and replace or capillary bulb has lost Warm capillary by holding it...

Страница 570: ...Replace relay air conditioner switch is in OFF position Electrical System produces no Blown fuse in Replace fuse cooling control head Open circuit breaker Reset circuit breaker Broken or disconnected...

Страница 571: ...e belts belt and or tighten to specifications 14 22 and 14 23 Compressor partially Remove compressor for or completely frozen service or replacement 14 18 Expansion valve stuck Replace expansion in op...

Страница 572: ...ressor clutch Remove clutch assembly for slipping service or replacement 14 24 Obstructed blower Examine entire passage passage for obstruction Correct as necessary Insufficient air Clean condenser co...

Страница 573: ...rect amount low of specified oil 14 21 Refrigeration Excessive charge in Discharge excess freon until system high pressure gauge drops within specifications Low charge in system Check system for leaks...

Страница 574: ...xcessive moisture Purge system replace in system receiver dehydrator 14 32 Air in system Purge evacuate and charge system 14 13 and 14 14 Replace receiver dehydrator 14 32 Excessive noisy Electrical s...

Страница 575: ...e 2 Ground 2 Brown Brown Black AC26A 2 Low Speed 1 Red Yellow Yellow Black 1 Medium Speed 2 Black Red Red White 2 High Speed 1 Yellow Orange Orange Red 1 NOTE 1 Pin number 1 is at the pointed side of...

Страница 576: ...d in the overhead duct behind the passengers and is lighted by a post light The portable oxygen system uses a 22 cu ft capacity 3AA 1800 cylinder The tank is incorporated in a carrying case which util...

Страница 577: ...lot s outlet c Insert a Scott plug in in each of the other outlets and pull the oxygen control knob to the on position The pressure and flow should be 55 to 80 psi and 3 3 to 5 31 pm respectfully at s...

Страница 578: ...Figure 14 16 Fixed Oxygen System Revised 2 13 89 3C2 CHEROKEE ARROW III SERVICE MANUAL ACCESSORIES AND UTILITIES...

Страница 579: ...Figure 14 17 Test Apparatus For Testing Oxygen System Revised 2 13 89 3C3 CHEROKEE ARROW III SERVICE MANUAL ACCESSORIES AND UTILITIES...

Страница 580: ...Figure 14 18 Oxygen Tubing Installation Revised 2 13 89 3C4 CHEROKEE ARROW III SERVICE MANUAL ACCESSORIES AND UTILITIES...

Страница 581: ...earance of 1 8 inch allowed after the maximum travel of the tube High pressure lines are affected similarly but require 1 2 inch clearances Refer to Figure 14 18 Sketch B 10 Perform any other required...

Страница 582: ...inger tight and insert the tube until it bottoms firmly on the shoulder in the fitting b Tighten nut with a wrench until the tube will not turn by hand c Mark the nut at the six o clock position d Hol...

Страница 583: ...Figure 14 19 Installation of Swageloc Fittings Revised 2 13 89 3C7 CHEROKEE ARROW III SERVICE MANUAL ACCESSORIES AND UTILITIES...

Страница 584: ...ot extend beyond the last thread on the fitting as the opening The tape should then be pulled until it separates Do not cut the tape it will not stick properly CHART VIII II OXYGEN SYSTEM LIMITS PARTS...

Страница 585: ...Temporarily support lines as needed to prevent damage Make sure caps and coverings are as clean as possible 14 62 OXYGEN SYSTEM COMPONENT HANDLING WARNING All oxygen components must be handled carefu...

Страница 586: ...by its own access door The valve is interconnected with the gauge line as well as the regulator control valve and is constantly under cylinder pressure as long as the high pressure line is attached t...

Страница 587: ...tee fitting at the tank regulator control valve The high pressure line connects into the valve such that it actuates a check valve permitting pressure to the line Disconnect high pressure fitting at t...

Страница 588: ...in overhead duct as shown in Figure 35 1 The wrap the cable as before b Make sure cable properly reaches valve and install vent and panels Connect cable to control mechanism 14 71 REFILLING OXYGEN SYS...

Страница 589: ...n the cylinder gauge Then open and close each valve on the cascade storage system and determine which cylinder has the lowest pressure When found if this cylinder has a pressure lower than the oxygen...

Страница 590: ...ION The portable oxygen system is available as one of two options that provides oxygen for the PA 28R 201T and renders it capable of cruising at higher altitudes The portable oxygen unit consists of a...

Страница 591: ...nd year of the last test is stamped on the cylinder beneath the ICC DOT identification 1 Inspect outlets and using directions described in the next paragraph check leaks both in the non use and use co...

Страница 592: ...the system Use the following procedures CAUTION When performing this operation make sure the area is a NO SMOKING AREA and is as clean as possible of oil and dirt a Keep all doors and windows open b C...

Страница 593: ...efective or take to approved shop Pressure indication normal Oxygen cylinder regulator Return unit to manufacturer but no oxygen flowing assembly defective or take to approved shop Offensive odors in...

Страница 594: ...INTENTIONALLY LEFT BLANK 3C18 THRU 3L24...

Отзывы: