background image

En

4

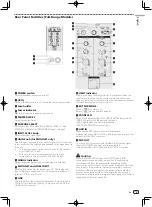
1

 POWER switch

Turns this speaker’s power on and off.

2

 AC IN

Connect the power cord to AC IN and then to the power outlet.

3

 Fuse holder

4

 Power indicator

Lights in blue when the power is turned on.

5

 MASTER LEVEL

Adjusts the output level.

6

 CROSS OVER

Selects the cut-off frequency of the low pass filter for the 

subwoofer from 80 Hz, 100 Hz, 120 Hz, and 150 Hz. 

100 Hz is recommended when using the subwoofer with the 

XPRS Series full-range speakers.

7

 SIGNAL indicator

A green indicator lights when an input signal is detected.

8

 LINE1 and LINE2 INPUT

Both the XLR connector (balanced) and 1/4” TRS (balanced 

type PHONO) are supported. The XLR connector consists of 1 

“ground,” 2 “hot,” and 3 “cold.”

9

 LINK

This is the XLR output connector (balanced). A signal input to 

XLR INPUT will be output directly.

a

 LIMIT indicator

Lights in red when the built-in limiter is activated or when the 

input level is too high and the sound is distorted. When that 

happens, lower the output level of the connected device or lower 

the input level or master level of this unit.

b

 PHASE

Switches the polarity for the subwoofer. Select the one that 

improves the playback of low frequencies when using the 

subwoofer with other speakers.

c

 FRONT LED

Selects the display setting of the FRONT LED indicator (white).

[POWER] Lights when the power is turned on.

[LIMIT] Lights when the limiter is activated.

[OFF] The FRONT LED does not light.

 CAUTION

When the FRONT LED setting is set to [OFF] and [LIMIT], 

the speaker may appear the same as when the power plug 

is disconnected from the power outlet depending on the 

specification of the product, but the power is not shut off. If you 

wish to shut off the power to the woofer completely, you must 

disconnect the power plug from the power outlet. Install the 

speaker near a power outlet so the power plug can easily be 

accessed. Leaving the power plug inserted in a power outlet for a 

long period of time may cause fire.

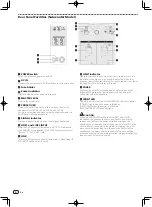
Rear Panel Facilities (Subwoofer Model)

1

2

3

5

4

6

a

c

b

9

8

7

9

8

7

Содержание XPRS10

Страница 1: ... helfen Ihr Produkt optimal zu verwenden Il sito di supporto DJ Pioneer indicato qui sopra offre una sezione FAQ informazioni sul software ed informazioni e servizi di vario tipo per permettere un uso più confortevole dei nostri prodotti De bovengenoemde Pioneer DJ ondersteuningswebsite biedt een overzicht van de vaak gestelde vragen informatie over software en allerlei andere soorten informatie e...

Страница 2: ...er amplifier and power supply by using advanced DSP control Protective circuits designed to meet the reliability requirements for professional use prevent problems in the field g A variety of I O terminals enabling flexible system connections A mixing function is available which mixes multiple input sources and outputs them In addition a through output terminal is available to make it easy to conn...

Страница 3: ...n the built in limiter is activated or when the input level is too high and the sound is distorted When that happens lower the output level of the connected device or lower the input level or master level of this unit d EXT SUB MODE Select for normal use Select when using a subwoofer e FRONT LED Selects the display setting of the FRONT LED indicator white POWER Lights when the power is turned on L...

Страница 4: ...s too high and the sound is distorted When that happens lower the output level of the connected device or lower the input level or master level of this unit b PHASE Switches the polarity for the subwoofer Select the one that improves the playback of low frequencies when using the subwoofer with other speakers c FRONT LED Selects the display setting of the FRONT LED indicator white POWER Lights whe...

Страница 5: ...m the installation safely CAUTION At least two persons should together lift the speaker to install Give sufficient consideration to safety when performing the work For the speaker pole use a 35 mm diameter one side M20 screw in speaker pole Use a commercially available product with a length of 900 mm or less Pioneer DJ will not be liable for any damages including but not limited to loss of busines...

Страница 6: ... as a fixed installation you can remove the casters When using it with the casters removed be sure to put back the caster fixing screws If you use it with the screws removed the sound quality will be affected by air leakage Caster M5 hex screw thread length 25 mm EQ MODE Settings Four EQ modes FLAT BASS SPEECH and WEDGE are available for the full range models EQ MODE can be selected from four opti...

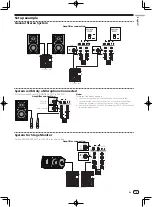
Страница 7: ... with the speaker s output direction For example use the microphone from behind the speaker or change the direction of the microphone Use the microphone with the GAIN setting and INPUT LEVEL knob set to appropriate positions System for Stage Monitor Setting EQ MODE SELECT to WEDGE is recommended Amplifier connection DJ mixer etc It is recommended to set EQ MODE SELECT to SPEECH Amplifier connectio...

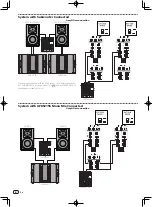
Страница 8: ...etc XPRS215S XPRS215S DJ mixer etc System with XPRS215S Mono Mix Connected Amplifier connection DJ mixer etc XPRS215S XPRS12 XPRS12 DJ mixer etc When using the speaker with the XPRS series it is recommended to set EXT SUB MODE of a full range model to and set CROSS OVER of the subwoofer model to 100 Hz ...

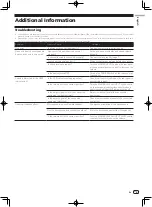
Страница 9: ...ng Is sound level set properly Turn the MASTER LEVEL knob on the rear panel of the speaker slowly to the right to increase the volume Is the power turned ON Turn on the POWER switch on the rear panel of the speaker Sound is distorted or the LIMIT indicator is lit Is the GAIN selector set appropriately Check that the GAIN setting on the rear panel is appropriate page 3 Is the volume set to the corr...

Страница 10: ...to 240 V 50 Hz 60 Hz Power consumption 162 W 167 W 175 W External dimensions W x H x D 320 mm x 520 mm x 374 mm 380 mm x 647 mm x 398 mm 445 mm x 750 mm x 416 mm Weight 18 9 kg 23 1 kg 29 2 kg XXPRS115S XPRS215S Type Active Subwoofer System characteristic Frequency Response 10 dB 40 Hz to 160 Hz 40 Hz to 160 Hz Maximum Sound Pressure Level peak 1 m 133 dB half space 135 dB half space Amplifier Amp...

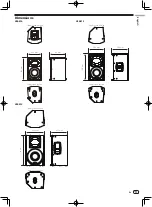
Страница 11: ... Dimensions XPRS10 374 mm 320 mm 520 mm Upper cross section Lower cross section XPRS12 398 mm 380 mm 647 mm Upper cross section Lower cross section XPRS15 416 mm 445 mm 750 mm Upper cross section Lower cross section ...

Страница 12: ...En 12 XPRS115S 633 mm 480 mm 476 mm Upper cross section XPRS215S Upper cross section 743 mm 811 mm 524 mm ...

Страница 13: ...UR PRODUCT TO THE COMPANIES at the addresses listed below for repair without advance contact for these companies are not repair locations AMERICA PIONEER ELECTRONICS USA INC P O BOX 1760 LONG BEACH CA 90801 1760 U S A EUROPE PIONEER EUROPE NV EUROPEAN SERVICE DIVISION HAVEN 1087 KEETBERGLAAN 1 B 9120 MELSELE BELGIUM ASEAN PIONEER ELECTRONICS ASIACENTRE PTE LTD SERVICE DEPARTMENT 2 JALAN KILANG BAR...

Страница 14: ...ANTABILITY AND FITNESS FOR A PARTICULAR PURPOSE TO A PERIOD NOTTO EXCEEDTHE WARRANTY PERIOD NO WARRANTIES SHALL APPLY AFTERTHE WARRANTY PERIOD SOME STATES DO NOT ALLOW LIMITATIONS ON HOW LONG AN IMPLIED WARRANTY LASTS AND SOME STATES DO NOT ALLOWTHE EXCLUSIONS OR LIMITATIONS OF INCIDENTAL OR CONSEQUENTIAL DAMAGES SOTHE ABOVE LIMITATIONS OR EXCLUSIONS MAY NOT APPLYTOYOU THISWARRANTY GIVESYOU SPECIF...

Страница 15: ...ࢃ ࡾࡸࡍࡃࡈグධࡃࡔࡉ ࠋ ࠉ ᐈᵝ ࡈグධ ࡓࡔ ࡓಖド ࡣࠊ ࠉ ಖドᮇ㛫ෆࡢࢧ ࣅࢫάືཬࡧ ࠉ ࡑࡢᚋࡢᏳ Ⅼ άືࡢࡓࡵ グ ෆ ᐜࢆ ࡉࡏ 㡬ࡃሙྜࡀࡈࡊ ࡲࡍ ࠉ ࡢ ࠊࡈ ᢎࡃࡔࡉ ࠋ ࠉࠉࠉ ࡈە ᗑᵝ ࠉ ୖࡆ ࠊ ᗑྡࠊఫᡤࠊ㟁ヰ ࠉ ྕࢆグධࡢ ࠊಖド ࢆ ᐈᵝ ࠉ Ώࡋࡃࡔࡉ ࠋࠉࠉࠉࠉࠉࠉ ࠛ ዉᕝ ᶓ ᕷす ࡳ ࡳࡽ ྕࠉ ᶓ ࢡࣉࣞ ࢫ 㝵 ୖࡆ ಖドᮇ㛫 ୖࡆ ࡼࡾ 㸱 PIONEER ELECTRONICS THAILAND CO LTD 17th Fl KPN Tower 719 Rama 9 Road Bangkapi Huaykwang Bangkok 10310 TEL 66 2 717 0777 PIONEER TECHNOLOGY MALAYSIA SDN BHD 16th Floor Menara Uni Asia 1008 Jalan ...

Отзывы: