46
XC-L11
Remote Control
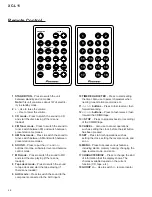
1 STANDBY/ON – Press to switch the unit
between standby and on modes.
Note: this unit consumes about 1W of electric-
ity in standby mode.
2 + – Use to raise the volume.
- – Use to lower the volume.
3 CD mode – Press to switch the sound to CD
and start the disc playing (if there’s one
loaded).
4 FM Tuner mode – Press to switch the sound to
tuner, switch between FM and switch between
preset station memories.
5 AM Tuner mode – Press to switch the sound to
tuner, switch between AM and switch between
preset station memories.
6 SOUND – Press to put the
$
and
›
buttons into tone, subwoofer level and balance
control mode.
7 MD mode – Press to switch the sound to MD
and start the disc playing (if there’s one
loaded).
8 Tape deck mode – Press to switch the sound
to tape deck and start the tape playing (if
there’s one loaded).
9 AUX mode – Press to switch the sound to the
component connected to the AUX inputs.
10 TIMER/CHARACTER – Press to start setting
the timer. Also use to select characters when
naming tuner station memories, etc.
11
! ⁄
buttons – Press to fast-reverse / fast-
forward scanning.
12
$ ›
buttons – Press to fast-reverse / fast-
forward the CD/MD/tape.
13
&
STOP – Press to stop playback (or recording)
of the CD/MD/tape.
14 CANCEL – Also use to cancel operations,
such as setting the clock, before the
SET
button
has been pressed.
15 SET – Press to finish operations such as
setting the clock, setting the reverse mode, and
so on.
16 MENU – Press to access various features,
including station memory naming, changing the
tape reverse mode, and so on.
17 CHARACTER/DISP – Press to change the kind
of information that the display shows. The
choices available depend on the current
function (CD, tape, etc.).
18 GUOUP +/- – Use to /- remote locator.
VOLUME
GROUP
SOUND
TIMER
SET
MENU
DISP
CANCEL
STANDBY/ON
1
7
¡
4
¢
CD
MD
TAPE
AM
FM
AUX
CHARACTER
DIRECT PLAY
3
1
2
2
3
4
5
6
7
9
10
11
11
8
12
12
13
15
16
17
14
18
18


