background image

28

Front Panel

   Rear Panel

   Remote

Contents 


Connections


  Playback 

  Setup 


„

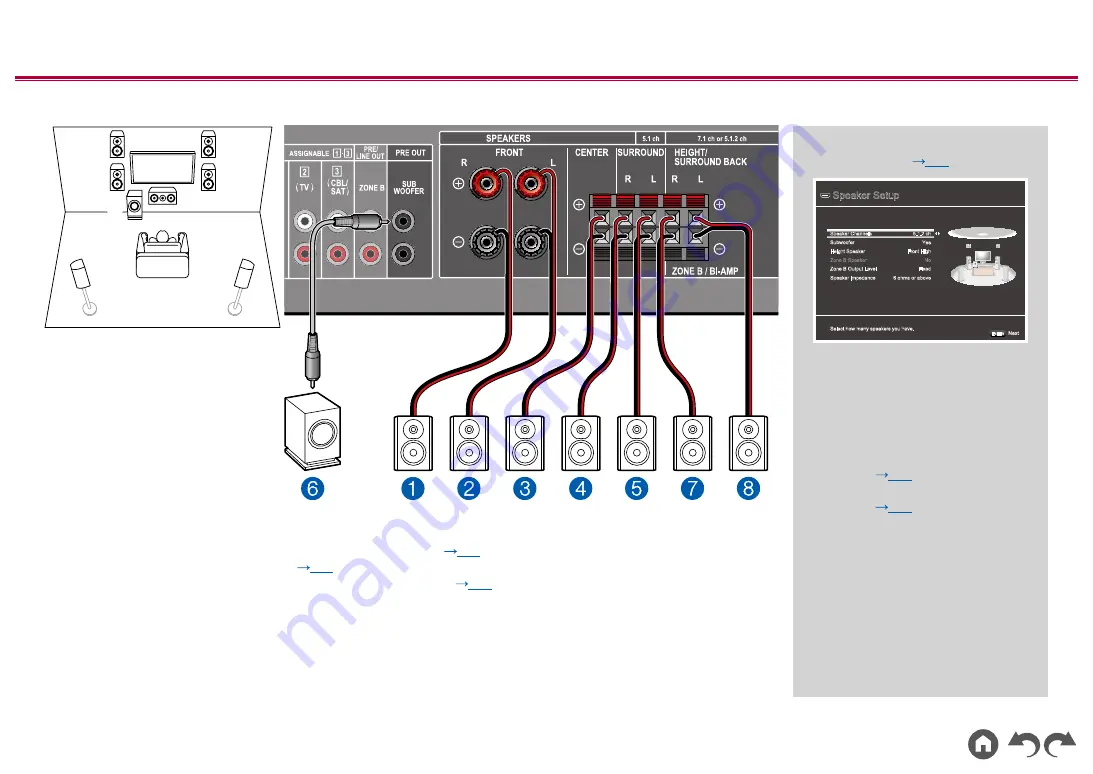
5.1.2 Channel System

7

8

1

3

2

4

5

6

This is a combination of the 5.1 Channel System and front high speakers. A front high speaker is a type of height speaker. 

You can select only one set of height speakers from the following three types for connection. 

 Front High Speakers/Rear High Speakers Installation Example ( 

p19

)

 Ceiling Speakers Installation Example ( 

p20

)

 Dolby Enabled Speakers (Dolby Speakers)  Installation Example ( 

p21

)

„

  "Speaker Setup" settings during 

Initial Setup ( 

p89

)

Speaker Setup

Select how many speakers you have.

Next

ENTER

Speaker Channels

Zone B Speaker

Speaker Impedance

5.1.2 ch

Yes

No

Fixed

6 ohms or above

Zone B Output Level

Subwoofer

Front High

Height Speaker

•  Speaker Channels: 

5.1.2 ch

• 

Subwoofer: 

Yes

•  Height Speaker: 

Select the 

type of height speaker actually 

installed.

• 

Zone B Speaker: 

No

• 

Zone B Output Level: 

Set any 

value 

p35

)

•  Speaker Impedance: 

Set any 

value 

p22

)

Содержание VSX-834

Страница 1: ...Front Panel Rear Panel Remote AV RECEIVER Instruction Manual VSX 834 En Table of contents Connections Connecting Speakers Playback Setup Troubleshooting Appendix Supplementary Information ...

Страница 2: ...onnecting Playback Devices 33 Connecting an AV Component with HDMI Jack Mounted 33 Connecting an Audio Component 34 Connecting an AV Component in a Separate Room ZONE B Connection 35 Connecting a Pre main Amplifier ZONE B 35 Connecting Antennas 36 Connecting the Power Cord 37 Playback AV Component Playback 39 Basic Operations 39 BLUETOOTH Playback 40 Basic Operations 40 Listening To the AM FM Radi...

Страница 3: ...des 62 Setup Setup Menu 67 Menu list 67 Menu operations 69 1 Input Output Assign 70 2 Speaker 73 3 MCACC 77 4 Audio Adjust 78 5 Source 80 6 Hardware 82 7 Miscellaneous 85 AV Adjust 86 Menu operations 86 Initial Setup with Auto Start up Wizard 88 Operations 88 Troubleshooting When the unit is operating erratically 92 Troubleshooting 93 Appendix About HDMI 99 General Specifications 101 ...

Страница 4: ...nna 1 Quick Start Guide 1 This document is an online instruction manual It is not included as an accessory Connect speakers with an impedance of 4 Ω to 16 Ω The power cord must be connected only after all other connections are completed We will not accept any responsibility for damage arising from the connection with equipment manufactured by other companies Specifications and appearance are subje...

Страница 5: ...firm the latest firmware contents and the firmware version of your product see the following section Update Information of the firmware For the latest firmware contents and the firmware version visit our company s website If the firmware version of your product differs from the latest one it is recommended to update the firmware To confirm the firmware version of your product press the button on t...

Страница 6: ...nction are not supported Do not connect these devices to the unit Delete any data stored on the USB storage device If HDMI CEC is set to On set it to Off Press Next select 6 Hardware HDMI press ENTER select HDMI CEC and select Off Depending on the USB storage device or its content long time may be required for loading the content may not be loaded correctly or power may not be supplied correctly O...

Страница 7: ...e is complete 8 Disconnect the USB storage device from the unit 9 Press STANDBY ON on the main unit to turn the unit into standby mode The process is completed and your firmware is updated to the latest version Do not use on the remote controller If an Error Message is Displayed If an error occurs Error is displayed on the display of the unit represents an alphanumeric character Refer to the follo...

Страница 8: ...8 Contents Connections Playback Setup Front Panel Rear Panel Remote Part Names Front Panel For details see p9 ...

Страница 9: ...ning mode p53 9 Remote control sensor Receives signals from the remote controller The signal range of the remote controller is within about 16 5 m at an angle of 20 on the perpendicular axis and 30 to either side 10 SOUND RETRIEVER button Turns on off the Sound Retriever function that provides better sound quality for compressed audio 11 MASTER VOLUME 12 STANDBY ON button 13 PHONES jack Headphones...

Страница 10: ...ls Receiving RDS broadcasting TUNED Receiving AM FM radio STEREO Receiving FM stereo SLEEP Sleep timer is set p84 AUTO STBY Auto Standby is set p84 4 Displays the audio output destination A Outputs audio only to the main room ZONE A B Outputs audio only to the separate room ZONE B AB Outputs audio to both the main room ZONE A and separate room ZONE B 5 Lights when headphones are connected 6 Blinks...

Страница 11: ...11 Contents Connections Playback Setup Front Panel Rear Panel Remote Rear Panel For details see p12 ...

Страница 12: ...udio signals with a digital optical cable or digital coaxial cable 6 ANTENNA AM LOOP FM UNBALANCE 75 Ω terminal The supplied antennas are connected 7 AUDIO IN jacks Input TV or AV component audio signals with an analog audio cable 8 ZONE B PRE LINE OUT jacks Output audio signals with an analog audio cable connected to a pre main amplifier or a power amplifier in a separate room ZONE B 9 SUBWOOFER ...

Страница 13: ...ns Allows you to select the listening mode p53 10 DIMMER button You can switch the display off or adjust the brightness of the display in three steps 11 CLEAR button Deletes all characters you have entered when entering text on the TV screen 12 Fav button Used to register AM FM radio stations p43 13 SLEEP button Set the sleep timer Select the time from 30 min 60 min and 90 min p52 14 ZONE A B butt...

Страница 14: ...tents Connections Playback Setup Connections Connecting speakers 15 Connecting the TV 30 Connecting Playback Devices 33 Connecting an AV Component in a Separate Room ZONE B Connection 35 Connecting Antennas 36 Connecting the Power Cord 37 ...

Страница 15: ...s when using this unit Use the following flow chart to select the speaker layout that suits your speakers and usage environment You can check the connection method and default settings Use height speakers Yes No 5 1 2 Channel System p28 5 1 Channel System p24 5 1 Channel System ZONE SPEAKER p25 5 1 Channel System Bi Amping the Speakers p26 7 1 Channel System p27 ...

Страница 16: ...nd field Powered subwoofer reproduces the bass sound and creates the rich sound field The front speakers should be positioned at ear height while the surround speakers should be positioned just above ear height The center speaker should be set up facing the listening position at an angle Placing the powered subwoofer between the center speaker and the front speaker gives you a natural sound even w...

Страница 17: ...the sense of envelopment and connectivity of sound in the back sound field and provides a more real sound field The front speakers should be positioned at ear height while the surround speakers should be positioned just above ear height The center speaker should be set up facing the listening position at an angle Placing the powered subwoofer between the center speaker and the front speaker gives ...

Страница 18: ...sting of the basic 5 1 Channel System p16 and added height speakers Select the height speakers that suit your speakers and usage environment from the following three types Front High Speakers Rear High Speakers Installation Example p19 Ceiling Speakers Installation Example p20 Dolby Enabled Speakers Dolby Speakers Installation Example p21 ...

Страница 19: ... Installing the height speakers will enrich the sound field feeling in the upper space Front high speakers or rear high speakers should be installed at least 3 0 9 m higher than the front speakers Front high speakers should be installed directly above the front speakers and the distance between the rear high speakers should match the distance between the front speakers In both cases the speakers s...

Страница 20: ...enrich the sound field feeling in the upper space Install the top front speakers on the ceiling anterior to the seating position top middle speakers on the ceiling directly above the seating position and top rear speakers on the ceiling posterior to the seating position The distance between each pair should match the distance between the front speakers Dolby Laboratories recommends the setups of t...

Страница 21: ...speakers front or Dolby enabled speakers surround combined Dolby enabled speakers are special speakers designed to face the ceiling so that the sound is heard from overhead by bouncing the sound off the ceiling Installing the height speakers will enrich the sound field feeling in the upper space Install them either on the front speakers or on the surround speakers 7 8 Height Speakers Choose one of...

Страница 22: ... from the Setup menu press on the remote controller and set 2 Speaker Configuration Speaker Impedance p73 to 4 ohms Connect the Speaker Cables 1 2 12 mm Make correct connection between the unit s jacks and speaker s jacks side to side and side to side for each channel If the connection is wrong a bass sound will not be reproduced properly due to reverse phase Twist the wires exposed from the tip o...

Страница 23: ...s Connections Playback Setup Connect the Subwoofer a a Subwoofer cable Connect a powered subwoofer with this unit using a subwoofer cable Up to two powered subwoofers can be connected The same signal is output from each SUBWOOFER PRE OUT jack ...

Страница 24: ...lation p16 Speaker Setup settings during Initial Setup p89 Speaker Setup Select how many speakers you have Next ENTER Speaker Channels Zone B Speaker Speaker Impedance 5 1 ch Yes No Fixed 6 ohms or above Zone B Output Level Subwoofer Height Speaker Speaker Channels 5 1 ch Subwoofer Yes Height Speaker Zone B Speaker No Zone B Output Level Set any value p35 Speaker Impedance Set any value p22 ...

Страница 25: ...ayback in the main room ZONE A you can enjoy 2 ch audio of the same source in the separate room ZONE B at the same time Speaker Setup settings during Initial Setup p89 Speaker Setup Select how many speakers you have Next ENTER Speaker Channels Zone B Speaker Speaker Impedance 5 1 ch Yes Yes Variable 6 ohms or above Zone B Output Level Subwoofer Height Speaker Speaker Channels 5 1 ch Subwoofer Yes ...

Страница 26: ...kers Refer to the instruction manual of your speakers as well Speaker Setup settings during Initial Setup p89 Speaker Setup Select how many speakers you have Next ENTER Speaker Channels Zone B Speaker Speaker Impedance 5 1 ch Yes No Fixed 6 ohms or above Zone B Output Level Subwoofer Height Speaker Speaker Channels 5 1 ch Subwoofer Yes Height Speaker Zone B Speaker No Zone B Output Level Set any v...

Страница 27: ... speaker layout refer to Speaker Installation p17 Speaker Setup settings during Initial Setup p89 Speaker Setup Select how many speakers you have Next ENTER Speaker Channels Zone B Speaker Speaker Impedance 7 1 ch Yes No Fixed 6 ohms or above Zone B Output Level Subwoofer Height Speaker Speaker Channels 7 1 ch Subwoofer Yes Height Speaker Zone B Speaker No Zone B Output Level Set any value p35 Spe...

Страница 28: ...on Example p19 Ceiling Speakers Installation Example p20 Dolby Enabled Speakers Dolby Speakers Installation Example p21 Speaker Setup settings during Initial Setup p89 Speaker Setup Select how many speakers you have Next ENTER Speaker Channels Zone B Speaker Speaker Impedance 5 1 2 ch Yes No Fixed 6 ohms or above Zone B Output Level Subwoofer Front High Height Speaker Speaker Channels 5 1 2 ch Sub...

Страница 29: ... to two powered subwoofers can be connected in either combination Speaker Channels FRONT CENTER SURROUND SURROUND BACK HEIGHT Bi AMP ZONE B ZONE SPEAKER 2 1 ch 1 1 3 1 ch 1 1 4 1 ch 1 1 5 1 ch 1 1 6 1 ch 7 1 ch 2 1 2 ch 3 1 2 ch 4 1 2 ch 5 1 2 ch 1 You can select either Bi AMP or ZONE SPEAKER ...

Страница 30: ... or play the audio of the TV on this unit Connection with the TV differs depending on whether the TV supports the ARC Audio Return Channel function or not The ARC function transmits the audio signals of the TV via an HDMI cable and plays the audio of the TV on this unit To check if the TV supports the ARC function refer to the instruction manual of the TV etc Yes No Does your TV support the ARC fu...

Страница 31: ...ettings are required in the Setup menu after Initial Setup is completed Pres on the remote controller and set 6 Hardware HDMI Audio Return Channel to On p83 For detailed settings for TV connection CEC function and audio output refer to the instruction manual of the TV ARC function This function transmits the audio signals of the TV via an HDMI cable and plays the audio of the TV on this unit Conne...

Страница 32: ...u use a cable set top box etc connected to the input jack of this unit to watch TV without using a TV s built in tuner connection with a digital optical cable or analog audio cable is not required ARC function This function transmits the audio signals of the TV via an HDMI cable and plays the audio of the TV on this unit Connection to an ARC compatible TV is complete with one HDMI cable To check i...

Страница 33: ...p84 to On To play 4K or 1080p video use a high speed HDMI cable Setup The HDMI CEC function and HDMI Standby Through function are automatically enabled if you select Yes for 3 ARC Setup in Initial Setup p88 If No Skip is selected settings are required in the Setup menu after Initial Setup is completed Press on the remote controller and select 6 Hardware HDMI to make the settings p82 To enjoy digit...

Страница 34: ...ents Connections Playback Setup Connecting an Audio Component This is a connection example of an audio component Connect a CD player using a digital coaxial cable or analog audio cable a Analog audio cable b Digital coaxial cable a b OR CD ...

Страница 35: ...he ZONE B PRE LINE OUT jack of this unit and the LINE IN jack of the pre main amplifier or power amplifier in the separate room Setup When connecting the power amplifier set Zone B Output Level to Variable for Speaker Setup in the Initial Setup section p88 When setting Zone B Output Level from the Setup menu press on the remote controller and set 2 Speaker Configuration Zone B Output Level p73 to ...

Страница 36: ...ect the antenna to this unit and set up the antenna at the best position for listening while receiving radio signals Attach the indoor FM antenna to the wall using push pins or adhesive tape a Indoor FM antenna b AM loop antenna b a b a North American models European Australian and Asian models ...

Страница 37: ...37 Front Panel Rear Panel Remote Contents Connections Playback Setup Connecting the Power Cord Connect the power cord after all the connections are completed a Power cord a ...

Страница 38: ... Panel Rear Panel Remote Contents Connections Playback Setup Playback AV Component Playback 39 BLUETOOTH Playback 40 Listening To the AM FM Radio 41 ZONE B Playback 46 Convenience functions 48 Listening Mode 53 ...

Страница 39: ...put connected to the unit 2 Press the input selector whose name is the same as that of the jack to which the player is connected For example press BD DVD to play the player connected to the BD DVD jack Press TV to listen the sound of the TV When the CEC link function works the input switches automatically when a CEC compliant TV or player is connected to this unit using HDMI connection 3 Start pla...

Страница 40: ...Pioneer VSX 834 XXXXXX To connect another BLUETOOTH enabled device press and hold the BLUETOOTH button until Now Pairing is displayed and then perform step 2 This unit can store the pairing information of up to 8 paired devices The coverage area is approx 48 15 m Note that connection is not always guaranteed with all BLUETOOTH enabled devices Playing Back 1 Perform the connection procedure on the ...

Страница 41: ... procedure when this unit is on Tuning Automatically 1 Press TUNER repeatedly to select either AM or FM 2 Press MODE repeatedly to display TunMode Auto on the display 3 When you press the cursors automatic tuning starts and searching stops when a station is found When tuned in to a radio station the TUNED indicator on the display lights up When tuned in to an FM radio station the STEREO indicator ...

Страница 42: ... reception 1 Press TUNER repeatedly to select either AM or FM 2 Press MODE repeatedly to display TunMode Manual on the display 3 While pressing the cursors select the desired radio station Each time you press the cursors the frequency changes by 1 step If the button is held down the frequency changes continuously and if the button is released the frequency stops changing Frequency step setting Pre...

Страница 43: ...you want to register perform the following procedure 1 Press Fav so that the preset number on the display blinks 2 While the preset number is blinking approx 8 seconds repeatedly press the cursors to select a number between 1 and 40 3 Press Fav again to register the station When the station is registered the preset number stops blinking Repeat this steps to register your favorite AM FM radio stati...

Страница 44: ...sors to select a preset number Deleting a Preset Radio Station 1 Press TUNER 2 Press the cursors to select the preset number to delete 3 After pressing Fav press CLEAR while the preset number is blinking and delete the preset number When deleted the number on the display disappears Using RDS European Australian and Asian models p45 ...

Страница 45: ...e cursors on the remote controller to select the Program Type you want to search for and then press the ENTER button to start the search The Program Types displayed are as follows None News News reports Affairs Current affairs Info Information Sport Educate Education Drama Culture Science Science and technology Varied Pop M Pop music Rock M Rock music Easy M Middle of the road music Light M Light ...

Страница 46: ...laying Back 1 Press ZONE A B to select an audio output destination ZONE A Outputs audio only to the main room ZONE A A on the display of the main unit lights up ZONE B Outputs audio only to the separate room ZONE B B on the display of the main unit lights up ZONE A B Outputs audio to both the main room ZONE A and separate room ZONE B A and B on the display of the main unit light up 2 Start play on...

Страница 47: ...Level to Variable for Speaker Setup in the Initial Setup section p88 When setting Zone B Output Level from the Setup menu press on the remote controller and set 2 Speaker Configuration Zone B Output Level p73 to Variable If it is not set a large volume is output and the power amplifier speakers etc may be damaged If ZONE A B is selected as an audio output destination you can select only the Stereo...

Страница 48: ...eration e g Pressing the PERSONAL PRESET button will automatically switch the input selector to TUNER to receive the registered station Also the listening mode and volume level are switched as registered Perform the following steps in the state of the setting to register 1 Press and hold any of the 1 to 3 buttons of PERSONAL PRESET 2 Preset Written appears on the display and the setting is registe...

Страница 49: ... stations are registered TUNER s preset numbers 38 39 and 40 p43 are overwritten Using the registered settings 1 Press any of the 1 to 3 buttons of PERSONAL PRESET with which settings have been registered Pressing PERSONAL PRESET buttons turns the power on even if the main unit is in standby mode Checking the registered settings 1 Press select 1 Input Output Assign PERSONAL PRESET Information on t...

Страница 50: ...akers 2 Press or for adjustment Adjusting DIALOG Emphasizes movie lines and music vocals to listen to them more easily It is effective to movie lines in particular Also it exerts the effect even if the center speaker is not used Select a desired level from 1 low to 5 high 1 Press DIALOG 2 Press or for adjustment Depending on the input source or listening mode setting selection is not possible or t...

Страница 51: ...ear Panel Remote Contents Connections Playback Setup 2 Press or to adjust the level between 15 0 dB and 12 0 dB If you set the unit to the standby mode the adjustments you made will be restored to the previous statuses ...

Страница 52: ...lly when the specified time has elapsed Press SLEEP button on the remote controller to select the time from 30 min 60 min and 90 min Off The unit does not automatically enter standby mode You can also set this by pressing the button on the remote controller and selecting 6 Hardware Power Management Sleep Timer p84 on the Setup menu ...

Страница 53: ...EO buttons stores the listening mode that was selected last If content incompatible of the listening mode selected last is played the most standard listening mode for the content is automatically selected For details of the effects of each listening mode refer to Listening Mode Effects p58 For listening modes selectable for each audio format of input signals refer to Input Formats and Selectable L...

Страница 54: ...tone control features so you can enjoy even better sound quality The Pure Direct mode shuts down even more processes that affects sound quality so you get a more faithful reproduction of the original sound In this case the speaker calibration made with MCACC is invalid SURR button By pressing repeatedly you can select the audio format of the signals being input and switch between a variety of list...

Страница 55: ...TUS button on the main unit repeatedly will switch the display of the main unit in the following order When using a BLUETOOTH connection press the STATUS button on the main unit Not all the information is necessarily displayed Input source and volume Listening mode Input format The display is switched in a few seconds Sampling frequency Input signal resolution ...

Страница 56: ...D Dolby Audio DD 1 1 1 2 2 2 2 2 DD Dolby Audio DD 1 1 1 1 1 1 1 1 1 DTHD Dolby Audio TrueHD 1 1 1 1 1 1 1 1 1 Atmos Atmos 2 0 2 1 Atmos 3 0 3 1 Atmos 4 0 4 1 Atmos 5 0 5 1 Atmos 6 0 6 1 Atmos 7 0 7 1 Atmos 2 0 2 2 1 2 Atmos 3 0 2 3 1 2 Dsur Dolby Audio Surr Dsur 2 0 2 1 Dolby Audio Surr Dsur 3 0 3 1 Dolby Audio Surr Dsur 4 0 4 1 Dolby Audio Surr Dsur 5 0 5 1 Dolby Audio Surr Dsur 6 0 6 1 Dolby Au...

Страница 57: ...X DTS Virtual X PCM 1 1 1 1 1 3 3 3 3 DSD 1 1 1 2 2 2 2 2 Direct 1 1 1 1 1 1 1 1 1 Pure Direct 1 1 1 1 1 1 1 1 1 Stereo 4 4 4 4 4 4 4 4 4 Mono 4 4 4 4 4 4 4 4 4 Ext Mono Ext Stereo Classical Ent Show Entertainment Show Drama Unplugged F S Surround Front Stage Surround 4 5 4 5 4 5 4 5 1 Reproduced with the sound field according to the number of channels of input signals 2 Not output from surround b...

Страница 58: ...reproduced more faithfully by connecting surround back speakers or height speakers You can select this mode when inputting the Dolby Amos audio format Unlike existing surround systems Dolby Atmos does not rely on channels but rather enables the accurate placement of sound objects that have independent motion in a 3D space with even greater clarity Dolby Atmos is an optional audio format for Blu ra...

Страница 59: ...input According to the speaker layout the following listening modes are displayed DSur 2 0 2 1 When only front speakers are installed DSur 3 0 3 1 When front speakers and center speaker are installed DSur 4 0 4 1 When front speakers and surround speakers are installed DSur 5 0 5 1 When front speakers center speaker and surround speakers are installed DSur 6 0 6 1 When front speakers surround speak...

Страница 60: ...s low bit rates To enable transfer of this audio format connect via an HDMI cable and set audio output on the player to Bitstream output DTS HD HR DTS HD High Resolution This mode faithfully reproduces the sound design recorded in the DTS HD High Resolution Audio audio format DTS HD High Resolution Audio is an optional audio format based on 5 1 ch for Blu ray Discs It is possible to record a maxim...

Страница 61: ... 6 1 channel playback is achieved by the matrix decoder on this unit To enable transfer of this audio format connect via a digital cable and set audio output on the player to Bitstream output Ent Show Entertainment Show Suitable for rock or pop music Listening to music in this mode creates a lively sound field with a powerful acoustic image like being at a club or rock concert Ext Mono Extended Mo...

Страница 62: ...cal 3 Unplugged 3 Ent Show 3 Drama 3 Ext Stereo 4 Ext Mono 4 F S Surround 1 1 Cannot be selected if Speaker Virtualizer is set to Off 2 Cannot be selected when height speakers are installed 3 Surround speakers or height speakers need to be installed 4 A center speaker surround speakers or height speakers need to be installed Input Format Listening Mode PCM Music files except DSD Dolby TrueHD Stere...

Страница 63: ...f Speaker Virtualizer is set to Off 4 Cannot be selected when height speakers are installed 5 Surround speakers or height speakers need to be installed 6 A center speaker surround speakers or height speakers need to be installed Input Format Listening Mode Atmos 1 Stereo Atmos Classical Unplugged Ent Show Drama Ext Stereo Ext Mono F S Surround 2 1 With the firmware version before supporting Atmos ...

Страница 64: ...ted if Speaker Virtualizer is set to Off Input Format Listening Mode DTS Stereo DTS 1 2 DTS Neural X 3 DTS Virtual X 4 5 Classical 6 Unplugged 6 Ent Show 6 Drama 6 Ext Stereo 7 Ext Mono 7 F S Surround 4 1 Cannot be selected when the input format is 2 ch 2 A center speaker or surround speakers need to be installed 3 Cannot be selected when the input format is monaural 4 Cannot be selected if Speake...

Страница 65: ...selected when the input format is 2 ch 2 A center speaker or surround speakers need to be installed 3 Cannot be selected when the input format is monaural 4 Cannot be selected if Speaker Virtualizer is set to Off 5 Cannot be selected when height speakers are installed 6 Surround speakers or height speakers need to be installed 7 A center speaker surround speakers or height speakers need to be inst...

Страница 66: ...nnot be selected when height speakers are installed 5 Surround speakers or height speakers need to be installed 6 A center speaker surround speakers or height speakers need to be installed Input Format Listening Mode DTS X Stereo DTS X DTS Virtual X 1 2 Classical 3 Unplugged 3 Ent Show 3 Drama 3 Ext Stereo 4 Ext Mono 4 F S Surround 1 1 Cannot be selected if Speaker Virtualizer is set to Off 2 Cann...

Страница 67: ...nformation Confirm the registered contents of PERSONAL PRESET p72 2 Speaker 1 Configuration Change the settings of connection environment of the speakers p73 2 Crossover Change the settings of crossover frequencies p74 3 Distance Set the distance from each speaker to the listening position p75 4 Channel Level Adjust the volume level of each speaker p76 5 Dolby Enabled Speaker Change the settings o...

Страница 68: ...n multiple audio sources are connected to one input selector p81 6 Hardware 1 HDMI Change the settings for the HDMI functions p82 2 Bluetooth Change the settings for the Bluetooth function p83 3 Power Management Change the settings for the power save function p84 7 Miscellaneous 1 Tuner Change the frequency step for the tuner p85 2 Firmware Update Change the settings for Firmware Update p85 3 Init...

Страница 69: ...p 1 Input Output Assign 5 Source 7 Miscellaneous 6 Hardware 2 Speaker 3 MCACC 4 Audio Adjust 1 TV Out OSD 4 Analog Audio Input 5 Input Skip PERSONAL PRESET Information 2 HDMI Input 3 Digital Audio Input 6 Select the item with the cursor buttons of the remote controller and press ENTER to confirm your selection Use the cursors to change the default values To return to the previous screen press To e...

Страница 70: ... TV OSD may not be displayed depending on the input signal even if On is selected In this case change the resolution of the connected device Screen Saver 3 minutes Set the time to start the screen saver Select a value from 3 minutes 5 minutes 10 minutes and Off 2 HDMI Input Change input assignment between the input selectors and HDMI IN jacks Setting Item Default Value Setting Details BD DVD HDMI ...

Страница 71: ... jack to the TV input selector Supported sampling rates for PCM signals stereo mono from a digital input are 32 kHz 44 1 kHz 48 kHz 88 2 kHz 96 kHz 16 bit 20 bit and 24 bit 4 Analog Audio Input Change input assignment between the input selectors and AUDIO IN jacks If you do not assign a jack select Setting Item Default Value Setting Details BD DVD AUDIO 1 to AUDIO 3 Assign a desired AUDIO IN jack ...

Страница 72: ...r to skip the TUNER input selector Select Skip to skip this input BLUETOOTH Use Set whether to skip the BLUETOOTH input selector Select Skip to skip this input 6 PERSONAL PRESET Information Confirm the registered contents of 1 to 3 buttons of PERSONAL PRESET The registered settings are displayed in the list Setting Item Default Value Setting Details Preset Preset 1 Selects a preset number from amo...

Страница 73: ...s are connected to Zone B speaker terminals Yes When speakers are connected to Zone B speaker terminals No When speakers are not connected to Zone B speaker terminals Zone B Output Level Fixed Select whether to adjust the volume on the premain amplifier in the separate room or on this unit when outputting to Zone B Fixed Adjust on the pre main amplifier in the separate room Variable Adjust on this...

Страница 74: ...kers with sufficient low range capabilities When Front is set to Small this is set to Small If an item cannot be selected even though connection is correct check that the settings in Configuration Speaker Channels matches the number of connected channels Setting Item Default Value Setting Details Surround Small Set the low range capabilities for each channel by setting either small or large Small ...

Страница 75: ... speaker and the listening position Height Left 10 0 ft 3 00 m Specify the distance between each speaker and the listening position Height Right 10 0 ft 3 00 m Specify the distance between each speaker and the listening position Surround Right 10 0 ft 3 00 m Specify the distance between each speaker and the listening position Surr Back Right 10 0 ft 3 00 m Specify the distance between each speaker...

Страница 76: ...t 0 0 dB Select a value between 12 0 dB and 12 0 dB in 0 5 dB increments A test tone will be output each time you change the value Select the desired level Surround Right 0 0 dB Select a value between 12 0 dB and 12 0 dB in 0 5 dB increments A test tone will be output each time you change the value Select the desired level Surr Back Right 0 0 dB Select a value between 12 0 dB and 12 0 dB in 0 5 dB...

Страница 77: ...e the supplied speaker setup microphone in the listening position measure the test tones emitted by the speakers then the unit automatically sets the optimum volume level for each speaker the crossover frequencies and the distance from the listening position This also automatically adjusts the equalizers for the speakers and enables correction of distortion caused by the acoustic environment of th...

Страница 78: ...e 2 MCACC Data Check You can check the number of speaker channels connected and the content and values you have set for each of the speaker settings Speaker Setting You can check the number of speaker channels connected and the large and small settings you have set for the low range reproduction capabilities for each of the speakers Channel Level You can check the output level settings for each of...

Страница 79: ...re is switched in the product production process For details of firmware update see Additional Function Firmware Update p5 3 DTS Change the setting of when DTS signals are input Setting Item Default Value Setting Details Dialog Control 0 dB You can increase the volume of dialog portion of the audio up to 6 dB by 1 dB step so that you can hear the dialog easily in noisy atmosphere This cannot be se...

Страница 80: ...he setting Setting Item Default Value Setting Details Name Edit Input name 1 Select a character or symbol with the cursors and press ENTER Repeat this operation to input up to 10 characters A a Switches between upper and lower cases Pressing MODE on the remote controller also toggles between upper and lower cases Moves the cursor in the arrow direction Removes a character on the left of the cursor...

Страница 81: ...tting COAXIAL When giving priority to the input signal from DIGITAL IN COAXIAL jacks This item can be selected only when the input to be set is assigned to the COAXIAL jack in the 1 Input Output Assign Digital Audio Input setting OPTICAL When giving priority to the input signal from DIGITAL IN OPTICAL jacks This item can be selected only when the input to be set is assigned to the OPTICAL jack in ...

Страница 82: ...to On set it to Off If a connected device is not CEC compatible or if you are not sure whether it is compatible set it to Off Setting Item Default Value Setting Details HDMI Standby Through Off When this is set to anything other than Off you can play the video and audio of an HDMI connected player on the TV even if the unit is in standby mode Also only Auto and Auto Eco can be selected if HDMI CEC...

Страница 83: ... desynchronization between the video and audio signals based on the information from the HDMI Lip Sync compatible TV On When enabling the automatic correction function Off When not using the automatic correction function 2 Bluetooth Change the settings for the Bluetooth function Setting Item Default Value Setting Details Bluetooth On Select whether or not to use the BLUETOOTH function On Enables c...

Страница 84: ...Details Sleep Timer Off You can allow the unit to enter standby automatically when the specified time elapses Select a value from 30 minutes 60 minutes and 90 minutes Off The unit does not automatically enter standby mode Auto Standby On Off This setting allows the unit to enter standby mode automatically after 20 minutes of inactivity without any video or audio input When USB Power Out at Standby ...

Страница 85: ... frequency step to suit your residential area Select 10 kHz or 9 kHz When this setting is changed all radio presets are deleted 2 Firmware Update Change the settings for Firmware Update Setting Item Default Value Setting Details Version The current firmware version is displayed Update via USB Press ENTER to select when updating the firmware via USB 3 Initial Setup Make the initial setup from the s...

Страница 86: ...ontroller and press ENTER to confirm your selection Use the cursors to change the settings To return to the previous screen press To exit the settings press HDMI Sound Delay If the video is behind the audio you can delay the audio to offset the gap Different settings can be set for each input selector It cannot be set if the listening mode is Pure Direct and the input signal is analog Audio Return...

Страница 87: ...l is other than 0 dB If you set the unit to the standby mode the adjustments you made will be restored to the previous statuses MCACC MCACC EQ Enable or disable the equalizer function that corrects for distortion caused by the acoustic environment of the room It cannot be set if the listening mode is Pure Direct Phase Control Correct phase disturbance in the low range to enhance the bass This enab...

Страница 88: ...Press on the remote controller to turn the unit on 4 When the language selection screen is displayed on TV select the language with the cursors and press ENTER Select the item with the cursors of the remote controller and press ENTER to confirm your selection To return to the previous screen press If you have terminated the Initial Setup halfway turn this unit to standby mode Then turning the powe...

Страница 89: ...the equalizers for the speakers and enables correction of sound distortion caused by the acoustic environment of the room It takes between 3 and 12 minutes for calibration to be completed Each speaker outputs the test tone at high volume during measurement so be careful of your surroundings Also keep the room as quiet as possible during measurement If you connect a subwoofer check the power and vo...

Страница 90: ...ack Setup 3 ARC Setup To connect with an ARC compatible TV select Yes The ARC setting on this unit turns on and you can listen to the TV s audio through this unit If you select Yes the HDMI CEC function is enabled and power consumption increases during standby ...

Страница 91: ...ected device The AV receiver contains a microPC for signal processing and control functions In very rare situations severe interference noise from an external source or static electricity may cause it to lockup In the unlikely event that this happens unplug the power cord from the wall outlet wait at least 5 seconds and then plug it back in Our company is not responsible for damages such as CD ren...

Страница 92: ...ices Resetting the unit this resets the unit settings to the default If the restart of the unit does not solve the problem reset the unit and restore all the settings to the factory default at the time of purchase This may solve the problem If the unit is reset your settings are restored to the default values Be sure to note down your setting contents before performing the following operations 1 W...

Страница 93: ...er The unit turns off unexpectedly If 6 Hardware Power Management Auto Standby on the Setup menu is activated the unit automatically enters the standby mode The protection circuit function may have operated due to an abnormal rise in temperature of the unit In such a case the power turns off repeatedly even if the power is turned on each time Secure sufficient ventilation space around the unit wai...

Страница 94: ...nother listening mode to see if sound is output If surround back speakers are installed be sure to install surround speakers as well A maximum of 5 1 ch playback is possible when Bi Amping connection is used Be sure to remove the jumper bar on the speakers when using Bi Amping connection p22 The subwoofer produces no sound If the setting of the front speakers is Large the low range elements will b...

Страница 95: ...outs and Selectable Listening Modes p56 or Input Formats and Selectable Listening Modes p62 in Listening Mode Cannot listen to the sound in Dolby TrueHD Dolby Atmos or DTS HD Master Audio format If the audio in Dolby TrueHD Dolby Atmos or DTS HD Master Audio format cannot be output correctly in the source format set BD video supplementary sound or reencode secondary sound video additional audio et...

Страница 96: ...lution Error is displayed on the main unit display when video input via HDMI IN jack is not displayed In this case the TV does not support the resolution of the video input from the player Change the setting on the player Normal operation with an HDMI DVI adapter is not guaranteed In addition video signals output from a PC are not guaranteed p82 Images flicker The output resolution of the player m...

Страница 97: ...io wave in the 2 4 GHz range A metallic object near the unit can affect on the radio wave and BLUETOOTH connection may not be possible Check the following if the problem persists after you have confirmed the above Cannot connect with this unit Check if the BLUETOOTH function of the BLUETOOTH enabled device is enabled p83 Music playback is unavailable on the unit even after successful BLUETOOTH con...

Страница 98: ...r turn off Press the DIMMER button and change the brightness level of the display p13 Others Strange noise can be heard from the unit If you have connected another device to the same outlet as this unit strange noise may occur under the influence of the device If the symptom is remedied by removing the power plug of the other device from the outlet use different outlets for this unit and the devic...

Страница 99: ...liant devices exceeding the connectable number to the HDMI jack as shown below Blu ray Disc DVD players up to 3 units Blu ray Disc DVD recorders up to 3 units Cable TV tuner terrestrial digital tuner and satellite broadcasting tuner up to 4 units Operation has been confirmed on the following devices As of January 2019 Toshiba brand televisions Sharp brand televisions Toshiba brand players and reco...

Страница 100: ...ss DSD Supported sampling rates 2 8 MHz Your Blu ray Disc DVD player must also support the HDMI output of the above audio formats Supported resolutions HDMI IN1 to IN4 Copyright protection technology HDCP1 4 HDCP2 2 Color space Color Depth 720 480i 60 Hz 720 576i 50 Hz 720 480p 60 Hz 720 576p 50 Hz 1920 1080i 50 60 Hz 1280 720p 24 25 30 50 60 Hz 1680 720p 24 25 30 50 60 Hz 1920 1080p 24 25 30 50 6...

Страница 101: ...half power Input Sensitivity and Impedance 200 mV 47 kΩ LINE RCA Rated RCA Output Level and Impedance 1 V 470 Ω SUBWOOFER PRE OUT 1 V 2 3 kΩ ZONE B PRE LINE OUT Frequency Response 10 Hz 100 kHz 1 dB 3 dB Pure Direct Tone Control Characteristics 10 dB 20 Hz BASS 10 dB 20 kHz TREBLE Signal to Noise Ratio 109 dB IHF A LINE IN SP OUT Speaker Impedance 4 Ω 16 Ω Headphone Rated Output 80 mW 80 mW 32 Ω 1...

Страница 102: ...s 27 4 W HDMI Standby Through North American 25 8 W HDMI Standby Through Others Dimensions W H D 435 mm 148 mm 321 mm 17 1 8 5 13 16 12 5 8 Weight 8 kg 17 6 lbs Maximum radio frequency power transmitted in the frequency band s European 2402 MHz 2480 MHz 4 dBm e i r p HDMI Input IN1 BD DVD IN2 GAME IN3 CBL SAT IN4 STRM BOX Output OUT Supported Audio Return Channel 3D 4K 60 Hz 6G HDR10 BT 2020 HLG D...

Страница 103: ... SUBWOOFER PRE OUT Speaker Outputs FRONT L R North American models support banana plugs CENTER SURROUND L R SURROUND BACK L R or ZONE B L R Phones PHONES Front ø6 3 mm 1 4 Others Setup Mic 1 Front USB 1 Power supply only 1 0 A Specifications and features are subject to change without notice License and Trademark ...

Страница 104: ...SN 29403616A_EN 2019 Onkyo Pioneer Corporation All rights reserved Pioneer and MCACC logo are trademarks of Pioneer Corporation and are used under license H1902 1 ...

Отзывы: