background image


Listening to your system

05


39


En


Playing other sources


1

Turn on the power of the playback component.

2

Turn on the power of the receiver.

3

Select the source you want to playback.


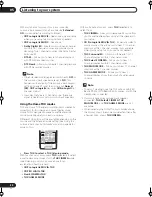
Use the 


MULTI CONTROL


 buttons (or 


INPUT SELECT


).


4

Start playback of the component you selected in 

step 1.


Selecting the multichannel analog 
inputs


If you have connected a decoder or a DVD player with 
multichannel analog outputs to this receiver (page 17), 
you must select the analog multichannel inputs for 
surround sound playback. 


1

Make sure you have set the playback source to 

the proper output setting.


For example, you might need to set your DVD player to 
output multichannel analog audio.


2

Press MULTI CH IN on the front panel.


To cancel playback from the multichannel inputs, press 


MULTI CH IN


 once again.


 Note


• When playback from the multichannel inputs is 

selected, you can’t use the 


ACOUSTIC EQ


DIALOG 

E


SIGNAL SELECT


INPUT ATT


TONE


, and 


MIDNIGHT/LOUDNESS


 buttons, as well as any of 

the listening modes (including 


STEREO/DIRECT


 and 

the Extended mode).

• When playback from the multichannel inputs is 

selected, only the volume and channel levels can be 
set.

• You can’t listen to your speaker B (Second Zone) 

system during playback from the multichannel 
inputs.


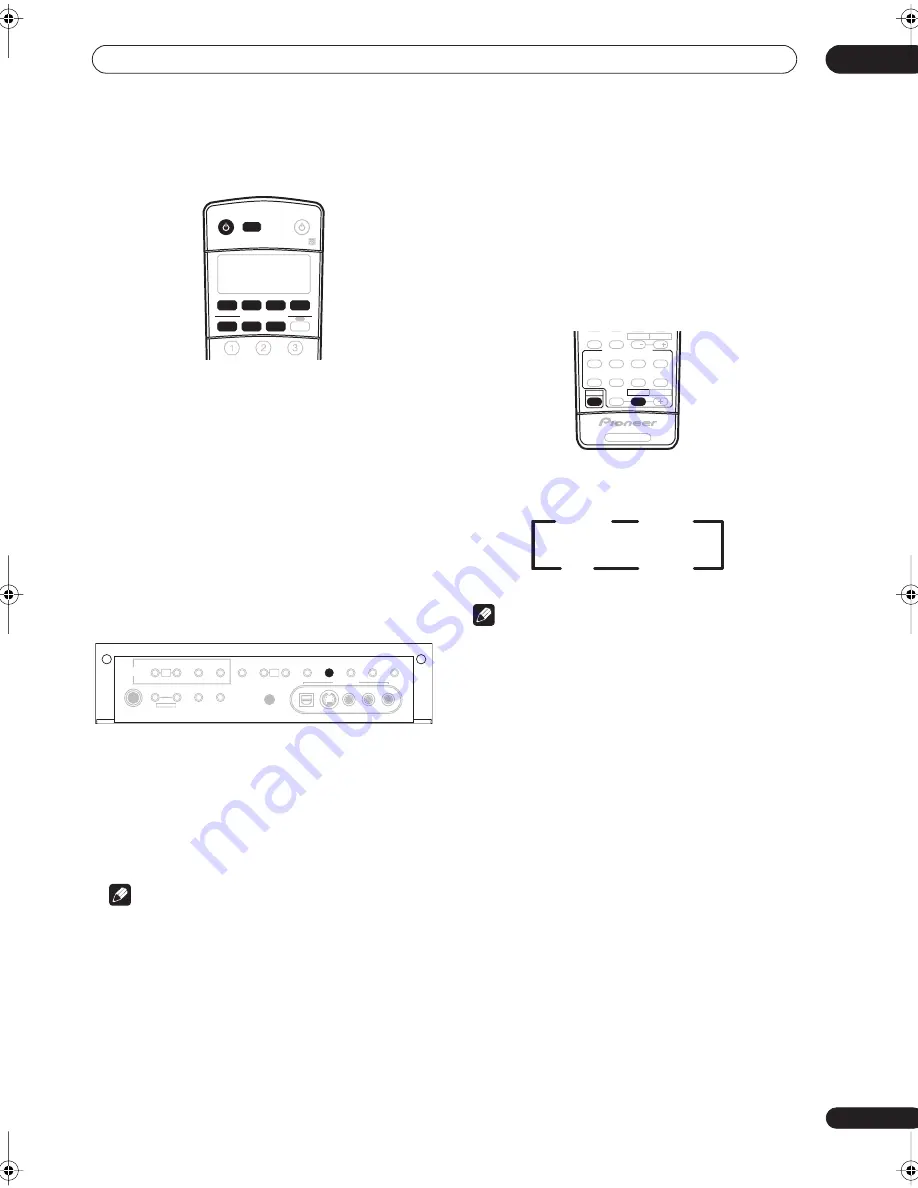
Using the sleep timer


The sleep timer switches the receiver into standby after a 
specified amount of time so you can fall asleep without 
worrying about the receiver being left on all night. Use 
the remote control to set the sleep timer.


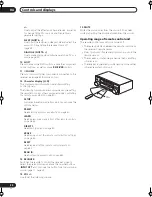
Press SHIFT+SLEEP repeatedly to set the sleep 

time.


 Note


• You can check the remaining sleep time at any time 

by pressing 


SHIFT+SLEEP


 once. Pressing repeatedly 

will cycle through the sleep options again.

• You can also switch off the sleep timer simply by 

switching off the receiver. 

RECEIVER

MULTI CONTROL

SOURCE

INPUT

SELECT

DVD/LD

TV/SAT

DVR/VCR

TV CONT

CD

CD-R/TAPE

TUNER

RECEIVER

PHONES

TUNER

CONTROL

TUNER

EDIT

SYSTEM

SETUP

RETURN

INPUT

ATT

FL

DIMMER

MCACC

SETUP MIC

DIGITAL IN

S-VIDEO

VIDEO

VIDEO2  INPUT

AUDIO

L

R

MULTI JOG

TUNING/

 STATION

BAND

MPX

TONE

ACOUSTIC

EQ

DIALOG

ENHANCEMENT

MULTI CH

IN

SIGNAL
SELECT

EXTENDED

MODE

SPEAKERS

MIDNIGHT/

LOUDNESS

MULTI

JOG

MULTI

JOG

RECEIVER CONTROL

SHIFT

THX

SLEEP

DIALOG E

AUTO SURR

STANDARD

ADV.SURR

STEREO

MPX

AUDIO

CH RETURN

SUBTITLE

MIDNIGHT/

LOUDNESS

SIGNAL 

SELECT

EFFECT 

/CH SEL

ACOUSTIC 

EQ

HDD

CH

CH

DVD

RECEIVER

Off

30 min

60 min

90 min

VSX_1015.book.fm 39 ページ 2004年11月29日 月曜日 午後2時38分

Содержание VSX-1015TX

Страница 1: ... your purchase will be on file for reference in the event of an insurance claim such as loss or theft Improve product development Your input helps us continue to design products that meet your needs Receive a free Pioneer newsletter Registered customers can opt in to receive a monthly newsletter Receive free tips updates and service bulletins on your new product ...

Страница 2: ...tion to User Alteration or modifications carried out without appropriate authorization may invalidate the user s right to operate the equipment D8 10 2_En CAUTION This product satisfies FCC regulations when shielded cables and connectors are used to connect the unit to other equipment To prevent electromagnetic interference with electric appliances such as radios and televisions use shielded cable...

Страница 3: ...grounding of the mast and supporting structure grounding of the lead in wire to an antenna discharge unit size of grounding conductors location of antenna discharge unit connection to grounding electrodes and requirements for the grounding electrode See Figure A LIGHTNING For added protection for this product during a lightning storm or when it is left unattended and unused for long periods of tim...

Страница 4: ... 26 Remote control 28 Operating range of remote control unit 30 05 Listening to your system Auto playback 31 Listening in surround sound 31 Standard surround sound 31 Using the Home THX modes 32 Using the Advanced surround effects 33 Dolby Pro Logic IIx Music settings 33 Neo 6 Music settings 34 Listening in stereo 34 Listening with Acoustic Calibration EQ 34 Choosing the input signal 35 Using the ...

Страница 5: ...ers 59 Bi wiring your speakers 59 Connecting additional amplifiers 60 Using this receiver with a Pioneer plasma display 60 Using the SR mode with a Pioneer plasma display 61 11 Other Settings The Input Assign menu 62 The Other Setup menu 63 Dynamic Range Control Setup 64 Dual Mono Setup 64 LFE Attenuator Setup 65 SR Setup for Pioneer plasma displays 65 12 Additional information Troubleshooting 66 ...

Страница 6: ...rround sound decoding for Dolby Surround sources but will also generate convincing surround sound for any stereo source Also with the addition of a surround back speaker you can take advantage of the built in Dolby Digital EX and DTS ES decoders for six channel surround sound Windows Media Audio 9 Professional decoding It is possible to listen to the Windows Media Audio 9 Professional WMA9 Pro dis...

Страница 7: ...ear a cassette deck or close to a device that gives off a magnetic field This may interfere with the sound in direct sunlight in damp or wet areas in extremely hot or cold areas in places where there is vibration or other movement in places that are very dusty in places that have hot fumes or oils such as a kitchen Loading the batteries Caution Incorrect use of batteries may result in such hazards...

Страница 8: ... no time at all In most cases you can simply leave the receiver in the default settings Be sure to complete all connections before connecting this unit to an AC power source 1 Hook up your DVD player For surround sound you ll want to hook up using a digital connection from the DVD player to the receiver You can do this with either a coaxial recommended or an optical connection you don t need to co...

Страница 9: ...r cable you re going to use is properly prepared with about 3 8 in 10 mm of insulator stripped from each wire and the exposed wire strands twisted together fig A To connect a terminal unscrew the terminal a few turns until there is enough space to insert the exposed wire fig B Once the wire is in position tighten the terminal until the wire is firmly clamped fig C OUT IN CONTROL CD IN IN IN IN IN ...

Страница 10: ...ext page for more on this 6 Play a DVD and adjust the volume to your liking Make sure that DVD LD is showing in the receiver s display indicating that the DVD input is selected If it isn t press DVD LD on the remote control to set the receiver to the DVD input In addition to the basic playback explained in Playing a source on page 13 there are several other sound options you can select See Listeni...

Страница 11: ... or a chair 3 Press RECEIVER on the remote control then press the SYSTEM SETUP button An on screen display OSD appears on your TV Use the buttons and ENTER on the remote control to navigate through the screens and select menu items Press RETURN to exit the current menu Press SYSTEM SETUP at any time to exit the System Setup menu 4 Select AUTO MCACC from the System Setup menu then press ENTER 5 Mak...

Страница 12: ...as finished Select Skip to go back to the System Setup menu The MCACC indicator on the front panel will light to show the surround settings are complete The settings made in the Auto MCACC Setup should give you excellent surround sound from your system but it is also possible to adjust these settings manually using the System Setup menu starting on page 40 If you are using THX Certified speakers c...

Страница 13: ...yer to this receiver make sure that the player is set to output multichannel analog audio Note Depending on your DVD player or source discs you may only get digital 2 channel stereo and analog sound In this case the receiver must be set to a multichannel listening mode see Listening in surround sound on page 31 if you need to do this if you want multichannel surround sound Playing a source Here ar...

Страница 14: ...damaged if bent around sharp corners You can also use a standard RCA video cable for coaxial digital connections Video cables Standard RCA video cables These cables are the most common type of video connection and should be used to connect to the composite video terminals They have yellow plugs to distinguish them from cables for audio S video cables S video cables give you clearer picture reprodu...

Страница 15: ...gives priority to component S video then composite in that order The following chart shows when the video signal will be converted from the various video inputs left column for output to the MONITOR OUT jacks top row The mark above indicates that the component video input must be assigned before it will be output see Assigning the component video inputs on page 63 for more on this When recording v...

Страница 16: ...h this unit When connecting your equipment always make sure the power is turned off and the power cord is disconnected from the AC outlet The arrows indicate the direction of the signal Note If your digital connections are different from the default settings you should refer to The Input Assign menu on page 62 to assign the jacks to the proper component s If you have a have a DVD Audio or SACD com...

Страница 17: ...ipment always make sure the power is turned off and the power cord is disconnected from the AC outlet The arrows indicate the direction of the signal OUT IN CONTROL CD IN IN IN IN IN IN OUT OUT CD R TAPE MD VIDEO1 DVR VCR DVD LD TV SAT CEN TER SUR ROUND FRONT SUBW MULTI CH IN MONITOR VIDEO1 DVR VCR TV SAT DVD LD IN IN IN VIDEO AUDIO VIDEO S VIDEO IN OUT OUT ANTENNA AM LOOP FM UNBAL 75Ω Y PB PR R L...

Страница 18: ...ting to the front panel video terminal Front video connections are accessed via the front panel using the VIDEO2 button There are standard audio video jacks as well as an S video jack and an optical input Hook them up the same way you made the rear panel connections OUT IN CONTROL CD IN IN IN IN IN IN OUT OUT CD R TAPE MD VIDEO1 DVR VCR DVD LD TV SAT CEN TER SUR ROUND FRONT SUBW MULTI CH IN MONITO...

Страница 19: ... into the hole then snap the connector shut Using external antennas To improve FM reception Use an F connector to connect an external FM antenna using a coaxial 75Ω cable To improve AM reception Connect a 15 18 feet length of vinyl coated wire to the AM antenna terminal without disconnecting the supplied AM loop antenna For the best possible reception suspend horizontally outdoors AM loop antenna ...

Страница 20: ...d make sure to connect your speakers as necessary these connections are explained in Other connections on page 58 Caution Make sure no bare speaker wire is touching the back panel when the unit is switched on The power may cut off as a safety measure Speaker terminals 1 Twist exposed wire strands together 2 Loosen speaker terminal and insert exposed wire Make sure that all the bare speaker wire is...

Страница 21: ... at the TV screen Also make sure the center speaker does not cross the line formed by the leading edge of the front left and right speakers It is best to angle the speakers towards the listening position The angle depends on the size of the room Use less of an angle for bigger rooms Surround and surround back speakers should be positioned a foot and a half to three feet 60 cm 90 cm higher than you...

Страница 22: ... outlet Power supplied through this outlet is turned on and off by the receiver s power switch Total electrical power consumption of connected equipment should not exceed 100 W 0 8 A Caution Do not connect a TV set monitor heater or similar appliance to this unit s AC outlet Do not connect appliances with high power consumption to the AC outlet in order to avoid overheating and fire risk This can ...

Страница 23: ...oneer components Many Pioneer components have SR CONTROL jacks which can be used to link components together so that you can use just the remote sensor of one component When you use a remote control the control signal is passed along the chain to the appropriate component Note that if you use this feature make sure that you also have at least one set of analog audio or video jacks connected to ano...

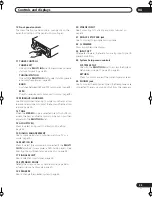
Страница 24: ...n Acoustic Calibration EQ is automatically set to ALL CH ADJUST after the Auto MCACC Setup page 11 or EQ Auto Setting page 43 is complete 8 Input select buttons Press to select an input source 9 MASTER VOLUME dial MASTER VOLUME DVD LD TV SAT DVR VCR VIDEO1 CD CD R TAPE MD STANDBY ON MULTI JOG TUNER VIDEO2 VSX 1015TX AUDIO VIDEO MULTI CHANNEL RECEIVER LISTENING MODE SELECT ENTER PHONES TUNER CONTRO...

Страница 25: ...CH IN Press to select the component connected to the MULTI CH IN terminals for example a DVD Audio player See Selecting the multichannel analog inputs on page 39 17 SIGNAL SELECT Use to select an input signal page 35 18 EXTENDED MODE Selects the surround back channel mode page 36 or virtual surround back mode page 37 19 SPEAKERS Use to change the speaker system page 58 20 VIDEO2 INPUT See Connecti...

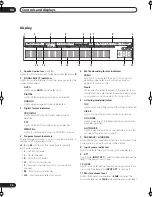
Страница 26: ...und sound on page 31 for more on this Neo 6 When one of the Neo 6 modes of the receiver is on this lights to indicate Neo 6 processing see Listening in surround sound on page 31 for more on this 6 Listening mode indicators THX Lights when one of the Home THX modes is selected VIR SB Lights during Virtual surround back processing ADV SURR Lights when one of the Advanced Surround modes has been sele...

Страница 27: ...s when the mono mode is set using the MPX button TUNED Lights when a broadcast is being received 14 Character display Displays various system information for example the reason an operation is not possible may flash in the display 15 SR Lights when the SR control mode has been switched on see Using the SR mode with a Pioneer plasma display on page 61 16 SLEEP Lights when the receiver is in sleep m...

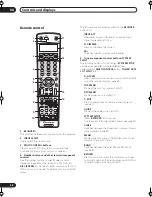
Страница 28: ...n directly using the number buttons page 49 TOP MENU Displays the disc top menu of a DVD DTV MENU Displays menus on a digital TV T EDIT Press to memorize and name a station for recall page 50 GUIDE Displays the guides on a digital TV SYSTEM SETUP Press RECEIVER first to access Use to access the System Setup menu see page 40 CLASS Switches between the three banks classes of radio station presets pa...

Страница 29: ...nges the audio language or channel on DVD discs CH RETURN Returns to the last channel selected with DTV SAT and some TVs SUBTITLE Displays changes the subtitles included in multilingual DVD Video discs CH Use to select channels when using a TV VCR DVR etc The following DVR controls can be accessed by pressing SHIFT REC Starts recording REC STOP Stops recording HDD DVD These buttons switch between ...

Страница 30: ...te controls on page 53 DIRECT F See Direct function on page 54 ERASE See Erasing one of the remote control button settings on page 54 RESET See Erasing all of the remote control presets on page 54 READ ID See Confirming preset codes on page 54 13 RECEIVER Switches the remote to control the receiver used to select the green commands above the number buttons INPUT ATT etc Also use this button to set...

Страница 31: ...y using Neo 6 CINEMA or 2 Pro Logic IIx MOVIE see Listening in surround sound below for more on these decoding formats The Auto Surround feature is canceled if you connect headphones or select the multichannel analog inputs Listening in surround sound Using this receiver you can listen to any source in surround sound However the options available will depend on your speaker setup and the type of s...

Страница 32: ...HX to select a THX listening mode With two channel sources press THX repeatedly to select a matrix decoding process for the THX CINEMA mode see Listening in surround sound above for an explanation of each process 2 Pro Logic IIx MOVIE THX 2 PRO LOGIC THX Neo 6 CINEMA THX THX GAMES MODE With multichannel sources press THX repeatedly to select from THX CINEMA Gives you cinema quality sound from your...

Страница 33: ...ode on page 36 If you press ADV SURR when the headphones are connected the PhonesSurround mode will automatically be selected You can t use the Advanced Surround effects with 88 2 96kHz PCM or DTS 96kHz 24 bit sources Tip When an Advanced Surround listening mode is selected the effect level can be adjusted in the range of 10 to 90 by pressing EFFECT CH SEL until EFFECT shows in the display The eff...

Страница 34: ...using the Acoustic Calibration Equalization set in Automatically setting up for surround sound MCACC on page 11 or Acoustic Calibration EQ on page 43 Refer to these pages for more on Acoustic Calibration Equalization While listening to a source press ACOUSTIC EQ Press repeatedly to select between ALL CH ADJ No special weighting is given to any one channel FRONT ALIGN All speakers are heard in acco...

Страница 35: ...2kHz 96 kHz DTS and WMA9 Pro digital signal formats including DTS 96kHz 24 bit With other digital signal formats set to ANALOG You may get digital noise when a LD or CD player compatible with DTS is playing an analog signal To prevent noise make the proper digital connections page 16 and set the signal input to DIGITAL Some DVD players don t output DTS signals For more details refer to the instruc...

Страница 36: ...r 6 1 encoded sources for example Dolby Digital EX or DTS ES Extended OFF Maximum 5 1 playback Note You must have surround back speakers connected and set to LARGE or SMALL in the Speaker Setting on page 46 and the Surround back speaker setting on page 40 must be set to Normal SB to hear the surround back channel You can t use the surround back channel with headphones the STEREO DIRECT mode You ca...

Страница 37: ...plied to 6 1 encoded sources for example Dolby Digital EX or DTS ES VirtualSB OFF Virtual Surround Back mode is switched off Note You can t use the Virtual Surround Back mode with headphones or with the THX or STEREO DIRECT modes You can only use the Virtual Surround Back mode if the surround speakers are on and the Surr Back setting is set to NO in the Speaker Setting on page 46 You can t hear th...

Страница 38: ...or when one of the THX modes has been selected Using the tone controls Depending on what you are listening to you may want to adjust the bass or treble using the front panel tone control 1 Press TONE to select the frequency you want to adjust Each press switches between BASS and TREBLE 2 Use the MULTI JOG dial to change the amount of bass or treble as necessary The bass and treble can be adjusted ...

Страница 39: ...is selected only the volume and channel levels can be set You can t listen to your speaker B Second Zone system during playback from the multichannel inputs Using the sleep timer The sleep timer switches the receiver into standby after a specified amount of time so you can fall asleep without worrying about the receiver being left on all night Use the remote control to set the sleep timer Press SH...

Страница 40: ...pecify the size number distance and overall balance of the speakers you ve connected see Manual speaker setup on page 45 Input Assign Specify what you ve connected to the digital and component video inputs see The Input Assign menu on page 62 Other Setup Make customized settings to reflect how you are using the receiver see The Other Setup menu on page 63 Surround back speaker setting Default sett...

Страница 41: ...olume to the middle position 1 Select MANUAL MCACC from the System Setup menu See Making receiver settings from the System Setup menu above if you re not already at this screen 2 Select the setting you want to adjust If you re doing this for the first time you might want to make these settings in order Fine Ch Level Make fine adjustments to the overall balance of your speaker system see Fine Chann...

Страница 42: ...lp you make detailed adjustments that you may not achieve using the Manual speaker setup below 1 Select Fine Ch Distance from the Manual MCACC setup menu 2 Adjust the distance of the left channel from the listening position 3 Select each channel in turn and adjust the distance as necessary Use cursor left right to adjust the delay of the speaker you selected to match the reference speaker The dela...

Страница 43: ...djusted automatically for the following settings ALL CH ADJUST A flat setting where all the speakers are set individually so no special weighting is given to any one channel FRONT ALIGN All speakers are set in accordance with the front speaker settings no equalization is applied to the front left and right channels You will return to the Acoustic Cal EQ setup menu after the Acoustic Calibration Eq...

Страница 44: ...ttons to select the next channel The front speakers can t be adjusted if you selected FRONT ALIGN The OVER indicator shows in the display if the frequency adjustment is too drastic and might distort If this happens bring the level down until OVER disappears from the display Tip Changing the frequency curve of one channel too drastically will affect the overall balance If the speaker balance seems ...

Страница 45: ...e doing this for the first time you may want to adjust these settings in order Speaker Setting Specify the size and number of speakers you ve connected page 46 Crossover Network Specify which frequencies will be sent to the subwoofer see Crossover Network below Channel Level Adjust the overall balance of your speaker system page 47 Speaker Distance Specify the distance of your speakers from the li...

Страница 46: ...t deeper bass the bass frequencies that would normally come out the front and center speakers are also routed to the subwoofer If you did not connect a subwoofer choose NO the bass frequencies are output from other speakers Note If you selected Second Zone or Front Bi Amp in Surround back speaker setting on page 40 you can t adjust the surround back settings If you select SMALL for the front speak...

Страница 47: ... Manual Move the test tone manually from speaker to speaker and adjust individual channel levels Auto Adjust channel levels as the test tone moves from speaker to speaker automatically 3 Confirm your selected setup option The test tones will start after you press ENTER 4 Adjust the level of each channel using the cursor left right buttons If you selected Manual use cursor up down to switch speaker...

Страница 48: ...r in 0 5 feet increments 3 When you re finished press RETURN You will return to the Manual SP Setup menu Tip For best surround sound make sure the surround back speakers are the same distance from the listening position Surround Back Speaker Position For the most effective results when using the THX Select2 Cinema and THX MusicMode listening modes see Using the Home THX modes on page 32 with the A...

Страница 49: ...t light when tuning to an FM station because the signal is weak press the MPX button to switch the receiver into mono reception mode This should improve the sound quality and allow you to enjoy the broadcast Tuning directly to a station Sometimes you ll already know the frequency of the station you want to listen to In this case you can simply enter the frequency directly using the number buttons ...

Страница 50: ...ER to confirm a character If no character is input a space is input The name is stored when ENTER is pressed after choosing the fourth character Tip To erase a station name simply repeat steps 1 3 and input four spaces instead of a name Once you have named a station preset you can press TUNER DISPLAY when listening to a station to switch the display between name and frequency Listening to station ...

Страница 51: ...e recording device and set the recording levels Refer to the instructions that came with the recorder if you are unsure how to do this Most video recorders set the audio recording level automatically check the component s instruction manual if you re unsure 5 Start recording then start playback of the source component Note The receiver s volume balance tone bass treble loudness and surround effect...

Страница 52: ...ess the MULTI CONTROL button for the component you want to control The LCD on the remote displays the component you want to control You can t assign the RECEIVER button 3 Use cursor left right to select PRESET then press ENTER 4 Use cursor up down to select the first letter of the brand name of your component then press ENTER This should be the manufacturer s name for example P for Pioneer 5 Use c...

Страница 53: ...s OK Certain buttons represent operations that cannot be learned from other remote controls The buttons available are shown below 6 To program additional signals for the current component repeat steps 4 and 5 To program signals for another component exit and repeat steps 1 through 5 7 Press the RECEIVER button to exit and store the operation s Note Some commands from other remote controls cannot b...

Страница 54: ...e time using your receiver to playback a different component This could let you for example use the remote control to set up and listen to a CD on the receiver and then use the remote control to rewind a tape in your VCR while you continue to listen to your CD player When direct function is on any component you select using the MULTI CONTROL buttons will be selected by both the receiver and the re...

Страница 55: ...URCE Switches the DTV on or off DTV Switches the TV or CATV between standby and on Cable TV Satellite TV TV Switches the DTV on or off DTV Press to get information on DTV programs DTV Use to choose the BLUE commands on a DTV menu DTV Use to choose the YELLOW commands on a DTV menu DTV Use to choose the GREEN commands on a DTV menu DTV Use to choose the RED commands on a DTV menu DTV AUDIO Use to s...

Страница 56: ... fast forward playback CD MD CD R VCR DVD LD DVR player Cassette deck Hold down for fast reverse playback CD MD CD R VCR DVD LD DVR player Cassette deck Stops playback on some models pressing this when the disc is already stopped will cause the disc tray to open CD MD CD R VCR DVD LD DVR player Cassette deck REC SHIFT Starts recording To prevent accidental recording this button must be pressed twi...

Страница 57: ...s the DVD player setup screen DVD DVR Player CH Selects channels VCR DVD DVR Player Selects tracks CD MD CD R Cassette deck AUDIO Changes the audio language or channel DVD DVR Player SUBTITLE Displays changes the subtitles on multilingual DVDs DVD DVR Player HDD SHIFT CH Switches to the hard disk controls when using a DVD HDD recorder DVR Player DVD SHIFT CH Switches to the DVD controls when using...

Страница 58: ...Second Zone setting only Use the SPEAKERS button on the front panel to select a speaker system setting As mentioned above if you have selected Normal SB the button will simply switch your main speaker system A on or off Press repeatedly to choose a speaker system option SP A Sound is output from speaker system A and the same signal is output from the pre out terminals SP B Sound is output from the...

Страница 59: ...h both Hi and Low terminals have two metal plates that connect the Hi to the Low terminals These must be removed when you are bi amping the speakers or you could severely damage the amplifier See your speaker manual for more information If your speakers have a removable crossover network make sure you do not remove it for bi amping Doing so may damage your speakers Bi wiring your speakers The reas...

Страница 60: ...hen the input is changed Important If you connect to a Pioneer plasma display using an SR cable you will need to point the remote control at the plasma display remote sensor to control the receiver In this case you won t be able to control the receiver using the remote control if you switch the plasma display off Note This receiver is compatible with all SR equipped Pioneer plasma displays from 20...

Страница 61: ... screen display of listening mode Automatic video input switching on the plasma display Automatic volume muting on the plasma display See also SR Setup for Pioneer plasma displays on page 65 for more on setting up the receiver 1 Make sure that the plasma display and this receiver are switched on and that they are connected with the SR cable See Using this receiver with a Pioneer plasma display abo...

Страница 62: ...lect Digital Input from the Input Assign menu 2 Select the number of the digital input to which you ve connected your digital component The numbers correspond with the numbers beside the inputs on the back of the receiver 3 Select the component that corresponds with the one you connected to that input Select between DVD LD TV SAT DVR VIDEO1 CD R CD or OFF Use the cursor left right buttons and ENTE...

Страница 63: ... to this receiver s component video MONITOR output 4 When you re finished press RETURN You will return to the Input Assign menu The Other Setup menu The Other Setup menu is where you can make customized settings to reflect how you are using the receiver 1 Switch on the receiver and your TV Use the RECEIVER button to switch on 2 Press RECEIVER on the remote control then press the SYSTEM SETUP butto...

Страница 64: ... listening at higher volume MID Mid setting MAX Dynamic range is reduced loud sounds are reduced in volume while quieter sounds are increased 3 When you re finished press RETURN You will return to the Other Setup menu Dual Mono Setup Default setting CH1 You can specify how dual mono encoded Dolby Digital soundtracks should be played Dual mono is not widely used but is sometimes necessary when two ...

Страница 65: ...the receiver is switched to one of the inputs that use the plasma display DVD LD or another one of functions below the volume on the plasma display is muted so only sound from the receiver is heard 3 Assign any input source connected to the plasma display to the corresponding input number This matches the receiver s input source with a numbered video input on the plasma display For example assign ...

Страница 66: ...back the power suddenly switches off The protection circuit has been activated because the lowest actual impedance of the speakers as opposed to the speakers rated impedance is dangerously low Turn down the volume When it s convenient go to Acoustic Calibration EQ on page 43 and lower the 40 Hz and 125 Hz equalizer levels using the manual setting Turning the digital safety feature on may allow you...

Страница 67: ...FF Set to Extended ON see Using the surround back channel Extended mode on page 36 The source is not a 6 1 channel playback source Switch the Extended mode to Extended ON see Using the surround back channel Extended mode on page 36 and choose a surround listening mode see Listening in surround sound on page 31 The surround back speakers are disconnected Check Connecting the speakers on page 20 to ...

Страница 68: ...he DTS signal output is turned off Make sure the player s settings are correct and or the DTS signal out is on Refer to the instruction manual supplied with the DVD player The digital output level is turned down on a CD player or other component equipped with digital output level adjustment capability The DTS signal has been altered by the player and cannot be read Set the digital volume level of ...

Страница 69: ...ingly Symptom Cause Remedy Symptom Cause Remedy No image is output when an input is selected The video connections are incorrect Make sure the video component is connected correctly see page 18 You are using component video connections for your source but not for your TV Using the video converter video signals can be converted from a composite or S video input to a component video output but not v...

Страница 70: ...a malfunction See also the operating instructions that came with your DVD player During playback of a DTS 96 24 source the display doesn t show 96kHz The receiver s input signal type is set to analog Set the receiver to AUTO or DIGITAL see Choosing the input signal on page 35 When playing Dolby Digital or DTS sources the receiver s format indicators do not light No digital connection or the digita...

Страница 71: ...not be remote controlled The remote control batteries have worn out Replace the batteries see Loading the batteries on page 7 Too far away or improper angle of operation Operate within 23 feet and a 30º angle of the remote sensor on the front panel see Operating range of remote control unit on page 30 There is an obstacle between the receiver and the remote control Remove the obstacle or move to a...

Страница 72: ...nerated by bass management in the receiver Dolby Surround is an encoding system which embeds surround sound information within a stereo soundtrack which a Dolby Pro Logic decoder can then use for enhanced surround listening with greater sound detail Manufactured under license from Dolby Laboratories Dolby Pro Logic and the double D symbol are trademarks of Dolby Laboratories DTS The DTS technologi...

Страница 73: ...theatre you use only two speakers located to the side of your head The Timbre Matching feature filters the information going to the surround speakers so that they more closely match the tonal characteristics of the sound coming from the front speakers This ensures seamless panning between the front and surround speakers Adaptive Decorrelation In a movie theatre a large number of surround speakers ...

Страница 74: ...me sources such as analog PCM DTS and Dolby Digital This accurately places all game audio surround information providing a full 360 degree playback environment THX Games Mode is unique as it gives you a smooth transition of audio in all points of the surround field THX is a trademark or registered trademark of THX Ltd Surround EX is a jointly developed technology of THX and Dolby Laboratories and ...

Страница 75: ...dance 1 Vp p 75 Ω Signal to Noise Ratio 65 dB Frequency Response 5 Hz to 100 MHz dB FM Tuner Section Frequency Range 87 5 MHz to 108 MHz Usable Sensitivity Mono 13 2 dBf IHF 1 3 µV 75 Ω 50 dB Quieting Sensitivity Mono 20 2 dBf Stereo 38 6 dBf Signal to Noise Ratio Mono 73 dB at 85 dBf Stereo 70 dB at 85 dBf Distortion Stereo 0 5 1 kHz Alternate Channel Selectivity 60 dB 400 kHz Stereo Separation 4...

Страница 76: ...ease do not ship your product to Pioneer without first calling the Customer Support Division at the above listed number for assistance Pioneer Electronics USA Inc Customer Support Division P O BOX 1760 Long Beach CA 90801 1760 U S A For warranty information please see the Limited Warranty sheet included with your product Should this product require service in Canada please contact a Pioneer Canadi...

Отзывы: