178
VSX-49TX, VSX-47TX
Remote Control Unit (VSX-47TX)
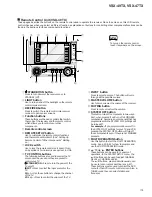
These pages describe the buttons on the remote control used to operate the receiver.
OFF
AV PRE-PROGRAMMED AND LEARNING
REMOTE CONTROL UNIT
AXD7290
S0URCE
Î
TV
MULTI CONTROL
SYSTEM RECEIVER
DVD/LD
TV
SAT
TV CONT
VCR1/
DVR
VCR2
VIDEO
MULTI
OPERATION
CD
DIMMER
CD-R/
TAPE1
TUNER
RECEIVER
1
INPUT ATT
2
LOUDNESS
3
SPEAKER A/B
4
VIDEO SEL
5
SIGNAL SEL
6
TAPE 2
DIRECT ACCESS DISP MODE
–
+
+
10
DISC
ENTER
7
EFFECT/CH SELL
8
TONE
9
BASS/TREBLE
0
SYSTEM SETUP
TUNER EDIT
MENU
REMOTE SETUP
STATUS
MPX
GUIDE
EXIT
RETURN
ENTER
TUNING
–
STATION
SURROUND
LISTENING
MODE
–
CHANNEL
–
1
4
DTV ON/OFF
TUNING
+
+
CHANNEL
+
¡
STATION
¢
8
3
7
EXTRA MENU
BAND
DTV MENU CLASS
TV INPUT
TV CONTROL
TV CH
TV VOL
VOLUME
INPUT
MIDNIGHT
DIGITAL
NR
STEREO
/DIRECT
THX
MUTE
STANDARD
LISTENING
CH SELECT
MULTI CH
INPUT
ACOUSTIC
CAL
ADVANCED
CONCERT
ADVANCED
CINEMA
(DVD-A/SACD)
LIGHT
SETUP
1
5
6
7
8
4
3
2
9
0
-
%
#
@
&
*
~
=
!
(
)
_
^
$
1
Remote Control Display Screen
2
SOURCE button
Use this button to turn off other components. You
must input the preset code in order to use this
function .
TV button
This is a dedicated TV button. Use it to turn on/off
your TV.
3
MULTI CONTROL buttons
The mode of the receiver and allow you to control
your other components.
DVD/LD:
Press to switch the remote control into
DVD/LD mode.
TV/SAT:
Press to switch the remote control into
TV/SAT (satellite tuner) mode.
VCR 1:
Press to switch the remote control into
VCR 1 mode.
VCR 2:
Press to switch the remote control into
VCR 2 mode.
MD/TAPE 1:
Press to switch the remote control
into MD/TAPE 1 mode.
CD:
Press to switch the remote control into CD
mode.
TUNER:
Press to switch the remote control into
TUNER mode.
TV CONTROL:
Press so that the remote control can
operate the TV CONTROL commands.
4
Number buttons
These can be used for many purposes depending on the
mode of the receiver. When the in receiver mode the
buttons operate as below:
Display DIMMER
Use to adjust the brightness of the main display.
INPUT ATT. button
Use to lower the input level of an analog signal that is
too powerful, thus causing the receiver to distort (in this
case the overload indicator will be flashing furiously).
LOUDNESS button
Switches the LOUDNESS mode on or off (for all modes
except THX and MULTI CH IN).
SPEAKER A/B button
Use to select the speaker system. A is the primary
setting. It plays all speakers hooked up to the A system.
A & B setting only plays the front speakers of both the A
& B systems and the subwoofer. Multi channel sources
will be down-mixed to these speakers so no sound will
be lost. B setting only plays the front speakers connect-
ed to the B system and multi channel sources will be
down-mixed to these two speakers. The button cycles
through the speaker systems as follows:
A
]
B
]
A&B
]
off.
VIDEO SELECT button
Use to toggle between the different video input possibil-
ities.
SIGNAL SELECT button
Press SIGNAL SELECT repeatedly to select one of the
following:
ANALOG :
To select an analog signal.
DIGITAL :
To select a digital signal (DVD/LD, TV/SAT, CD,
MD/TAPE 1, VCR 1, VCR 2).
2
RF :
To select an
2
RF signal (DVD/LD, TV/SAT, VCR 1,
VCR 2).
AUTO :
This is the default. If there are analog, digital and
2
RF signals input, the receiver automatically selects the
2
RF signal. If there are analog and digital signals input the
digital will be selected.TAPE 2 MONITOR button (See p.57)
Selects the tape deck (or MD recorder, etc.) connected
to the TAPE 2 MONITOR inputs/outputs. Allows monitor-
ing of a recording as it's being made.
EFFECT/CH SEL. button
Switches the tone adjust controls between the front,
center, surround and surround back speakers. You can
then use the +and – buttons to adjust the sound.
TONE buttons
This button has two functions. Firstly, it switches
between TONE on and TONE DIRECT, which bypasses
the tone circuitry. Secondly, you need to press the
button before using the CHANNEL SELECT buttons to
adjust the BASS & TREBLE.
Содержание VSA-AX10
Страница 123: ...VSX 49TX VSX 47TX 93 A B C D 1 2 3 4 1 2 3 4 L SIDE B ANALOG IN A D ASSY L ANP7390 A IC3901 ...
Страница 129: ...VSX 49TX VSX 47TX 99 A B C D 1 2 3 4 1 2 3 4 Q SIDE B VR PRE OUT ASSY Q ANP7392 A ...
Страница 132: ...VSX 49TX VSX 47TX 102 A B C D 1 2 3 4 1 2 3 4 R Q5814 Q5813 Q5805 IC5806 IC5807 ...
Страница 133: ...VSX 49TX VSX 47TX 103 A B C D 5 6 7 8 5 6 7 8 R SIDE B MOTHER ASSY R ANP7392 A IC5808 IC5801 IC5809 IC5807 ...
Страница 147: ...VSX 49TX VSX 47TX 117 A B C D 1 2 3 4 1 2 3 4 AA SIDE B LOCAL SUPPLY ASSY AA DSP DIODE ASSY AI ANP7391 B Q4054 AI ...
Страница 195: ...VSX 49TX VSX 47TX 165 A B C D 1 2 3 4 1 2 3 4 SIDE B K1 K2 K12 K13 K18 K6 K7 EL HON GND VDD ...
Страница 197: ...VSX 49TX VSX 47TX 167 A B C D 1 2 3 4 1 2 3 4 SIDE A SIDE B 7 3 2 2 PCB DIAGRAM ...


