background image

En

78

11

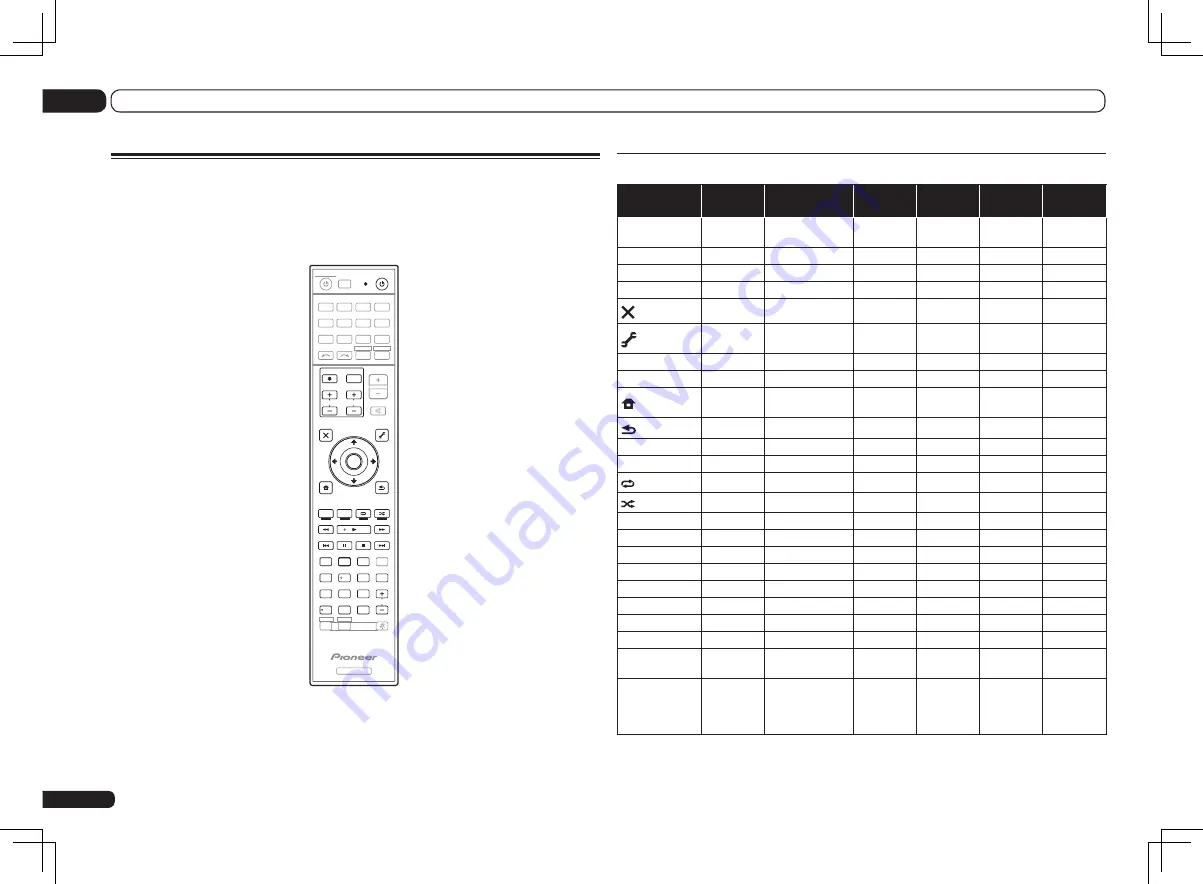
Controlling the rest of your system (In case of SC-LX75)

TV and Audio/Video components

Button(s)

TV

TV (Monitor)

BD/DVD

HDD/
BDR/DVR

VCR

SAT/
CATV

u


SOURCE

POWER ON/
OFF

POWER ON/OFF

POWER ON/
OFF

POWER ON/
OFF

POWER ON/
OFF

POWER ON/
OFF

Number buttons

numerics

numerics

numerics

numerics

numerics

numerics

!

/CLR

k


(dot)

KURO LINK

CLEAR

+

*

ENTER

 (CLASS)

CH ENTER

CH ENTER

ENTER

ENTER

ENTER

EXIT/INFO

EXIT

TOP MENU

TOP MENU

LIST

TOOLS/
GUIDE/EPG

USER MENU

TOOLS
<a>

GUIDE

GUIDE

i

/

j

/

k

/

l

i

/

j

/

k

/

l

i

/

j

/

k

/

l

i

/

j

/

k

/

l

i

/

j

/

k

/

l

i

/

j

/

k

/

l

ENTER

ENTER

ENTER

ENTER

ENTER

ENTER

HOME 
MENU

HOME MENU

HOME 
MENU

HOME 
MENU

HOME 
MENU

RETURN

RETURN

RETURN

RETURN

RETURN

HDD


(Red)

Red

Red

HDD

Red

DVD


(Green)

Green

Green

DVD

Green


(Yellow)

Yellow

Yellow

VCR

Yellow


(Blue)

Blue

Blue

MENU

MENU

Blue

d

d

d

d

d

e

AUTO SETUP

e

e

e

e

g

FREEZE

g

g

g

g

m

m

m

m

m

n

n

n

n

n

o

TV/DTV

AV SELECTION

o

o

o

p

SCREEN SIZE

p

p

p

AUDIO

AUDIO

AUDIO

AUDIO

AUDIO

AUDIO

AUDIO

DISP

DISPLAY

DISPLAY

DISPLAY

DISPLAY

DISPLAY/
INFO

CH +/–

CH +/–

CH +/–

OUTPUT 
RESOLU-
TION +/–
<a>

CH +/–

CH +/–

CH +/–

a  Controls for BD.

Controlling components

This remote control can control components after entering the proper codes (see 

Setting the remote 

to control other components

 on page 74 for more on this). Use the input function buttons to select 

the component.

!

 The 

TV CONTROL

 buttons on the remote control are dedicated to control the TV assigned to the 

TV CTRL

 button. If you have two TVs, assign the main TV to the 

TV CTRL

 button.

ZONE 2

ZONE 3

LIGHT

RECEIVER

D.ACCESS

CH  LEVEL A.ATT DIMMER

SIGNAL SEL MCACC SLEEP

TV / DTV

MPX

PQLS

PHASE  CTRL

THX

STATUS

PGM

STEREO

iPod CTRL

HOME

MENU

TUNE

TUNE

TOOLS

LIST

CH

TV  CONTROL

INPUT

INPUT  SELECT

iPod

USB

OPTION

TUNER

VIDEO

ADPT

HMG

SAT

CD

TV

RCU SETUP

SOURCE

RECEIVER MULTI

OPERATION

BDR

BD

DVD

DVR

HDMI

RECEIVER

TV CTRL

MUTE

MASTER

VOLUME

VOL

PRESET

TOP MENU

BAND

GUIDE

T.EDIT

VIDEO

PARAMETER

AUDIO

PARAMETER

ENTER

PRESET

RETURN

PTY

SEARCH

STANDARD

MENU

ADV SURR

AUTO / ALC /

DIRECT

AUDIO

HDMI OUT

INFO

CLASS

ENTER

DISP

HDD

DVD

5

4

6

8

0

7

9

1

3

 / CLR

CH

222

Содержание SC-LX75

Страница 1: ...SC LX85 SC LX75 ...

Страница 2: ...ent To avoid fire hazard the power cord should also be unplugged from the AC outlet when left unused for a long period of time for example when on vacation D3 4 2 2 2a _A1_En This product is for general household purposes Any failure due to use for other than household purposes such as long term use for business purposes in a restaurant or use in a car or ship and which requires repair will be cha...

Страница 3: ...ious types of playback using the listening modes 45 Selecting MCACC presets 47 Choosing the input signal 47 Better sound using Phase Control 47 Better sound using Phase Control and Full Band Phase Control 48 07 Playback with HOME MEDIA GALLERY inputs About remote control operation 49 Enjoying the Home Media Gallery 49 Features of Home Media Gallery 49 Introduction 49 Playback with Home Media Galle...

Страница 4: ... Making receiver settings from the System Setup menu 87 Manual speaker setup 87 Network Setup menu 89 Checking the Network Information 91 The Other Setup menu 91 14 Additional information Troubleshooting 1 94 Troubleshooting 2 100 Troubleshooting of wireless LAN 103 About status messages 104 Speaker Setting Guide 105 Important information regarding the HDMI connection 106 Cleaning the unit 106 Pre...

Страница 5: ...r Bi amping connection High quality surround j 3 Connecting the speakers Placing the speakers on page 17 Connecting the speakers on page 18 Installing your speaker system on page 19 Bi amping your speakers on page 18 j 4 Connecting the components About the audio connection on page 24 About the video converter on page 24 Connecting your TV and playback components on page 25 Connecting AM FM antenna...

Страница 6: ...rol without worrying about obstacles or the direction in which the remote control is pointing The CU RF100 is included with the SC LX85 sold separately with the SC LX75 En 6 01 Before you start Before you start Our philosophy Pioneer is dedicated to making your home theater listening experience as close as pos sible to the vision of the moviemakers and mas tering engineer when they created the ori...

Страница 7: ...ogether Insert the plus and minus sides of the batteries properly according to the marks in the battery case Batteries with the same shape may have different voltages Do not use different batteries together When disposing of used batteries please comply with governmental regulations or environmental public institution s rules that apply in your country area Operating range of remote control unit T...

Страница 8: ...tains Wiring Navi allowing you to easily make the receiver s connections and initial settings in dialog fashion High precision initial settings can be completed easily simply by following the instructions on the screen to make the connec tions and settings There are also other features enabling easy use of various functions including an Interactive Manual that operates in association with the rece...

Страница 9: ... access the Home Menu pages 34 36 54 80 and 87 RETURN Press to confirm and exit the current menu screen 9 i j k l ENTER Use the arrow buttons when setting up your surround sound system see page 80 and the Audio or Video options page 57 or 59 10 Receiver Control buttons Set the remote control operation selector switch to RECEIVER first to access STATUS Press to check selected receiver settings page...

Страница 10: ...eiver and paired with the remote control For details see Using the RF communications function on page 70 Depending on the communications environment two way communications may not work well and the remote control display may not reflect the receiver s status 1 Remote control operating zone indicator This indicates which zone the remote control is currently set to operate The display indicates the ...

Страница 11: ... ENTER Use the arrow buttons when setting up your surround sound system see page 80 and the Audio or Video options page 57 or 59 9 Receiver Control buttons Press first to access AUTO ALC DIRECT Switches between Auto Surround page 45 Auto Level Control Optimum Surround mode and Stream Direct mode page 46 STEREO Press to select stereo playback mode page 45 STANDARD Press for Standard decoding and to...

Страница 12: ...ER MONO dB 2 MULTI ZONE STEREO TrueHD PQLS ALC ATT 2 2 USB VIDEO HMG TV DVD HDMI DVR BD CD TUNER PHONO iPod 2 3 4 FULL BAND TUNED RDS 2 1 3 8 6 5 4 10 7 11 13 14 20 21 16 17 18 19 15 6 12 9 1 Signal indicators Light to indicate the currently selected input signal AUTO lights when the receiver is set to select the input signal automatically page 47 2 Program format indicators Light to indicate the ...

Страница 13: ... j to find radio fre quencies and use PRESET k l to find preset stations page 41 10 VIDEO PARAMETER Use to access the Video options page 59 11 SPEAKERS Use to change the speaker terminal page 61 12 MULTI ZONE controls If you ve made MULTI ZONE connections page 29 use these controls to control the sub zone from the main zone page 61 13 iPod iPhone iPad DIRECT CONTROL Change the receiver s input to ...

Страница 14: ...lugging in should be the final step When making connections also keep the power cords of the devices being connected unplugged from the power outlets Depending on the device being connected amplifier receiver etc the methods of connection and terminal names may differ from the explanations in this manual Also refer to the operating instructions of the respective devices Important Illustration show...

Страница 15: ...if you use any of the connections shown below other than A see Speaker system setting on page 87 The speakers from which sound is output can be switched according to the speaker layout usage pattern sound is not necessarily output from all connected speakers Use the SPEAKERS button to switch the speakers from which sound is output For details see Switching the speaker terminals on page 61 A 9 2 ch...

Страница 16: ...er System setting 5 1ch Bi Amp ZONE 2 With these connections you can simultaneously enjoy Bi amping connection of the front speak ers for high sound quality with 5 2 channel surround sound in the main zone with stereo playback on another component in ZONE 2 The selection of input devices is limited L R Main zone Sub zone ZONE 2 L R SL SR Front Bi Amp SW 1 SW 2 C C 7 2 channel surround system Front...

Страница 17: ... of the front and center speakers for high sound quality with 5 2 chan nel surround sound L R SL SR Front Bi Amp Center Bi Amp SW 1 SW 2 C Other speaker connections Your favorite speaker connections can be selected even if you have fewer than 5 2 speakers except front left right speakers When not connecting a subwoofer connect speakers with low frequency reproduction capabilities to the front chan...

Страница 18: ...el when you re listening to them Putting the speakers on the floor except the subwoofer or mounting them very high on a wall is not recommended For the best stereo effect place the front speakers 2 m to 3 m apart at equal distance from the TV If you re going to place speakers around your CRT TV use shielded speakers or place the speakers at a sufficient distance from your CRT TV If you re using a ...

Страница 19: ... IN 4 DVD IN 5 DVR BDR IN 6 ASSIGNABLE 1 6 SUBWOOFER LINELEVEL INPUT LINELEVEL INPUT Front height right Front height left Front wide right Front right Center Subwoofer 2 Subwoofer 1 Front left Surround left Surround back right Surround back left Surround right Front wide left B 7 2 channel surround system Speaker B connection Select 7 1ch Speaker B from the Speaker System menu See Speaker system s...

Страница 20: ...ront left Surround left Surround back right Surround back left Surround right ZONE 2 left C 7 2 channel surround system Front Bi amping connection High quality surround Select 7 1ch Front Bi Amp from the Speaker System menu See Speaker system setting on page 87 to do this When only connecting one surround back speaker connect it to the SURROUND BACK L Single terminals RS 232C ZONE 2 IN IN IN IN DV...

Страница 21: ... Subwoofer 2 Subwoofer 1 Front left Surround left Surround right Front wide left ZONE 2 right ZONE 2 left F 5 2 channel surround system Front Bi amping connection High quality surround ZONE 2 connection Multi Zone Select 5 1ch Bi Amp ZONE 2 from the Speaker System menu See Speaker system setting on page 87 to do this RS 232C ZONE 2 IN IN IN IN DVR BDR OUT OUT ZONE 3 OUT TV SAT VIDEO IN PHONO GND S...

Страница 22: ...t left Center Subwoofer 2 Subwoofer 1 Surround left Surround right Bi amp compatible speaker Speaker B right Bi amp compatible speaker Speaker B left G 5 2 channel surround system ZONE 2 ZONE 3 connection Multi Zone Select 5 1ch ZONE 2 3 from the Speaker System menu See Speaker system setting on page 87 to do this RS 232C ZONE 2 IN IN IN IN DVR BDR OUT OUT ZONE 3 OUT TV SAT VIDEO IN PHONO GND SIGN...

Страница 23: ... speaker Front right Bi amp compatible speaker Front left Bi amp compatible speaker Surround right Bi amp compatible speaker Surround left J 5 2 channel surround system Front and Center Bi amping connection High quality surround SC LX85 only Select 5 1ch F C Bi Amp from the Speaker System menu See Speaker system setting on page 87 to do this RS 232C ZONE 2 IN IN IN IN DVR BDR OUT OUT ZONE 3 OUT TV...

Страница 24: ...ion in the audio may occur when switching between audio formats or beginning playback Turning on off the device connected to this unit s HDMI OUT terminal during playback or disconnecting connecting the HDMI cable during playback may cause noise or interrupted audio HDMI the HDMI logo and High Definition Multimedia Interface are trademarks or regis tered trademarks of HDMI Licensing LLC in the Uni...

Страница 25: ...e TV and receiver are connected by HDMI connections if the TV supports the HDMI ARC Audio Return Channel function the sound of the TV is input to the receiver via the HDMI OUT terminal so there is no need to connect an audio cable In this case set TV Audio at HDMI Setup to via HDMI see HDMI Setup on page 54 Connecting your DVD player with no HDMI output This diagram shows connections of a TV with ...

Страница 26: ...nput This diagram shows connections of a TV with no HDMI input and DVD player or other playback component to the receiver With these connections the picture is not output to the TV even if the DVD player is connected with an HDMI cable Connect the receiver and TV using the same type of video cable as used to connect the receiver and player RS 232C ZONE 2 IN IN IN IN DVR BDR OUT OUT ZONE 3 OUT TV S...

Страница 27: ...ing it to the receiver s HDMI IN 1 or IN 2 terminal When doing so also connect the receiver and TV by HDMI see Connecting using HDMI on page 25 Connecting other audio components This receiver has both digital and analog inputs allowing you to connect audio components for playback When you set up the receiver you ll need to tell the receiver which input you connected the compo nent to see also The ...

Страница 28: ...but it s possible to add additional amplifiers to every channel of your system using the pre outs Make the connections shown below to add amplifiers to power your speakers IN ONO GND SIGNAL CD IN OUT 1 CONTROL OUT 2 PRE OUT MULTI CH IN SUBWOOFER 1 2 FRONT CENTER SURROUND SURR BACK FHEIGHT F WIDE L R CENTER FRONT SURROUND SURRBACK CD DVD COAXIAL ASSIGNABLE IN 1 IN 2 DVR BDR TV SAT OPTICAL ASSIGNABL...

Страница 29: ...s Making MULTI ZONE connections It is possible to make these connections if you have a separate TV and speakers for your primary ZONE 2 sub zone and a separate TV and a separate amplifier and speakers for your secondary ZONE 3 sub zone You will also need a separate amplifier if you are not using the MULTI ZONE setup using speaker terminals ZONE 2 on page 29 for your primary sub zone There are two ...

Страница 30: ... VIDEO ZONE 2 OUT can be used to output clear images The GUI screen is not displayed if only the COMPONENT VIDEO ZONE 2 OUT jack is connected To use the front wide speaker terminals for ZONE 2 PRE OUT 2 SURROUND SURR BACK FHEIGHT F WIDE FRONT CD D SIGNABLE 1 IN 2 DVR BDR TV SAT OPTICAL ASSIGNABLE IN1 IN2 IN3 VIDEO O ADA DC OUTPUT rWIRELESS LAN 10 100 LAN OUTPUT 5V 0 6 A MAX L R L Single FRONTWIDE ...

Страница 31: ... from your iPod using the controls of this receiver USB HDMI 3 INPUT iPod iPhone iPad AUTO SURR ALC STREAM DIRECT HOME THX STANDARD SURROUND ADVANCED SURROUND iPod iPhone iPad DIRECT CONTROL 5V 2 1A MENU iPod iPod cable supplied Switch the receiver into standby then use the supplied iPod cable to connect your iPod to the iPod iPhone iPad USB terminal on the front panel of this receiver It is also ...

Страница 32: ...ASSIGNABLE IN1 IN2 IN3 OUT VIDEO OUTPUT 5 V 0 1 A MAX ADAPTER PORT DC OUTPUT forWIRELESS LAN 10 100 LAN OUTPUT 5V 0 6 A MAX SURROUND L R L R Single FRONTWIDE B GHT SUBWOOFER Internet Modem Wireless LAN converter AS WL300 Router Connecting an IR receiver If you keep your stereo components in a closed cabinet or shelving unit or you wish to use the sub zone remote control in another zone you can use...

Страница 33: ...the plug by tugging the cord and never touch the power cord when your hands are wet as this could cause a short circuit or electric shock Do not place the unit a piece of furniture or other object on the power cord or pinch the cord in any other way Never make a knot in the cord or tie it with other cables The power cords should be routed so that they are not likely to be stepped on A damaged powe...

Страница 34: ... setting on page 87 and make sure to connect your speakers as necessary before continuing to step 4 En 34 04 Basic Setup Basic Setup About remote control operation Important The procedure for setting the receiver operation mode differs for the remote controls included with the SC LX85 and SC LX75 For the SC LX85 s remote control set the remote control operation selector switch to RECEIVER For the ...

Страница 35: ...sing speakers that affect the phase dipole speakers reflective speakers etc Reverse Phase may be displayed even if the speakers are properly connected If Reverse Phase is displayed the speaker s wiring and may be inverted Check the speaker connections If the connections were wrong turn off the power disconnect the power cord then reconnect properly After this perform the Full Auto MCACC procedure ...

Страница 36: ... function default and possible settings on page 36 In this case you need to tell the receiver what equipment is hooked up to which terminal so the buttons on the remote control correspond to the components you ve connected 1 Set the remote control to the receiver operation mode then press HOME MENU A Graphical User Interface GUI screen appears on your TV Use i j k l and ENTER to navigate through t...

Страница 37: ... HEIGHT Virtual Height Creates a virtual height channel sound for play back 57 V DEPTH Virtual Depth Plays with a sound field suited for 3D images 57 Other functions INPUT SELECT INPUT SELECTOR Switches the input 38 MASTER VOLUME MUTE Use to set the listening volume 38 LISTENING MODE Only Pioneer recommended modes can be selected 45 PQLS Plays using the PQLS function 56 Operable functions items De...

Страница 38: ...p homeav support ios eu Installing software versions other than indicated on the website of Pioneer to your iPod iPhone iPad may result in incompatibility with this receiver iPod iPhone and iPad are licensed for reproduction of non copyrighted materials or materials the user is legally permitted to reproduce En 38 05 Basic playback Basic playback About remote control operation Important The proced...

Страница 39: ...back press i j to switch the playback speed Faster f Normal f Slower SC LX85 Set the remote control operation selector switch to SOURCE then press iPod USB to switch the remote control to the iPod USB operation mode AUDIO PARAMETER TOP MENU BAND iPod CTRL PTY SEARCH CATEGORY LIST TOOLS HOME MENU T EDIT GUIDE VIDEO PARAMETER SOURCE TV RECEIVER INPUT MUTE TUNE TUNE PRESET PRESET MUTE VOL VOL TVCONTR...

Страница 40: ...en press ENTER to browse that folder To return to the previous level any time press RETURN 3 Continue browsing until you arrive at what you want to play then press d to start playback Copyrighted audio files cannot be played back on this receiver DRM protected audio files cannot be played back on this receiver Basic playback controls This receiver s remote control buttons can be used for basic pla...

Страница 41: ...e the band FM or AM if necessary 4 Tune to a station There are three ways to do this Automatic tuning To search for stations in the currently selected band press and hold TUNE i j for about a second The receiver will start searching for the next station stopping when it has found one Repeat to search for other stations Manual tuning To change the frequency one step at a time press TUNE i j High sp...

Страница 42: ... you see NO PTY DATA in the PTY display it means no PTY data can be received Press DISP for RDS information Each press changes the display as follows Radio Text RT Messages sent by the radio station For example a talk radio station may provide a phone number as RT Program Service Name PS The name of the radio station Program Type PTY This indicates the kind of program currently being broadcast Cur...

Страница 43: ...uetooth wireless technology both comply with Bluetooth Specification Ver 2 1 pairing of the two may be possible without the need for inputting a password In this case a passcode may be displayed on this receiver and on the device equipped with Bluetooth wireless technology If this happens check that the same passcode is displayed on this receiver and the device equipped with Bluetooth wireless tec...

Страница 44: ...basic playback of files stored on Bluetooth wireless technology devices Bluetooth wireless technology device should be compatible with AVRCP profile Depending on the Bluetooth wireless technology device you use operation may differ from what is shown in the remote control buttons SC LX85 SOURCE TV RECEIVER VOL VOL CH STATUS THX PQLS MPX MEMORY PHASE CTRL CH LEVEL PGM MENU STEREO AUTO ALC DIRECT ST...

Страница 45: ... Optimum Surround mode this receiver automatically optimizes sound balance in each scene based on actually set volume The sound balancer controls three major theater sound elements dialogue bass and surround with original algorithm Note When ALC is selected the effect level can be adjusted using the EFFECT parameter in Setting the Audio options on page 57 Standard surround sound The following mode...

Страница 46: ... modes when you want to hear the truest possible reproduction of a source All unnecessary signal processing is bypassed and you re left with the pure analog or digital sound source Note When listening sources in 2 Pro Logic IIz HEIGHT mode you can also adjust the H GAIN effect see Setting the Audio options on page 57 When listening to 2 channel sources in Dolby Pro Logic IIx Music mode there are t...

Страница 47: ...er operation mode 2 Press SIGNAL SEL to select the input signal corresponding to the source component Each press cycles through the options as follows AUTO The receiver selects the first available signal in the following order HDMI DIGITAL ANALOG ANALOG Selects an analog signal DIGITAL Selects an optical or coaxial digital signal HDMI Selects an HDMI signal When the HDMI audio output parameter is ...

Страница 48: ... of the speakers either follow the Full Auto MCACC procedure under Advanced MCACC see Automatically conducting optimum sound tuning Full Auto MCACC on page 34 or set Auto MCACC menu under Auto MCACC under ADVANCED MCACC to Full Band Phase Ctrl Select ALL when you perform the Auto MCACC with Auto MCACC menu Upon calibration of the frequency phase characteristics of the speakers the Full Band Phase ...

Страница 49: ...PCs running Microsoft Windows Vista or XP with Windows Media Player 11 installed PCs running Microsoft Windows 7 with Windows Media Player 12 installed DLNA compatible digital media servers on PCs or other components Files stored in a PC or DMS Digital Media Server as described above can be played via command from an external Digital Media Controller DMC Devices controlled by this DMC to play file...

Страница 50: ...dio on page 51 for more on this To listen to Internet radio stations you must have high speed broadband Internet access With a 56 K or ISDN modem you may not enjoy the full benefits of Internet radio The port number varies depending on the Internet radio station Check the firewall settings not have the built in DHCP server function it is necessary to set up the network manually Otherwise you canno...

Страница 51: ...ayed back or stopped The selected song is then registered in the Favorites folder Up to 20 songs or Internet radio stations can be registered To delete a registered song select the Favorites folder select the song you want to delete from the folder and press CLR The selected song is then deleted from the Favorites folder Advanced operations for Internet radio Saving Internet radio stations This re...

Страница 52: ... Digital Living Network Alliance DLNA is a cross industry organization of consumer elec tronics computing industry and mobile device companies Digital Living provides consumers with easy sharing of digital media through a wired or wireless network in the home The DLNA certification logo makes it easy to find products that comply with the DLNA Interoperability Guidelines This unit complies with DLN...

Страница 53: ...Supported LPCM b LPCM Sampling frequency 8 kHz to 48 kHz Quantization bitrate 16 bit 20 bit Channel 2 ch WAV wav LPCM Sampling frequency 8 kHz to 192 kHz Quantization bitrate 16 bit 20 bit 24 bit Channel 2 ch WMA wma WMA2 7 8 Sampling frequency 8 kHz to 48 kHz Quantization bitrate 16 bit Channel 2 ch Bitrate 5 kbps to 320 kbps VBR CBR Supported Supported WMA9 Sampling frequency 8 kHz to 48 kHz Qua...

Страница 54: ...settings set forth in step 6 below ALL Enabled for all linked functions PQLS Enabled only for the PQLS function When PQLS is selected link functions other than the PQLS function may not work properly If you wish to use all link functions select ALL 6 Select the Display Power Off setting you want If the TV s power is turned off while using the Control with HDMI function the receiver s Control with ...

Страница 55: ... menu screen of the Control with HDMI compatible TV set audio to be played through this receiver and the receiver will switch to the synchronized amp mode When in the synchronized amp mode you can adjust the receiver s volume or mute the sound using the TV s remote control When in the synchronized amp mode the synchronized amp mode is canceled when the receiver s power is turned off To turn the sy...

Страница 56: ...the player s audio output to Linear PCM On players compatible with PQLS 2 ch Audio PQLS only works when playing CDs Please refer to the operating instructions sup plied with your player for more information This function is activated when Control is set to ON If a listening mode other than AUTO SURROUND ALC DIRECT PURE DIRECT OPTIMUM SURR or STEREO is selected while the PQLS effect is enabled the ...

Страница 57: ...ther than Phase Con trol the LFE channel is delayed upon recording in the first place This function corrects for phase shifting on such discs c 0 to 16 ms d Default 6ms DELAY Sound Delay Some monitors have a slight delay when showing video so the soundtrack will be slightly out of sync with the pic ture By adding a bit of delay you can adjust the sound to match the presentation of the video c 0 0 ...

Страница 58: ...lected the sound field expands virtually to behind the display resulting in a sound field with the same depth as the 3D picture to achieve a better sense of presence OFF MIN MID MAX Setting What it does Option s Hi bit32 Creates a wider dynamic range with digital sources like CDs DVDs or BDs Smoother more delicate musical expression can be achieved by requantizing 16 bit PCM or 20 bit compressed a...

Страница 59: ...g is set to NO or if the setting for not connecting front height speakers is selected in the Speaker System settings Also the Virtual Height mode cannot be used when playing signals containing actual front height channel information l This mode is effective for contents with a sampling frequency of 48 kHz or less You can t use the Virtual Depth mode when the headphones are connected to this receiv...

Страница 60: ...This setting is only displayed when 480i p or 576i p video signals are being input Setting What it does Option s STREAM Stream Smoother e This improves elements that reduce picture quality mainly noticeable in network contents such as mosquito noise and block noise When AUTO is selected this unit s Stream Smoother function automatically turns on when network contents are played on the player suppo...

Страница 61: ...und is output from the speakers When you select 5 1ch SP B Bi Amp you can select from SP A ON Sound is output from the A speaker terminals maximum 5 channels SP B ON Sound is output from the two speakers connected to the B speaker terminals Multichannel sources will not be heard SP A B ON Sound is output from the A speaker terminals up to 5 channels depending on the source the two speakers connect...

Страница 62: ...n is pressed 5 When you re finished press MULTI ZONE CONTROL again to return to the main zone controls You can also press MULTI ZONE ON OFF on the front panel to switch off all output to the sub zone s You won t be able to switch the main zone off completely unless you ve switched off the MULTI ZONE control first If you don t plan to use the MULTI ZONE feature for a while turn off the power in bot...

Страница 63: ...r beforehand Set the Control with HDMI to OFF see HDMI Setup on page 54 1 Switch the receiver into standby 2 While holding down ENTER on the front panel press u STANDBY ON The display shows RESET c NO d 3 Select RESET using PRESET k l then press ENTER on the front panel The display shows RESET OK 4 Press ENTER to confirm OK appears in the display to indicate that the receiver has been reset to the...

Страница 64: ...mponent you want to control you can still teach the remote individual commands from another remote control see Programming sig nals from other remote controls on page 65 En 64 10 Controlling the rest of your system In case of SC LX85 Controlling the rest of your system In case of SC LX85 About the Remote Setup menu Important This section includes explanations for the SC LX85 s remote control For i...

Страница 65: ...ra tions buttons not covered in the presets after assigning a preset code The remote can store about 200 preset codes this has been tested with codes of Pioneer format only Certain buttons represent operations that can not be learned from other remote controls The buttons available are shown below DVD RECEIVER SOURCE MAIN MULTI OPERATION ZONE2 SOURCE TV RECEIVER 3 iPod USB OPTION MULTICH ADAPTER N...

Страница 66: ...time using your receiver to playback a different component This could let you for example use the remote control to set up and listen to a CD on the receiver and then En 66 10 Controlling the rest of your system In case of SC LX85 Note Note that interference from TVs or other devices will sometimes result in the remote control learning the wrong signal Some commands from other remote controls cann...

Страница 67: ...ll start the multi operation then press ENTER For example if you want to start the sequence by switching on your DVD player press DVD 4 Use i j to select EDIT CODE then press ENTER To erase any previously stored multi operations or shutdown sequences select CLEAR CODE above 5 Use i j to select a command in the sequence then press ENTER If this is the first command in the sequence select 1ST CODE O...

Страница 68: ...ARD ADV SURR IN TUNER HMG BD TV HDMI DVR BDR 1 2 ENTER RETURN BAND En 68 10 Controlling the rest of your system In case of SC LX85 Using System off RECEIVER SOURCE MAIN MULTI OPERATION ZONE2 3 DVD iPod USB OPTION MULTICH ADAPTER NET RADIO CD TUNER HMG BD TV HDMI DVR BDR 1 2 MULTI OPERATION 1 Press MULTI OPERATION MULTI OPERATE flashes in the display 2 Press u SOURCE The command sequence you progra...

Страница 69: ...een Yellow Yellow Yellow VCR Yellow Blue Blue Blue MENU TV DTV Blue d d d d d e AUTO SETUP e e e C e g FREEZE g g g D g m m m m A m n n n n n o ANT AV SELECTION o o o B o p SCREEN SIZE p p p E p AUDIO AUDIO AUDIO AUDIO AUDIO AUDIO AUDIO DISP DISPLAY DISPLAY DISPLAY DISPLAY DISPLAY INFO CH CH CH OUTPUT RESOLU TION a CH CH CH g n RECORD a Controls for BD Audio Video components Button s LD CD CD R SA...

Страница 70: ...r and remote control are possible by connecting the included RF adapter to the RS 232C and CU RF100 terminals For instructions on connecting the RF adapter see Connecting the RF adapter on page 15 Two way communications allow you to use the following functions The receiver can be operated by pointing the remote control in any direction 360º maximum line of sight distance for two way communications...

Страница 71: ...unications Make this setting as described at Operating this receiver by RF communications on page 71 Operating this receiver by RF communications Use this procedure to make the remote con trol settings to operate the receiver using RF two way communications The settings can be made individually for the main zone ZONE 2 and ZONE 3 Connect the receiver and RF adapter and pair the RF adapter and remo...

Страница 72: ...LX85 Operation is not possible unless the IR blaster is mounted in an appropriate position Whenever possible mount it above the other component s remote control sensor If mounted below the influence of external light etc could hamper reception Mount the IR blaster securely to a position near the other component s remote control sensor For the location of the other component s remote control sensor...

Страница 73: ...erate due to poor or erratic radio wave transmission When signal transmission is blocked by a wall or floor constructed of ferro concrete or metal Nearby large metal furniture objects In large crowds of people or near obstructive buildings Locations where another device using the same 2 4 GHz frequency is being used such as a Bluetooth wireless technology device or wireless LAN or in the vicinity ...

Страница 74: ...4 11 Controlling the rest of your system In case of SC LX75 Controlling the rest of your system In case of SC LX75 About the Remote Setup menu Important This section includes explanations for the SC LX75 s remote control For instructions for the SC LX85 s remote control see Controlling the rest of your system In case of SC LX85 on page 64 The Remote Setup mode is set by pressing the number button ...

Страница 75: ...nues to flash To cancel the preset setup mode press RCU SETUP 2 Press the input function button for the component you want to control The LED blinks once and flashes continuously 3 Point the two remote controls towards each other then press the button that will be doing the learning on this receiver s remote control The LED flashes once then stops flashing remaining lit The remote controls should ...

Страница 76: ... and TV CTRL settings cannot be made For other settable input functions see Setting the remote to control other components on page 74 For System off press the u SOURCE button The LED blinks twice and flashes continuously En 76 11 Controlling the rest of your system In case of SC LX75 2 Press and hold the input function button corresponding to the command to be erased for three seconds If the LED l...

Страница 77: ...programmed will run then all Pioneer components will switch off followed by this receiver switch of all the zones becomes off In order to avoid accidently switching off a DVD recorder that is currently recording no DVD recorder power off codes are sent Erasing the settings for the multi operation This erases all the settings programmed in the remote control for the multi operation 1 Press and hold...

Страница 78: ...AUDIO AUDIO AUDIO DISP DISPLAY DISPLAY DISPLAY DISPLAY DISPLAY INFO CH CH CH OUTPUT RESOLU TION a CH CH CH a Controls for BD Controlling components This remote control can control components after entering the proper codes see Setting the remote to control other components on page 74 for more on this Use the input function buttons to select the component The TV CONTROL buttons on the remote contro...

Страница 79: ... i j k l i j k l e g m n ENTER ENTER SACD SETUP b RETURN d d d d d e e e e e g g g g g m m m m m n n n n n o o o o o p p p p p AUDIO AUDIO PURE AUDIO b DISP DISPLAY INFO TIME b a Controls for MD b Controls for SACD TV Projector Button s TV Projector u SOURCE POWER ON 1 MOVIE 2 STANDARD 3 DYNAMIC 4 USER1 5 USER2 6 USER3 7 COLOR 8 SHARP 9 GAMMA 0 COLOR CLR SHARP ENTER CLASS COLOR TEMP EXIT INFO i j ...

Страница 80: ... the front speaker settings no equalization is applied to the front left and right channels If you selected ALL or Keep SP System as your Auto MCACC menu you can specify the MCACC preset where you want to save the SYMMETRY ALL CH ADJ and FRONT ALIGN settings En 80 12 The Advanced MCACC menu The Advanced MCACC menu About remote control operation Important The procedure for setting the receiver oper...

Страница 81: ...nd press ENTER in step 8 If you see an ERR message or the speaker configuration displayed isn t correct there may be a problem with the speaker connection If selecting RETRY doesn t work turn off the power and check the speaker connections If there doesn t seem to be a problem you can simply use i j to select the speaker and k l to change the setting and continue If the speaker is not pointed to t...

Страница 82: ...enu Manual MCACC setup You can use the settings in the Manual MCACC setup menu to make detailed adjustments when you re more familiar with the system Before making these settings you should have already completed Automatically conducting optimum sound tuning Full Auto MCACC on page 34 You only need to make these settings once unless you change the placement of your cur rent speaker system or add n...

Страница 83: ...he level down until OVER disappears from the display 3 When you re finished press RETURN You will return to the Manual MCACC setup menu Note Changing the frequency curve of one channel too drastically will affect the overall balance If the speaker balance seems uneven you can raise or lower channel levels using test tones with the TRIM feature Use k l to select TRIM then use i j to raise or lower ...

Страница 84: ...nt select EQ ON or EQ OFF and then START The following options determine how the reverb characteristics of your listening area are dis played in Reverb View EQ OFF You will see the reverb characteristics of your listening area without the equalization performed by this receiver before calibration EQ ON You will see the reverb characteristics of your listening area with the equalization performed b...

Страница 85: ...Use this to display the distance from the dif ferent channels to the listening position See Speaker Distance on page 89 for more on this 1 Select Speaker Distance from the MCACC Data Check menu 2 When MCACC is highlighted use k l to select the MCACC preset you want to check The distance from the various channels set at the selected MCACC preset is displayed is displayed for channels that are not c...

Страница 86: ... Full Auto MCACC on page 34 or Automatic MCACC Expert on page 80 either of which you should have already completed 1 Set the remote control to the receiver operation mode then press HOME MENU A Graphical User Interface GUI screen appears on your TV Use i j k l and ENTER to navigate through the screens and select menu items Press RETURN to exit the current menu 2 Select Data Management from the Hom...

Страница 87: ...al SP Setup are output at high volume 1 Select Manual SP Setup then press ENTER See Making receiver settings from the System Setup menu on page 87 if you re not already at this screen 2 Select the setting you want to adjust If you are doing this for the first time you may want to adjust these settings in order Speaker System Specifies how you are using your surround back speaker terminals and B sp...

Страница 88: ...ral characteristics If you re using THX speakers confirm that the crossover frequency is set to 80Hz 4 When you re finished press RETURN You will return to the Manual SP Setup menu En 88 13 The System Setup and Other Setup menus speakers see Bi amping your speakers on page 18 5 1ch F C Bi Amp Select this setting if you re bi amping your front and center speakers see Bi amping your speakers on page...

Страница 89: ...Setting This menu allows the user to adjust various THX features including Loudness Plus SBch pro cessing THX Ultra2 Select2 Subwoofer on off and Boundary Gain Control Please see page 108 for details regarding these THX features ULTRA2 for the SC LX85 SELECT2 for the SC LX75 1 Select THX Audio Setting from the Manual SP Setup menu 2 Select either ON or OFF for the THX Loudness Plus setting 3 Speci...

Страница 90: ...P server function Before you set up the network consult with your ISP or the network manager for the required settings It is advised that you also refer to the operation manual supplied with your network component In case you make changes to the network configuration without the DHCP server function make the corresponding changes to the network settings of this receiver IP Address The IP address t...

Страница 91: ...If it is not possible to connect to the access point with the WPS PBC or WPS PIN connection settings we recommend making the connection settings at Search for Access Point or Manual Setting WLAN IP Address If the IP address of a device connected in the LAN other than the wireless LAN converter is set to 192 168 XXX 249 the IP address of the wireless LAN converter will be redundant making connectio...

Страница 92: ... Use to pair a Bluetooth ADAPTER and Bluetooth wireless technology device page 43 5 Make the adjustments necessary for each setting pressing RETURN to confirm after each screen Auto Power Down The power can be set to turn off automatically if no operation has been performed for a specific amount of time with no audio or video signals being input to the receiver When using ZONE 2 or ZONE 3 the ZONE...

Страница 93: ...a the Internet do not disconnect the LAN cable When updating via a USB memory device do not disconnect the USB memory device 1 Select Software Update from the Other Setup menu 2 Select the update procedure Update via Internet The receiver checks whether updatable software is available via the Internet Update via USB Memory The receiver checks whether the USB memory device inserted into the USB por...

Страница 94: ...n for trouble and malfunctions If you think that there is something wrong with this component check the points below Sometimes the trouble may lie in another component Investigate the other components and electrical appliances being used If the trouble cannot be rectified even after exercising the checks listed below ask your nearest Pioneer authorized independent service company to carry out repa...

Страница 95: ...up If your subwoofer has a sleep function make sure it is switched off Make sure that the Subwoofer setting is YES or PLUS see Speaker Setting on page 88 The crossover frequency may be set too low try setting it higher to match the characteristics of your other speakers see Speaker Setting on page 88 If there is very little low frequency information in the source material change your speaker setti...

Страница 96: ...ver during playback Depending on the listening mode the front height or front wide and surround back speakers may switch automatically in function of changes in the input audio A speaker switching sound clicking sound will be heard from the receiver at this time If this sound both ers you we recommend to change the speaker terminal option see Switching the speaker terminals on page 61 Broadcast st...

Страница 97: ...ions on page 59 Video signals from the HDMI terminal cannot be output to the component terminals Input the video signals from the player or other source to the com posite or component terminals When using the component terminal assign it at Input Setup see The Input Setup menu on page 36 The picture s movement is unnatural When Resolution under VIDEO PARAMETER is set to 1080 24p the picture may no...

Страница 98: ...player isn t set up so that Dolby Digital and DTS sources are converted to PCM Ensure that if there are several audio tracks on the disc the Dolby Digital or DTS is selected When playing certain discs none of the receiver s format indicators light The disc may not contain 5 1 6 1 channel material Check the disc packaging for more on what audio tracks are recorded on the disc Symptom Remedy SC LX85...

Страница 99: ...ote control Symptom Remedy SC LX85 only Receiver or other components cannot be operated by RF two way com munications There may be radio interference with other devices Try increasing the distance from microwave ovens devices on a wireless LAN other wireless devices etc see Precautions when using the Omni Directional RF Remote Control on page 72 There may be radio interference with other devices M...

Страница 100: ...nnection for the audio Check the audio output settings of the source component HDMI format digital audio transmissions require a longer time to be rec ognized Due to this interruption in the audio may occur when switching between audio formats or beginning playback Turning on off the device connected to this unit s HDMI OUT terminal during playback or disconnecting connecting the HDMI cable during...

Страница 101: ...ifications Note that there are cases where even the audio files stored on a USB memory device compatible with the mass storage class specifications are not played back on this receiver page 39 Connect the USB memory device and switch on this receiver page 31 A USB hub is currently being used This receiver does not support USB hubs page 39 This receiver recognizes the USB memory device as a fraud S...

Страница 102: ...s not properly operated The corresponding IP address is not properly set Switch on the built in DHCP server function of your router or set up the network manually according to your network environment page 89 The IP address is being auto matically configured The automatic configuration process takes time Please wait The audio files stored on components on the network such as a PC cannot be played ...

Страница 103: ...LAN cable page 31 Wireless LAN converter and base unit wire less LAN router etc are too far apart or there is an obstacle between them Improve the wireless LAN environment by moving the wireless LAN converter and base unit closer together etc There is a microwave oven or other device generating electromagnetic waves near the wireless LAN environment Use the system in a place away from microwave ov...

Страница 104: ...the settings The access point is set to conceal the SSID In this case the SSID may not be dis played on the access point list screen If not set the SSID etc by making the wireless LAN converter settings on the receiver manually The access point s security settings use WEP 152 bit length code key or shared key authentication The receiver does not support WEP 152 bit length code key or shared key au...

Страница 105: ... by the Pioneer Multi channel Research Group has shown that a good sense of sound positioning can be achieved by point ing all the speakers towards an area 30 cm to 80 cm behind the listening position between the surround speakers and the listening position However the sense of sound positioning can differ according to the conditions in the room and the speakers being used In smaller envi ronments...

Страница 106: ...o poor or erratic radio wave transmission When signal transmission is blocked by a wall or floor constructed of ferro concrete or metal Nearby large metal furniture objects In large crowds of people or near obstructive buildings Locations where another device using the same 2 4 GHz frequency is being used such If the center speaker is not of the shielded type install it away from the TV When insta...

Страница 107: ... devices is prohibited since adverse affects may be caused to flight communications equipment or medical devices Follow all precautions and directives given by medical institutions Declaration of Conformity with regard to the R TTE Directive 1999 5 EC Manufacturer 1 1 Shin ogura Saiwai ku Kawasaki shi Kanagawa EU Representative s Pioneer Europe NV Haven 1087 Keetberglaan 1 9120 Melsele Belgium htt...

Страница 108: ...999 5 EK būtiskajām prasībām un citiem ar to saistītajiem noteikumiem Šiuo Pioneer deklaruoja kad šis SC LX85 SC LX75 atitinka esminius reikalavimus ir kitas 1999 5 EB Direktyvos nuostatas Pioneer týmto vyhlasuje že SC LX85 SC LX75 spĺňa základné požiadavky a všetky príslušné ustanovenia Smernice 1999 5 ES SC LX85 SC LX75 SC LX85 SC LX75 R TTE 24L_A1_En Surround sound formats Below is a brief desc...

Страница 109: ...THX Ultra2 Select2 Plus requirements cover every aspect of the product including pre amplifier and power amplifier performance and operation and hundreds of other parameters in both the digital and analog domain THX Surround EX THX Surround EX Dolby Digital Surround EX is a joint development of Dolby Laboratories and the THX Ltd In a movie theater film soundtracks that have been encoded with Dolby...

Страница 110: ... are trademarks of Apple Inc registered in the U S and other countries About FLAC FLAC Decoder Copyright 2000 2001 2002 2003 2004 2005 2006 2007 Josh Coalson Redistribution and use in source and binary forms with or without modification are permit ted provided that the following conditions are met Redistributions of source code must retain the above copyright notice this list of conditions and the...

Страница 111: ...encoding whereby a surround back channel is matrixed into the surround left right chan nels for 6 1 channel playback This allows for compatibility with Dolby Digital 5 1 channel decoding as well as for decoding using Dolby Digital EX Dolby Pro Logic IIx and Dolby Surround Dolby Pro Logic IIx is an improved version of the Dolby Pro Logic II and Dolby Pro Logic decod ing system Dolby Surround is an ...

Страница 112: ...to radio and TV broadcasts on the Internet vTuner lists thousands of sta tions from over 100 different countries around THX The THX technologies are explained below See http www thx com for more detailed information THX Cinema A mode for playing in a home theater environ ment the sound tracks of theater movies that have been recorded and edited for playback in large spaces such as movie theaters T...

Страница 113: ...en enabled it allows network functions to be used simply by connecting the devices to the network Wireless LAN Wi Fi Wi Fi Wireless Fidelity is a trademark coined by the Wi Fi Alliance trade associa tion to increase recognition of wireless LAN standards With the increase in the number of devices connected to computers in recent years Wi Fi offers the advantage of eliminat ing the complexity of mak...

Страница 114: ...ypes of playback using the listening modes on page 45 Sound Retriever Air See Enjoying various types of playback using the listening modes on page 45 Dialog Enhancement See Setting the Audio options on page 57 Internet radio See Listening to Internet radio stations on page 50 vTuner See Listening to Internet radio stations on page 50 DLNA See About network playback on page 51 AirPlay See Using Air...

Страница 115: ...ELESS LAN ADAPTER terminal 5 V 600 mA Integrated Control Section Control SR terminal ø 3 5 Mini jack MONO Control IR terminal ø 3 5 Mini jack MONO IR signal High Active High Level 2 0 V 12 V Trigger terminal ø 3 5 Mini jack MONO 12 V Trigger output type 12 V Total 150 mA RS 232C cable type 9 pin cross type female female SC LX85 only CU RF100 terminal 5 V 150 mA SC LX75 only EXTENSION terminal 5 V ...

Страница 116: ... Crown 0010 0017 0027 0034 0035 0037 0039 0040 CS Electronics 0026 0028 0113 CTC Clatronic 0029 Cybertron 0028 Daewoo 0013 0026 0027 0034 0039 0040 0054 0064 0091 0113 0114 Dainichi 0028 0113 Dansai 0025 0034 0037 0040 0113 0114 Dantax 0010 0037 Dawa 0040 Daytron 0027 0039 De Graaf 0030 Decca 0026 0034 0037 0040 0114 Denver 0098 0103 Desmet 0034 0037 0040 Diamant 0040 Diamond 0113 Dixi 0027 0034 0...

Страница 117: ...0026 0027 0029 0034 0037 0114 Provision 0037 0040 Pye 0034 0037 0040 0083 Pymi 0027 0039 Quandra Vision 0041 Quelle 0025 0026 0034 0037 0040 0114 Questa 0032 Radialva 0040 Radio Shack 0040 Radiola 0034 0037 0040 0114 Radiomarelli 0023 0040 Radiotone 0010 0034 0039 0040 Rank 0032 Recor 0040 Redstar 0040 Reflex 0040 Revox 0010 0034 0037 0040 Rex 0025 0030 0031 RFT 0010 0018 0023 Rhapsody 0113 R Line...

Страница 118: ...0 Soundmaster 2086 Soundmax 2086 Spectra 2094 Standard 2086 Star Cluster 2086 Starmedia 2089 Sunkai 2093 Supervision 2086 Synn 2086 BD If operations are not possible using the preset codes below you may be able to conduct operations with the preset codes for the DVD DVR BDR HDR Pioneer 2247 2248 Denon 2212 2213 2214 Hitachi 2209 2210 2211 JVC 2192 2193 2195 2196 2197 2198 Kenwood 2109 LG 2188 2189...

Страница 119: ...um 1000 1005 1006 Videon 1002 Weltblick 1005 Yamishi 1007 1017 Yokan 1007 1017 Yoko 1004 1005 1007 1017 Satellite Set Top Box Pioneer 6096 6095 6080 6176 0196 sat 6127 Sky 6114 ABsat 6056 Acoustic Solutions 6093 ADB 6050 Akai 6090 Akura 6104 Alba 6052 6076 6056 6093 Allsat 6090 Alltech 6056 Allvision 6128 6114 6075 Amitronica 6056 Ampere 6132 6137 Amstrad 6132 6137 6112 6056 6078 6119 Anglo 6056 A...

Страница 120: ...c 6054 6052 6167 6168 6169 Panda 6053 6052 6131 Pansat 6067 Pass 6059 Patriot 6132 peeKTon 6062 6121 Philips 6096 6053 6090 6151 6095 6139 6153 6144 6108 6055 6076 6052 Phoenix 6121 Phonotrend 6109 Pilotime 6154 Pino 6114 Pixx 6067 Planet 6137 PMB 6056 6079 Polytron 6137 Portland 6071 Preisner 6132 6137 6119 6061 Premier 6095 Primacom 6143 Primestar 6178 Pro Basic 6096 6060 Proline 6093 Promax 605...

Страница 121: ...echniSat 6092 6099 Technosonic 6130 Telestar 6092 6099 Thomson 6086 6141 TNT SAT 6134 Topfield 6074 Viasat 6149 Visiosat 6130 6067 Wisi 6106 Xoro 6067 Xtreme 6127 Zehnder 6068 6075 6125 Cable Set Top Box Pioneer 0197 6081 ABC 6142 ADB 6051 Auna 6051 Austar 6152 Bell Howell 6142 Birmingham Cable Communications 6152 Cablecom 6146 Fosgate 6152 France Telecom 6136 Freebox 6150 General Instrument 6152 ...

Страница 122: ... 5901 905 479 4411 PIONEER EUROPE NV Haven 1087 Keetberglaan 1 B 9120 Melsele Belgium TEL 03 570 05 11 PIONEER ELECTRONICS ASIACENTRE PTE LTD 253 Alexandra Road 04 01 Singapore 159936 TEL 65 6472 7555 PIONEER ELECTRONICS AUSTRALIA PTY LTD 5 Arco Lane Heatherton Victoria 3202 Australia TEL 03 9586 6300 PIONEER ELECTRONICS DE MEXICO S A DE C V Blvd Manuel Avila Camacho 138 10 piso Col Lomas de Chapu...

Отзывы: