Pioneer PRV-LX1 Скачать руководство пользователя страница 64

64

PRV-LX1
En

Title Editing / Chapter Editing

Chapter Editing

Select a clip edited with the 

Function Menu

’s 

EDIT

section 

=

 [

Title

=

 [

Target Clip

] command; by

selecting 

“Go To Video”

 on the the 

EDIT 

section 

=

[

Title

=

 [

Editing

=

 [

Chapter Points

] command,

the selected clip’s chapter mark position can be
changed.

EDIT section 

=

 [Title] 

=

 [Editing] 

=

 [Chapter Points]

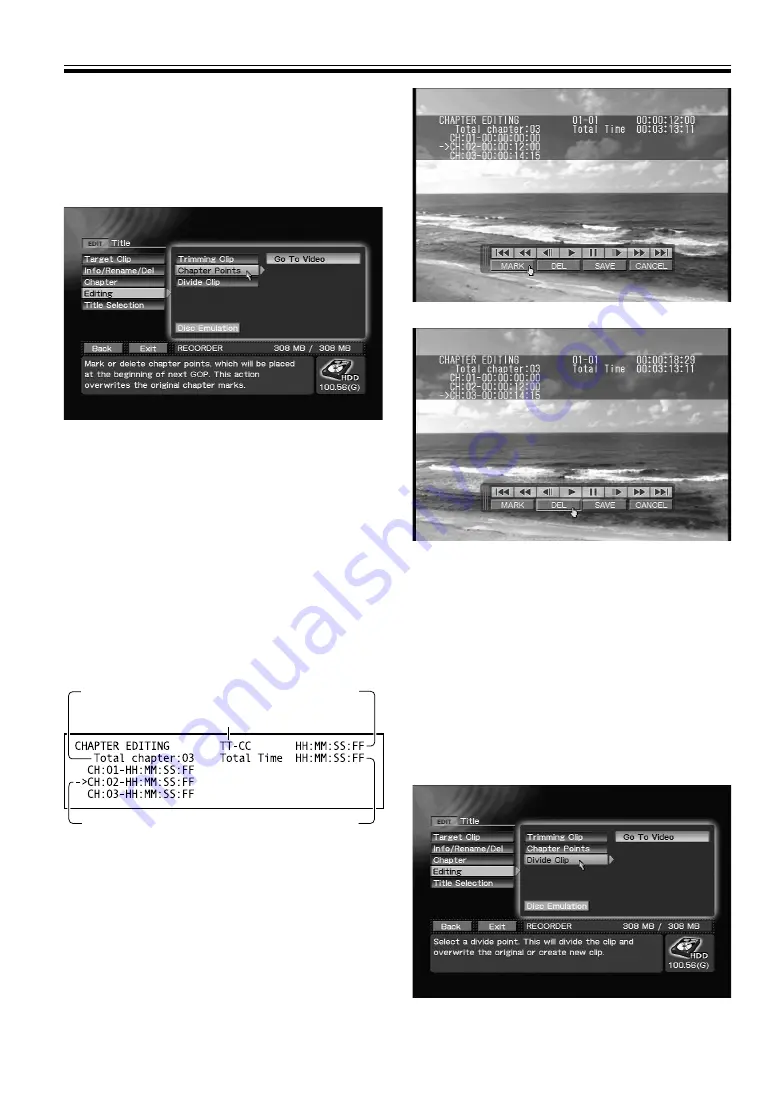
For this edit, use the 

MARK


and 

DEL


buttons on

the control bar displayed in conjunction with the
clip’s playback. While playing back the clip, press the

MARK


button to insert a chapter mark at that point.

When the 

DEL


button is pressed, the chapter

including the point at which the button was pressed
is joined to the the previous chapter (in other words,
the nearest chapter mark prior to that point is
deleted). When the 

SAVE


button is pressed, the

chapter mark edit is effected, and when it is
completed the screen returns to the 

Function

Menu

. Pressing the 

CANCEL


button will cause the

screen to return to the 

Function Menu

 without

completing the edit.

Chapter mark insert

Erasing chapter marks

Note:

Chapter marks can be inserted only at the beginning
of a group of pictures (GOP); as a result, actual
chapter mark positions will be at the beginning of the
GOP immediately following the marked time code.

Dividing Clips

Using the [

Title

=

 [

Target Clip

] command in the

Function Menu

’s 

EDIT

 section, select the clip you

wish to divide, then use the 

“Go To Video”

 on the

EDIT

 section  

=

 [

Title

=

 [

Editing

=

 [

Divide Clip

]

command to divide the selected clip.

EDIT section 

=

 [Title] 

=

 [Editing] 

=

 [Divide Clip]

Total chapters

Play Title / Chapter

Play Time

Chapter Edit Point

OSD during Chapter Edit

Total Title Time

Содержание PRV-LX1

Страница 1: ...DVD recorder PRV LX1 Operating Instructions ...

Страница 2: ... be required to correct the interference at his own expense D8 10 1 1_En This Class A digital apparatus complies with Canadian ICES 003 Cet appareil numérique de la Classe A est conforme à la norme NMB 003 du Canada D8 10 1 4_EF Information to User Alteration or modifications carried out without appropriate authorization may invalidate the user s right to operate the equipment D8 10 2_En CAUTION T...

Страница 3: ...product OUTDOOR ANTENNA GROUNDING If an outside antenna or cable system is connected to the product be sure the antenna or cable system is grounded so as to provide some protection against voltage surges and built up static charges Article 810 of the National Electrical Code ANSI NFPA 70 provides information with regard to proper grounding of the mast and supporting structure grounding of the lead...

Страница 4: ...er Playback Settings 50 External Sync Function 53 Other Functions 53 Regarding Progressive Scan Output 54 DVD Menu Editing 55 DVD Menu Type Selection 55 Font Selection 55 DVD Menu Selection 56 Thumbnail Selection 56 Button Text 57 Selecting Opening Clip 57 Setting an Idle Clip 58 Setting Navigation Commands 58 Customizing the DVD Menu 59 Deleting and Initializing Menu Library 60 DVD Menu Preview 6...

Страница 5: ...ing use should be within the range of 5 C to 35 C 41 F to 95 F and 85 Relative Humidity with ventilation ports not blocked 7 Prohibited Installation Locations Places exposed to direct sunlight or bright artificial light Places exposed to high levels of dust or smoke Places subject to vibration Places subject to strong electrical or magnetic fields Close to heat sources Places exposed to high level...

Страница 6: ...rting after a shutdown the wait several seconds after the power indicator see page 14 turns orange before powering on again Precautions Regarding Built In Hard Disk Drive HDD The built in hard disk drive HDD incorporates high precision technology and recorded contents may be damaged or lost under certain conditions of use Take precautions regarding the following 7 Important Recordings If the built...

Страница 7: ...peeds Do not use non standard discs since they may cause adverse affects to the player and other components Do not use discs shaped in non circular shapes hearts polygons etc since they may cause malfunctions To clean fingerprints from a soiled disc wipe gently from the center hole radially toward the circumference Do not wipe in a circular motion Do not use anti static or other record sprays Also...

Страница 8: ... result discs recorded on this unit can be played on other DVD players but discs must be finalized before they can be played in this way see page 43 Recording to DVD R RW discs is in video mode only VR Mode VR mode is the basic recording mode for DVD RW allowing repeated recording and editing on a single disc VR is an abbreviation for Video Recording DVD RW discs recorded in VR Video Recording for...

Страница 9: ...al Linear PCM sountracks are mono or stereo only 2 Subtitle languages DVD discs can contain up to 32 subtitle languages You can watch the disc with any of these subtitle languages or with no subtitles displayed at all 3 Screen aspect ratio Movies are shot in a variety of screen formats This box tells you what the original format was in this case Cinemascope and what it is best viewed as on a wides...

Страница 10: ...led independently sounds can be heard travelling from front to back left to right and vice versa Preparations for Use Basic Information Stereo Playback Stereo playback means sound is played back through independent channels from right and left speakers The soundtracks for DVD video stereo and ordinary music CDs recorded with 2ch stereo are played back only from the front speakers even when 5 surro...

Страница 11: ... and video recording functions permit optimum disc creation for any application 2 Required in the event of a twin DVD drive model or when the optional DVD writer unit PRA DW11 is installed 7 Professional System Support This unit is equipped with a wide range of input and output systems including component input output XLR input output DV connector composite and S video in this way supporting a wid...

Страница 12: ...rt input of SDI video signals and SDI AES EBU audio signals Note By installing the optional SDI AES EBU output board PRA BD12 in the unit s expansion slots the PRV LX1 can be upgraded to support output of SDI video signals and SDI AES EBU audio signals Writer 2 optional for single DVD drive model Expansion DVD R RW writer unit Must be purchased separately PRA DW11 Example of System Composition and...

Страница 13: ...pying one disc 4 7 GB to hard disk drive DVD DVD Times required when using optional additional drive to duplicate one disc 4 7 GB from one DVD drive to another Write Read HDD DVD R DVD R 4X SPEED DVD RW 2X SPEED About 30 minutes About 20 minutes About 30 minutes Write Read DVD Video About 30 minutes About 30 minutes About 30 minutes About 30 minutes DVD R About 30 minutes About 30 minutes About 30...

Страница 14: ...d to the right side of DVD1 DVD 2 this indicator light orange to indicate that a disc is loaded 1 Press to open close disc tray The DISC indicator flashes from the time the button is pressed until the disc tray closes fully This space is provided to allow the addition of a second DVD drive When an additional writer PRA DW11 is added here it is considered DVD2 Some models are factory equipped with ...

Страница 15: ...ode During playback press to move to previous title or chapter Hold depressed to initiate scan mode Press to select function menu items and commands and to input DVD menu items and commands during DVD playback During recording press to insert chapter marks at optional locations Use when selecting function menu items and for DVD menu control during DVD playback These are ventilation ports provided ...

Страница 16: ...to DV connector of professional use VTR or similar component Fan motor for cooling internal parts Connector for obtaining time code from VHS VTR etc Note Use a coaxial cable impedance 75 ohm to connect with BNC plugs Use for connecting external sync signal and for pass through signals Note Use coaxial cables impedance 75 ohm to connect with BNC plugs Use to terminate sync signal Set to ON when use...

Страница 17: ...0 21 22 23 24 Note Do not mix new batteries with old Even batteries of the same type may display different voltage characteristics As a result do not mix batteries of different brands together If you do not plan to use the remote control unit for an extended period one month or more remove the batteries from the remote control unit to prevent potential damage from leakage of battery fluid If batte...

Страница 18: ...C start to REC stop is recorded on the HDD or DVD disc as a single unit called a video file clip or title Chapter marking can also be performed during recording 7 Following recording of the video signal items which can be set or changed together with disc production procedures are noted below When recording to DVD disc 1 Settable items Disc menu setting Disc program setting 2 Disc creation flow Vi...

Страница 19: ...d from the main unit See page 29 for information on function key settings Some front panel control buttons are assigned to shortcut keys Shortcut key assignments are described on page 88 The numeric keys on the keyboard provide the same functions as the numeric buttons on the remote control unit During title text and other text input any functions assigned to the keyboard s normal function keys ar...

Страница 20: ...ue fonts licenced by NEC Corporation FontAvenue is a registered trademark of NEC Corporation The Function Menu is composed of a top menu for confirming current operating STATUS together with the following three sub sections 1 EDIT items related to recorded video data and DVD settings 2 APP Application settings for disc duplication and importing auto capture for EDL Edit Decision List and other set...

Страница 21: ...trol unit s SETUP button 4 Click the right button on the mouse Note 6 5 If the Function Menu has been assigned to a function key on the keyboard press that key Note 6 Use of the mouse s right button to exit the Function Menu is supported only during display of the top menu 7 Control Bar The control bar is displayed by pressing the mouse s right and left buttons simultaneously When the control bar ...

Страница 22: ...WER CONVERSION CORP APC 7 Operation Settings Use to make settings required when connecting the PRV LX1 to other components and to perform operation settings 1 Control Setting Settings required when connecting this unit to a source component page 40 Example of connections with local settings Example of connections with remote settings Note 3 There are limitations on supported commands In addition c...

Страница 23: ...ted When chapter marks are inserted by pressing the Enter key on a keyboard if the Enter key is held depressed multiple consecutive chapter marks may be inserted Chapter mark positions are inserted in units of 15 frames NTSC or 12 frames PAL When using the Edit List EDL function at the final IN OUT point setting the APP section Auto Capture IN OUT Point Record As command must be set to Title Stop ...

Страница 24: ...ew clips created by trimming differs depending on the HDD s open space When saving by overwriting previous files clips up to 4 7GB HDD available space can be created Chapter mark positions are inserted in units of 15 frames NTSC or 12 frames PAL The total size after editing must be such that can be held on a single DVD disc 4 7 GB or recording to disc will not begin Authoring Functions Operation D...

Страница 25: ...scs or an FTP connection from a computer linked to online network DVD menu layout image files and DVD menu background image files can be downloaded for importing to the menu library Edit Lists EDL can be similarly downloaded and imported 7 Backup and Restore Projects image files menu libraries EDL and system settings on the internal hard disk can be backed up by connecting an external hard disk US...

Страница 26: ... the need to enter the Function Menu thus permitting more efficient operation When in the idling condition the OSD screen is composed of two pages The first two times the DISPLAY button is pressed the OSD alternates between the two pages when the button is pressed a third time the OSD is turned off Note 1 When the destination drive is DVD the project name is not displayed Project names are display...

Страница 27: ...e 2 The recording time is the same as the time for the input video image this differs from the output video image time which is subjected to encoding decoding Note 3 Playback status is shown only during time shift playback Main unit button Remote control unit Recording status Recording title chapter Recording time Note 2 Playback status Note 3 Playback title chapter Note 3 Playback time Note 3 OSD...

Страница 28: ...ack time OSD during Playback page 1 Note 5 Displayed only during repeat play Note 6 Displayed only during scan and slow speed playback Not displayed when performing reverse slow motion playback with progressive output NTSC only Playback title chapter Playback time Remaining time in title Total title time Remaining time in chapter Total chapter time Playback speed display Note 8 Repeat display Note...

Страница 29: ...tings command also allows selection of mouse cursor movement speed keyboard key repeat speed and time zone and date time SET UP section System System Settings TimeZone setting Programming the Function keys To facilitate operation of the unit the SET UP section System F Key Set command allows you to program your keyboard s 12 function keys F1 F12 to perform the equivalent functions of front panel c...

Страница 30: ...ible to connect to a network but cause malfunctions throughout the network If you are unsure of the proper values to set for these items consult your network administrator UPS Support Whenever the power to this unit is turned OFF the unit performs a shutdown operation An unintentional power interruption results in the power being disconnected without the shutdown operation being performed thus res...

Страница 31: ...ird party when hard disk data has been deleted using these functions runs the risk of placing backed up image data into the wrong hands To prevent such a risk use commercially available software to wipe the hard disk clean or request a dealer to do so Consult your USB HDD manufacturer for details SET UP section System HDD Tools Note 1 Selecting Format deletes all projects and image files on the ha...

Страница 32: ...tor SET UP section Operation Video Settings Composite Out Note If Composite Out is set to Source Monitor pass through output when OSD is set to ON during recording the video and audio will switch to Decoder Out encode decode output Regardless of the setting of the Composite Out command outputs other than composite video audio RCA and headphones will be treated as Decoder Out encode decode output v...

Страница 33: ...yed about 4 seconds with respect to the input signal due to the time required for encoding and decoding Note 2 Recording will not begin if a copy guard protected input signal is detected Note 3 If Composite Out is set to Source Monitor pass through output when OSD is set to ON during recording the video and audio will switch to Decoder Out encode decode output Note 4 Turn off the power of the reco...

Страница 34: ...ted or playback is begun on a connected DV component Note If preview is performed immediately after setting input the error message No DV Input will appear This is only the result of the auto sensing process noted above however and is not a malfunction STATUS section V Input STATUS section A Input TV system switch confirmation dialog 1 When OK is selected the TV system changes and a second confirm...

Страница 35: ...even after the DVD disc has been removed STATUS section Drive single DVD drive model STATUS section Drive twin DVD drive model When a disc is removed before finalizing the data recorded so far remains on the hard disk A new project is automatically created when this disc is reinserted and additional data that is recorded is saved to this project Thus data recorded prior to removal and data recorde...

Страница 36: ...ot be selected when PAL is selected as the TV system Recording Video Encode Rate Settings The SET UP section Recording Video Audio Video Encode Rate command allows you to set the encoding rate for recording This setting affects the recording time and the transfer rate image quality See pages 78 and 79 for information on the relationship between encoding rate and recording time transfer rate The en...

Страница 37: ...o level when the audio source is too low or so large the sound is distorted to obtain an appropriate sound setting Select R or L and press the Up Down key to adjust the sound in the right or left channel the numbers are incremented or decremented by each press of the Up Down key To adjust both the right and left channels select L R and press the Up Down key Adjust the audio level so that maximum l...

Страница 38: ... in the recording standby mode for 1 hour or more the unit will automatically switch to STOP mode to prevent damage to the system 1 Manual Recording Starting and stopping manual recording is performed with the front panel s REC and STOP buttons During recording the PAUSE button can be pressed to temporarily interrupt the recording From the pause mode press REC button again to resume recording and ...

Страница 39: ...nts When the Function Menu s REC button is then pressed the external VTR is automatically rewound to a position just preceding the selected IN point and recording starts automatically from that point When the designated OUT point is detected the unit automatically enters the REC pause stop mode APP section Auto Capture IN OUT Point IN OUT Point Recording The preroll time preceding the IN point can...

Страница 40: ... be output but when recording is completed the screen will return to the Function Menu display 7 Edit List EDL Recording The Edit List EDL function allows automated recording of consecutive multiple IN OUT points by setting the points on an Edit List EDL This recorder allows formation of an Edit List by using the contents set with the Function Menu s APP section Auto Capture IN OUT Point command B...

Страница 41: ...ng multiple IN OUT points the chapter points will be added as an additional record at the end of the edit list and thus must be changed to their proper order APP section Auto Capture EDL Note When recording the edit list the final IN OUT point setting must be as follows APP section Auto Capture IN OUT Point Record As command must be set to Title Stop APP section Auto Capture EDL items editing exam...

Страница 42: ... Edit Lists Note 2 If EDL is used when target drive is set to HDD initialize and finalize commands are ignored EDIT section DVD Disc Initialize Initialize Initialize confirmation dialog Initialize progress bar appears during initialization Recording to DVD Discs Data can be recorded on an unused or not finalized DVD R or DVD RW disc A finalized DVD RW disc must be initialized or finalization must ...

Страница 43: ... from each drive before finalization can be reloaded for simultaneous additional recording Reselecting a drive makes it possible to cancel simultaneous recording and continue recording on one drive Simultaneous recording cannot be resumed after this Menus chapter names and clip names can be edited after selecting one drive Note that resuming a simultaneous recording after this will delete all edit...

Страница 44: ...Title Order Edit on page 65 or reduce clip size see Title Trimming on page 63 The disc cannot be removed until the Make Disc process is completed EDIT section DVD Disc Make Disc Target Use the EDIT section DVD Disc Make Image command to create image files The Target Image will display in the initial condition the project name the three character img extension If the image file name is changed the ...

Страница 45: ...yback source Use the front panel s DRIVE SELECT button or the Drive command on the Function Menu s STATUS section to select the recording destination Drive indicators PLAY PAUSE DISPLAY REPEAT AUDIO SCAN STEP RPT A B ANGLE SUBTITLE PREV NEXT SETUP ENTER RETURN SEARCH CLEAR 1 2 3 4 5 6 7 8 9 0 10 TITLE CHP FRM TIME MENU TOP MENU FRM TIME STOP DXX2527 PLAY STOP STATUS section Drive single DVD drive ...

Страница 46: ...itle 7 To go back to previous chapter title Press the main unit s SCAN SKIP REV button or the remote control unit s PREV button once to return to the beginning of the currently playing chapter press additional times to return to the beginning of previous chapters When multiple titles exist on the disc and this command is executed within the first chapter of title playback will return to the top ch...

Страница 47: ...ration Inhibited message Time Search 1 During playback press the FRM TIME button Alternately press the TITLE CHP FRM TIME button three times 2 Use the number buttons to enter the desired time number Example to designate the frame at 21 min 43 sec 17 Press number buttons 2 1 4 3 1 7 in order 3 Press the SEARCH button The selection can be made also by pressing the PLAY button Note 1 The search funct...

Страница 48: ...e display setting alternates between those available If multiple language subtitles are recorded on the disc the subtitle can be selected from among those recorded Some DVD Video discs also allow subtitle selection from the disc s onscreen menu In this case display the menu by pressing the MENU button and select the desired subtitle setting directly from the menu When playing a DVD Video disc the ...

Страница 49: ...me as the recording start position and the range of possible playback is within 60 324 seconds prior to the current recording point During playback monitoring the REC and PLAY buttons light and during pause mode the PAUSE button also lights If the STOP button is pressed during playback playback monitoring stops and the screen display returns to show the point currently being recorded Press the STO...

Страница 50: ...ng an amplifier that does not support MPEG SET UP section Playback Audio Other Playback Settings The Function Menu s SET UP section Playback commands can be used to input default setups for playback on the PRV LX1 These setup values cannot be changed during playback 7 Video Aspect Ratio Video Aspect 4 3 LB 4 3 PS 16 9 Choose the aspect ratio setting in accordance with your television monitor This ...

Страница 51: ...D Video menu language to English Japanese or Other Note SET UP section Playback Language SET UP section Playback Language DVD Menu Note When Others Next Menu is selected as the language input the code number from the Language Code List on page 99 SET UP section Playback Language Inputting Language Code Note 7 Subtitle Display Language Subtitle Display ON OFF Use to select whether subtitles are dis...

Страница 52: ...s 7 Parental Management Level Others Parental Level 1 8 off Some prerecorded DVD Videos with violence or sexual contents are encoded with parental management levels low high Such discs are so indicated on their jackets or labels By setting the management level on the PRV LX1 to a value lower than the disc s level the viewing of such discs can be restricted When off is selected playback will be per...

Страница 53: ...corrector TBC component thus allowing video switching without distortion V roll of the TV monitor s image When the SET UP section Operation Video Settings DV OUT command is set to Enabled External Sync is automatically set to Disabled Thereafter even if DV OUT is returned to the Disabled setting external sync will remain off so manual resetting is required When synchronizing two or more recorders ...

Страница 54: ...upporting progressive scan Proper image reproduction will not be produced with other monitors Note 3 When progressive output is ON image signals will not be produced from output connectors other than the component output connector Note 4 Some progressive scan monitors currently available do not possess complete compatibility with the PRV LX1 with the result that some image distortion may occur If ...

Страница 55: ...to confirm the contents before burning a DVD disc Also if the playback mode is field playback output will be for one field only and menu characters may not appear correctly Font Selection Use the Function Menu s EDIT section DVD Menu Menu Type Font Font and J Font commands to select fonts for DVD menus Fonts specified by the Font command are used for text that contains only English text Fonts spec...

Страница 56: ...Design Select Thumbnail Selection When the thumbnail type item is selected the initial image of the title clip corresponding to each button is automatically extracted but when the recording has already been made the Function Menu s EDIT section DVD Menu Menu Design Thumbnail command can be used to extract the actual recorded image When Go To Video is selected the thumbnail extraction screen appear...

Страница 57: ...ction Menu s EDIT section you can select the first clip to be played when a disc is inserted Also on the User Operation command you can select operation restrictions during playback if Disabled is selected all operations during playback of the opening clip are disabled If Enabled is selected the ENTER key is enabled The actual operation performed when the ENTER key is pressed during playback of th...

Страница 58: ...ection DVD Menu Navigation Cmd Idle Clip EDIT section DVD Menu Navigation Cmd Waiting Time Setting Navigation Commands Using the DVD Menu Navigation Cmd First Play PGC command on the Function Menu s EDIT section you can set the first play setting for a DVD Video disc when opening clip is set whether opening post command is set to Stop Title or Menu This item is reflected to Make Disc Make Image an...

Страница 59: ...DIT section DVD Menu Menu Modification Image Background image extraction screen DVD Menu Editing Likewise when the EDIT section DVD Menu Menu Modification Background command is used to select Title Picture the first image of the first title clip is automatically extracted When a previously recorded image is used however the EDIT section DVD Menu Menu Modification Image command can be used to extra...

Страница 60: ...pears when each button is selected EDIT section DVD Menu Menu Modification Select Color The EDIT section DVD Menu Menu Modification Active Color command allows you to change the display color that appears when each button is finalized EDIT section DVD Menu Menu Modification Active Color Deleting and Initializing Menu Library Use the EDIT section DVD Menu Del Init Library command to delete menu lay...

Страница 61: ...itch between the various menus If a mouse is connected clicking the right left buttons simultaneously enables the displayed control bar Press the FUNCTION button to end the preview and return to the Function Menu Executing Preview command on EDIT section DVD Menu Progress bar during preview display DVD menu preview image DVD Disc Emulation Performs same playback as DVD disc with DVD menu title and...

Страница 62: ...ct a keyboard to the MOUSE KEYBOARD USB jack Note 2 The clip name can contain up to 32 one byte characters EDIT section Title Target Clip Edit To HDD EDIT section Title Info Rename Del Changing the selected clip s name on EDIT section Title Info Rename Name Editing Chapter Names Individual names can be assigned to chapters existing within the clips selected with the EDIT section Title Target Clip ...

Страница 63: ...omatically be deleted so as to keep the name within the 32 character limit If the pre edit clip was saved as a title the post edit clip will be entered as the title instead If the pre edit clip was not saved as a title the post edit clip will not be saved as a title If required add a title as described in Title Order Edit on page 65 Trimming edit confirmation dialog Trimming Start Play Title Chapt...

Страница 64: ...ter mark prior to that point is deleted When the SAVE button is pressed the chapter mark edit is effected and when it is completed the screen returns to the Function Menu Pressing the CANCEL button will cause the screen to return to the Function Menu without completing the edit Chapter mark insert Erasing chapter marks Note Chapter marks can be inserted only at the beginning of a group of pictures...

Страница 65: ...layed control bar to designate the point at which you wish to divide the clip Clip division will begin when the SAVE button is pressed and when completed the display will return to the Function Menu If the CANCEL button is pressed instead the clip division will be canceled and the display will return to the Function Menu When beginning the division you may select whether to overwrite the divided c...

Страница 66: ...d for the recording is designated as DVD1 If an additional expansion drive has been added DVD2 or DVD1 2 can also be selected Discs cannot be removed until the Make Disc processing has been completed The volume label given to the DVD disc will be the same as the project name Use the Make Image command for creating image files on the hard disk see Recording from HDD to DVD on page 44 EDIT section D...

Страница 67: ...creation etc P project exists on the STATUS section s Project menu P clip exists on the EDIT section s Title Target Clip Edit To HDD menu The Function Menu s EDIT section Project Record Name command can be used to confirm the number of clips the project size and the number of titles within the currently selected project Further when a keyboard is connected the EDIT section Project Record Name Name...

Страница 68: ...oject Copy Clip command to copy clip in project specified by Source Drive command to currently selected project HDD DVD1 and DVD2 can be selected DVD2 appear only if connected Using EDIT section Project Copy Clip Source Drive for selecting drives Executing Copy command on EDIT section Project Copy Clip Recorded data is also managed as a project when recording directly to DVD disc but editing is no...

Страница 69: ... be exported and saved as a VOB file with an individualizing name The file name can be input using the VOB Name command and saved in the vob folder accessible via FTP The VOB Name command provides the default file name exptXXX each time the command is executed the number XXX is incremented However this automatic operation is not supported if VOB Name is edited The copied clip will be appended to t...

Страница 70: ...and neighboring rights holder Failure to obtain the permission of each rights holder can be punished by law Pioneer accepts no liability whatever for problems arising between the user of this device and any rights holder Note 2 The time required for disc duplication and creating image files depend on disc read write performance Disc to disc Duplication Use the Function Menu s APP section Cpy Impt ...

Страница 71: ...ation is executed the new file name will be displayed with the numerals automatically modified However once an image file name has been changed it cannot be handled by automatic processing Creating Discs from Image Files Use the Function Menu s APP section Cpy Impt Bkup Image Copy Del Source command to specify image file to be copied and use the Destination command to specify the disc to write the...

Страница 72: ... to be added to the menu library are selected and the Add to Library button is pressed to begin importing The same procedure is used for importing Edit List files When DVD1 or DVD2 is designated as the source import is begun from the disc loaded in the respective drive when the Add to Library button is pressed Note 1 When importing image data or edit lists if DVD1 or DVD2 is selected as the Source...

Страница 73: ...t Image File Format DVD menu layout image files are composed of a combination of text files providing detailed information about the various DVD menu settings together with multiple image files Plans are currently underway to make available a plugin that will allow the output of computer image editing software to be converted to an importable form DVD Menu Background Image File Format Support is c...

Страница 74: ...PAUSE The final IN OUT point setting entry in an edit list must always designate the post REC action as STOP Chapter Point Setting Entry Number Operation Type Parameter 1 NNN CHP CHAPTER POINT The chapter point is designated using time code as HH MM SS FF The chapter point description must come immediately below the IN OUT point setting to which it is applied Also the Number value is given as that...

Страница 75: ...s set to HDD initialize and finalize commands are ignored Note 2 The header may also use PIONEER DVDRec EDL001 version Designating a Title Name Number Operation Type Parameter 1 NNN T N Title name The title name will be reflected in the title currently being recorded or a previously recorded title Designating a Chapter Name Number Operation Type Parameter 1 NNN C N Chapter name The chapter name wi...

Страница 76: ... unit and the USB HDD may slow down the process Connecting a USB HDD Turn off the unit and make sure it is in standby mode before connecting the USB HDD Turn on the USB HDD and the unit Note 1 Unit operation may become unstable when the USB HDD is connected or disconnected during unit operation To ensure stable operation do not connect or disconnect the USB connectors during unit operation Note 2 ...

Страница 77: ... been deleted using these functions runs the risk of placing backed up image data into the wrong hands To prevent such a risk use commercially available software to wipe the disk clean or request a dealer to do so Consult your USB HDD manufacturer for details Removing a USB HDD Turn off the unit and make sure it is in standby mode before disconnecting and turning off the USB HDD Note Never disconn...

Страница 78: ...0 720x576 16bit 48kHz 22 1 45 40 34 5 556 5 300 256 720x480 720x576 16bit 48kHz 21 1 54 44 17 5 090 4 834 256 720x480 720x576 16bit 48kHz 20 2 04 48 00 4 696 4 440 256 720x480 720x576 16bit 48kHz 19 2 14 51 47 4 358 4 102 256 720x480 720x576 16bit 48kHz 18 2 23 55 28 4 066 3 810 256 720x480 720x576 16bit 48kHz 17 2 33 59 13 3 810 3 554 256 720x480 720x576 16bit 48kHz 16 2 43 62 58 3 583 3 327 256 ...

Страница 79: ...46 3 810 1536 720x480 720x576 16bit 48kHz 17 1 56 44 47 5 090 3 554 1536 720x480 720x576 16bit 48kHz 16 2 01 46 53 4 863 3 327 1536 720x480 720x576 16bit 48kHz 15 2 06 48 56 4 663 3 127 1536 720x480 720x576 16bit 48kHz 14 2 12 50 56 4 483 2 947 1536 720x480 720x576 16bit 48kHz 13 2 17 52 52 4 321 2 785 1536 720x480 720x576 16bit 48kHz 12 2 21 54 45 4 175 2 639 1536 720x480 720x576 16bit 48kHz 11 2...

Страница 80: ...Introduction Clip User Operation First Play PGC or Post Cmd Title Post Cmd Idle Clip Display object for DVD menu editing Display currently set TV mode Select DVD menu type Select character font for DVD menu Select Japanese font for DVD menu Select menu design including button type Set thumbnail for posting to button Select character format for button text No characters are used for menus when Disa...

Страница 81: ...it Clip List Text Edit Project List except current project Clip List Text Edit xx xx xx xxxxxMB Text Edit Go To Video Go To Video Go To Video Sets time until beginning idle clip playback Select type to delete Select library to delete and press the Delete button to delete it Display name of currently selected project Prevent erasure of clips in projects Select whether to record also to HDD Display ...

Страница 82: ...k Time Code Setting Mark Finalize Initialize Wait CLEAR ALL CLEAR UP DOWN EDL List EDL List File Name Input DVD1 DVD2 DVD1 DVD2 DVD1 DVD2 File Name Input File Name Input Display the clip with the assigned title and edit in order DVD finalize Use Quick Format to initialize DVD RW disc Erase all DVD RW contents Canceling finalization of DVD RW Select destination for recording selected project to dis...

Страница 83: ...me List xxxxGB US Type 101 Japan Type 106 Slow Medium Fast Generic Slow Medium Fast Select the destination of the file to be created Select type of background image Select type of menu layout image Select source for importing of background image menu layout image Select background image menu layout image for import Select source for edit list import Select edit list source file Select the destinat...

Страница 84: ...ion key F9 Set allocation to function key F10 Set allocation to function key F11 Set allocation to function key F12 Select whether to enable network Select IP address setting method Select manual IP address Select manual sub net mask Select manual gateway address Display MAC address Select UPS Select time until shutdown via UPS Display system version Display total power on time Display HDD access ...

Страница 85: ...ject command operation Select external sync signal for playback Enable disable OSD display Enable disable input pass through for composite RCA output Select background image during idling Enable disable DV connector output When enabled outputs during playback only 7 Output color bar Enable disable playback of previous recorded portion during recording time shift recording Select language for infor...

Страница 86: ... Others Next Menu ON OFF 1 8 off us jp Others Next Menu Select method for inserting chapter markintitle WhenManualisselected chapter marks are inserted with ENTER button Select REC button function Select video aspect ratio during playback Select still display mode Select whether to convert Dolby Digital to PCM Set DTS Selectwhethertoconvert96kHzPCM to 48 kHz Select whether to convert MPEG audio to...

Страница 87: ...estination playback source Also change recording destination playback source Display currently selected project Also change project Display currently selected video input Also change video input Displaycurrentlyselectedaudioinput Also change audio input Switch TV system setting Display number of projects on hard disc Display remaining available space on hard disc Display drive disc loading conditi...

Страница 88: ...Skip Fwd Ctrl Shift B Skip Rev Ctrl Step Fwd Ctrl Step Rev Ctrl Shift Slow Fwd During playback initiates slow playback Ctrl Shift Slow Rev During playback initiates slow reverse playback Ctrl M Top menu Ctrl T Frame time Ctrl C Search Ctrl F Finalize Ctrl I Initialize Ctrl W Make disc Ctrl U Unfinalize Ctrl E DVD1 Eject Ctrl Shift E DVD2 Eject ...

Страница 89: ...ting operation All data previously recorded on the hard disk drive will be erased The hard disk cannot be formatted when there is a disc in the drive Eject the disc and try again Displayed at start of hard disk check Depending on the condition of the hard disk drive this operation may require several minutes to complete The USB HDD cannot be recognized Appears when USB HDD formatting starts Delete...

Страница 90: ...le export confirmation querry Continuing this operation will overwrite erase this file Input the desired VOB file name Check your remaining hard disk drive space No disc is in drive Insert a disc No selectable title exists This disc contains no selectable title This project has no titles so no thumbnails can be selected Press Yes to copy menu data Press Yes to copy menu data Current project alread...

Страница 91: ...tles or use trimming editing to shorten the length of titles The attached menu size is too large for the current project title composition Change to a menu design with more buttons on each page of the menu Also by changing to title menu it may be possible to construct the menu with a smaller volume No disc has been loaded in the designated drive The designated disc has recorded contents The design...

Страница 92: ...ject Do you really want to overwrite Does it overwrite all files when the same file exists Not enough space in HDD Backup failed Restore failed There is saved parameter file Do you want to overwrite Do you really want to restore system settings This PROJECT is protected No data to restore Illegal data to restore Load error Delete failed Menu Data is lost after unfinalization Cannot be unfinalized ...

Страница 93: ... so stopped recording automatically Insufficient remaining space on DVD so stopped recording automatically An IN OUT REC cannot be performed within 1 sec from IN point to OUT point VTR RS 422A is not connected Check also VTR settings VTR DV is not connected Check also VTR settings Previous auto capture is in pause mode To end the auto capture press the STOP button or execute Record As Title Stop a...

Страница 94: ...s disc The current disc has no playable titles This disc cannot be played This disc has a region code which cannot be played on this player The operation is not permitted with this disc The current disc has no playable titles This disc cannot be played Attempt to view a title prohibited under parental management level To playback title press YES to cancel playback press NO The current project has ...

Страница 95: ...TV system mode setting Insert the disc correctly in the disc table Insert disc is with correct up down orientation Clean the disc Confirm that the disc region number is proper for the player Confirm that the type of disc is proper for the player Check and eliminate any condensation inside the unit A disc created on the PRV LX1 that contains many titles may take dozens of seconds to recognize when ...

Страница 96: ...be erased Before disconnecting the power plug always press the unit s STANDBY ON POWER button and wait until the display s POWER OFF display disappears then set the rear panel s power switch to OFF If video monitor or AV amplifier s sound volume is set to minimum raise the sound volume When using audio input from external input connector set the Audio Level command Check and confirm that all audio...

Страница 97: ...ING Malfunctions may be caused by static electricity or other external sources In such cases normal operation may be restored by disconnecting the power cord and then reconnecting it again If problem persist consult your dealer Symptom An error occurred and data back up or restore operation from the USB HDD failed During loading of DV the screen stops and controls are disabled Several seconds of n...

Страница 98: ...an 80 dB Distortion THD N Less than 0 02 CH1 L CH2 R balanced XLR male x 2 0 dBu 600 Ω load low impedance Frequency response 4 Hz to 22 kHz DVD fs 48 kHz S N ratio More than 80 dB Distortion THD N Less than 0 02 Digital unbalanced Pin jack x 1 0 5 Vp p 75 Ω External Sync Input BNC x 2 black burst 0 286 Vp p NTSC 0 300 Vp p PAL 75 Ω ON OFF Other DV input output 4 pin i Link IEEE 1394 compatible x 1...

Страница 99: ... 1111 Greenlandic kl 1112 Cambodian km 1113 Kannada kn 1114 Kashmiri ks 1119 Kurdish ku 1121 Kirghiz ky 1125 Latin la 1201 Lingala ln 1214 Laothian lo 1215 Lithuanian lt 1220 Latvian lv 1222 Malagasy mg 1307 Maori mi 1309 Macedonian mk 1311 Malayalam ml 1312 Mongolian mn 1314 Moldavian mo 1315 Marathi mr 1318 Malay ms 1319 Maltese mt 1320 Burmese my 1325 Nauru na 1401 Nepali ne 1405 Norwegian no 1...

Страница 100: ...s 2119 Argentina ar 0118 Australia au 0121 Austria at 0120 Belgium be 0205 Brazil br 0218 Canada ca 0301 Chile cl 0312 China cn 0314 Denmark dk 0411 Finland fi 0609 France fr 0618 Germany de 0405 Hong Kong hk 0811 India in 0914 Indonesia id 0904 Italy it 0920 Japan jp 1016 Korea Republic of kr 1118 Malaysia my 1325 Mexico mx 1324 Netherlands nl 1412 New Zealand nz 1426 Norway no 1415 Pakistan pk 1...

Страница 101: ...aying it may be distributed under the terms of this General Public License The Program below refers to any such program or work and a work based on the Program means either the Program or any derivative work under copyright law that is to say a work containing the Program or a portion of it either verbatim or with modifications and or translated into another language Hereinafter translation is inc...

Страница 102: ...quired to accept this License since you have not signed it However nothing else grants you permission to modify or distribute the Program or its derivative works These actions are prohibited by law if you do not accept this License Therefore by modifying or distributing the Program or any work based on the Program you indicate your acceptance of this License to do so and all its terms and conditio...

Страница 103: ...f each source file to most effectively convey the exclusion of warranty and each file should have at least the copyright line and a pointer to where the full notice is found one line to give the program s name and a brief idea of what it does Copyright C year name of author This program is free software you can redistribute it and or modify it under the terms of the GNU General Public License as p...

Страница 104: ...A TEL 1 310 952 2111 Customer Support Division 1925 East Dominguez St Long Beach CA 90810 U S A TEL 1 310 952 2820 PIONEER ELECTRONICS OF CANADA INC Industrial Products Department 300 Allstate Parkway Markham Ontario L3R OP2 Canada TEL 1 905 479 4411 Printed in Japan DRC1228 A TSZZF 04K00000 Pioneer disclaims all responsibility for the integrity of contents recorded on hard disc drives or DVD disc...

Отзывы: