background image

4

Fr

Fran

ç

ais

A

vant de commencer

Description des modes
opératoires

Chaque opération est décrite en suivant son ordre
particulier. Les instructions de fonctionnement font
référence aux commandes, présentes sur la
télécommande, à l’exception des touches qui ne se
trouvent que sur l’écran à plasma proprement dit.
Lorsque des commandes équivalentes se trouvent à la
fois sur l’écran à plasma et sur la télécommande, celles
de l’appareil principal peuvent être utilisées également.

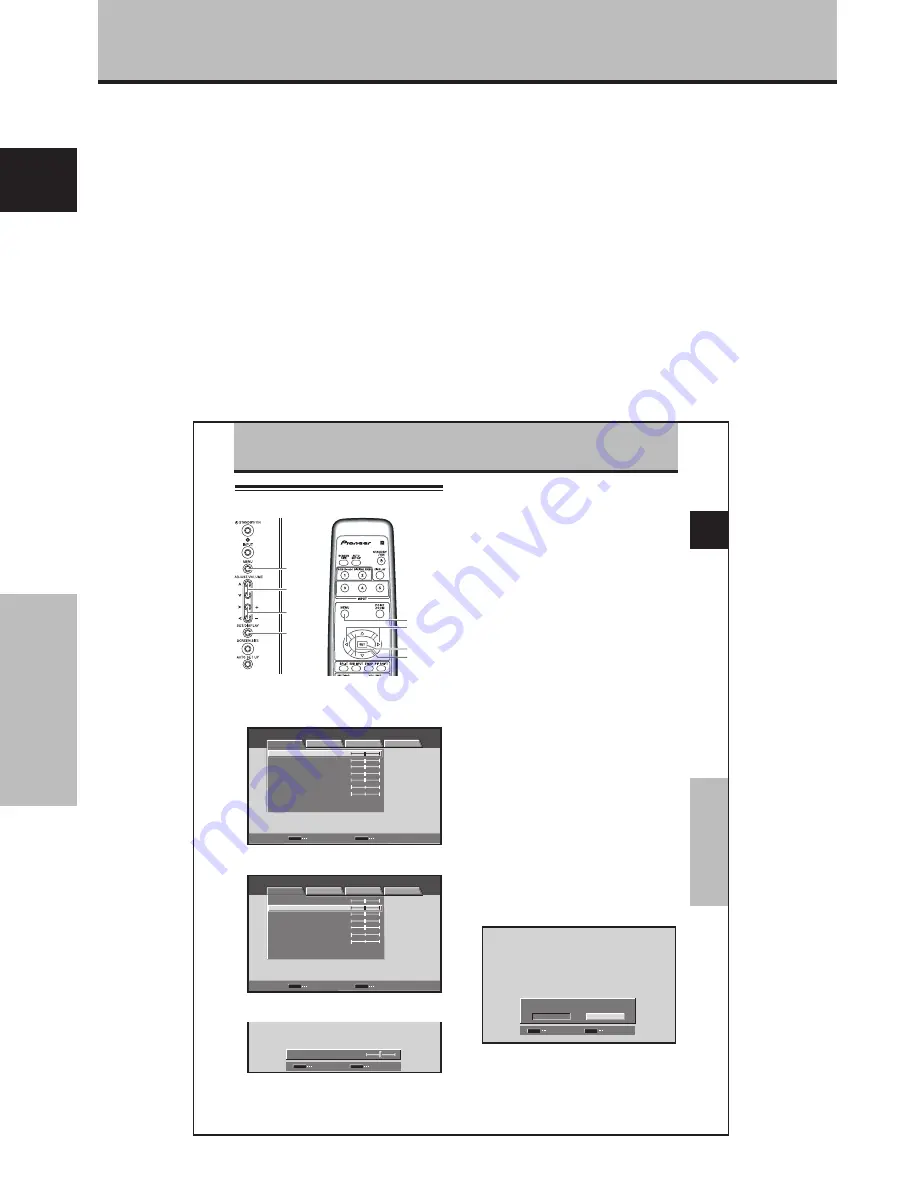
Les illustrations suivantes sont un exemple des
démarches réelles utilisées pour la section “Réglage de
l’IMAGE”. Les exemples sont fournis pour vous
permettre de vérifier si les démarches se déroulent
correctement ou non.

Avant de commencer

Remarque

Les images d’écran illustrées dans ce manuel ne sont

présentées qu’à titre d’exemple. En pratique, certaines

différences apparaîtront en fonction de la rubrique affichée et de
son contenu, selon la source d’entrée et d’autres paramétrages

particuliers.

25

Fr

R

é

glages de l

’IMAGE et de l

’É

CRAN

Fran

ç

ais

Réglages de l’IMAGE et de l’ÉCRAN

Réglage de l’IMAGE

4

Appuyez sur la touche SET.

En appuyant sur la touche 

SET

, vous mettez en mémoire

la valeur choisie et retournez à la page de l’opération 2.

5

Appuyez sur la touche MENU pour abandonner la
page de menu lorsque la mise en oeuvre est terminée.

Remarque

Effectuez ces réglages pour chaque entrée (INPUT1 ou INPUT2)

et chaque signal.

Paramètres qui peuvent être réglés [IMAGE]

Voici de brèves explications sur les paramètres qui
peuvent être réglés grâce à l’option [IMAGE].

CONTRASTE ··········· Réglez le contraste en fonction de

l’éclairage ambiant de manière que
l’image soit bien visible.

LUMINOSITÉ ·········· Réglez la luminosité de manière que

les parties sombres de l’image
soient bien visibles.

NIV. ROUGE ············ Pour régler la quantité de rouge

dans l’image.

NIV. VERT ················ Pour régler la quantité de vert dans

l’image.

NIV. BLEU ··············· Pour régler la quantité de bleu dans

l’image.

AGRAND. HOR ······· Pour accroître la netteté de l’image

dans le sens horizontal.

AGRAND. VER ········ Pour accroître la netteté de l’image

dans le sens vertical.

Pour rétablir les valeurs par défaut des
paramètres de l’option [IMAGE]

Si les réglages effectués ne vous conviennent pas, il peut
être souhaitable de rétablir les valeurs par défaut des
différents paramètres de l’option [IMAGE] plutôt que de
continuer à modifier les réglages.

1

Au cours de l’opération 2 ci-dessus, utilisez les
touches 

5

/

 pour choisir l’option [RÉINIT. IMAGE]

puis appuyez sur la touche SET.

VALIDER

SET

SORTIE

MENU

RÉINIT. IMAGE

OUI

NON

2

Utilisez les touches 

2

/

3

 pour choisir la valeur

[OUI] puis appuyez sur la touche SET.

Les valeurs par défaut des paramètres de l’option
[IMAGE] sont rétablies.

1

Appuyez sur la touche MENU pour afficher la page
de menu.

MENU

ENTRÉE1

ENTRÉE

SET

SORTIE

MENU

IMAGE

É C R A N

SETUP

OPTION

:

0

:

0

:

0

:

0

:

0

:

0

CONTRASTE

:

0

LUMINOSITÉ
NIV. ROUGE
NIV. VERT
NIV. BLEU
AGRAND. HOR
AGRAND. VER

RÉINIT. IMAGE

2

Utilisez les touches 

5

/

 pour choisir le paramètre

à régler puis appuyez sur la touche SET.

SET

MENU

MENU

ENTRÉE1

ENTRÉE

SORTIE

IMAGE

É C R A N

SETUP

OPTION

:

0

:

0

:

0

:

0

:

0

:

0

CONTRASTE

:

0

LUMINOSITÉ

NIV. ROUGE
NIV. VERT
NIV. BLEU
AGRAND. HOR
AGRAND. VER

RÉINIT. IMAGE

3

Réglez la qualité de l’image à l’aide des touches

2

/

3

.

:

0

LUMINOSITÉ

VALIDER

SET

SORTIE

MENU

MENU

2

/

3

5

/

SET

MENU

5

/

SET

2

/

3

Panneau de commande
de l’écran à plasma

Télécommande

Содержание PDP-50MXE1

Страница 1: ...PDP 50MXE1 PDP 50MXE1 S PDP 43MXE1 PDP 43MXE1 S Operating Instructions Mode d emploi Bedienungsanleitung Plasma Display Écran à plasma Plasma Display ...

Страница 2: ...ilisation comme moniteur d affichage d ordinateur La carte vidéo optionnelle est nécessaire si vous souhaitez regarder d autres signaux sur ce moniteur Pour plus de renseignements consultez votre revendeur Deutsch Dieses Gerät ist als Monitor für Personalcomputer konzipiert Wenn andere Videosignale auf diesem Monitor betrachtet werden sollen muss die optionale Videokarte installiert werden Weitere...

Страница 3: ...u will find it useful in the future Notes on Installation Work This product is marketed assuming that it is installed by qualified personnel with enough skill and competence Always have an installation specialist or your dealer install and set up the product PIONEER cannot assume liabilities for damage caused by mistake in installation or mounting misuse modification or a natural disaster Note for...

Страница 4: ... RISK OF ELECTRIC SHOCK DO NOT REMOVE COVER OR BACK NO USER SERVICEABLE PARTS INSIDE REFER SERVICING TO QUALIFIED SERVICE PERSONNEL CAUTION RISK OF ELECTRIC SHOCK DO NOT OPEN IMPORTANT WARNING The apparatus is not waterproofs to prevent fire or shocks hazard do not expose this apparatus to rain or moisture and do not put any water source near this apparatus such as vase flower pot cosmetics contai...

Страница 5: ...s wide range of computer signals analog digital Supports non compressed display of signals ranging from 640x400 and 640x480 VGA to 1024x768 XGA and 1280x768 and compressed display of 1280x1024 SXGA 1400x1050 SXGA and 1600x1200 UXGA signals Further aspect ratio and screen size settings supported include DOT BY DOT 4 3 FULL and PARTIAL 1 Supported signals are different on INPUT1 and INPUT2 1 Aspect ...

Страница 6: ... 1400x1050 SXGA and 1600x1200 UXGA signals Further aspect ratio and screen size settings supported include DOT BY DOT 4 3 FULL and ZOOM 1 Supported signals are different on INPUT1 and INPUT2 1 Aspect ratio and screen size appearance will differ depending on input signal Free Installation Configuration Broader installation possibilities with thinner lighter high endurance design While producing a l...

Страница 7: ...ainder of the sections in this manual is dedicated to the basic operations associated with selecting a source component up to the more complex operations associated with adjusting the plasma display picture to match the requirements of specific components and personal preferences The PDP 50MXE1 PDP 43MXE1 and PDP 50MXE1 S PDP 43MXE1 S have differing external appearances but their functions and ope...

Страница 8: ...mount of green in the picture B LEVEL Adjust the amount of blue in the picture H ENHANCE Sharpens the image in the horizontal direction V ENHANCE Sharpens the image in the vertical direction To reset PICTURE mode settings to the default If settings have been adjusted excessively or the picture on the screen no longer appears natural it may prove more beneficial to reset the PICTURE mode to default...

Страница 9: ...ies x 2 3 Cleaning cloth for screen 4 Speed clamps x 2 5 Bead bands x 2 6 Ferrite core Before Proceeding 7 Display stands x 2 8 Washers x 2 9 Hex hole bolts x 2 0 Remote control unit holder Cable tie These Operating Instructions Use as a holder for the remote control unit When attaching to the rear of the main unit be careful not to cover the vents ...

Страница 10: ...t but the handles themselves are used in the same way page 11 Operation panel on the main unit 7 STANDBY ON button Press to put the display in operation or standby mode page 19 8 INPUT button Press to select the input page 19 9 MENU button Press to open and close the on screen menu pages 16 to 33 0 ADJUST buttons Use these buttons to move the onscreen cursor between selection options and to perfor...

Страница 11: ...unit pages 16 to 33 5 SET button Press to adjust or enter various settings on the unit pages 16 to 33 6 SUB INPUT button During multi screen display use this button to change inputs to subscreens page 23 7 SPLIT button Press to switch to multi screen display page 23 8 MUTING button Press to mute the volume page 20 9 AUTO SET UP button When using computer signal input automatically sets the POSITIO...

Страница 12: ...atteries in the remote control unit CAUTION Insert batteries so that the plus and minus sides are aligned according to the markings in the battery case When not using the remote control unit for a long period of time 1 month or more remove the batteries from the remote control unit to prevent leaking of battery fluid If battery liquid has leaked thoroughly wipe the inside of the case until all liq...

Страница 13: ...UT1 to this unit page 13 7 DIGITAL RGB INPUT2 DVI D jack Use to connect a computer Note This unit does not support the display of copyguard protected video signals page 12 DIGITAL RGB DVI D 1 0 2 3 4 5 6 L COMBINATION IN OUT RS 232C ANALOG RGB IN D Sub ANALOG RGB OUT D Sub AUDIO AUDIO AUDIO R SPEAKER 8Ω 16Ω INPUT1 INPUT2 OUTPUT 7 8 9 POWER OFF ON AC IN SPEAKER 8Ω 16Ω Illustration depicts PDP 50MXE...

Страница 14: ...cessories manufactured by PIONEER PIONEER will not be held responsible for accident or damage caused by the use of parts and accessories manufactured by other companies For custom installation please consult the dealer where the unit was purchased or a qualified installer Wall mount installation of the unit This unit has been designed with bolt holes for wall mount installation etc The installatio...

Страница 15: ...attached by anyone other than the professional installation technician or service personnel If handles must be removed due to specific installation conditions the mounting screws should be stored carefully together with the handles To ensure safety the mounting screws should be tightened to a minimum torque of 2N m 20 kgf cm when reattaching the handles When moving the display it should always be ...

Страница 16: ...ary For details please read your PC s instruction manual or consult the maker or nearest dealer of your computer NOTICE INPUT1 supports Microsoft Plug Play VESA DDC 1 2B components See Appendix 2 1 2 page 42 when making connections to INPUT1 See Appendix 1 pages 38 and 40 for information regarding signals and display formats supported by INPUT1 To an external monitor When connecting to ANALOG RGB ...

Страница 17: ...TPUT Making connections to the audio inputs on this unit This unit features two audio inputs and one audio output The following chart shows the video inputs and the corresponding audio input terminals Twist exposed wire strands together Push tab to the open position and insert the wire Then close tab firmly to secure the wire in place INPUT1 INPUT2 Audio input jacks Sound output Stereo mini jack L...

Страница 18: ... with a ground terminal is used for efficiency protection Always be sure to connect the power cord to a three pronged grounded outlet and make sure that the cord is properly grounded If you use a power source converter plug use an outlet with a ground terminal and screw down the ground line NO Do not use a power supply voltage other than that indicated AC 100 240 V 50 60 Hz as this may cause fire ...

Страница 19: ... attach carefully To attach the speed clamps to the main unit Connect the speed clamps using the 6 holes marked with below depending on the situation As viewed from the rear of the display Installation and Connections 1 2 To remove speed clamps Using pliers twist the clamp 90 and pull it outward In some cases the clamp may have deteriorated over time and may get damaged when removed 2 Bunch separa...

Страница 20: ... AUTO SET UP MODE INACTIVE AUTO FUNCTION OFF AUDIO OUT FIXED STANDARD LANGUAGE ENGLISH ENTER SET EXIT MENU PICTURE SCREEN SETUP OPTION 5 Use the 5 buttons to select LANGUAGE then press the SET button SET SET EXIT MENU ENGLISH LANGUAGE 6 Use the 2 3 buttons to select the desired language Each time the 2 3 buttons are pressed the language alternates between those available in the following order SET...

Страница 21: ...nputs set SIGNAL FORMAT manually to WXGA 5 Press the SET button The setting is stored in memory and the screen returns to that shown in step 3 6 When the setup is completed press the MENU button to exit the menu screen Note Make SIGNAL FORMAT setting for each input INPUT1 and INPUT2 Settings after connections After components have been connected to INPUT1 or INPUT2 on screen setup is necessary Fol...

Страница 22: ... SET button is pressed 5 When the setup is completed press the MENU button to exit the menu screen Notes The CLAMP POSITION setting is supported only for INPUT1 When making this setting be sure to confirm the signal output of the component used For details consult the component s Operating Instructions 3 AUTO LOCKED 2 1 Press the MENU button to display the menu screen MENU INPUT1 ENTER SET EXIT ME...

Страница 23: ...wing message will be displayed 5 8 8 5 1 2 6 8 4 k H z f V 7 8 1 6 H z f H X INPUT1 FULL CAUTION UNSUPPORTED SIGNAL 0 2 0 k H z f V 7 7 1 5 H z f H INPUT1 FULL CAUTION OUT OF RANGE 4 Use VOLUME buttons on the remote control unit or the main unit to adjust the sound volume If no audio connections are made to this unit this step is not necessary 5 When viewing is finished press the STANDBY ON button...

Страница 24: ...tion is active the SCREEN MGT message will also be displayed at the lower left corner of the screen Operation Adjusting sound volume Press the VOLUME buttons Press the or button to respectively decrease and increase the volume of sound from the speakers 5 VOLUME Muting the sound MUTING Press the MUTING button on the remote control unit Press the MUTING button again to restore the sound Muting is a...

Страница 25: ...odes are designed for full display of a picture on a wide screen it is our hope that you make use of them with a full understanding of the manufacturer s intentions Screen size selection The size of the image displayed on the screen and the range of the image shown can be set in one of four modes Press the SCREEN SIZE button to select the size SCREEN SIZE SCREEN SIZE Main unit operating panel Remo...

Страница 26: ...d only on PDP 43MXE1 PDP 43MXE1 S The ZOOM setting is available only during personal computer input 1280 x 1024 input only A portion of the display will not appear on the screen Use the 5 buttons to adjust the vertical position of the video image on the screen Moving the screen position upward or downward Press the 5 buttons When playing a PARTIAL or ZOOM image 1280 x 1024 input only from a comput...

Страница 27: ...T button to select the subscreen input source To exchange the main screen and subscreen inputs Press the remote control unit s SWAP button When 2 SCREEN mode has been selected The right and left sides of the display will switch what was previously the main screen will now show the subscreen and vice versa When PinP or PoutP has been selected What was previously the main screen image will now appea...

Страница 28: ...button to exit the menu screen Note The POWER MANAGEMENT function must be set individually for each input INPUT1 or INPUT2 To return to operating mode To return to normal operation from the POWER MANAGEMENT function s standby mode either operate your computer or press the INPUT button on the plasma display or remote control unit To change the position of the subscreen in PinP mode Press the remote...

Страница 29: ...o the default If settings have been adjusted excessively or the picture on the screen no longer appears natural it may prove more beneficial to reset the PICTURE mode to default settings instead of trying to make adjustments under already adjusted conditions 1 In step 2 in the previous procedure use the 5 buttons to select PICTURE RESET then press the SET button SET SET EXIT MENU PICTURE RESET YES...

Страница 30: ... cases set the AUTO SET UP MODE to INACTIVE and use the manual adjustment methods explained in the following section Adjusting screen POSITION CLOCK and PHASE manual adjust AUTO SET UP AUTO SET UP Main unit operating panel Remote control unit When the automatic setup mode is selected the unit will automatically be adjusted to the optimum image settings whenever the power is turned on the input sou...

Страница 31: ...ess the MENU button to return to the normal screen image Note Optimum settings may not be possible for low luminance and certain other signals In such cases set the AUTO SETUP MODE to INACTIVE and use the manual adjustment methods explained in the following section Adjusting screen POSITION CLOCK and PHASE manual adjust 3 INACTIVE ACTIVE 2 1 Press the MENU button to display the menu screen MENU IN...

Страница 32: ...icker of screen letters or color misalignment This setting adjusts the phase of the internal clock signal adjusted by the CLOCK setting Notes The CLOCK and PHASE adjustment items are supported only for INPUT1 When the CLOCK frequency is changed the POSITION command s horizontal H option may require readjustment If the adjustment items in the SCREEN mode are adjusted excessively the picture may not...

Страница 33: ...T MENU PICTURE SCREEN SETUP OPTION 3 Use the 5 buttons to select ORBITER MENU INPUT1 ENERGY SAVE SCREEN MGT OFF ORBITER OFF MASK CONTROL ON AUTO SET UP MODE INACTIVE AUTO FUNCTION OFF AUDIO OUT FIXED STANDARD LANGUAGE ENGLISH PICTURE SCREEN SETUP OPTION 4 Press the SET button to activate the setting The factory default setting is OFF Each time the button is pressed the setting alternates as follow...

Страница 34: ...ed screen management settings consult your professional installation technician 1 Press the MENU button to display the menu screen MENU INPUT1 PICTURE SCREEN SETUP OPTION 0 0 0 0 0 0 CONTRAST 0 BRIGHTNESS R LEVEL G LEVEL B LEVEL H ENHANCE V ENHANCE PICTURE RESET 2 Use the 2 3 buttons to select OPTION MENU INPUT1 ENERGY SAVE SCREEN MGT OFF ORBITER OFF MASK CONTROL ON AUTO SET UP MODE INACTIVE AUTO ...

Страница 35: ...ation when set to ONCE or REPEAT if the display s MAIN POWER switch is turned OFF the screen management program will end and this part of the display will change to display the message OFF If you wish to continue the screen management program use the 2 3 buttons to select ONCE or REPEAT again 6 Use the 5 buttons to select TIME TO ACTIVATE SET MENU RETURN EXIT SCREEN MGT REPEAT STATUS 01H00M TIME T...

Страница 36: ...uce optimum image appearance 5 When finished with the setting press the MENU button to return to the normal screen image Note The ENERGY SAVE setting affects all input sources 3 STANDARD MODE2 2 MODE1 2 3 AUTO MODE3 2 MENU 2 3 5 SET MENU 5 SET 2 3 Main unit operating panel Remote control unit Automatic input switching AUTO FUNCTION This display is equipped with an optional AUTO FUNCTION selector W...

Страница 37: ...me changes in response to operation of VOLUME controls 5 When finished with the setting press the MENU button to return to the normal screen image Note The AUDIO OUT setting affects all input sources 3 FIXED VARIABLE 2 3 OFF INPUT1 2 4 Press the SET button to select INPUT1 The factory default setting is OFF Each time the SET button is pressed the selector function switches alternately as shown OFF...

Страница 38: ...remedied with a quick check Please check to see if a warning is displayed on the screen If displayed refer to the table below and check the mode If there is no display check to see if the problem is listed on page 35 The problem may also be caused by something other than this unit so please also check the other components being used such as a video deck If the problem can still not be solved pleas...

Страница 39: ...mall size Letter breakup on screen A sharp sound is sometimes heard from the cabinet Bright portions of image appear to be losing intensity Speckles or noise appears on screen Stripes appear on the screen Sound is heard from inside the unit Fan isn t moving Fan speed changes ON green indicator doesn t light Is the correct screen size selected pages 21 22 26 and 27 Adjust using SCREEN mode on the m...

Страница 40: ...recision array but on occasion one or more of the pixels may fail to light or may light erratically This is an inevitable by product of the manufacturing process and not a malfunction Concerning infrared light In principle the plasma display radiates infrared light Depending on the environment in which the monitor is installed and used infrared remote control units for other nearby appliances may ...

Страница 41: ...ting atmospheric pressure range 800 to 1100 hPa Input output Video INPUT1 Input Mini D sub 15 pin socket connector RGB signal G ON SYNC compatible RGB 0 7 Vp p 75 Ω no sync HD VS VD TTL level positive and negative polarity 2 2 kΩ G ON SYNC 1 Vp p 75 Ω negative sync Compatible with Microsoft Plug Play VESA DDC1 2B Output Mini D sub 15 pin socket connector 75 Ω with buffer Additional Information INP...

Страница 42: ...Hz 60Hz 72Hz 75Hz 75 1Hz 66Hz 76Hz 60Hz 60Hz 75Hz 85Hz 60Hz 75Hz 85Hz 60Hz 65Hz 70Hz 75Hz 85Hz 640x400 720x400 640x480 848x480 800x600 832x624 1024x768 1280x720 1280x768 1152x864 1152x870 1152x900 1280x960 1280x1024 1400x1050 1600x1200 NEC PC 9800 NEC PC 9800 Apple Macintosh 13 1072x600 Apple Macintosh 16 1376 x 768 indicates Apple Macintosh 19 Apple Macintosh 21 Sun Microsystems LO Sun Microsyste...

Страница 43: ... 60Hz 56Hz 60Hz 60Hz 60Hz 60Hz 60Hz 640x480 848x480 800x600 1024x768 1280x768 1152x864 1280x960 1280x1024 1400x1050 1072x600 1376x768 1280x768 1280x768 1280x768 1280x768 1280x768 1280x768 1280x768 1280x768 640x480 848x480 800x600 1024x768 1280x768 31 5kHz 31 0kHz 35 2kHz 37 9kHz 48 4kHz 45 1kHz 47 8kHz 53 7kHz 60 0kHz 64 0kHz 65 3kHz 1280x768 Optimal picture Adjustment of picture position refresh ...

Страница 44: ... 7kHz 64 9kHz 67 5kHz 68 7kHz 61 8kHz 71 7kHz 60 0kHz 64 0kHz 80 0kHz 91 2kHz 65 3kHz 82 3kHz 93 9kHz 75 0kHz 81 3kHz 87 5kHz 93 8kHz 106 3kHz Optimal picture Adjustment of picture position refresh rate phase etc may be necessary Picture will be enlarged but some fine detail will be hard to see Simple reproduction Fine detail will not be reproduced 768x768 768x768 768x768 768x768 768x768 768x768 7...

Страница 45: ...x768 1152x864 1280x960 1280x1024 1400x1050 1072x600 1376x768 640x480 848x480 800x600 1024x768 1024x768 Additional Information Appendix 1 4 4 PDP 43MXE1 PDP 43MXE1 S INPUT2 Optimal picture Adjustment of picture position refresh rate phase etc may be necessary Picture will be enlarged but some fine detail will be hard to see Simple reproduction Fine detail will not be reproduced Resolution Dot x Lin...

Страница 46: ...ppendix 2 INPUT1 2 pin assignments Appendix 2 1 2 INPUT1 Mini D sub 15 pin female connector pin allocation Input Output 1 2 3 4 5 6 7 8 9 10 11 12 13 14 15 R G B NC No connection GND GND GND GND DDC 5V GND NC No connection DDC SDA HD or H V SYNC VD DDC SCL NC No connection NC No connection NC No connection Pin No Apple and Macintosh are registered trademarks of Apple Computer Inc Microsoft is a re...

Страница 47: ...le dans les mois ou les années qui suivent Remarques sur l installation Ce produit est vendu en assumant qu il sera installé par un personnel suffisamment expérimenté et qualifié Faites toujours réaliser le montage et l installation par un spécialiste ou par votre revendeur PIONEER ne peut être tenu responsable pour tout dommage causé par une erreur d installation ou de montage une mauvaise utilis...

Страница 48: ...3 4 2 1 1_Fr ATTENTION Ne placez aucune source de flamme nue telle que les bougies allumées près de l appareil Si une source de flamme nue devait tomber accidentellement sur l appareil le feu se repandrait sur l appareil et pourrait causer un incendie D3 4 2 1 7a_Fr ATTENTION Cet appareil n est pas imperméable afin de prévenir tout risque de choc électrique ou de début d incendie ne pas exposer ce...

Страница 49: ...ermettant l insertion de cartes pour le branchement de périphériques externes ce qui accroît son potentiel d extension Prise en compte d une large gamme de signaux d ordinateur analogique numérique L écran supporte l affichage non compressé de signaux allant de 640x400 et 640x480 VGA à 1024x768 XGA et 1280x768 ainsi que l affichage compressé de signaux de 1280x1024 SXGA 1400x1050 SXGA et 1600x1200...

Страница 50: ...mérique L écran supporte l affichage non compressé de signaux allant de 640x400 et 640x480 VGA à 1024x768 XGA ainsi que l affichage compressé de signaux de 1280x1024 SXGA 1400x1050 SXGA et 1600x1200 UXGA De plus les réglages de rapport largeur hauteur et de taille d écran supportés comprennent POINT PAR POINT 4 3 PLEIN ÉCRAN et ZOOM 1 Les signaux pris en compte sont différents à INPUT1 et à INPUT2...

Страница 51: ...sés il peut être utile de lire cette section Les autres sections de ce mode d emploi abordent des opérations de base telle le choix d une source et des opérations plus détaillées telles que l affichage d image correspondant aux appareils utilisés et aux goûts personnels Les écrans PDP 50MXE1 PDP 43MXE1 et PDP 50MXE1 S PDP 43MXE1 S ont un aspect différent mais leurs fonctions et la méthode de fonct...

Страница 52: ...églez le contraste en fonction de l éclairage ambiant de manière que l image soit bien visible LUMINOSITÉ Réglez la luminosité de manière que les parties sombres de l image soient bien visibles NIV ROUGE Pour régler la quantité de rouge dans l image NIV VERT Pour régler la quantité de vert dans l image NIV BLEU Pour régler la quantité de bleu dans l image AGRAND HOR Pour accroître la netteté de l ...

Страница 53: ...e nettoyage pour l écran 4 2 colliers rapides 5 2 serre câble 6 Noyau en ferrite Avant de commencer 7 2 supports pour l écran 8 2 rondelles petite 9 2 boulons hexagonaux 0 Support pour télécommande Attache de câble Le présent mode d emploi Utilisez ce support pour y ranger la télécommande Si vous fixez ce support à l arrière de l écran veiller à ne pas obstruer les ouïes d aération ...

Страница 54: ...ON Appuyez sur cette touche pour mettre l écran en service ou en veille page 19 8 Touche INPUT Appuyez sur cette touche pour choisir le signal d entrée page 19 9 Touche MENU Appuyez sur cette touche pour ouvrir ou fermer les menus s affichant sur l écran pages 16 à 33 0 Touches ADJUST réglage Utilisez ces touches pour déplacer le curseur de l écran entre les options de sélection et effectuer des a...

Страница 55: ...OSITION HORLOGE et PHASE horloge phase aux valeurs optimales page 26 0 Touche STANDBY ON Appuyez sur cette touche pour mettre l écran en service ou en veille page 19 Touche DISPLAY Appuyez sur cette touche pour afficher le nom de l entrée et de mode de fonctionnement actuels page 20 Touche POINT ZOOM Utilisez cette touche pour choisir et agrandir une partie de l écran page 22 Touche SWAP Lors d un...

Страница 56: ...s Pour éviter que le boîtier de télécommande ne soit endommagé par une fuite de l électrolyte des piles retirez en les piles si vous envisagez de ne pas l utiliser pendant un mois environ Si les piles ont fuit nettoyez soigneusement le logement et utilisez un jeu de piles neuves Lorsque vous diposez de piles batteries usées veuillez vous conformer aux normes gouvernementales ou environnementales e...

Страница 57: ...i prise stéréo Utilisez cette prise pour disposer des sons appliqués sur INPUT1 Branchez sur cette prise la sortie son de l appareil relié à INPUT1 page 13 Cette illustration présente le modèle PDP 50MXE1 PDP 50MXE1 S 7 DIGITAL RGB INPUT2 prise DVI D A utiliser pour raccorder un ordinateur Remarque Cet appareil ne prend pas en compte l affichage de signaux vidéo protégés contre la copie page 12 8 ...

Страница 58: ...que le support ou la fixation PIONEER vendus séparément Dans toute la mesure du possible utilisez des pièces et des accessoires fabriqués par PIONEER PIONEER ne pourra être tenue responsable des accidents et dommages qui résulteraient de l utilisation de pièces ou d accessoires fabriqués par des tiers Pour effectuer une installation personnalisée consultez le revendeur ou un technicien compétent A...

Страница 59: ... doit toujours être transporté par deux personnes saisissant les poignées arrière comme illustré ici NON N essayez jamais de déplacer l écran à plasma en ne le tenant que par une de ses poignées Lors de l installation de l écran à plasma n utilisez pas ses poignées pour le suspendre à une paroi ni comme moyen d éviter qu il ne bascule voir l illustration Perçage b Appareil Perçage b Axe Perçage b ...

Страница 60: ...evendeur NOTICE La prise INPUT1 prend en compte les composants à approche Plug Play VESA DDC 1 2B de Microsoft Consultez le Supplément 2 1 2 page 42 lors de connexions sur INPUT1 Consultez le Supplément 1 pages 38 et 40 pour des informations sur les signaux et les formats d affichage pris en compte par INPUT1 Installation et raccordements Pour le raccordement à ANALOG RGB OUT INPUT1 ANALOG RGB IN ...

Страница 61: ... audio de cet écran à plasma Cet écran à plasma est doté de deux entrées audio et d une sortie audio Le tableau qui suit donne pour chaque entrée vidéo les entrées audio correspondantes Torsadez les brins mis à nu Soulevez la languette puis introduisez le conducteur Abaissez la languette pour maintenir le conducteur en place Raccordement audio pour un appareil ordinateur relié à INPUT1 ANALOG RGB ...

Страница 62: ... cordon à deux conducteurs plus un conducteur de masse Veillez à ce que la prise possède une broche de mise à la terre et qu elle soit convenablement câblée En cas d utilisation d un adaptateur le conducteur de masse doit tout de même être relié à la terre NON Alimentez l écran à plasma à partir de la tension prescrite 100 240 Volts CA 50 60 Hz tout autre tension peut provoquer un incendie ou une ...

Страница 63: ...fficile Fermez les soigneusement Fixation des colliers rapides à l écran à plasma Engagez les colliers rapides dans les trous 6 repérés par sur l illustration ci dessous Pour retirer les colliers rapides A l aide d une pince tordez le collier de 90 puis tirez le vers vous Avec le temps le collier peut se détériorer et il peut être nécessaire de la remplacer après que vous l avez retiré Vue de l ar...

Страница 64: ...TER OFF MASK CONTROL ON AUTO SET UP MODE INACTIVE AUTO FUNCTION OFF AUDIO OUT FIXED STANDARD LANGUAGE ENGLISH ENTER SET EXIT MENU PICTURE SCREEN SETUP OPTION 5 Utilisez les touches 5 pour sélectionner LANGUAGE puis appuyez sur la touche SET SET SET EXIT MENU ENGLISH LANGUAGE 6 Utilisez les touches 2 3 pour sélectionner la langue souhaitée A chaque pression sur les touches 2 3 les langues disponibl...

Страница 65: ... SET SORTIE MENU TYPE DE SIGNAL VGA 1 Si le signal d entrée a une fréquence de rafraîchissement de 31 5 kHz horizontal 60 Hz vertical une pression sur 2 3 modifie alternativement comme suit le mode d affichage 2 Si le signal d entrée a une fréquence de rafraîchissement de 48 4 kHz horizontal 60 Hz vertical ou de 56 1 kHz horizontal 70 Hz vertical une pression sur 2 3 modifie alternativement comme ...

Страница 66: ...suit le mode choisi 5 Appuyez sur la touche MENU pour abandonner la page de menu lorsque la mise en oeuvre est terminée Remarques La mise en œuvre POSITION CLAMP est prise en compte seulement pour INPUT1 Lorsque vous effectuez ce réglage veillez à vérifier la sortie du signal du composant utilisé Pour plus de détails consultez le mode d emploi du composant 1 Appuyez sur la touche MENU pour affiche...

Страница 67: ... suivant est affiché 5 8 8 5 1 2 6 8 4 k H z f V 7 8 1 6 H z f H X ENTRÉE1 PLEIN ÉCRAN ATTENTION SIGNAL NON RECONNU 0 2 0 k H z f V 7 7 1 5 H z f H ENTRÉE1 PLEIN ÉCRAN ATTENTION FREQ HORS STANDARD 4 Utilisez les touches VOLUME de la télécommande ou de l écran à plasma pour régler le niveau d écoute Si aucune signal sonore n est appliqué à l écran à plasma cette opération est inutile 5 Lorsque vous...

Страница 68: ...touche DISPLAY Le nom de l entrée choisie le format de l image et les fréquences de rafraîchissement seront affichés pendant 3 secondes environ 0 6 0 4 6 0 8 4 0 k H z f V 5 3 1 H z f H X ENTRÉE1 POINT PAR POINT Remarques Il se peut que les fréquences de rafraîchissement affichées soient légèrement différentes des valeurs réelles Lorsque vous utilisez la fonction Agrandissement partiel de l image ...

Страница 69: ...fi A 3 PLEIN ÉCRAN L image a le format 16 9 et remplit l écran A L illustration concerne une entrée 640 x 480 640 points 1024 points 768 lignes 480 lignes L illustration concerne une entrée 640 x 480 640 points 1280 points 768 lignes 480 lignes Le format d image change comme suit chaque fois que la touche SCREEN SIZE est actionnée PDP 50MXE1 PDP 50MXE1 S ou PDP 43MXE1 PDP 43MXE1 S ou Consultez le ...

Страница 70: ...trée provient de l ordinateur 1280 x 1024 uniquement Le signal d entrée et l image sont dans un rapport point à ligne de 1 1 L image est tout à fait fidèle à la source Toutefois pour que le rapport 1 1 soit maintenu une partie de l image n est pas affichée Utilisez les touches 5 pour ajuster la position verticale de l image vidéo sur l écran 5 ZOOM Supporté seulement sur le PDP 43MXE1 PDP 43MXE1 S...

Страница 71: ...nde pour sélectionner la source d entrée du sous écran Pour permuter les entrées à l écran principal et au sous écran Appuyez sur la touche SWAP de la télécommande Lorsque le mode 2 SCREEN est sélectionné Les côtés droit et gauche de l affichage permutent Ce qui était affiché sur l écran principal apparaît sur le sous écran et vice versa Lorsque le mode PinP ou PoutP est sélectionné Ce qui était a...

Страница 72: ...mentation GESTION D ALIM qui lui permet de passer automatiquement en mode Veille quand aucun signal de synchronisation n est détecté Un message d avertissement apparaît avant l action de cette fonction Remarque Coupez toujours d interrupteur principal de l écran à plasma lorsque vous prévoyez de ne pas l utiliser pendant une longue période Panneau de commande de l écran à plasma Télécommande INPUT...

Страница 73: ...e sens vertical Pour rétablir les valeurs par défaut des paramètres de l option IMAGE Si les réglages effectués ne vous conviennent pas il peut être souhaitable de rétablir les valeurs par défaut des différents paramètres de l option IMAGE plutôt que de continuer à modifier les réglages 1 Au cours de l opération 2 ci dessus utilisez les touches 5 pour choisir l option RÉINIT IMAGE puis appuyez sur...

Страница 74: ...ains autres types Dans ces cas réglez le mode PARAMÉTRAGE AUTO sur INACTIF et utilisez les méthodes de réglage manuel expliquées dans la section suivante Réglage de la POSITION de l écran de l HORLOGE et de la PHASE Réglage manuel Panneau de commande de l écran à plasma AUTO SET UP AUTO SET UP Télécommande Lorsque le mode de paramétrage automatique est sélectionné l appareil sera automatiquement a...

Страница 75: ...che MENU pour repasser à l image de l écran normal Remarque Il se peut que les réglages optimaux ne soient pas obtenus avec des signaux à faible luminance ou certains autres types Dans ces cas réglez le mode PARAMÉTRAGE AUTO sur INACTIF et utilisez les méthodes de réglage manuel expliquées dans la section suivante Réglage de la POSITION de l écran de l HORLOGE et de la PHASE Réglage manuel 3 INACT...

Страница 76: ...cintillement et des erreurs de couleur Ce réglage agit sur la phase du signal de l horloge interne dont la fréquence a été réglée au moyen du paramètre HORLOGE Remarques Les paramètres de réglage HORLOGE et PHASE sont pris en compte uniquement pour ENTRÉE1 Si la fréquence HORLOGE est changée il se peut que l option H de la commande POSITION doive être retouchée Si les paramètres de l option ÉCRAN ...

Страница 77: ...RÉE SORTIE IMAGE ÉCRAN SETUP OPTION 3 Utilisez les touches 5 pour sélectionner ORBITER MENU ENTRÉE1 ÉCONOM D ÉNERGIE GESTION ÉCRAN ARRÊT ORBITER ARRÊT CONTRÔLE MASQUE MARCHE PARAMÉTRAGE AUTO INACTIF MODE AUTO ARRÊT SORTIE AUDIO FIXE STANDARD LANGUAGE FRANÇAIS IMAGE ÉCRAN SETUP OPTION 4 Appuyez sur la touche SET pour valider le réglage Le réglage par défaut effectué en usine est ARRÊT À chaque pres...

Страница 78: ...RETOUR GESTION ÉCRAN STATUS DÉLAI ACTIVATION DÉMARRAGE ARRÊT 01HR00MN 5 Utilisez les touches 2 3 pour sélectionner UNE FOIS ou RÉPÉTITION Le réglage par défaut effectué en usine est ARRÊT À chaque pression sur la touche le réglage change comme suit UNE FOIS Le programme de gestion d écran est exécuté une fois seulement RÉPÉTITION Le programme de gestion d écran est exécuté de façon répétée par cyc...

Страница 79: ...PÉTITION STATUS 00HR10MN DÉLAI ACTIVATION DÉMARRAGE Autres démarches Réglages d économie d énergie ÉCONOM D ÉNERGIE Cette fonction permet une atténuation de la luminosité de l écran un moyen de réduire la consommation de courant et d éviter la détérioration de l écran 1 Appuyez sur la touche MENU pour afficher la page de menu MENU ENTRÉE1 IMAGE ÉCRAN SETUP OPTION 0 0 0 0 0 0 CONTRASTE 0 LUMINOSITÉ...

Страница 80: ...3 La luminosité reste à un niveau fixe quel que soit le signal d entrée ce qui contribue à réduire la détérioration de l écran par rémanence d images virtuelles etc AUTO La luminosité se règle automatiquement en fonction des conditions de l éclairage ambiant de manière à produire des images optimales 5 Une fois terminés ces réglages appuyez sur la touche MENU pour repasser à l écran normal Remarqu...

Страница 81: ...audio SORTIE AUDIO Au besoin le niveau du signal fourni à la prise AUDIO OUTPUT peut être réglé sur FIXE ou VARIABLE lié à la fonction VOLUME 1 Appuyez sur la touche MENU pour afficher la page de menu MENU ENTRÉE1 IMAGE ÉCRAN SETUP OPTION 0 0 0 0 0 0 CONTRASTE 0 LUMINOSITÉ NIV ROUGE NIV VERT NIV BLEU AGRAND HOR AGRAND VER RÉINIT IMAGE 2 Utilisez les touches 2 3 pour choisir OPTION SET MENU MENU EN...

Страница 82: ...s Dans le cas contraire et si vous pensez que cet appareil est défectueux procédez aux vérifications de la page 35 Il peut arriver aussi que le défaut provienne d un autre élément de l installation assurez vous que ce n est pas le cas Si en dépit de ces contrôles vous n êtes pas en mesure d obtenir un fonctionnement satisfaisant consultez le revendeur Mode d autodiagnostic Des messages peuvent app...

Страница 83: ...e 25 Anomalies Remèdes possibles Anomalies générales Anomalies qui n en sont pas L image a un format réduit Les caractères affichés sont déformés Un son aigu est parfois émis par l écran à plasma Les portions lumineuses de l image semblent manquer d intensité Les taches ou du bruit se forment sur l écran Des rayures se forment sur l écran L écran à plasma émet des bruits Le ventilateur ne fonction...

Страница 84: ...hez immédiatement la fiche du cordon d alimentation et consultez votre revendeur ou un centre de service Informations complémentaires Précautions relatives à l utilisation Persistance des images Afficher pendant une longue période la même image fixe peut entraîner une persistance de cette image Cela se produit dans les cas suivants 1 Persistance d image due à une charge électrique Si une image fix...

Страница 85: ... atmosphérique de fonctionnement De 800 à 1100 hPa Entrée sortie Vidéo INPUT1 Entrée Mini D sub 15 broches connecteur femelle Signal RVB Compatible G ON SYNC RVB 0 7 Vcc 75 Ohms pas de synchro HD VS VD Niveau TTL polarités positive et négative 2 2 kOhms G ON SYNC 1 Vcc 75 Ohms synchro négative Compatibilité Microsoft Plug Play VESA DDC1 2B Sortie Mini D sub 15 broches connecteur femelle 75 Ohms av...

Страница 86: ...Hz 72Hz 75Hz 85Hz 74 6Hz 60Hz 70Hz 75Hz 74 9Hz 85Hz 60Hz 56Hz 60Hz 70Hz 60Hz 72Hz 75Hz 75 1Hz 66Hz 76Hz 60Hz 60Hz 75Hz 85Hz 60Hz 75Hz 85Hz 60Hz 65Hz 70Hz 75Hz 85Hz 640x400 720x400 640x480 848x480 800x600 832x624 1024x768 1280x720 1280x768 1152x864 1152x870 1152x900 1280x960 1280x1024 1400x1050 1600x1200 NEC PC 9800 NEC PC 9800 Apple Macintosh 13 1072x600 Apple Macintosh 16 1376 x 768 Indique le mo...

Страница 87: ...0Hz 60Hz 60Hz 640x480 848x480 800x600 1024x768 1280x768 1152x864 1280x960 1280x1024 1400x1050 1072x600 1376x768 1280x768 1280x768 1280x768 1280x768 1280x768 1280x768 1280x768 1280x768 640x480 848x480 800x600 1024x768 1280x768 31 5kHz 31 0kHz 35 2kHz 37 9kHz 48 4kHz 45 1kHz 47 8kHz 53 7kHz 60 0kHz 64 0kHz 65 3kHz 1280x768 Image optimale Un réglage de la position de l image de la fréquence de rafraî...

Страница 88: ...détails ne sont pas reproduits 24 8kHz 31 5kHz 37 9kHz 31 5kHz 35 0kHz 37 9kHz 37 5kHz 43 3kHz 31 0kHz 35 2kHz 37 9kHz 48 1kHz 46 9kHz 53 7kHz 49 7kHz 48 4kHz 56 5kHz 60 0kHz 60 2kHz 68 7kHz 44 7kHz 45 1kHz 47 8kHz 56 1kHz 53 7kHz 64 9kHz 67 5kHz 68 7kHz 61 8kHz 71 7kHz 60 0kHz 64 0kHz 80 0kHz 91 2kHz 65 3kHz 82 3kHz 93 9kHz 75 0kHz 81 3kHz 87 5kHz 93 8kHz 106 3kHz 768x768 768x768 768x768 768x768 ...

Страница 89: ... 640x480 848x480 800x600 1024x768 1024x768 Supplément 1 4 4 PDP 43MXE1 PDP 43MXE1 S INPUT2 Image optimale Un réglage de la position de l image de la fréquence de rafraîchissement de la phase etc peut s avérer nécessaire L image sera agrandie mais certains petits détails seront difficiles à voir La reproduction est simple Les détails ne sont pas reproduits Définition Points x Lignes Vertical POINT ...

Страница 90: ...Agencement des broches INPUT1 Connecteur femelle mini D sub à 15 broches Entrée Sortie 1 2 3 4 5 6 7 8 9 10 11 12 13 14 15 R G B Réservé pas de connexion Masse Masse Masse Masse DDC 5 V Masse Réservé pas de connexion DDC SDA HD ou H V SYNC VD DDC SCL Réservé pas de connexion Réservé pas de connexion Réservé pas de connexion No broche Apple et Macintosh sont des marques déposées par Apple Computer ...

Страница 91: ...nen in Zukunft nützliche Dienste leisten Hinweis zur Installation Dieses Produkt ist für die Installation durch einen Fachmann bestimmt Der Käufer muss dieses Produkt entweder von einem qualizifierten Techniker oder vom Fachhändler installieren und einrichten lassen PIONEER übernimmt keinerlei Haftung für Schäden die auf unsachgemäße Installation oder Befestigung zweckentfremdeten Gebrauch Nachges...

Страница 92: ...ION RISK OF ELECTRIC SHOCK DO NOT OPEN WARNUNG Dieses Gerät ist nicht wasserdicht Zur Vermeidung der Gefahr von Brand und Stromschlag dieses Gerät weder Regen noch Nässe aussetzen und keine Behälter mit Flüssigkeiten z B Blumenvasen und töpfe Kosmetikbehälter und Medizinflaschen in die Nähe des Gerätes bringen D3 4 2 1 3_Ge WARNUNG Keine Licht oder Wärmequellen mit offener Flamme z B brennende Ker...

Страница 93: ...tzung eines breiten Bereichs von Computersignalen analog digital Dieses Display unterstützt die nichtkomprimierte Anzeige von Computersignalen mit Auflösungen von 640 x 400 und 640 x 480 VGA Pixeln bis hin zu 1024 x 768 XGA und 1280 x 768 Pixeln sowie die komprimierte Anzeige von Computersignalen mit einer Auflösung von 1280 x 1024 SXGA 1400 x 1050 SXGA und 1600 x 1200 UXGA Pixeln Zu den unterstüt...

Страница 94: ...isplay unterstützt die nichtkomprimierte Anzeige von Computersignalen mit Auflösungen von 640 x 400 und 640 x 480 VGA Pixeln bis hin zu 1024 x 768 XGA sowie die komprimierte Anzeige von Computersignalen mit einer Auflösung von 1280 x 1024 SXGA 1400 x 1050 SXGA und 1600 x 1200 UXGA Pixeln Zu den unterstützten Bildseitenverhältnissen und Bildschirmformaten gehören PUNKT FÜR PUNKT 4 3 VOLL und ZOOM 1...

Страница 95: ... u U übergangen werden Die übrigen Abschnitte dieser Anleitung enthalten Erläuterungen der grundlegenden Bedienungsschritte zur Wahl der Eingangsquelle sowie weiterführender Bedienungsvorgänge mit deren Hilfe Sie die für die jeweils angeschlossenen Geräte und Ihre Anforderungen optimalen Bildeinstellungen am Plasma Display vornehmen können Die Modelle PDP 50MXE1 PDP 43MXE1 und PDP 50MXE1 S PDP 43M...

Страница 96: ...en die im BILD Modus eingestellt werden können sind nachstehend mit einer kurzen Erläuterung aufgelistet KONTRAST Stellen Sie den Kontrast je nach der Umgebungshelligkeit so ein dass das Bild klar zu erkennen ist HELLIGKEIT Stellen Sie die Helligkeit so ein dass die dunklen Bildbereiche deutlich zu erkennen sind R PEGEL Ermöglicht eine Justierung des Rot Anteils des Bilds G PEGEL Ermöglicht eine J...

Страница 97: ... 2 Mignonzelle R6 Größe AA x 2 3 Reinigungstuch für Bildschirm 4 Schnellverschluss Kabelband x 2 5 Kugelband x 2 6 Ferritkern 7 Display Ständer x 2 8 Unterlegscheibe x 2 9 Innensechskantschraube x 2 0 Halter für Fernbedienung Kabelband Vorliegende Bedienungsanleitung In diesen Halter kann die Fernbedienung eingesetzt werden Beim Anbringen des Halters an der Rückwand des Gerätes dürfen die Ventilat...

Страница 98: ...rch Drücken dieser Taste wird das Plasma Display in den Bereitschafts oder Betriebsmodus geschaltet Seite 19 8 INPUT Eingangswahltaste Diese Taste dient zur Wahl des gewünschten Eingangs Seite 19 9 MENU Menütaste Durch Drücken dieser Taste wird die Menüanzeige in den Bildschirm eingeblendet und wieder vom Bildschirm gelöscht Seite 16 bis 33 0 ADJUST Einstelltasten Diese Tasten dienen als Cursortas...

Страница 99: ...us geschaltet Seite 19 DISPLAY Anzeigeparameter Taste Nach Drücken dieser Taste werden der momentan gewählte Eingang und das aktuelle Bildschirmformat angezeigt Seite 20 POINT ZOOM Bildausschnitt Vergrößerungstaste Nach Drücken dieser Taste kann ein gewünschter Bildausschnitt vergrößert werden Seite 22 SWAP Bildwechseltaste Bei Mehrbildanzeige dient diese Taste zum Vertauschen der Eingangssignalqu...

Страница 100: ...nung Den Deckel leicht eindrücken und zum Abnehmen in Pfeilrichtung schieben VORSICHT Legen Sie die Batterien polaritätsgerecht und entsprechend den Markierungen im Inneren des Batteriefachs ein Wenn die Fernbedienung längere Zeit länger als einen Monat nicht verwendet werden soll entfernen Sie die Batterien um ein Auslaufen von Elektrolyt im Batteriefach zu vermeiden Falls Elektrolyt ausgelaufen ...

Страница 101: ...chlossenen Gerätes Seite 13 7 DIGITAL RGB INPUT2 DVI D Buchse Video Eingang 2 An diese Buchse kann ein Personalcomputer angeschlossen werden Hinweis Dieses Gerät unterstützt keine Anzeige von Videosignalen die mit Kopierschutz codiert sind Seite 12 8 AUDIO INPUT2 Stereo Minibuchse Audio Eingang 2 Diese Buchse dient zur Eingabe des Tonsignals wenn der Eingang INPUT2 gewählt ist Verbinden Sie diese ...

Страница 102: ...tänder oder Montagehalterung Bitte verwenden Sie möglichst nur PIONEER Originalteile und Sonderzubehör PIONEER übernimmt keinerlei Haftung für Unfälle oder Sachschäden die auf den Gebrauch von Teilen und Sonderzubehör anderer Fabrikate in Verbindung mit diesem Plasma Display zurückzuführen sind Falls eine kundenspezifische Aufstellung gewünscht wird konsultieren Sie bitte Ihren Fachhändler oder ei...

Страница 103: ...d VERBOTEN Das Plasma Display darf auf keinen Fall getragen werden indem es nur an einem einzigen Tragegriff ergriffen wird Bei der Aufstellung des Plasma Displays dürfen die Tragegriffe auf keinen Fall zum Aufhängen des Displays verwendet werden sie dürfen auch nicht als Verankerungsteile verwendet werden um ein Umkippen des Displays zu verhindern siehe nachstehendes Schema Installation und Ansch...

Страница 104: ...rhältlich ist Einzelheiten hierzu sind der Bedienungsanleitung Ihres Computers zu entnehmen oder Sie können sich an den PC Hersteller bzw an Ihren Computer Fachhändler wenden ZUR BEACHTUNG Der Eingang INPUT1 ist mit der Plug Play Funktion von Microsoft VESA DDC 1 2B kompatibel Wenn Anschlüsse an INPUT1 hergestellt werden sollen schlagen Sie bitte in Anhang 2 1 2 Seite 42 nach Einzelheiten zu den v...

Страница 105: ...eo Minibuchse über ein Kabel mit Stereo Ministeckern mit der Audio Ausgangsbuchse eines AV Verstärkers oder einer anderen Audio Komponente DIGITAL RGB DVI D AUDIO AUDIO INPUT2 OUTPUT Anschlüsse an den Audio Eingangsbuchsen des Plasma Displays Dieses Plasma Display verfügt über zwei Audio Eingangs buchsen und eine Audio Ausgangsbuchse Aus der nachstehenden Tabelle ist ersichtlich welche Audio Einga...

Страница 106: ...Achten Sie stets darauf das Netzkabel an eine vorschriftsmäßig geerdete dreipolige Netzsteckdose anzuschließen damit eine einwandfreie Erdung des Kabels gewährleistet ist Bei Verwendung eines Umrüststeckers ist das Netzkabel an eine Netzsteckdose mit Erdungsklemme anzuschließen und die Erdungsleitung fest mit der Erdungsklemme zu verschrauben VERBOTEN Schließen Sie das Plasma Display ausschließlic...

Страница 107: ...der Befestigung sorgfältig vor Ansicht von der Rückseite des Plasma Displays 2 Bündeln Sie getrennt verlaufende Kabel und sichern Sie sie mit den mitgelieferten Kugelbändern Sorgen Sie dafür dass die Kabelenden keiner starken Belastung ausgesetzt sind Hinweis Kabel können wahlweise auf der rechten oder linken Seite verlegt werden Entfernen der Schnellverschluss Kabelbänder Drehen Sie den Verschlus...

Страница 108: ...AUDIO OUT FIXED STANDARD LANGUAGE ENGLISH ENTER SET EXIT MENU PICTURE SCREEN SETUP OPTION 5 Betätigen Sie 5 zur Wahl von LANGUAGE und drücken Sie dann SET SET SET EXIT MENU ENGLISH LANGUAGE 6 Betätigen Sie 2 3 zur Wahl der gewünschten Sprache Bei jeder Betätigung von 2 3 wird in der folgenden Reihenfolge zwischen den verschiedenen Einstellungen umgeschaltet SET SET EXIT MENU DEUTSCH LANGUAGE 7 Wen...

Страница 109: ...wendet wird stellen Sie SIGNAL FORMAT manuell auf WXGA ein 5 Drücken Sie SET Die neue Einstellung wird gespeichert wonach das in Schritt 3 gezeigte Menü auf den Bildschirm zurückkehrt 6 Drücken Sie nach beendetem Setup MENU um die Menüanzeige vom Bildschirm zu löschen Hinweis Die Einstellung des Eintrags SIGNAL FORMAT muss für jeden Eingang INPUT1 und INPUT2 separat ausgeführt werden Systemeinstel...

Страница 110: ...lgenden Einstellungen umgeschaltet 5 Drücken Sie nach beendetem Setup MENU um die Menüanzeige vom Bildschirm zu löschen Hinweise Die Einstellung von CLAMP POSITION wird nur für INPUT1 unterstützt Wenn diese Einstellung ausgeführt wird muss die Signalausgabe des angeschlossenen Gerätes sorgfältig überprüft werden Einzelheiten hierzu finden Sie in der Bedienungsanleitung des jeweiligen Gerätes Syste...

Страница 111: ...nbedienung oder am Bedienfeld des Plasma Displays um die Lautstärke wunschgemäß einzustellen Wenn keine Audio Anschlüsse am Plasma Display hergestellt wurden erübrigt sich diese Einstellung 5 Drücken Sie nach beendeter Wiedergabe STANDBY ON um das Display in den Bereitschaftsmodus umzuschalten 6 Bringen Sie den MAIN POWER Schalter an der Anschlussleiste in die Stellung OFF um die Stromzufuhr des P...

Страница 112: ...ISPLAY Danach werden der momentan gewählte Eingang das aktuelle Bildschirmformat sowie Horizontal und Vertikalfrequenz des Eingangssignals ca 3 Sekunden lang auf dem Bildschirm angezeigt PUNKT FÜR PUNKT EINGANG1 0 6 0 4 6 0 8 4 0 k H z f V 5 3 1 H z f H X Hinweise Die angezeigten Horizontal und Vertikalfrequenzen weichen u U geringfügig von den tatsächlichen Werten ab Bei Verwendung der POINT ZOOM...

Страница 113: ...ngangssignals verändert wird A 3 VOLL In diesem Modus erfolgt die Anzeige im Breitbildformat mit einem Bildseitenverhältnis von 16 9 wobei das Bild den Bildschirm vollständig ausfüllt A Bei jeder Betätigung von SCREEN SIZE wird in der folgenden Reihenfolge zwischen den verschiedenen Bildschirmformaten umgeschaltet PDP 50MXE1 PDP 50MXE1 S oder PDP 43MXE1 PDP 43MXE1 S oder Informationen zu den Bilds...

Страница 114: ...Hinweis Das Bild kann nicht in horizontaler Richtung auf dem Bildschirm verschoben werden 1 Drücken Sie POINT ZOOM an der Fernbedienung 66 0 22 1 R12 24 10 ZOOM P ZOOM ROLLEN x 1 5 Zoom Navigations Nebenbild Bei jeder Betätigung von POINT ZOOM wird in der folgenden Reihenfolge zwischen den verschiedenen Vergrößerungsmaßstäben umgeschaltet Hinweise Bei aktivierter POINT ZOOM Funktion kann das Bilds...

Страница 115: ...enden Reihenfolge zwischen den verschiedenen Mehrbildanzeige Modi umgeschaltet 3 2 SCREEN 3 PinP 3 PoutP 3 AUS 1 2 SCREEN Das Hauptbild wird in der linken Hälfte des Bildschirms das Nebenbild in der rechten Hälfte angezeigt 66 0 22 1 R12 24 10 2 PinP Das Nebenbild wird in eine der vier Ecken des Hauptbilds eingeblendet 66 0 22 1 R12 24 10 3 PoutP Das Nebenbild wird außerhalb des Hauptbilds am rech...

Страница 116: ...r ENERGIEMANAGEMENT Funktion muss für jeden Eingang INPUT1 und INPUT2 separat ausgeführt werden Zurückschalten in den Betriebsmodus Um aus dem Energiesparmodus der ENERGIEMANAGEMENT Funktion in den Betriebsmodus zurückzuschalten betätigen Sie entweder den Personalcomputer oder drücken Sie INPUT am Bedienfeld des Plasma Displays bzw an der Fernbedienung Bedienung Bedienfeld des Plasma Displays Fern...

Страница 117: ...ung der Bildschärfe in vertikaler Richtung Zurücksetzen der Einträge im BILD Modus auf ihre Standardwerte Wenn die Einstellungen dieser Einträge stark verändert wurden oder das Bild unnatürlich wirkt ist es u U praktischer sämtliche Standardwerte des BILD Modus wiederherzustellen anstatt zu versuchen die verschiedenen Einstellungen einzeln zu justieren 1 Betätigen Sie in Schritt 2 des obigen Verfa...

Страница 118: ...elle gewechselt oder der Typ des Eingangssignals gewechselt wird MENU 2 3 5 SET MENU 5 SET 2 3 Bedienfeld des Plasma Displays Fernbedienung 1 Drücken Sie MENU um die Menüanzeige aufzurufen MENÜ EINGANG1 EINGABE SET BEENDEN MENU BILD BILDSCHIRM SETUP OPTIONEN 0 0 0 0 0 0 KONTRAST 0 HELLIGKEIT R PEGEL G PEGEL B PEGEL H SCHÄRFE V SCHÄRFE BILD RESET 2 Betätigen Sie 2 3 zur Wahl von OPTIONEN SET MENU M...

Страница 119: ...nz und bestimmten anderen Signalarten ist u U keine optimale automatische Einstellung möglich In einem solchen Fall stellen Sie den Eintrag AUTO SET UP MODE auf INACTIVE ein und gehen Sie dann wie im folgenden Abschnitt Einstellen von POSITION CLOCK Taktsignal und PHASE des Bilds manuelle Einstellung beschrieben vor um eine präzise Einstellung manuell vorzunehmen 3 INACTIVE ACTIVE 2 1 Drücken Sie ...

Страница 120: ...flimmern auf das Mindestmaß reduziert wird und die Farben korrekt ausgerichtet sind Mit dieser Einstellung wird die Phase des im Eintrag CLOCK eingestellten Taktsignals justiert Hinweise Die Einstellung der Einträge CLOCK und PHASE wird nur für INPUT1 unterstützt Nach einer Änderung der Frequenz im Eintrag CLOCK muss die Horizontalpositions Option H des Eintrags POSITION möglicherweise ebenfalls g...

Страница 121: ... STANDARD LANGUAGE DEUTSCH BILD BILDSCHIRM SETUP OPTIONEN 3 Betätigen Sie 5 zur Wahl von ORBITER MENÜ EINGANG1 ENERGIESPARMODUS BILD MANAGEMENT AUS ORBITER AUS MASK CONTROL EIN AUTO SET UP MODE INACTIVE AUTO FUNCTION AUS AUDIO AUSGANG FEST STANDARD LANGUAGE DEUTSCH BILD BILDSCHIRM SETUP OPTIONEN 4 Drücken Sie SET um die gewünschte Einstellung zu aktivieren Die werkseitige Voreinstellung dieser Fun...

Страница 122: ...NAGEMENT AUS ORBITER AUS MASK CONTROL EIN AUTO SET UP MODE INACTIVE AUTO FUNCTION AUS AUDIO AUSGANG FEST STANDARD LANGUAGE DEUTSCH BILD BILDSCHIRM SETUP OPTIONEN 4 Betätigen Sie 5 zur Wahl von STATUS ZURÜCK SET BEENDEN MENU BILD MANAGEMENT STATUS AKTIVIERUNGSZEIT START AUS 01H00M MENU 2 3 5 SET MENU 5 SET 2 3 Bedienfeld des Plasma Displays Fernbedienung Weitere Funktionen 2 Betätigen Sie 2 3 zur W...

Страница 123: ... MANAGEMENT REPEAT STATUS 01H00M AKTIVIERUNGSZEIT START SET MENU ZURÜCK BEENDEN 7 Verwenden Sie 2 3 zur Einstellung der Zeit zu der die Ausführung des Bildschirm Verwaltungsprogramms beginnen soll Durch Betätigen von 2 3 können Sie die Betriebszeit der Bildschirm Verwaltung in Schritten von 10 Minuten zwischen 0 und 24 Stunden einstellen 8 Betätigen Sie 5 zur Wahl von START SET MENU SET START BILD...

Страница 124: ... Die Bildschirmhelligkeit wird dem Eingangssignal entsprechend geregelt doch mit einer noch stärkeren Reduzierung der Leistungsaufnahme als im MODUS1 Modus MODUS3 Die Bildschirmhelligkeit bleibt ungeachtet des Eingangssignals auf einen festen Wert eingestellt Diese Einstellung ist sehr praktisch um die Lebensdauer des Bildschirms dadurch zu verlängern dass ein Einbrennen des Bilds usw verhindert w...

Страница 125: ...Hinweise zum Tonausgang AUDIO AUSGANG Der Ausgangspegel des an der Buchse AUDIO OUTPUT anliegenden Signals kann wahlweise auf FEST oder VARIABEL mit der VOLUME Einstellung verknüpft eingestellt werden 1 Drücken Sie MENU um die Menüanzeige aufzurufen MENÜ EINGANG1 EINGABE SET BEENDEN MENU BILD BILDSCHIRM SETUP OPTIONEN 0 0 0 0 0 0 KONTRAST 0 HELLIGKEIT R PEGEL G PEGEL B PEGEL H SCHÄRFE V SCHÄRFE BI...

Страница 126: ...e geeignete Abhilfemaßnahme zu ermitteln Wenn keine Meldung angezeigt wird schlagen Sie bitte in der Tabelle auf Seite 35 nach in der verschiedene Störungen aufgelistet sind Da die Störung auch von einem anderen Gerät verursacht werden kann sollten Sie alle an das Plasma Display angeschlossenen Geräte z B Videorecorder usw ebenfalls überprüfen Falls sich die Störung auf diese Weise nicht beheben l...

Страница 127: ...hirm Knackgeräusche sind gelegentlich vom Gehäuse zu hören Die hellen Bildstellen wirken verblasst Flecken erscheinen im Bild oder das Bild ist verrauscht Streifen erscheinen auf dem Bildschirm Geräusche sind aus dem Geräteinneren zu hören Der Ventilator arbeitet nicht Die Ventilator Drehzahl ändert sich Die grüne ON Anzeige leuchtet nicht Ist das korrekte Bildschirmformat gewählt worden Seite 21 ...

Страница 128: ...es vorkommen dass ein oder mehrere Pixel überhaupt nicht oder fehlerhaft aufleuchten Dieses Phänomen ist technisch bedingt es handelt sich dabei nicht um eine Funktionsstörung des Gerätes Zusätzliche Informationen Hinweis zur Abstrahlung von Infrarotlicht Dieses Plasma Display strahlt Infrarotlicht ab Dies kann je nach den Bedingungen am Aufstellungsort beim Betrieb des Displays dazu führen dass d...

Страница 129: ...ion Der Eingang INPUT1 ist mit der Plug Play Funktion von Microsoft VESA DDC1 2B kompatibel Ausgang 15 polige Mini D Sub Buchse 75 Ω mit Puffer INPUT2 Eingang 24 polige DVI D Buchse Digitales RGB Signal DVI kompatibles TMDS Signal Der Eingang INPUT2 ist mit der Plug Play Funktion von Microsoft VESA DDC2B kompatibel Audio Eingang AUDIO INPUT für INPUT1 Stereo Minibuchse L R 500 mV eff höher als 10 ...

Страница 130: ...z 56Hz 60Hz 70Hz 60Hz 72Hz 75Hz 75 1Hz 66Hz 76Hz 60Hz 60Hz 75Hz 85Hz 60Hz 75Hz 85Hz 60Hz 65Hz 70Hz 75Hz 85Hz 640x400 720x400 640x480 848x480 800x600 832x624 1024x768 1280x720 1280x768 1152x864 1152x870 1152x900 1280x960 1280x1024 1400x1050 1600x1200 NEC PC 9800 NEC PC 9800 Apple Macintosh 13 1072x600 Apple Macintosh 16 1376 x 768 Die in Klammern gesetzten Angaben beziehen sich auf den 19 Zoll Appl...

Страница 131: ...x768 1280x768 1280x768 1280x768 1280x768 1280x768 640x480 848x480 800x600 1024x768 1280x768 31 5kHz 31 0kHz 35 2kHz 37 9kHz 48 4kHz 45 1kHz 47 8kHz 53 7kHz 60 0kHz 64 0kHz 65 3kHz 1280x768 Optimales Bild Eine Einstellung von Bildposition Vertikalfrequenz Horizontalfrequenz Phase usw kann erforderlich sein Bild wird vergrößert doch sind kleine Details schwer zu sehen Einfache Wiedergabe Kleinere De...

Страница 132: ... 8kHz 31 5kHz 37 9kHz 31 5kHz 35 0kHz 37 9kHz 37 5kHz 43 3kHz 31 0kHz 35 2kHz 37 9kHz 48 1kHz 46 9kHz 53 7kHz 49 7kHz 48 4kHz 56 5kHz 60 0kHz 60 2kHz 68 7kHz 44 7kHz 45 1kHz 47 8kHz 56 1kHz 53 7kHz 64 9kHz 67 5kHz 68 7kHz 61 8kHz 71 7kHz 60 0kHz 64 0kHz 80 0kHz 91 2kHz 65 3kHz 82 3kHz 93 9kHz 75 0kHz 81 3kHz 87 5kHz 93 8kHz 106 3kHz 768x768 768x768 768x768 768x768 768x768 768x768 768x768 768x768 7...

Страница 133: ...00x1050 1072x600 1376x768 640x480 848x480 800x600 1024x768 1024x768 Anhang 1 4 4 PDP 43MXE1 PDP 43MXE1 S INPUT2 Optimales Bild Eine Einstellung von Bildposition Vertikalfrequenz Horizontalfrequenz Phase usw kann erforderlich sein Bild wird vergrößert doch sind kleine Details schwer zu sehen Einfache Wiedergabe Kleinere Details werden nicht reproduziert Auflösung Punkte x Zeilen Vertikal frequenz P...

Страница 134: ... Beim Bildseitenverhältnis handelt es sich um das Verhältnis von Breite und Höhe der Bildschirmanzeige Bei einem herkömmlichen Fernsehgerät beträgt dieses 4 3 bei Breitformat und HD Fernsehgeräten High Definition beträgt es 16 9 G ON SYNC Dieser Ausdruck bezeichnet ein Videosignal das in Form eines Synchronsignals dem G Signal Grün des RGB Signals überlagert ist VGA Akronym von Video Graphics Arra...

Страница 135: ...rosoft ist ein eingetragenes Warenzeichen von Microsoft Corporation NEC und PC 9800 sind eingetragene Warenzeichen von NEC Corporation VESA und DDC sind eingetragene Warenzeichen der Video Electronics Standards Association Power Management und Sun Microsystems sind eingetragene Warenzeichen von Sun Microsystems Inc VGA und XGA sind eingetragene Warenzeichen von International Business Machines Co I...

Страница 136: ...TRONICS AUSTRALIA PTY LTD 178 184 Boundary Road Braeside Victoria 3195 Australia TEL 61 39 586 6300 PIONEER HK LIMITED Suite 901 906 9th Floor World Commerce Centre Harbour City 11 Canton Road Tsim Sha Tsui Kowloon Hong Kong TEL 852 2848 6488 PIONEER ELECTRONICS ASIACENTRE PTE LTD 253 Alexandra Road 04 01 Singapore 159936 TEL 65 6472 1111 PIONEER GULF FZE Lob 11 017 Jebel Ali Free Zone P O BOX 612...

Отзывы: