


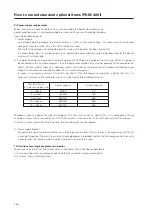


109
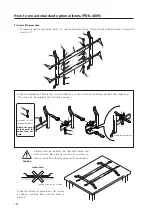
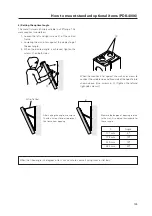
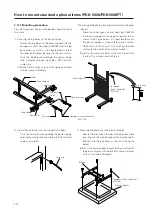
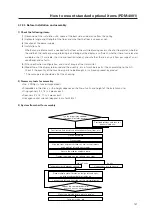
6) Setting the optimal angle
This metal fixture is infinitely variable in a 25
°
range. This
work requires two workers.
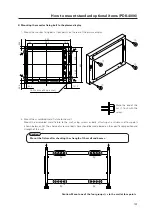
1. Loosen the left and right screws
c
of the vertical
frame.
2. Lowering the arm, press against the display to get
the best angle.
3. When the desired angle is achieved, tighten the
screws
c
on both sides.
When the monitor is flat against the wall, use screws to
connect the variable side and fixed side of the hook fixture
shown above. (Use screws in
a
.) Tighten the left-and
right-side screws
c
.
a
c
X
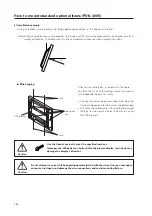
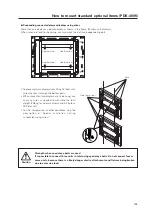
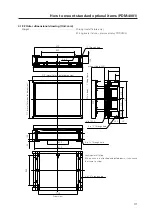
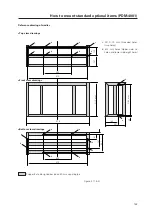
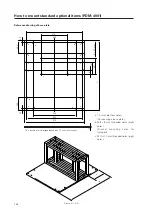
How to mount standard optional items (PDK-4006)
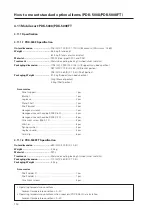
Wire, flat bar
After setting the angle, use screws
a
and a wire or flat bar to prevent
the frame from opening.
Measure the degree of opening relative
to the wall, X, to obtain the standard for
the set angle.
X
Angle
117 mm
5
°
173 mm
10
°
229 mm
15
°
282 mm
20
°
When the tilted angle is 5 degrees or less, make sure to secure it using wires or flat bars.
Содержание PDK-5008
Страница 5: ...5 Features ...
Страница 11: ...11 Remote control ...
Страница 21: ...21 Installation procedure ...
Страница 57: ...57 Special installation Installation under the floor ...
Страница 85: ...85 How to mount standard optional items PDK 4001 ...
Страница 91: ...91 How to mount standard optional items PDK 4002 ...
Страница 97: ...97 How to mount standard optional items PDK 4004 ...
Страница 115: ...115 How to mount standard optional items PDK 5008 PDK 5008FT ...
Страница 153: ...153 How to mount standard optional items Precautions for installing the optional speaker ...
Страница 161: ...161 Before making adjustments ...


