background image

6

ENGLISH

ESPAÑOL

DEUTSCH

FRANÇAIS

ITALIANO

NEDERLANDS

Precaution

• Keep this manual handy as a reference for operating procedures and precautions.
• Always keep the volume low enough for outside sounds to be audible. 
• Protect the product from moisture.
• If the battery is disconnected, the preset memory will be erased and must be repro-

grammed.

After-sales Service for Pioneer Products

Please contact the dealer or distributor from where you purchased the product for its after-
sales service (including warranty conditions) or any other information. In case the necessary
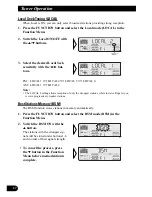
information is not available, please contact the companies listed below:

Please do not ship your product to the companies at the addresses listed below for repair
without advance contact.

For warranty information please see the Limited Warranty sheet included with your product.

When using the 50-Disc Type Multi-CD Player

The available functions of the 50-Disc Type Multi-CD Player are described in this
Operation Manual. Note that other 50-Disc Type Multi-CD Player functions cannot be
used with this product.

CAUTION:

USE OF CONTROL OR ADJUSTMENT OR PERFOR-
MANCE OF PROCEDURES OTHER THAN THOSE SPEC-
IFIED HEREIN MAY RESULT IN HAZARDOUS RADIA-
TION EXPOSURE.

CAUTION:

THE USE OF OPTICAL INSTRUMENTS WITH THIS
PRODUCT WILL INCREASE EYE HAZARD.

7

U.S.A.

Pioneer Electronics Service, Inc.
CUSTOMER SERVICE
DEPARTMENT
P.O. Box 1760
Long Beach, CA 90801
800-421-1404

7

CANADA

Pioneer Electronics of Canada, Inc.
CUSTOMER SERVICE DEPARTMENT
300 Allstate Parkway
Markham, Ontario L3R 0P2
(905) 479-4411
1-877-283-5901

Содержание P47DH - DEH Radio / CD Player

Страница 1: ...ower CD player with FM AM tuner Syntoniseur FM AM et lecteur de CD Puissance élevée avec contrôleur pour lecteur de CD à chargeur Operation Manual DEH P47DH Mode d emploi ENGLISH FRANÇAIS DEUTSCH FRANÇAIS ITALIANO NEDERLANDS ...

Страница 2: ...ding Display Indications and Buttons 13 Entering the Function Menu 13 Function Menu Functions 14 Entering the Detailed Setting Menu 15 Detailed Setting Menu Functions 16 Tuner Operation 17 Local Seek Tuning LOCAL Best Stations Memory BSM Using the Built in CD Player 18 Repeat Play REPEAT Random Play RANDOM Scan Play T SCAN Pause PAUSE Disc Title Input TITLE IN Using Multi CD Players 20 Repeat Play...

Страница 3: ...tion 35 Detaching the Front Panel Replacing the Front Panel Warning Tone Initial Setting 36 Entering the Initial Setting Menu 36 Initial Setting Menu Functions 37 Setting the Time Setting the Warning Tone WARN Switching the AUX Mode AUX Setting the Dimmer DIMMER Setting the Rear Speaker Lead and Subwoofer Controller REAR SP Other Functions 40 Using the PROGRAM Button PGM FUNC 40 Setting the PROGRA...

Страница 4: ...t the dial and leave it there Taking a minute to do this now will help to prevent hearing damage or loss in the future After all we want you listening for a lifetime We Want You Listening For A Lifetime Used wisely your new sound equipment will provide a lifetime of fun and enjoyment Since hearing damage from loud noise is often undetectable until it is too late this manufacturer and the Electroni...

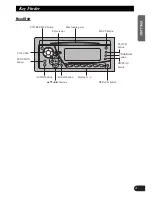
Страница 5: ... PROGRAM button DISPLAY button FUNCTION button VOLUME 5 2 3 buttons BAND button Buttons 1 6 DETACH button AUDIO button SOURCE OFF button Disc loading slot EQ selector EJECT button 4 ENGLISH ESPAÑOL DEUTSCH FRANÇAIS ITALIANO NEDERLANDS ...

Страница 6: ...al is intended to help you benefit fully from their potential and to maximize your listening enjoyment We recommend that you familiarize yourself with the functions and their operation by reading through the manual before you begin using this product It is especially important that you read and observe the Precaution on the next page and in other sections Important The serial number of this device...

Страница 7: ...anies at the addresses listed below for repair without advance contact For warranty information please see the Limited Warranty sheet included with your product When using the 50 Disc Type Multi CD Player The available functions of the 50 Disc Type Multi CD Player are described in this Operation Manual Note that other 50 Disc Type Multi CD Player functions cannot be used with this product CAUTION ...

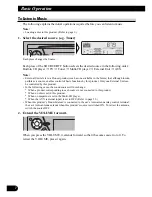
Страница 8: ...product Only one External Unit can be controlled by this product In the following cases the sound source will not change When a product corresponding to each source is not connected to this product When no disc is set in this product When no magazine is set in the Multi CD player When the AUX external input is set to OFF Refer to page 38 When this product s blue white lead is connected to the car ...

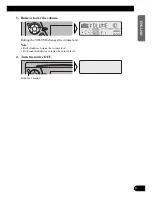
Страница 9: ...NÇAIS ITALIANO NEDERLANDS 3 Raise or lower the volume Rolling the VOLUME changes the volume level Note Roll clockwise to raise the volume level Roll counterclockwise to lower the volume level 4 Turn the source OFF Hold for 1 second ...

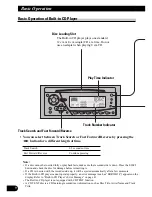
Страница 10: ...e before reinserting it If a CD is inserted with the recorded side up it will be ejected automatically after a few moments If the Built in CD player cannot operate properly an error message such as ERROR 14 appears on the display Refer to Built in CD Player s Error Message on page 43 The Built in CD player is not equipped with CD TEXT function A CD TEXT disc is a CD featuring recorded text informa...

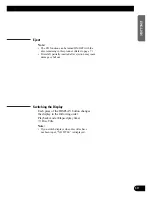
Страница 11: ... in the following order Playback mode Elapsed play time Disc Title Note If you switch displays when disc titles have not been input NO TITLE is displayed Eject Note The CD function can be turned ON OFF with the disc remaining in this product Refer to page 7 Discs left partially inserted after ejection may incur damage or fall out ...

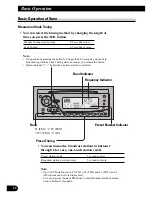
Страница 12: ...n as you release the button Stereo indicator lights when a stereo station is selected Preset Tuning You can memorize broadcast stations in buttons 1 through 6 for easy one touch station recall Preset station recall 2 seconds or less Broadcast station preset memory 2 seconds or more Note Up to 18 FM stations 6 in F1 FM1 F2 FM2 and F3 FM3 and 6 AM stations can be stored in memory You can also use th...

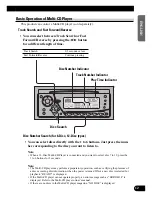
Страница 13: ...the 1 to 6 buttons for 2 seconds Note The Multi CD player may perform a preparatory operation such as verifying the presence of a disc or reading disc information when the power is turned ON or a new disc is selected for playback READY is displayed If the Multi CD player cannot operate properly an error message such as ERROR 14 is displayed Refer to the Multi CD player owner s manual If there are ...

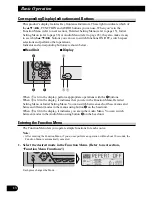
Страница 14: ...play perform appropriate operations with the z buttons When 2 is lit in the display it indicates that you are in the Function Menu Detailed Setting Menu or Initial Setting Menu You can switch between each of these menus and between different modes in the menus using button x on the head unit When 3 is lit in the display it indicates you are in the Audio Menu You can switch between modes in the Aud...

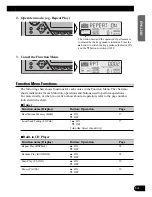
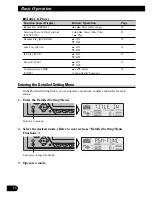
Страница 15: ...ration refer to the page number indicated in the chart 7Tuner Function name Display Button Operation Page Best Stations Memory BSM 5 ON 17 OFF Local Seek Tuning LOCAL 1 5 ON 17 3 OFF 2 2 or 3 Select Sensitivity 7Built in CD Player Function name Display Button Operation Page Repeat Play REPEAT 5 ON 18 OFF Random Play RANDOM 5 ON 18 OFF Scan Play T SCAN 5 ON 19 OFF Pause PAUSE 5 ON 19 OFF The button...

Страница 16: ...N 21 OFF ITS Play ITS P 5 ON 22 OFF Pause PAUSE 5 ON 21 OFF Compression and DBE 5 or Select 26 COMP Sound Quality Function Entering the Detailed Setting Menu In the Detailed Setting Menu you can operate convenient complex functions for each source 1 Enter the Detailed Setting Menu 2 Select the desired mode Refer to next section Detailed Setting Menu Functions 3 Operate a mode Each press changes th...

Страница 17: ...ow about an operation refer to the page number indicated in the chart 7Tuner Function name Display Button Operation Page Program Function PGM FUNC 1 2 or 3 Select Function 40 2 5 Memory 7Built in CD Player Function name Display Button Operation Page Disc Title Input TITLE IN 1 5 or Select Letter 19 2 2 or 3 Select Position 3 3 Memory Program Function PGM FUNC 1 2 or 3 Select Function 40 2 5 Memory...

Страница 18: ...rogressively weaker stations Best Stations Memory BSM The BSM function stores stations in memory automatically 1 Press the FUNCTION button and select the BSM mode BSM in the Function Menu To cancel the process press the button in the Function Menu before memorization is complete 2 Switch the BSM ON with the 5 button The stations with the strongest sig nals will be stored under buttons 1 6 and in o...

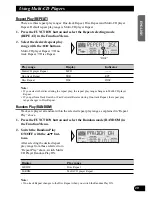
Страница 19: ...everse Repeat Play is automatically canceled Random Play RANDOM Random Play plays the tracks on a CD in random order for variety 2 Switch the Random Play ON OFF with the 5 buttons 1 Press the FUNCTION button and select the Random mode RANDOM in the Function Menu RPT 2 Switch the Repeat Play ON OFF with the 5 buttons 1 Press the FUNCTION button and select the Repeat mode REPEAT in the Function Menu...

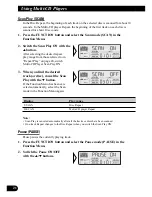
Страница 20: ... under Using Multi CD Players Note After the title for 48 discs have been entered data for a new disc will overwrite the oldest one If you connect a Multi CD player you can input disc titles for up to 100 discs 2 Switch the Pause ON OFF with the 5 buttons 1 Press the FUNCTION button and select the Pause mode PAUSE in the Function Menu 3 When you find the desired track cancel the Scan Play with the...

Страница 21: ...orm Track Search or Fast Forward Reverse during One track Repeat the repeat play range changes to Disc Repeat Random Play RANDOM Tracks are played at random within the selected repeat play range as explained in Repeat Play above 1 Press the FUNCTION button and select the Random mode RANDOM in the Function Menu Display Play range D RDM Disc Repeat M RDM Multi CD player Repeat Note One track Repeat ...

Страница 22: ...the tracks or discs have been scanned One track Repeat changes to the Disc Repeat when you switch the Scan Play ON Pause PAUSE Pause pauses the currently playing track 1 Press the FUNCTION button and select the Pause mode PAUSE in the Function Menu 2 Switch the Pause ON OFF with the 5 buttons 3 When you find the desired track or disc cancel the Scan Play with the button If the Function Menu has be...

Страница 23: ...Select the ITS Programming mode ITS in the Detailed Setting Menu Refer to page 15 Note After 100 discs have been programmed data for a new disc will overwrite the data for the disc that has not been played back for the longest time ITS Play ITS P ITS Play of tracks is performed within the play range explained in the Repeat Play sec tion 1 Press the FUNCTION button and select the ITS Play mode ITS ...

Страница 24: ...m 1 Select the disc you wish to erase while the disc is playing 2 Select the ITS Programming mode ITS in the Detailed Setting Menu Refer to page 15 3 Erase the disc program with the button 3 Erase the track program with the button ITS is canceled and playback of the next ITS programmed track begins If there are no more programmed tracks in the current range ITS EMPTY is displayed and normal play r...

Страница 25: ...D TEXT disc is a CD featuring recorded text information such as Disc Title Artist Name and Track Title Note Titles remain in memory even after the disc has been removed from the magazine and are recalled when the disc is reinserted After the titles for 100 discs have been entered data for a new disc will overwrite the data for the disc that has not been played back for the longest time You can dis...

Страница 26: ...ly playing Disc Title Note You can also display the currently playing Disc Title when playing a CD TEXT disc on a CD TEXT compatible Multi CD player Refer to page 27 Note If you switch displays when disc titles have not been input NO TITLE is displayed Switch the Disc Title Display with the DISPLAY button Each press of the DISPLAY button changes the display in the following order Playback mode Pla...

Страница 27: ...es between loud and subdued sounds at higher volumes 7 DBE DBE Dynamic Bass Emphasis boosts bass levels to give a fuller sound COMP DBE ON OFF Switching 1 Press the FUNCTION button and select the COMP DBE switching mode COMP in the Function Menu Note You can use these functions with a Multi CD player that has them If the player does not feature the COMP DBE functions NO COMP is displayed if you tr...

Страница 28: ... dis played Title Scroll This product displays the first 10 letters only of Disc Title Artist Name and Track Title With text longer than 10 letters you can see the rest of the text by scrolling Scroll the title display by press ing the DISPLAY button for 2 seconds Select the desired title display with the DISPLAY button Each press of the DISPLAY button changes the display in the following order Pl...

Страница 29: ...s for different sources The Built in CD player and Multi CD player are set to the same Equalizer Curve Adjustment setting automatically Entering the Audio Menu With this menu you can adjust the sound quality Note After entering the Audio Menu if you do not perform an operation within about 30 seconds the Audio Menu is automatically canceled Audio Menu functions change depending on the Rear Speaker...

Страница 30: ...aliz er curve settings are memorized in CUSTOM 1 Press the AUDIO button and select the Equalizer mode EQ LOW MID HIGH in the Audio Menu Note If you make adjustments when a curve other than CUSTOM is selected the newly adjusted curve will replace the previous adjusted curve Then a new curve with CUSTOM appears on the display while selecting the equalizer curve Refer to page 28 CUSTOM 3 Boost or att...

Страница 31: ... Adjustment Note If you make adjustments when a curve other than CUSTOM is selected the newly adjusted curve will replace the previous adjusted curve Then a new curve with CUSTOM appears on the display while selecting the equalizer curve Refer to page 28 4 Select the desired Q factor with the 5 buttons 2N 1N 1W 2W 3 Select the desired frequency with the 2 3 buttons LOW 40 80 100 160 Hz MID 200 500...

Страница 32: ...between normal or 0 NOR and reverse or 180 REV 0 is the default phase Note When the Subwoofer Controller setting is S W CTL EXT you cannot switch the Subwoofer ON OFF mode In this case this setting is not necessary Refer to page 39 Select the OFF setting when you do not want the Subwoofer to operate 3 Change the phase of Subwoofer output with the 2 3 buttons 2 Switch the Subwoofer output ON OFF wi...

Страница 33: ... through this unit s low pass filter for the Subwoofer but is output through the RCA output Note When the Subwoofer Controller setting is only S W CTL EXT you can switch the Non Fading Output ON OFF mode Refer to page 39 2 Switch the Non Fading output ON OFF with the 5 buttons 1 Press the AUDIO button and select the Non Fading Output ON OFF mode NON FAD in the Audio Menu 3 Increase or decrease the...

Страница 34: ...ction FIE The F I E Front Image Enhancer function is a simple method of enhancing front imaging by cutting mid and high range frequency output from the rear speakers limiting their out put to low range frequencies You can select the frequency you want to cut Precaution When the F I E function is deactivated the rear speakers output sound of all frequencies not just bass sounds Reduce the volume be...

Страница 35: ...ents radical leaps in volume level when switching between sources Settings are based on the FM volume level which remains unchanged 1 Compare the FM volume with the volume of the other source e g Built in CD player 2 Press the AUDIO button and select the SLA mode SLA in the Audio Menu Note Since the FM volume is the control SLA is not possible in the FM modes The Built in CD player and Multi CD pl...

Страница 36: ...ip it tightly or drop it Replacing the Front Panel Replace the front panel by clipping it into place Precaution Never use force or grip the display tightly when removing or replacing the front panel Avoid subjecting the front panel to excessive shocks Keep the front panel out of direct sunlight and high temperatures Warning Tone If the front panel is not detached within 5 seconds after the ignitio...

Страница 37: ...urn the source OFF 2 Enter the Initial Setting Menu 3 Select a desired mode 4 Operate a mode 5 Cancel the Initial Setting Menu Note Holding down the FUNCTION button for 2 seconds also cancels the Initial Setting Menu Each press changes the Mode Hold for 2 seconds 36 ENGLISH ESPAÑOL DEUTSCH FRANÇAIS ITALIANO NEDERLANDS ...

Страница 38: ...to Minute the seconds start counting from 00 Setting the Warning Tone WARN You can switch the Warning Tone function ON OFF Refer to Warning Tone on page 35 1 Press the FUNCTION button and select the Warning Tone mode WARN in the Initial Setting Menu 2 Switch the Warning Tone ON OFF with the 5 but tons 3 Set as desired with the 5 buttons 2 Select Hour or Minute with the 2 3 buttons 1 Press the FUNC...

Страница 39: ...utton and select the AUX Setting mode AUX in the Initial Setting Menu Setting the Dimmer DIMMER To enable this product s display from being too bright at night when the vehicle s head lights are turned ON the display is dimmed You can switch this function ON OFF 1 Press the FUNCTION button and select the Dimmer mode DIMMER in the Initial Setting Menu 2 Switch the Dimmer ON OFF with the 5 buttons 2...

Страница 40: ...TL INT or the auxiliary S W CTL EXT Note Even if you change this setting there is no output unless you switch the Non Fading Output refer to page 32 or Subwoofer Output refer to page 31 in the Audio Menu ON If you change the Subwoofer Controller Subwoofer output and Non Fading output in the Audio Menu return to the factory settings Note When no Subwoofer is connected to the rear speaker lead selec...

Страница 41: ...u It is possible to memorize a different function for each source Setting the PROGRAM Button 1 Select the PROGRAM button s setting mode PGM FUNC in the Detailed Setting Menu Refer to page 15 2 Select the function you want to memorize in the PROGRAM button 3 Memorize the function in the PROGRAM button Pressing the BAND button cancels the Detailed Setting Menu Hold for 2 seconds ...

Страница 42: ... OFF Repeat Play REPEAT ON OFF Random Play RANDOM ON OFF 7Multi CD Player Function name Display Press Hold for 2 seconds Pause PAUSE ON OFF Repeat Play REPEAT Selecting the play range Random Play RANDOM ON OFF Disc Title List LIST Enter the LIST mode ITS ITS ITS Programming ITS Play ON OFF Displaying the Time To turn the time display ON The time display disappears temporarily when you perform anot...

Страница 43: ... AUX source can be changed 1 Select the AUX Title Input mode TITLE IN in the Detailed Setting Menu 2 Input the AUX Title Refer to Disc Title Input on page 24 and perform procedures 3 to 5 in the same way Cellular Telephone Muting Sound from this system is muted automatically when a call is made or received using a cellular telephone connected to this product The sound is turned off MUTE is display...

Страница 44: ...es Do not affix labels or apply chemicals to discs Condensation may collect inside the player when using the heater in cold weather inter fering with playback Turn it off for an hour or so and wipe damp discs with a soft cloth Road shocks may interrupt CD playback Built in CD Player s Error Message When problems occur with CD playback an error message appears on the display Refer to the table belo...

Страница 45: ...ntour Low 3 5 dB 100 Hz 3 dB 10 kHz Mid 10 dB 100 Hz 6 5 dB 10 kHz High 11 dB 100 Hz 11 dB 10 kHz volume 30 dB Network HPF Frequency 50 80 125 Hz Slope 12 dB oct Subwoofer output Frequency 50 80 125 Hz Slope 18 dB oct Gain 12 dB CD player System Compact disc audio system Usable discs Compact disc Signal format Sampling frequency 44 1 kHz Number of quantizatin bits 16 linear Frequency characteristi...

Страница 46: ...ations affichées et les touches 13 Affichage du menu des fonctions 13 Fonctions du menu des fonctions 14 Affichage du menu des réglages détaillés 15 Fonctions du menu des réglages détaillés 16 Utilisation du syntoniseur 17 Accord automatique sur les seules stations puissantes LOCAL Mémoire des meilleures stations BSM Utilisation du lecteur de CD intégré 18 Répétition de la lecture REPEAT Lecture a...

Страница 47: ...le vol 35 Dépose de la face avant Pose de la face avant Tonalité d alarme Réglages initiaux 36 Affichage du menu des réglages initiaux 36 Paramètres du menu des réglages initiaux 37 Réglage de l heure Réglage de la tonalité d alarme WARN Utilisation ou non de la source auxiliaire AUX Réglage de la luminosité DIMMER Réglage du câble d enceintes arrière et du contrôleur de l enceinte d extrêmes grav...

Страница 48: ...ommages ou des pertes de sensibilités d écoute dans le futur Après tout nous voulons que vous écoutiez pendant toute votre vie Nous voulons que vous écoutiez pendant toute votre vie Utilisé avec sagesse votre nouvel équipement sonore sera une source de plaisir pendant toute votre vie Comme les dommages de l ouïe provenant d un bruit fort ne sont souvent détectables que lorsqu il est trop tard ce f...

Страница 49: ... CLOCK Touche PROGRAM Touche DISPLAY Touche FUNCTION VOLUME Touches 5 2 3 Touche BAND Touches 1 6 Touche DETACH Touche AUDIO Touche SOURCE OFF Fente pour le disque Sélecteur EQ Touche EJECT 4 ENGLISH FRANÇAIS DEUTSCH FRANÇAIS ITALIANO NEDERLANDS ...

Страница 50: ...meilleures conditions Ces fonctions sont conçues pour que leur emploi soit aussi aisé que possible mais certaines exigent quelques explications Ce mode d emploi a pour objet de vous aider à tirer le meilleur parti des possibilités de l appareil de façon que votre plaisir d écouter de la musique soit aussi grand que possible Nous vous conseillons de lire attentivement ce mode d emploi afin de vous ...

Страница 51: ... de nécessité ou lorsque l in formation recherchée n est pas disponible veuillez contacter Pioneer aux adresses suivantes N envoyez pas le produit à réparer sans avoir au préalable contacté nos bureaux Pour de plus amples informations relatives à la garantie référez vous au feuillet Garantie Limitée livrée avec l appareil Lors de l utilisation du lecteur de CD à changeur 50 disques Les fonctions d...

Страница 52: ...t être commandé par cet appareil Dans les cas suivants la source n est pas modifiée Quand un appareil correspondant à une source n est pas connecté à cet appareil L appareil ne contient aucun disque Le lecteur de CD à chargeur ne contient aucun chargeur L entrée AUX entrée extérieure n est pas en service Reportez vous à la page 38 Si le fil bleu blanc de cet appareil est connecté à la prise de com...

Страница 53: ... la commande VOLUME change le niveau d écoute Remarque Roulez la commande dans le sens des aiguilles d une montre pour augmenter le niveau d écoute Roulez la commande dans le sens contraire des aiguilles d une montre pour diminuer le niveau d écoute 4 Mettez la source hors service Appuyez pendant 1 seconde ...

Страница 54: ...rs le bas appuyez sur la touche EJECT et con trôlez l état du disque avant de le réintroduire Si vous introduisez le disque de façon que la face gravée soit tournée vers le haut le disque est éjecté quelques instants plus tard Si le lecteur de CD intégré ne peut pas fonctionner normalement un message d erreur par exem ple ERROR 14 s affiche Reportez vous à la page 43 Messages d erreur fournis par ...

Страница 55: ...tre du disque Remarque Si vous commandez d afficher des informations alors que le disque ne porte pas de titre l indi cation NO TITLE s affiche Ejection Remarque Il n est pas nécessaire de retirer le disque pour mettre le lecteur de CD en service ou hors service Reportez vous à la page 7 Ne conservez pas le disque partiellement introduit dans le lecteur après son éjection car il pourrait être endo...

Страница 56: ...conde les stations de radiodiffusion sont sautées L accord automatique commence dès que vous cessez d appuyer sur la touche Le témoin s éclaire quand vous choisissez une station émettant en stéréophonie Mise en mémoire des fréquences Les mémoires associées aux touches 1 à 6 permettent de conserver les fréquences des stations Rappel d une présélection 2 secondes ou moins Mise en mémoire d une fréqu...

Страница 57: ...uvez choisir un disque directement grâce aux touches 1 à 6 Il vous suffit pour cela d appuyer sur la touche correspondant au numéro du disque Remarque Si vous possédez un lecteur à chargeur 12 disques et si vous désirez choisir un disque dont le numéro est compris entre 7 et 12 il vous suffit d appuyer pendant 2 secondes sur la touche 1 à 6 correspondante Remarque Quand vous mettez l appareil sous...

Страница 58: ... Affichage Lorsque le témoin 1 est éclairé effectuez les opérations au moyen de la touche z Lorsque le témoin 2 est éclairé cela signifie que le menu des fonctions le menu des réglages détaillés ou le menu des réglages initiaux est affiché Vous pouvez passer d un menu à l autre et au sein de chaque menu d une fonction à une autre en utilisant la touche x de l élément central Lorsque le témoin 3 es...

Страница 59: ...s le tableau 7Syntoniseur Fonction Indication affichée Touche Résultat Page Mémoire des meilleures stations BSM 5 En 17 Hors Accord automatique sur les seules stations 1 5 En 17 puissantes LOCAL 3 Hors 2 2 ou 3 Choisissez Sensibilité 7Lecteur de CD intégré Fonction Indication affichée Touche Résultat Page Répétition de la lecture REPEAT 5 En 18 Hors Lecture au hasard RANDOM 5 En 18 Hors Examen rap...

Страница 60: ...e ITS ITS P 5 En 22 Hors Pause PAUSE 5 En 21 Hors Compression et DBE COMP 5 ou Choisissez 26 Fonction de réglage de la restitution Affichage du menu des réglages détaillés Le menu des réglages détaillés permet d avoir accès aux diverses fonctions propres à chaque source 1 Affichez le menu des réglages détaillés 2 Choisissez le mode de fonctionnement désiré Reportez vous à la section suivante Fonct...

Страница 61: ...vous à la page mentionnée dans le tableau 7Syntoniseur Fonction Indication affichée Touche Résultat Page Programme Fonction PGM FUNC 1 2 ou 3 Choisissez Fonction 40 2 5 Mémoire 7Lecteur de CD intégré Fonction Indication affichée Touche Résultat Page Frappe du titre d un disque TITLE IN 1 5 ou Choisissez Caractère 19 2 2 ou 3 Choisissez Position 3 3 Mémoire Programme Fonction PGM FUNC 1 2 ou 3 Choi...

Страница 62: ... la touche le menu des fonc tions étant affiché avant que cette mise en mémoire ne soit terminée 2 Mettez la mémoire des meilleures stations en service au moyen de la touche 5 Les fréquences des stations dont le signal reçu par le syntoniseur est puissant sont sauvegardées par les mémoires des touches 1 à 6 dans l ordre décroissant de puissance 1 Appuyez sur la touche FUNCTION puis choisissez le m...

Страница 63: ...de la lecture est abandonnée Lecture au hasard RANDOM Les plages musicales du disque sont lues au hasard ce qui apporte quelque variété 2 Mettez la lecture au hasard en service ou hors service au moyen des touches 5 1 Appuyez sur la touche FUNCTION puis choisissez le mode de lecture au hasard RANDOM grâce au menu des fonctions RPT 2 Mettez la répétition de la lecture en service ou hors service au ...

Страница 64: ...un nouveau disque écraseront le plus ancien titre Si l installation comporte un lecteur de CD à chargeur le nombre de disques que vous pouvez titrer est porté à 100 2 Mettez la pause en service ou hors service au moyen des touches 5 1 Appuyez sur la touche FUNCTION puis choisissez le mode de pause PAUSE grâce au menu des fonctions 3 Lorsque se présente la plage musicale que vous désirez écouter ab...

Страница 65: ...musicales du disque sont lues au hasard à l intérieur du champ de la lecture répétée comme l explique Répétition de la lecture ci dessus Indication affichée Possibilité de lecture D RDM Répétition d un disque M RDM Répétition des disques d un chargeur Remarque La répétition d une plage musicale change à la répétition d un disque quand vous mettez la lecture au hasard en service 2 Mettez la lecture...

Страница 66: ... Pause permet d arrêter momentanément la lecture d une plage musicale 2 Mettez la pause en service ou hors service au moyen des touches 5 1 Appuyez sur la touche FUNCTION puis choisissez le mode de pause PAUSE grâce au menu des fonctions 3 Lorsque se présente la plage musicale que vous désirez écouter ou le disque abandonnez l examen rapide des disques en appuyant sur la touche Si le menu des fonc...

Страница 67: ...mplacent celles du disque dont la lecture est la plus ancienne Lecture ITS ITS P La lecture ITS tient compte des conditions définies au paragraphe Répétition de la lecture Remarque Si vous commandez la lecture d une plage musicale qui ne fait pas partie du programme ITS l indication ITS EMPTY s affiche 2 Mettez la lecture ITS en service ou hors service au moyen des touches 5 Après avoir choisi le ...

Страница 68: ...t le numéro doit être effacé 3 Appuyez sur la touche pour effacer la référence à cette plage musicale La lecture ITS se poursuit avec la plage musicale suivante dont le numéro est en mémoire Si la lecture d aucune autre plage musicale parmi celles concernées n est programmée l indication ITS EMPTY s affiche et la lecture normale reprend 2 Grâce au menu des réglages détaillés choisissez le mode de ...

Страница 69: ...après le retrait des disques ils sont de nouveau affichés si les disques sont remis en place Après la frappe du titre du 100e disque toutes les données concernant un nouveau disque remplacent celles du disque dont la lecture est la plus ancienne Vous pouvez afficher le titre du disque en cours de lecture Pour de plus amples détails reportez vous à la page 25 Affichage du titre du disque 5 Lorsque ...

Страница 70: ...eur compatible CD TEXT Reportez vous à la page 27 Remarque Si vous commandez d afficher des informations alors que le disque ne porte pas de titre l indication NO TITLE s affiche Commutation de l affichage du titre du disque avec la touche DISPLAY Chaque pression sur la touche DISPLAY change les indications affichées dans l ordre suivant Mode de lecture Durée de lecture Titre du disque 3 Commandez...

Страница 71: ...a fonction DBE Dynamic Bass Emphasis accentue les niveaux des graves pour donner un son plus étoffé Mise en hors service de la fonction COMP DBE Remarque Vous pouvez utiliser ces fonctions pour les lecteurs de CD à chargeur qui en sont pourvus Si le lecteur ne possède pas les fonctions COMP DBE l indication NO COMP s affiche au moment où vous tentez de les utiliser 2 Choisissez le mode au moyen de...

Страница 72: ...t appareil ne peut afficher que 10 caractères du titre du disque du nom de l interprète et du titre de la plage musicale Si le texte comporte plus de 10 caractères vous devez le faire défiler pour en prendre connaissance Faites défiler le texte en appuyant sur la touche DISPLAY pendant 2 secondes Choisissez l affichage conven able avec la touche DISPLAY Chaque pression sur la touche DISPLAY change...

Страница 73: ...et le lecteur de CD à chargeur font usage automatiquement de la même courbe d égalisation Affichage du menu des réglages sonores Ce menu permet de régler au mieux la qualité de la reproduction Remarque Si vous ne procédez à aucune opération dans les 30 secondes qui suivent l affichage du menu des réglages sonores ce menu disparaît Les fonctions du menu Audio changent selon le réglage du câble d en...

Страница 74: ...lisation EQ LOW MID HIGH Vous pouvez modifier comme bon vous semble la courbe d égalisation présentement choisie Les modifications apportées à une courbe d égalisation sont conservées par la mémoire CUSTOM 1 Appuyez sur la touche AUDIO et choisissez le mode d égalisation EQ LOW MID HIGH grâce au menu des réglages sonores 2 Au moyen des touches 2 3 choisissez la plage de fréquence que vous désirez ...

Страница 75: ...dant 2 secondes sur la touche AUDIO pour choisir le mode permettant le réglage fin de la courbe d égalisation Remarque Si vous modifiez une courbe d égalisation autre que CUSTOM la courbe ainsi modifiée est rem placée par la courbe précédemment modifiées Une nouvelle courbe accompagnée de CUSTOM s affiche quand vous sélectionnez la courbe d égalisation Reportez vous à la page 28 4 Choisissez le fa...

Страница 76: ...s REV Par défaut la phase est normale 0 degré Remarque Quand le réglage du contrôleur de l enceinte d extrêmes graves est sur S W CTL EXT vous ne pouvez pas mettre en hors service ON OFF le mode de l enceinte d extrêmes graves Dans ce cas ce réglage n est pas nécessaire Reportez vous à la page 39 Mettez hors service OFF la sortie vers le haut parleur d extrêmes graves si vous ne désirez pas excite...

Страница 77: ...appareil pour l enceinte d extrêmes graves mais est sorti directement par les prises de sortie RCA Remarque Quand le réglage du contrôleur de l enceinte d extrêmes graves n est que S W CTL EXT vous pouvez mettre en hors service la sortie de ligne préamplifiée Reportez vous à la page 39 2 Mettez en hors service la sortie de ligne préamplifiée avec les touches 5 1 Appuyez sur la touche AUDIO et choi...

Страница 78: ...r permet d augmenter la présence de l image sonore avant en réduisant simplement les fréquences moyennes et aiguës émises par les haut parleurs arrière qui ne reproduisent plus que les sons du registre grave Vous pouvez choisir la plage de fréquence à atténuer Précaution Lorsque la fonction F I E est hors service les haut parleurs arrière peuvent émettre tous les sons possibles du spectre audible ...

Страница 79: ...que ne se produisent de fortes varia tions d amplitude sonore lorsque vous passez d une source à l autre Le réglage est basé sur le niveau du signal FM qui lui demeure inchangé 1 Comparez le niveau de sortie du signal en FM à celui d une autre source par exemple le lecteur de CD intégré 2 Appuyez sur la touche AUDIO puis choisissez le mode de réglage du niveau de la source SLA grâce au menu des ré...

Страница 80: ...agez la face avant de manière à obtenir sa fixation Précaution Lors de la pose ou de la dépose de la face avant n exercez aucune force excessive Evitez de heurter la face avant Conservez la face avant à l abri de la lumière directe du soleil et des températures élevées Tonalité d alarme La tonalité d alarme retentit si la face avant n est pas retirée dans les 5 secondes qui suivent la coupure de l...

Страница 81: ...e base de ce produit 1 Mettez la source hors service 2 Affichez le menu des réglages initiaux 3 Choisissez le mode de fonctionnement désiré 4 Procédez aux réglages requis 5 Abandonnez le menu des réglages initiaux Remarque Pour abandonner le menu des réglages initiaux appuyez pendant 2 secondes sur la touche FUNCTION Chaque pression change le mode Appuyez pendant 2 secondes ...

Страница 82: ... initiaux Dès que vous choisissez de régler les minutes les secondes sont comptées à partir de 00 Réglage de la tonalité d alarme WARN Vous pouvez mettre en service ou hors service la tonalité d alarme Reportez vous à la page 35 Tonalité d alarme 2 Mettez la tonalité d alarme en service ou hors service au moyen des touches 5 1 Appuyez sur la touche FUNCTION puis choisissez le mode de fonction neme...

Страница 83: ...pas gênante en particulier la nuit après allumage des feux de route Vous pouvez mettre en service ou hors service l atténuateur de luminosité 2 Mettez l atténuateur de lumi nosité en service ou hors ser vice au moyen des touches 5 1 Appuyez sur la touche FUNCTION puis choisissez le mode d atténuation de la luminosité DIMMER grâce au menu des réglages initiaux 2 Mettez l entrée auxiliaire en servic...

Страница 84: ...glage aucun signal n est présent en sortie aussi longtemps que vous n avez pas mis en service la sortie sans équilibrage reportez vous à la page 32 ou la sortie vers le haut parleur d extrêmes graves reportez vous à la page 31 à l aide du menu des réglages sonores Si vous modifiez le réglage du contrôleur de l enceinte d extrêmes graves la sortie pour l enceinte d extrêmes graves et la sortie de l...

Страница 85: ... au menu des réglages détaillés choisissez le mode permettant l attribution d une fonction à la touche PROGRAM PGM FUNC Reportez vouz à la page 15 2 Choisissez la fonction que vous désirez attribuer à la touche PROGRAM 3 Effectuez l attribution de la fonction à la touche PROGRAM Pour abandonner le menu des réglages détaillés appuyez sur la touche BAND Appuyez pendant 2 secondes Autres fonctions 40...

Страница 86: ...n de la lecture REPEAT En Hors Lecture au hasard RANDOM En Hors 7Lecteur de CD à chargeur Fonction Indication affichée Pression Appuyez pendant 2 secondes Pause PAUSE En Hors Répétition de la lecture REPEAT Choix de la plage de lecture Lecture au hasard RANDOM En Hors Liste des titres des disques LIST Choisissez du mode LIST ITS ITS Programmation ITS Lecture ITS En Hors Affichage de l heure Pour a...

Страница 87: ...hoisissez le mode permettant de frapper le nom de l entrée auxiliaire TITLE IN grâce an menu des réglages détaillés 2 Tapez le nom de cette entrée Reportez vous à la page 24 Frappe du titre d un disque et effectuez les opérations 3 à 5 Silencieux pour le téléphone de voiture Lorsque vous placez ou recevez un appel au moyen du téléphone de voiture relié à l appareil les sons qu il produit sont mome...

Страница 88: ...ante peut se condenser à l intérieur du lecteur en particulier si le véhicule est chauffé ce qui peut perturber le fonctionnement du lecteur En ce cas mettez le lecteur hors service pendant environ une heure et si le disque est humide essuyez l à l aide d un chiffon doux Les cahots dus à la chaussée peuvent empêcher momentanément le fonctionnement du lecteur Messages d erreur fournis par le lecteu...

Страница 89: ...rection physiologique Graves 3 5 dB 100 Hz 3 dB 10 kHz Médium 10 dB 100 Hz 6 5 dB 10 kHz Aigus 11 dB 100 Hz 11 dB 10 kHz Niveau 30 dB Réseau FPH Fréquence 50 80 125 Hz Pente 12 dB octave Haut parleur d extrêmes graves Fréquence 50 80 125 Hz Pente 18 dB octave Gain 12 dB Lecteur de CD Système Système audio disque compact Disques utilisables Disque compact Format du signal Fréquence d échantillonnag...

Страница 90: ......

Страница 91: ......

Страница 92: ...IA PTY LTD 178 184 Boundary Road Braeside Victoria 3195 Australia TEL 03 9586 6300 PIONEER ELECTRONICS OF CANADA INC 300 Allstate Parkway Markham Ontario L3R 0P2 Canada TEL 905 479 4411 PIONEER ELECTRONICS DE MEXICO S A de C V San Lorenzo Num 1009 3er piso Desp 302 Col Del Valle Mexico D F C P 03100 TEL 5 688 52 90 Published by Pioneer Corporation Copyright 1999 by Pioneer Corporation All rights r...

Отзывы: