background image

4

function for entertainment purposes.

Handling the USB connector

CAUTION

  To prevent data loss and damage to the storage device, 

never remove it from this product while data is being 
transferred.

  Pioneer cannot guarantee compatibility with all USB mass 

storage devices and assumes no responsibility for any loss 
of data on media players, iPhone, smartphone, or other 
devices while using this product.

In case of trouble

Should this product fail to operate properly, contact your dealer 

or nearest authorized Pioneer Service Station.

Visit our website

Visit us at the following site:

http://www.pioneer.eu

  Register your product. We will keep the details of your pur-

chase on file to help you refer to this information in the event 

of an insurance claim such as loss or theft.

  We offer the latest information about PIONEER 

CORPORATION on our website.

  Pioneer regularly provides software updates to further 

improve it’s products. Please check the support section of 

the Pioneer website for all available software updates.

About this product

  This product does not work correctly in areas other than 

Europe. The RDS (Radio Data System) function operates only 

in areas with FM stations broadcasting RDS signals. The 

RDS-TMC service can also be used in the area where there is 

a station that broadcasts the RDS-TMC signal.

  The Pioneer CarStereo-Pass is for use only in Germany.

Protecting the LCD panel and 
screen

  Do not expose the LCD screen to direct sunlight when this 

product is not used. This may result in LCD screen malfunc-

tion due to the resulting high temperatures.

  When using a cellular phone, keep the antenna of the cel-

lular phone away from the LCD screen to prevent disruption 

of the video in the form of spots, colored stripes, etc.

  To protect the LCD screen from damage, be sure to touch the 

touch panel keys only with your finger and do so gently.

Notes on internal memory

Before removing the vehicle battery

  Some of the settings and recorded contents will not be reset.

Data subject to erasure

The information is erased by disconnecting the yellow lead from 

the battery (or removing the battery itself).

  Some of the settings and recorded contents will not be reset.

Resetting the microprocessor

CAUTION

Pressing the 

RESET

 button resets settings and recorded 

contents to the factory settings.

  Do not perform this operation when a device is connected 

to this product.

  Some of the settings and recorded contents will not be 

reset.

The microprocessor must be reset under the following 

conditions:

  Prior to using this product for the first time after installation.

  If this product fails to operate properly.

  If there appears to be problems with the operation of the 

system.

  If your vehicle position is shown on the map with a signifi-

cant positioning error.

1  Turn the ignition switch OFF.
2  Press the 

RESET

 button with a pen tip or other 

pointed implement.


Checking part names and functions

 on page 5

Settings and recorded contents are reset to the factory settings.

About this manual

This manual uses diagrams of actual screens to describe opera-

tions. However, the screens on some units may not match those 

shown in this manual depending on the model used.

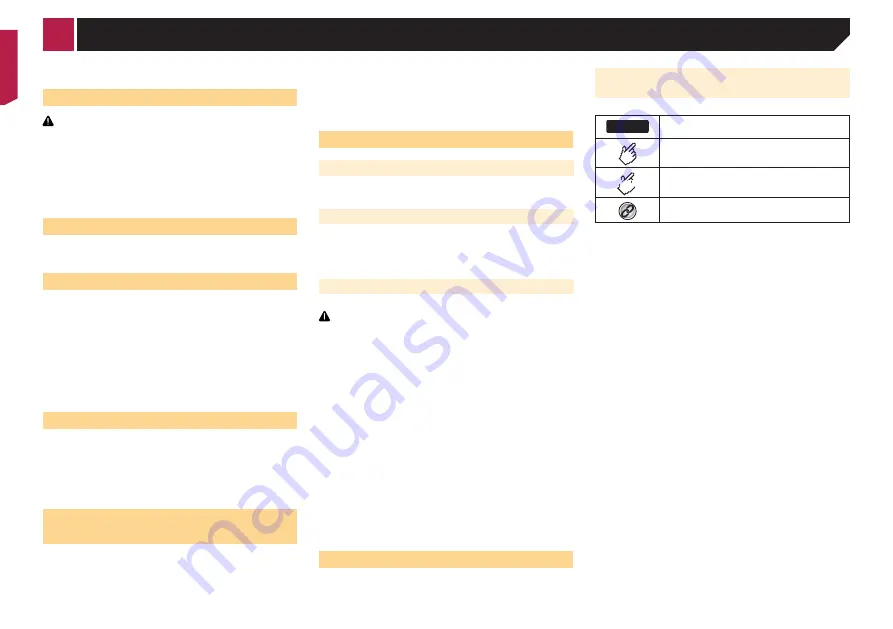
Meanings of Symbols Used in This 

Manual

AV270BT

This indicates model name that are supported 

the described operations.
This indicates to touch an appropriate soft key 

on the touch screen.

HOLD

This indicates to touch and hold an appropriate 

soft key on the touch screen.

This indicates that there is a reference or 

supplementary for the key or screen.

< CRB4570-A >

Precaution

Содержание MVH-AV170

Страница 1: ...Operation Manual MVH AV270BT MVH AV170 RDS AV RECEIVER English ...

Страница 2: ...eceiving traffic announcements TA 14 Receiving news announcements 14 Compressed audio files 15 Starting procedure 15 Selecting files from the file name list 15 Switching the media file type 15 Compressed video files 16 Starting procedure 16 Selecting files from the file name list 16 Still image files 17 Starting procedure 17 Selecting files from the file name list 17 Setting the slideshow interval...

Страница 3: ...apply the parking brake before making the necessary adjustments Never set the volume of this product so high that you can not hear outside traffic and emergency vehicles To promote safety certain functions are disabled unless the vehicle is stopped and or the parking brake is applied Keep this manual handy as a reference for operating procedures and safety information Do not install this product w...

Страница 4: ...to prevent disruption of the video in the form of spots colored stripes etc To protect the LCD screen from damage be sure to touch the touch panel keys only with your finger and do so gently Notes on internal memory Before removing the vehicle battery Some of the settings and recorded contents will not be reset Data subject to erasure The information is erased by disconnecting the yellow lead from...

Страница 5: ...ing a USB storage device p This product may not achieve optimum performance with some USB storage devices p Connection via a USB hub is not possible p A USB cable is required for connection 1 Pull out the plug from the USB port of the USB cable 2 Plug a USB storage device into the USB cable 2 1 1 USB cable 2 USB storage device Check that no data is being accessed before pulling out the USB storage...

Страница 6: ...ABC A System Month Date 12hour 24hour 10 6 2015 12 22 Time Format d m y m d y Bluetooth Audio AUX Rear View ON OFF Top menu screen Time and date setting screen Setting menu screen Phone menu screen AV source icons Current source By pressing the button on any screen you can display the Top menu screen Basic operation ...

Страница 7: ...ct the LCD screen from damage be sure to touch the screen only with your finger gently Using the common touch panel keys Returns to the previous screen Closes the screen Operating list screens ROOT abcdefghi abcdefghi abcdefghi abcdefghi abcdefghi 1 Touching an item on the list allows you to narrow down the options and proceed to the next operation 2 Appears when all characters are not displayed o...

Страница 8: ...ice is being deleted 1 Display the Bluetooth screen Displaying the Bluetooth screen on page 8 2 Touch Connection 3 Touch Connecting a registered Bluetooth device manually Connect the Bluetooth device manually in the following cases Two or more Bluetooth devices are registered and you want to manually select the device to be used You want to reconnect a disconnected Bluetooth device Connection cann...

Страница 9: ...ing updated 1 Connect the USB storage device stored the ver sion up file to this unit Plugging and unplugging a USB storage device on page 5 2 Display the Bluetooth screen Displaying the Bluetooth screen on page 8 3 Touch BT Software Update 4 Touch Start Follow the on screen instructions to finish updating the Bluetooth software Displaying the Bluetooth soft ware version If this product fails to o...

Страница 10: ...a number in the phone book p The contacts on your phone will be automatically transferred to this product p Visibility of the Bluetooth screen should be on Switching visibility on page 8 1 Display the Phone menu screen Displaying the Phone menu screen on page 10 2 Touch 3 Touch the desired name on the list 4 Touch the phone number you want to dial The dial screen appears and dialing starts 5 Touch...

Страница 11: ...ons vary depending on the type of cel lular phone Refer to the instruction manual that came with your cellular phone for detailed instructions When phone book transfer does not work disconnect your phone and then perform pairing again from your phone to this product Making and receiving calls You may hear a noise in the following situations When you answer the phone using the button on the phone W...

Страница 12: ...ly sold connector cables p Operation methods may vary depending on the iPod model and the software version p Depending on the software version of the iPod it may not be compatible with this product For details about iPod compatibility with this product refer to the information on our website This manual applies to the following iPod models iPod with 30 pin connector iPhone 3GS 4 4s iPod touch 2nd ...

Страница 13: ... strength If you touch Cancel the storage process is canceled Displaying the Radio settings screen 1 Press 2 Touch and then 3 Touch AV Source Settings 4 Touch Radio Settings Tuning into strong frequencies p You can use this function when Radio is selected as the source Local seek tuning allows you to only tune into those radio sta tions with sufficiently strong signals 1 Display the Radio Settings...

Страница 14: ...ing You can switch whether the area code is checked during the auto PI search 1 Display the Radio Settings screen Displaying the Radio settings screen on page 13 2 Touch Regional to switch On default or Off Receiving traffic announce ments TA The traffic announcement can be received from the last selected frequency interrupting the other sources 1 Display the Radio Settings screen Displaying the R...

Страница 15: ... also skip files forward or backward p By pressing and holding or you can perform fast reverse or fast forward You can play compressed audio files stored in a USB storage device Media compatibility chart on page 32 Starting procedure 1 Press 2 Plug the USB storage device Plugging and unplugging a USB storage device on page 5 3 Touch USB p Play back is performed in order of folder numbers Folders a...

Страница 16: ...le type on page 15 p By pressing or you can also skip files forward or backward p By pressing and holding or you can perform fast reverse or fast forward p Changing the wide screen mode Common operations on page 29 You can play compressed video files stored in a USB storage device Media compatibility chart on page 32 CAUTION For safety reasons video images cannot be viewed while your vehicle is in...

Страница 17: ...d holding or you can search 10 files at a time If the file currently being played is the first or last file in the folder the search is not performed p Changing the wide screen mode Common operations on page 29 You can view still images stored in an USB storage device Media compatibility chart on page 32 Starting procedure Compressed audio files on page 15 Selecting files from the file name list Y...

Страница 18: ...reen on page 19 p By pressing the or button you can also skip files forward or backward p By pressing and hold the or button you can also perform fast reverse or fast forward p Changing the wide screen mode Common operations on page 29 Connecting your iPod For iPod with a 30 pin connector users Via USB cable p Depending on your iPod a USB interface cable for iPod iPhone CD IU201V sold separately i...

Страница 19: ... the song or video you want to play from the playlist screen 1 Touch 2 Touch or to switch the music or video category list 3 Touch the category you want to search for If you use English as the system language the alphabet search function is available Touch the initial search bar to use this function 4 Touch the title of the list that you want to play 5 Start playback of the selected list p Dependi...

Страница 20: ...vice to this product Registering your Bluetooth devices on page 8 p Depending on the Bluetooth device connected to this prod uct the available operations with this product may be limited or differ from the descriptions in this manual p While you are listening to songs on your Bluetooth device please refrain from operating the phone function as much as possible If you try operating the signal may c...

Страница 21: ...r vehicle is in motion To view video images stop in a safe place and apply the parking brake Starting procedure You can display the video image output by the device connected to video input 1 Display the System setting screen 2 Confirm that AUX Input is turned on 3 Press 4 Touch AUX The image is displayed on the screen Setting the video signal When you connect this product to an AUX equipment sele...

Страница 22: ...ing screen on page 22 2 Touch Camera Settings 3 Touch Back Camera Input to switch On or Off default Setting the polarity of the rear view camera p This function is available when Back Camera Input is On Setting rear view camera activation on page 22 1 Display the System setting screen Displaying the System setting screen on page 22 2 Touch Camera Settings 3 Touch Camera Polarity Battery default Th...

Страница 23: ...brake 1 Display the System setting screen Displaying the System setting screen on page 22 2 Touch Dimmer Settings 3 Touch Dimmer Duration The Duration Setting screen appears 4 Touch the time display to activate the adjust ment mode 5 Touch the graph to set the dimmer duration You can also set the dimmer duration touching or Each touch of or moves the cursor back ward or forward in the 15 minute wi...

Страница 24: ... and Contrast are switched auto matically depending on whether the vehicle s headlights are on or off Dimmer can be changed the setting or the time to switch it to on or off Setting the dimmer on page 23 The setting contents can be memorized separately System settings ...

Страница 25: ...st the source volume p If you directly touch the area where the cursor can be moved the SLA setting will be changed to the value of the touched point p 4 to 4 is displayed as the source volume is increased or decreased p The default setting is 0 Adjusting loudness This function compensates for deficiencies in the low frequency and high frequency ranges at low volume p This function is not availabl...

Страница 26: ...lied to all AV sources Custom2 is an adjusted equalizer curve that you create If you select this curve the effect is applied to all AV sources p The default setting is Powerful 1 Display the Audio setting screen Displaying the Audio setting screen on page 25 2 Touch Graphic EQ 3 Touch the equalizer you want Customizing the equalizer curves You can adjust the currently selected equalizer curve sett...

Страница 27: ...27 Selecting the theme color A theme color can be selected from 3 different colors 1 Display the Theme screen 2 Touch Theme 3 Touch the color you want Theme menu ...

Страница 28: ...u want to add to the favorite menu The star icon for the selected menu is filled in To cancel the registration touch the star icon in the menu column again Selecting a shortcut 1 Display the Favorites screen 2 Touch the desired menu item Removing a shortcut 1 Display the Favorites screen 2 Touch and hold the favorite menu column you want to remove The selected menu item is removed from the Favorit...

Страница 29: ...and for JPEG BMP images is Normal p When there are touch panel keys on the screen images are displayed with the Full mode regardless of your setting 1 Touch the screen display mode key p The appearance of this key changes according to the current setting 2 Touch the desired mode Full A 4 3 picture is enlarged in the horizontal direction only enabling you to enjoy an image without any omissions Zoo...

Страница 30: ... to the default settings You can restore settings or recorded content to the default set tings Various methods are used to clear user data Method 1 Remove the vehicle battery Resets various settings registered to this product p The settings configured on the Theme screen are not reset Method 2 Initialize from the System menu Method 3 Press the RESET button Resetting the microprocessor on page 4 Re...

Страница 31: ... check the screen on the smartphone The screen is displayed but operation does not work at all An error has occurred Park your vehicle in a safe place and then turn off the ignition switch ACC OFF Subsequently turn the ignition switch to on ACC ON again The smartphone was not charged Charging stopped because the temperature of the smart phone rose due to prolonged use of the smartphone during char...

Страница 32: ...mplex folder hierarchies Operations may vary depending on the kind of an USB stor age device It may not be possible to play some music files from USB because of file characteristics file format recorded applica tion playback environment storage conditions and so on USB storage device compatibility For details about USB storage device compatibility with this product refer to Specifications on page ...

Страница 33: ...aterials provided with the distribution 3 All advertising materials mentioning features or use of this software must display the following acknowledgement This product includes software developed by the University of California Berkeley and its contributors 4 Neither the name of the University nor the names of its con tributors may be used to endorse or promote products derived from this software ...

Страница 34: ...ges shown in Specifications on page 35 Do not use the LCD screen at temperatures higher or lower than the operating temperature range because the LCD screen may not operate normally and could be damaged The LCD screen is exposed in order to increase its visibility within the vehicle Please do not press strongly on it as this may damage it Do not push the LCD screen with excessive force as this may...

Страница 35: ...erse Bass boost Gain 12 dB to 0 dB USB USB standard spec USB1 1 USB2 0 Full Speed USB2 0 High Speed Max current supply 1 0 A USB Class MSC Mass Storage Class File system FAT16 FAT32 MP3 decoding format MPEG 1 2 Audio Layer 3 WMA decoding format Ver 7 7 1 8 9 2 ch audio Windows Media Player AAC decoding format MPEG 4 AAC iTunes encoded only Ver 10 6 and earlier WAVE signal format Linear PCM wav Sam...

Страница 36: ...ADA INC 340 Ferrier Street Unit 2 Markham Ontario L3R 2Z5 Canada TEL 1 877 283 5901 TEL 905 479 4411 PIONEER EUROPE NV Haven 1087 Keetberglaan 1 B 9120 Melsele Belgium Belgique TEL 0 3 570 05 11 PIONEER ELECTRONICS ASIACENTRE PTE LTD 253 Alexandra Road 04 01 Singapore 159936 TEL 65 6472 7555 PIONEER ELECTRONICS AUSTRALIA PTY LTD 5 Arco Lane Heatherton Victoria 3202 Australia TEL 03 9586 6300 PIONE...

Отзывы: