background image

7

En

En
g

lis

h

2

Plug in the USB device/iPod using an appropriate cable.

NOTE

To automatically switch to [USB] source when a USB device/iPod is connected to the unit, set [USB 
AUTO] to [ON] in the SYSTEM settings (page 16).

 CAUTION

Use an optional Pioneer USB cable (CD-U50E) to connect the USB device as any device connected 
directly to the unit will protrude out from the unit, which could be dangerous.

Before removing the device, stop playback.

AOA connections

For details on AOA connection, see page 11.

MTP connection

A device installed with Android OS 4.0 or later can be connected to the unit via MTP, using the cable 
supplied with the device. However, depending on the connected device and the numbers of the files in 
the device, audio files/songs may not be able to be played back via MTP. Note that MTP connection is 
not compatible with WAV file formats and FLAC file formats, and cannot be used with the MIXTRAX 
function.

NOTE

If you use an MTP connection, [ANDROID WIRED] needs to be set to [MEMORY] in the SYSTEM settings 
(page 16).

AUX

1

Insert the stereo mini plug into the AUX input jack.

2

Press 

SRC

/

OFF

 to select [AUX] as the source.

NOTE

If [AUX] is set to [OFF] in the SYSTEM settings, [AUX] cannot be selected as a source (page 15).

You can make various adjustments in the FUNCTION settings (page 13).
Note that the following operations do not work for an AUX device. To operate an AUX 
device, use the device itself.
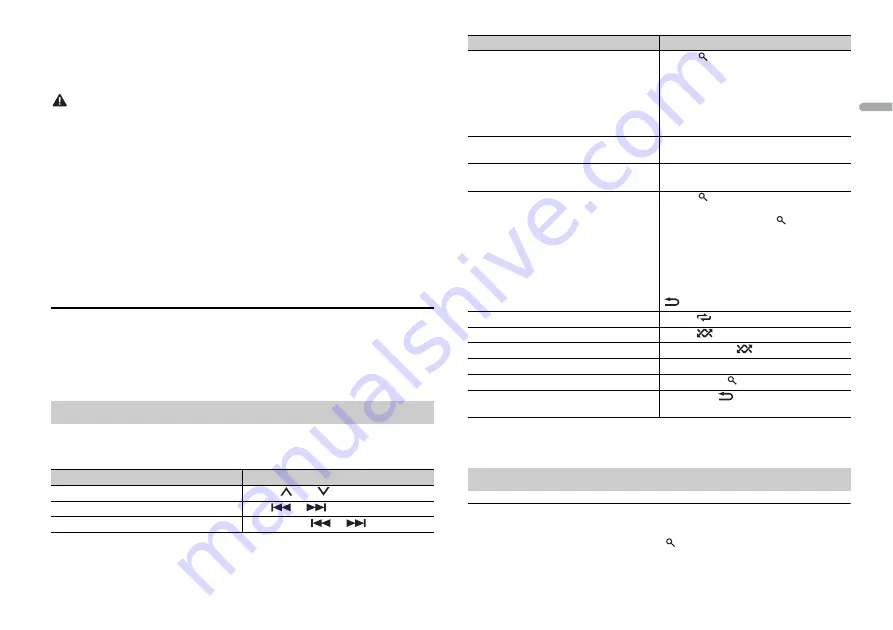
Operations

Purpose

Operation

Select a folder/album*1

Press 

1

/


or 

2

/

.

Select a track/song (chapter)

Press 

 or 

.

Fast forward or reverse*2

Press and hold 

 or 

.

*1 Compressed audio files only
*2 When you use the fast forward or reverse function while playing a VBR file, the playback time may 

be not correct.

Link play mode

You can access songs based on the artist, album, or genre currently playing.

1

While listening to a song, press and hold 

 to enter the link play mode.

Search for a file from a list

1

Press 

 to display the list.

2

Turn the 

M.C.

 dial to select the desired 

file (folder) name or category, then press 
to confirm.

3

Turn the 

M.C.

 dial to select the desired 

file, then press to confirm.
Playback starts.

View a list of the files in the selected folder/
category*1

Press the 

M.C.

 dial when a folder/category 

is selected.

Play a song in the selected folder/
category*1

Press and hold the 

M.C.

 dial when a folder/

category is selected.

Alphabetical search (iPod only)

1

Press 

 to display the list.

2

Turn the 

M.C.

 dial to select the desired 

category list, then press 

 to enter the 

alphabetical search mode.
(Turning the 

M.C.

 dial twice also enters 

the alphabetical search mode.)

3

Turn the 

M.C.

 dial to select a letter, then 

press to display the alphabetical list.

To cancel alphabetical search, press 

BAND

/

.

Repeat play

Press 

6

/

.

Random/shuffle play

Press 

5

/

.

Shuffle all play (iPod only)

Press and hold 

5

/

.

Pause/resume playback

Press 

4

/

PAUSE

.

Return to root folder (CD/USB only)*1

Press and hold 

.

Switch between compressed audio and CD-
DA (CD only)

Press 

BAND

/

.

Useful functions for iPod

Purpose

Operation

Содержание FH-X789BT

Страница 1: ...English CD RDS RECEIVER FH X789BT Owner s Manual ...

Страница 2: ... or servicing of this product by persons without training and experience in electronic equipment and automotive accessories may be dangerous and could expose you to the risk of electric shock injury or other hazards Do not attempt to operate the unit while driving Make sure to pull off the road and park your vehicle in a safe location before attempting to use the controls on the device CAUTION Do ...

Страница 3: ...te the unit Press again to unmute Select a source Press SRC OFF repeatedly Press SRC repeatedly Change the display information Press DISP DISP OFF repeatedly Press and hold DISP DISP OFF to turn off the display information Press DISP repeatedly Return to the previous display list Press BAND Press to select the next previous folder Return to the normal display from the menu Press and hold BAND Answ...

Страница 4: ...tor immediately If the battery compartment does not close securely stop using the product and keep it away from children Do not expose the battery or remote control to excessive heat such as direct sunlight or fire CAUTION There is a potential danger of explosion if the battery is incorrectly replaced When replacing the battery replace it with the same type Do not handle or store the battery with ...

Страница 5: ...irm You cannot complete the setup menu without setting the SPEAKER MODE Once the speaker mode is set this setting cannot be changed unless the default settings of this product are restored Restore the default settings to change the speaker mode setting refer to SYSTEM RESET on page 5 STANDARD NETWORK Canceling the demonstration display DEMO OFF 1 Press and hold SRC OFF until the unit turns off 2 P...

Страница 6: ...hold the M C dial to store a station The unit searches for a station by PTY program type information 1 Press and hold during FM reception 2 Turn the M C dial to select a program type from NEWS INFO POPULAR CLASSICS or OTHERS 3 Press the M C dial The unit begins to search for a station When it is found its program service name is displayed Best stations memory BSM Using PTY functions NOTES To cance...

Страница 7: ... the device itself Operations Purpose Operation Select a folder album 1 Press 1 or 2 Select a track song chapter Press or Fast forward or reverse 2 Press and hold or 1 Compressed audio files only 2 When you use the fast forward or reverse function while playing a VBR file the playback time may be not correct Link play mode You can access songs based on the artist album or genre currently playing 1...

Страница 8: ...RAX USB iPod only Important If three or more Bluetooth devices e g a phone and separate audio player are connected they may not work properly 1 Turn on the Bluetooth function of the device 2 Press to display the phone menu 3 Turn the M C dial to select BT SETTING then press to confirm 4 Turn the M C dial to select ADD DEVICE then press to confirm The unit starts to search for available devices the...

Страница 9: ...G Select ON to pair the unit and iPhone automatically when an iPhone is connected to the unit via USB This function may not be available depending on the version of iOS you are using ON OFF Bluetooth telephone Menu Item Description 2 Turn the M C dial to select RECENTS or PHONE BOOK then press to confirm If you select PHONE BOOK proceed to step 4 3 Turn the M C dial to select MISSED DIALLED or REC...

Страница 10: ... BT SETTING You can adjust various settings for Bluetooth connections For details on Bluetooth settings see page 8 1 The contacts on your phone will normally be transferred automatically when the phone is connected If they are not use your phone to transfer the contacts 2 If two phones are connected this function does not work on incoming calls that are received while one of the phones is being us...

Страница 11: ...ct IPHONE IPOD for iPhone Select ANDROID for Android device 6 Turn the M C dial to select one of the below Select WIRED for the USB connection Select BLUETOOTH for the Bluetooth connection App Mode Playback of an application via the unit NOTE When the connection setting is changed a message that lets you know that the connection setting had been changed will appear in the display Press the M C dia...

Страница 12: ...device yet a message that prompts you to install the application will appear on your Android device Select OFF in P APP AUTO ON to clear the message page 16 10Press SRC OFF to select any source 11Launch Pioneer ARC APP on the mobile device NOTE You can also launch the application by pressing and holding the M C dial if you select the USB connection for iPhone or the Bluetooth connection Making a c...

Страница 13: ...ress the M C dial to display the main menu 2 Turn the M C dial to select one of the categories below then press to confirm FUNCTION settings page 13 AUDIO settings page 14 SYSTEM settings page 15 Settings ILLUMINATION settings page 16 MIXTRAX settings page 17 3 Turn the M C dial to select the options then press to confirm The menu items vary according to the source FUNCTION settings Menu Item Desc...

Страница 14: ... the subwoofer phase SPEAKER LEVEL Network mode HIGH L HIGH R MID L MID R SUBWOOFER Standard mode FRONT L FRONT R REAR L REAR R SUBWOOFER Output level 24 to 10 Select a speaker unit filter and adjust the output level Each value you have adjusted changes when you change the POSITION setting page 14 CROSSOVER Select a speaker unit filter to adjust the HPF or LPF cut off frequency and the slope for e...

Страница 15: ... ON OFF A beep can be heard when any button is pushed Select OFF to disable this function INFO DISPLAY SOURCE BTINFO SOURCE SPEANA CLOCK BTINFO CLOCK SPEANA LEVEL METER SPEANA OFF Display the item on the sub information display When SOURCE SPEANA or CLOCK SPEANA is selected display the antenna instead of the speana on the radio source DOT DISPLAY SPEANA ICON Select SPEANA or ICON to appear on the ...

Страница 16: ... COLOR BOTH COLOR Select color for the keys display of the unit from 12 preset colors SCAN or CUSTOM SCAN Cycle through a variety of colors automatically CUSTOM 1 Press and hold the M C dial until the color setting display appears 2 Set the primary color R red G green B blue and brightness level 0 to 60 You cannot select a level below 10 for all three of R red G green B blue at the same time You c...

Страница 17: ...sed by 2 Ω of subwoofer use speakers over 70 W maximum input power Please refer to connections for a connection method The black cable is ground When installing this unit or power amp sold separately make sure to connect the ground wire first Ensure that the ground wire is properly connected to metal parts of the car s body The ground wire of the power amp and the one of this unit or any other dev...

Страница 18: ...eparately Subwoofer output Power cord Perform these connections when not connecting a rear speaker or middle range speaker lead to a subwoofer Perform these connections when using a subwoofer without the optional amplifier Important In the case of above two 4 Ω subwoofers wired in parallel will represent a 2 Ω load To power cord input Left Right Front speaker STD or high range speaker NW Rear spea...

Страница 19: ...ach side Tapping screw 5 mm 9 mm not supplied with product Mounting bracket Dashboard or console The microphone should be placed directly in front of the driver at a suitable distance to pick up their voice clearly CAUTION It is extremely dangerous to allow the microphone lead to become wound around the steering column or shift lever Be sure to install the microphone in such a way that it will not...

Страница 20: ...ional Information Troubleshooting Error messages FORMAT READ Sometimes there is a delay between the start of playback and when you start to hear any sound Wait until the message disappears and you hear sound NO AUDIO The inserted disc does not contain any playable files Replace the disc SKIPPED The inserted disc contains DRM protected files The protected files are skipped PROTECT All the files on ...

Страница 21: ... a soft cloth outward from the center Condensation may temporarily impair the player s performance Let it rest for about one hour to adjust to a warmer temperature Also wipe any damp discs off with a soft cloth When using discs that can be printed on label surfaces check the instructions and the warnings of the discs Depending on the discs inserting and ejecting may not be possible Using such disc...

Страница 22: ... write data transfer Not compatible USB device There may be a slight delay when starting playback of audio files on a USB storage device with numerous folder hierarchies This unit supports only the following iPod models Supported iPod software versions are shown below Older versions may not be supported Made for iPod touch 1st through 6th generation iPod classic iPod with video iPod nano 1st throu...

Страница 23: ...wireless performance Android Google Play Android Google Play and the Google Play logo are trademarks of Google Inc MIXTRAX MIXTRAX is a trademark of the PIONEER CORPORATION T Kernel 2 0 This product uses the source code of T Kernel 2 0 under T License 2 0 granted by T Engine Forum www tron org MP3 Copyright C 1998 2009 PacketVideo Licensed under the Apache License Version 2 0 the License you may n...

Страница 24: ...Lossless Audio Codec WAV signal format Linear PCM MS ADPCM Non compressed FM tuner Frequency range 87 5 MHz to 108 0 MHz Usable sensitivity 11 dBf 1 0 μV 75 Ω mono S N 30 dB Signal to noise ratio 72 dB IEC A network AM tuner Frequency range 531 kHz to 1 602 kHz 9 kHz 530 kHz to 1 640 kHz 10 kHz Usable sensitivity 25 μV S N 20 dB Signal to noise ratio 62 dB IEC A network SW tuner Frequency range 2 ...

Страница 25: ...25 En English ...

Страница 26: ...26En ...

Страница 27: ...27 En English ...

Страница 28: ... 2015 PIONEER CORPORATION All rights reserved QRB3538 A ID ...

Отзывы: