background image

Using the tuner

05

16

En

2

Press CLASS to select the class in which 

the station is stored.

Press repeatedly to cycle through classes A, B 
and C.

3

Press ST +/– to select the station preset 

you want.

A6_KU.book  16 ページ  2006年11月13日 月曜日 午後3時1分

Содержание Elite SX-A6-J

Страница 1: ...l be on file for reference in the event of an insurance claim such as loss or theft Improve product development Your input helps us continue to design products that meet your needs Receive a free Pioneer newsletter Registered customers can opt in to receive a monthly newsletter Receive free tips updates and service bulletins on your new product SX A6 J Stereo Receiver A6 ...

Страница 2: ... correct the interference by one or more of the following measures Reorient or relocate the receiving antenna Increase the separation between the equipment and receiver Connect the equipment into an outlet on a circuit different from that to which the receiver is connected Consult the dealer or an experienced radio TV technician for help D8 10 1 2_En This Class B digital apparatus complies with Ca...

Страница 3: ...able system is grounded so as to provide some protection against voltage surges and built up static charges Article 810 of the National Electrical Code ANSI NFPA 70 provides information with regard to proper grounding of the mast and supporting structure grounding of the lead in wire to an antenna discharge unit size of grounding conductors location of antenna discharge unit connection to groundin...

Страница 4: ...ncluded for your protection Decibel Level Example 30 Quiet library soft whispers 40 Living room refrigerator bedroom away from traffic 50 Light traffic normal conversation quiet office 60 Air conditioner at 20 feet sewing machine 70 Vacuum cleaner hair dryer noisy restaurant 80 Average city traffic garbage disposals alarm clock at two feet THE FOLLOWING NOISES CAN BE DANGEROUS UNDER CONSTANT EXPOS...

Страница 5: ...plays Front panel 11 Remote control 12 Using the remote control 12 Display 13 04 Listening to your system Using Direct listening 14 Using the balance and tone controls 14 Playing other sources 14 Making an audio recording 14 05 Using the tuner Listening to the radio 15 Saving station presets 15 Naming station presets 15 Listening to station presets 15 06 Other connections Using XM Radio 17 Connect...

Страница 6: ...l path for minimum deterioration of signal clarity Wide Range Linear Circuit Through this proprietary feedback circuit an output signal of low impedance offering a flat even response over the widest possible frequency range is delivered to your speakers XM Radio ready The XM Radio terminal on this receiver provides a quick and easy connection to XM Radio the leading provier of satellite radio serv...

Страница 7: ...p away from children If swallowed please contact a doctor immediately Lithium batteries may present a fire or chemical burn hazard if misused Do not disassemble heat above 100 C 212 F or incinerate Remove the battery if the unit isn t going to be used for a month or more When disposing of used batteries please comply with governmental regulations or environmental public instruction s rules that ap...

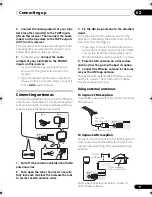
Страница 8: ...t you re connecting Follow the steps below to connect a CD player tape recorder turntable or other audio component 1 Connect the analog audio outputs of your CD player or other component to the CD inputs on this receiver Use a stereo RCA phono cable as shown Connect any other components such as an iPod1 dock or a portable audio player to the AUX inputs in the same way Note 1 iPod is a trademark of...

Страница 9: ...the AM antenna wires 3 Fix the AM loop antenna to the attached stand To fix the stand to the antenna bend in the direction indicated by the arrow then clip the loop onto the stand fig a If you plan to mount the AM antenna to a wall or other surface secure the stand with screws fig b before clipping the loop to the stand Make sure the reception is clear 4 Place the AM antenna on a flat surface and ...

Страница 10: ... wire strands twisted together fig A To connect a terminal unscrew the terminal a few turns until there is enough space to insert the exposed wire fig B Once the wire is in position tighten the terminal until the wire is firmly clamped fig C Important Please refer to the manual that came with your speakers for details on how to connect the other end of the speaker cables to your speakers Caution T...

Страница 11: ...4 DIRECT Press to switch the Direct listening feature on or off page 14 5 INPUT SELECTOR dial Selects an input source 6 MASTER VOLUME 7 Remote sensor 8 PHONES jack Use to connect headphones when connected there is no sound output from the speakers ON OFF VOLUME INPUT SELECTOR DIRECT POWER STANDBY PHONES STEREO RECEIVER A6 3 1 7 2 5 6 4 8 ...

Страница 12: ...y Switches between stereo and mono reception of FM broadcasts page 15 D ACCESS Press to access a radio station directly using the number buttons page 15 T EDIT Memorizes names stations for recall page 15 CLASS Switches between the three banks of radio station presets page 15 RETURN XM Radio only Press to confirm and exit the current menu Using the remote control Keep in mind the following when usi...

Страница 13: ...ol indicators TREBLE Lights when high range tone adjustment is applied BASS Lights when low range tone adjustment is applied 3 Master volume level 4 FM Lights when FM broadcasts are received AM Lights when AM broadcasts are received 5 XM Lights when XM radio broadcasts are received 6 Character display Displays various system information 7 MHz Lights when an FM frequency is displayed KHz Lights whe...

Страница 14: ...ront panel when the corresponding tone control is active To return to the flat setting tone control off press L and R at the same time Playing other sources 1 Turn on the power of the playback component 2 Turn on the power of the receiver 3 Select the source you want to playback Use the input select buttons or INPUT SELECTOR dial 4 Start playback of the component you selected in step 1 Making an a...

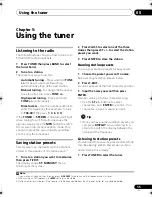
Страница 15: ...DIT The display shows ST MEMORY then a blinking memory class 2 Press CLASS to select one of the three classes then press ST to select the station preset you want 3 Press ENTER to store the station Naming station presets You can your station presets for easy recall 1 Choose the preset you want to name See Listening to station presets below 2 Press T EDIT A cursor appears at the first character posi...

Страница 16: ...Using the tuner 05 16 En 2 Press CLASS to select the class in which the station is stored Press repeatedly to cycle through classes A B and C 3 Press ST to select the station preset you want ...

Страница 17: ...o input For best reception you may need to move the Connect and Play antenna near a window the southernmost window should produce the best results If after pressing XM the display shows ANTENNA try disconnecting the antenna and reconnecting 2 Listening to XM Radio After connecting you will be able to use this receiver to select channels and navigate categories using the front panel display Selecti...

Страница 18: ...of the three classes then press to select the channel preset you want You can also use the number buttons to select a preset The default for all presets is CH001 4 Press ENTER After pressing ENTER the preset class and number stop blinking and the receiver stores the XM channel Listening to channel presets You will need to have some presets stored to do this 1 Press CLASS to select the class in whi...

Страница 19: ...rol signal is passed along the chain to the appropriate component Note that if you use this feature make sure that you also have at least one set of analog audio jacks connected to another component for grounding purposes 1 Connect the CONTROL OUT of this receiver to the CONTROL IN jack of another Pioneer component Use a cable with a mono mini plug on each end for the connection 2 If the Pioneer c...

Страница 20: ...is receiver will not turn on if you turn a connected component off while this receiver is currently off 1 Connect the 12V TRIGGER jack of this receiver to the 12V trigger of another component Use a cable with a mono mini plug on each end for the connection Note 1 When this system is already on switching the connected component on will have no effect switching the connected compo nent off will have...

Страница 21: ...e power shuts off automatically take the unit to your nearest Pioneer authorized service center or your dealer for servicing No sound is output when a function is selected Make sure the component is connected correctly refer to Connecting up on page 8 Press MUTE on the remote control to turn muting off Considerable noise in radio broadcasts Connect the antenna page 9 and adjust the position for be...

Страница 22: ...RR A short circuit occurring in the antenna or surrounding antenna cable Make sure that there is nothing unusual with the antenna or antenna cable Switch the power off then back on again UPDATING The radio is being updated with the latest encryption code Wait until the encryption code has been updated Channels 00 and 01 should function normally NO SIGNAL The XM signal is too weak at the current lo...

Страница 23: ...anced AM Tuner Section Frequency Range 530 kHz to 1700 kHz Sensitivity IHF Loop antenna 350 µV m Signal to Noise Ratio 50 dB Antenna Loop antenna Miscellaneous Power requirements AC 120 V 60 Hz Power consumption 170 W In standby 0 6 W Dimensions 420 mm W x 100 mm H x 359 mm D 16 9 16 in W x 3 15 16 in H x 14 1 8 in D Weight without package 10 kg 22 lb Accessories Remote control 1 Lithium battery C...

Страница 24: ...vision at the above listed number for assistance Pioneer Electronics USA Inc Customer Support Division P O BOX 1760 Long Beach CA 90801 1760 U S A For warranty information please see the Limited Warranty sheet included with your product Should this product require service in Canada please contact a Pioneer Canadian Authorized Dealer to locate the nearest Pioneer Authorized Service Company in Canad...

Отзывы: