background image


Controls and displays

03


23


En


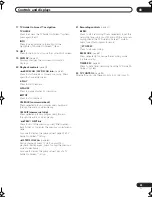
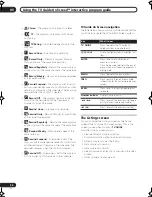
17 TV Guide On Screen™ navigation

TV GUIDE


Press to access the TV Guide On Screen™ system; 
press again to exit.


INFO


Press to see additional information for the 
highlighted TV Guide On Screen™ item.


18 HELP


Press for help on how to use the current GUI screen.


19 DISPLAY 


(page 32)

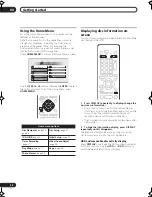
Displays/changes the on-screen information 
displays.


20 Playback controls 


(page 29)


 REV SCAN / FWD SCAN 


(page 60)

Press to start reverse or forward scanning. Press 
again to change the speed.


 PLAY


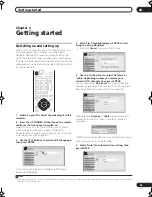
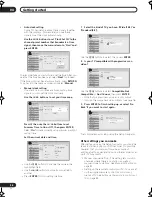
Press to start playback.


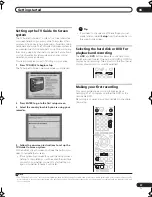
 PAUSE


Press to pause playback or recording.


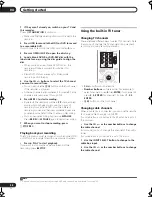
 STOP


Press to stop playback.


CM BACK (commercial back)


Press repeatedly to skip progressively backward 
through the audio or video playing.


CM SKIP (commercial skip)


Press repeatedly to skip progressively forward 
through the audio or video playing.


 PREV / NEXT 


Press to skip to the previous or next title/chapter/
track/folder; or to display the previous or next menu 
page.

Also use to display the previous/next page of a TV 
Guide On Screen™ listing.


 STEP/SLOW 


(page 60)

During playback, press to start slow-motion 
playback; while paused, press to show the previous 
or next video frame.

Also use to display the previous/next day of a TV 
Guide On Screen™ listing.


21 Recording controls 


(page 27)


 REC


Press to start recording. Press repeatedly to set the 
recording time in blocks of 30 mins. With a program 
highlighted in the TV Guide On Screen™ system, 
press to set that program to record.


 STOP REC


Press to stop recording.


REC MODE 


(page 51)

Press repeatedly to change the recording mode 
(picture quality).


TIMER REC 


(page 44)

Press to set a timer recording from the TV Guide On 
Screen™ system.


22 TV CONTROL 


(page 98)

After setting up, use these controls to control your TV.

DVR-530H_KU.book 23 ページ 2005年6月8日 水曜日 午前11時16分

Содержание DVR-531H-S

Страница 1: ...DVD Recorder DVR 633H S DVR 533H S DVR 532H S DVR 531H S Operating Instructions RegisterYour Product on www pioneerelectronics com US www pioneerelectronics ca Canada ...

Страница 2: ...e to radio or television reception which can be determined by turning the equipment off and on the user is encouraged to try to correct the interference by one or more of the following measures Reorient or relocate the receiving antenna Increase the separation between the equipment and receiver Connect the equipment into an outlet on a circuit different from that to which the receiver is connected...

Страница 3: ...m the product OUTDOOR ANTENNA GROUNDING If an outside antenna or cable system is connected to the product be sure the antenna or cable system is grounded so as to provide some protection against voltage surges and built up static charges Article 810 of the National Electrical Code ANSI NFPA 70 provides information with regard to proper grounding of the mast and supporting structure grounding of th...

Страница 4: ...r tie it with other cords The power cords should be routed such that they are not likely to be stepped on A damaged power cord can cause a fire or give you an electrical shock Check the power cord once in a while When you find it damaged ask your nearest PIONEER authorized service center or your dealer for a replacement S002_En This product is for general household purposes Any failure due to use ...

Страница 5: ...cluded for your protection Decibel Level Example 30 Quiet library soft whispers 40 Living room refrigerator bedroom away from traffic 50 Light traffic normal conversation quiet office 60 Air conditioner at 20 feet sewing machine 70 Vacuum cleaner hair dryer noisy restaurant 80 Average city traffic garbage disposals alarm clock at two feet THE FOLLOWING NOISES CAN BE DANGEROUS UNDER CONSTANT EXPOSU...

Страница 6: ...m 35 The Listings screen 36 Recording programs 37 Setting program reminders 39 Searching for programs 40 Scheduling recordings and reminders 44 Changing setup options 45 TV Guide On Screen FAQ and troubleshooting 47 06 Recording About DVD recording 49 About HDD recording 49 Recording time and picture quality 50 Recorded audio 50 Restrictions on video recording 50 Setting the picture quality record...

Страница 7: ...nu 92 14 Additional information Resetting the recorder 98 Setting up the remote to control your TV 98 Screen sizes and disc formats 99 Minimum copying times 100 Troubleshooting 101 Frequently asked questions 103 About DV 104 Manual recording modes 105 Additional information for cable satellite STB set top box users 106 Language code list 107 Country Area code list 107 On screen displays and record...

Страница 8: ...ed so that picture quality can be optimized when making real time copies to DVD later This is applicable only to MN16 32 HDD recordings Video Mode Off or MN12 32 XP recordings Video Mode On Chase play Using chase play you can start watching a recording from the beginning while continuing to record For example you could set a timer recording for a program that you re going to miss the first 15 minu...

Страница 9: ...ous parts of the Original content Play Video mode recordings on a regular DVD player Discs recorded using the Video mode can be played back on regular DVD players including computer DVD drives compatible with DVD Video playback DVD Video format recording The use of the DVD Video format for recording on DVD R and DVD RW discs is referred to as recording in Video mode on Pioneer s DVD recorders Supp...

Страница 10: ...ion may become unreliable if strong sunlight or fluorescent light is shining on the unit s remote sensor Remote controllers for different devices can interfere with each other Avoid using remotes for other equipment located close to this unit Replace the batteries when you notice a fall off in the operating range of the remote When the batteries run down or you change the batteries the remote cont...

Страница 11: ...nd therefore may not play It is possible that when loading or ejecting a DualDisc the opposite side to that being played will be scratched Scratched discs may not be playable The DVD side of a DualDisc plays in this product DVD Audio content will not play For more detailed information on the DualDisc specification please refer to the disc manufacturer or disc retailer CD R RW compatibility This re...

Страница 12: ...that DVD R is a record once medium while DVD RW is a re recordable erasable medium You can re record erase a DVD RW disc approximately 1 000 times For more information see About DVD recording on page 49 What s VR mode VR Video Recording mode is a special mode designed for home DVD recording It allows flexible editing of recorded material compared to Video mode On the other hand Video mode discs ar...

Страница 13: ...rtant recordings onto DVD R RW discs in order to protect against accidental loss Pioneer cannot under any circumstances accept resposibility for any direct or indirect loss arising from any inconvenience or loss of recorded material resulting from HDD failure Do not move the recorder while it is on this includes during EPG download when the display shows EPG Install and use the recorder on a stabl...

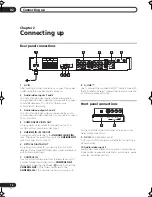
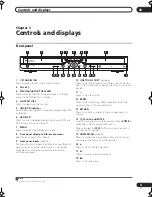
Страница 14: ...AV amp receiver Dolby Digital DTS decoder or other equipment with optical digital input 7 CONTROL IN Use to control this recorder from the remote sensor of another Pioneer component with a CONTROL OUT terminal and bearing the Pioneer mark Connect the CONTROL OUT of the other component to the CONTROL IN of this recorder using a mini plug cord 8 G LINK Use to connect the supplied G LINK cable for us...

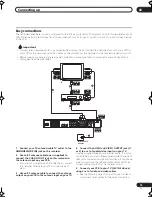
Страница 15: ...our VCR If you are not connecting a VCR in the chain connect this recorder directly to your TV and skip the next step 3 Use an RF antenna cable to connect the antenna output on your VCR to the antenna input on your TV 4 Connect the AUDIO and VIDEO OUTPUT jacks 1 or 2 to a set of audio video inputs on your TV Use the supplied three pin audio video cable It is color coded to help you match them up r...

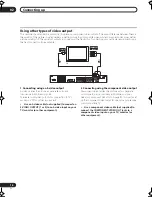
Страница 16: ...tion to TVs monitors VCRs or other equipment Use an S video cable not supplied to connect an S VIDEO OUTPUT 1 or 2 to an S video input on your TV monitor or other equipment 2 Connecting using the component video output Component video carries the picture as two separate color signals plus a luminance brightness signal See also Component Video Out on page 92 for how to set up the component video ou...

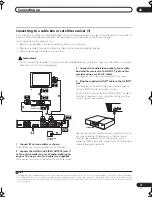
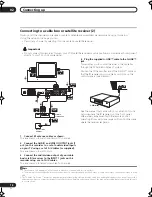
Страница 17: ...lug the supplied G LINK cable to the G LINK jack This enables you to control the tuner in the cable box through the TV Guide On Screen2 system Position the IR transmitter end of the G LINK cable so that the IR receiver on your cable box will pick up the control signals see diagram See the manual that came with your cable box if you re not sure where the IR receiver is on the front panel Alternativ...

Страница 18: ...ansmitter end of the G LINK cable so that the IR receiver on your cable box will pick up the control signals see diagram See the manual that came with your cable box if you re not sure where the IR receiver is on the front panel Alternatively experiment with the remote control operating it from very close range until you find the place where the receiver responds Note 1 The setup on this page does...

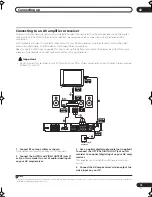
Страница 19: ... TV 1 Connect RF antenna cables as shown This enables you to watch and record TV channels 2 Connect the AUDIO and VIDEO OUTPUT jacks 1 or 2 on this recorder to a set of audio video inputs on your AV amp receiver 3 Use an optical digital audio cable not supplied to connect the OPTICAL DIGITAL OUT jack on this recorder to an optical digital input on your AV amp receiver This enables you to listen to...

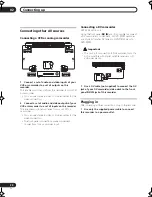
Страница 20: ...g the front panel DV IN jack it is possible to connect a DV camcorder or video deck or DVD R RW recorder and digitally transfer DV tapes or DVD R RW discs to DVD R RW Important This jack is for connection to DV equipment only It is not compatible with digital satellite receivers or D VHS video decks 1 Use a DV cable not supplied to connect the DV jack of your DV camcorder video deck to the front p...

Страница 21: ...r connecting camcorders and other portable equipment 10 ONE TOUCH COPY page 66 Press to start One Touch Copy of the currently playing title to DVD or the HDD See also the Note on copying on page 9 11 Press to stop recording 12 REC Press to start recording Press repeatedly to set the recording time in 30 minute blocks 13 RETURN Press to go back one level in the on screen menu or display 14 and ENTE...

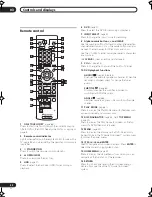
Страница 22: ...he tuner audio SUBTITLE page 64 Displays changes the subtitles included in multilingual DVD Video discs ANGLE page 65 Switches camera angles on discs with multi angle scenes 11 PLAY MODE page 61 Press to display the Play Mode menu for features such as search repeat and program play 12 DISC NAVIGATOR page 58 76 TOP MENU page 30 Press to display the Disc Navigator screen or the top menu if a DVD Vid...

Страница 23: ...ogressively forward through the audio or video playing PREV NEXT Press to skip to the previous or next title chapter track folder or to display the previous or next menu page Also use to display the previous next page of a TV Guide On Screen listing STEP SLOW page 60 During playback press to start slow motion playback while paused press to show the previous or next video frame Also use to display ...

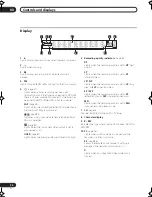
Страница 24: ...ER page 93 Lights when the analog audio input level is too high 6 Recording quality indicators page 50 XP Lights when the recording mode is set to XP best quality SP Lights when the recording mode is set to SP standard play LP SLP Lights when the recording mode is set to LP long play or SLP super long play EP SEP Lights when the recording mode is set to EP extended play or SEP super extended play ...

Страница 25: ...ne all the channels if you re using the Setup Navigator for a second time for example After selecting Antenna or Cable the recorder starts automatic tuning This takes a couple of minutes to complete If EPG data is downloaded the clock will automatically be set and you can skip to step 7 below 1 6 Select Auto for automatic time setting then press ENTER STANDBY ON ENTER Initial Setup Basic Tuner Vid...

Страница 26: ...uld be ready to start enjoying your DVD recorder It s possible however that you may want to make a couple of additional settings depending on how the recorder is set up for TV broadcasts Manual channel setting This setting lets you skip channels where there is no station as well as manually tune to stations See Manual CH Setting on page 92 Setting up the remote to control your TV You can set up th...

Страница 27: ...p process before it s completed you will be asked the next time you switch on whether you want to start setting up again or whether to leave it until later Tip If you need to change any of the settings you just made later on select Setup from the Service bar in the main Guide screen Selecting the hard disk or DVD for playback and recording The HDD and DVD buttons remote control and front panel are...

Страница 28: ...ng by pressing PAUSE Press REC or PAUSE again to restart recording 7 When you want to stop recording press STOP REC Playing back your recording The TV program you just recorded should be on the HDD or DVD disc as a single title with one or more chapters Press PLAY to start playback If you want to stop playback before the end of the recording press STOP Using the built in TV tuner Changing TV chann...

Страница 29: ...2 Press HDD to playback from the HDD or DVD to play a DVD If playing video from the HDD skip to step 5 below 3 Press OPEN CLOSE to open the disc tray 4 Load a disc Load a disc with the label side facing up using the disc tray guide to align the disc if you re loading a double sided DVD Video disc load it with the side you want to play face down If you want to play a DTS audio CD please first read ...

Страница 30: ...ess repeatedly to change the playback speed While paused press to advance a single frame in either direction Press to display the menu of a DVD Video disc Use the cursor buttons to navigate DVD Video disc menus press ENTER to select items Press to return to the previous level of a DVD Video disc menu PLAY STOP PAUSE REV SCAN FWD SCAN PREV NEXT CLEAR CLEAR ENTER SKIP CM BACK STEP SLOW TOP MENU MENU...

Страница 31: ...EAR ENTER Press to start playback If RESUME is displayed on screen play back starts from the place last stopped Press to stop playback You can resume playback from the same point by pressing PLAY Press STOP again to cancel the resume function Pauses playback or restarts playback when paused Press to start scanning Press repeatedly to increase the scanning speed Press to skip to previous next track...

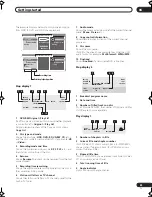
Страница 32: ...removable disc DVD etc activity together Press again to show the status of just the currently selected playback recording device HDD or removable disc The on screen display automatically disappears after 150 minutes 2 To hide the information display press DISPLAY repeatedly until it disappears The example displays below are a guide only actual displays vary according to the disc loaded etc HDD and...

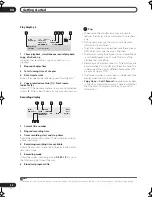
Страница 33: ... CDs this area shows playable files other than CD audio tracks for example Multi format WMA MP3 10 Finalized Shows Finalized if a recordable DVD is finalized Stop display 2 1 Broadcast program name 2 Date and time 3 Number of titles tracks on disc For a VR mode DVD RW the number of Original and Play List titles are shown separately Play display 1 1 Number of chapters in title 2 Current title and c...

Страница 34: ...y shows information for playback only During real time copy the copy source playback information is displayed The Video mode disc displays become the same as a DVD Video disc once the disc is finalized The total recording time figure shown in parenthesis is calculated based on a 12cm 4 7GB disc at the displayed record setting Recording and playback times for TV recordings are approximately 0 1 sho...

Страница 35: ...Guide On Screen est fabriqués sous licence de Gemstar TV Guide International Inc et ou d une de ses sociétés affiliées The TV Guide On Screen system is protected by one or more of the following issued United States patents 6 498 895 6 418 556 6 331 877 6 239 794 6 154 203 5 940 073 4 908 713 4 751 578 4 706 121 Le systéme TV Guide On Screen est protégés par un ou plusieurs brevets émis aux Etats U...

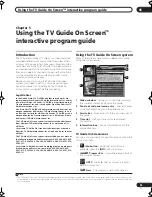
Страница 36: ...emains in the schedule The reminder resumes when the conflict is cleared Remind Off A reminder is set for the program but it is currently off it remains in the schedule TV Guide On Screen navigation The table below shows a summary of the remote buttons you ll use to navigate the TV Guide On Screen system The Listings screen You can consider the Listings screen as the home screen of the TV Guide On...

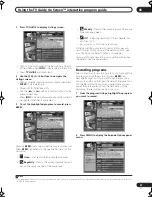
Страница 37: ...ek Off Keep the recording in the schedule but don t record it No record icon Don t set a recording Note that setting a program to record in this way will result in a recording using all the default options see also Changing the Default Options on page 46 If you want to set a recording using settings other than the default use the panel menu Recording programs The simplest way to record a program i...

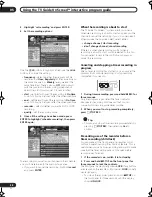
Страница 38: ...t select either change channel start recording don t change channel cancel recording If there s a scheduled recording conflict when a recording is about to start you ll be alerted to this too You can select to record the conflicting program or cancel the recording Canceling and stopping a timer recording in progress After a timer recording has started you can cancel the program but continue record...

Страница 39: ...ption which puts the program in the reminder schedule but no reminder is given you can set it to remind later auto tune set whether the recorder should automatically change channels when a reminder is due or not when set when the reminder is displayed before on time or after a program has started 5 Once all the settings have been made press ENTER to highlight schedule reminder then press ENTER aga...

Страница 40: ... the buttons to select a search category The available categories are Movies Sports Children Educational News Variety Series HDTV 3 Press to move to the search sub categories and select the sub category you want The sub categories available depend on the category you chose in the last step 4 Press ENTER to display a listing of upcoming programs that match the categories you chose 5 Highlight a pro...

Страница 41: ...he displayed keywords highlight it and then press MENU From the menu panel you can choose edit search or delete search 3 Press ENTER to display the Keyword Search menu 4 Select new search 5 If you want to change the category move up and select the category you want To search using only the keyword leave the category set to All If you select a category HDTV for example then you ll only see programs...

Страница 42: ...RCH from the Service bar at the top of the screen 2 Press to move to the search category bar then use the buttons to select ALPHABETICAL 3 Press ENTER 4 Select a letter and press ENTER to display all programs starting with that letter 5 Highlight a program listing press ENTER select an episode and press MENU to display the Episode Options menu panel See The search Episode Options menu on page 43 f...

Страница 43: ...o channel watch now exit the TV Guide On Screen guide and tune to the channel set recording go to the Record Option menu see Recording programs on page 37 set reminder go to the Remind Option menu see Setting program reminders on page 39 cancel close the menu panel and return to the highlighted program listing Navigation and search tips The buttons move the highlight between options in the panel m...

Страница 44: ...r in the information box The Schedule Options menu The Schedule Options menu is accessible by pressing MENU when either SCHEDULE is highlighted in the Service bar or a program is highlighted When SCHEDULE is highlighted go to Service Bar close the menu panel and return to the Service bar at the top of the screen sort by select a sort order for the program listings new manual recording select and t...

Страница 45: ...e divided into three categories System Settings Channel Display and Default Options 1 Select SETUP from the Service bar at the top of the screen 2 Use the button to select one of the setup areas As you highlight an option you can see the settings you can adjust in that area System Settings Zip postal code and cable setup Channel Display Channel position tuning channel display on off etc Default Op...

Страница 46: ... This is the place to change the default settings for recordings reminders and other general settings 1 Select the Change Default Options item 2 Select one of the three default option categories A different menu panel appears for each option General default options Info box size the initial size of the information box no small large last used box cycle the cycle behavior of the information box no ...

Страница 47: ...Recordings Setup Search and press the INFO button An expanded info box displays additional help information Press INFO again to close the box I ve noticed some stars displayed after show titles What do they mean These stars are a broadcast industry rating system used to inform you of a show s quality Four stars is the highest rating one the lowest I ve seen the word download in reference to the TV...

Страница 48: ...der Change system settings Make sure that your cable box is switched on if applicable A show I set to record didn t record Make sure the recorder is in standby before the recording is due to start For DVD recording make sure there is a recordable DVD loaded Check that the recording appears in the Schedule listing The TV Guide On Screen system didn t automatically tune to a show that I set a remind...

Страница 49: ...sable In this case try re initializing the disc DVD RW only or use a new disc Pioneer is not responsible for lost recordings damaged discs or other losses in these cases Fingerprints and small scratches on a disc can affect playback and or recording performance Please take proper care of your discs See also Disc content format playback compatibility on page 10 for detailed disc compatibility infor...

Страница 50: ... main and SAP audio channels will be recorded and you can switch on playback The table below shows the different audio output possibilities Restrictions on video recording You cannot record copy protected video using this recorder Copy protected video includes DVD Video discs and some satellite broadcasts If copy protected material is encountered during a recording recording will pause automatical...

Страница 51: ... manual recording is on The setting is indicated in the front panel display and shown on screen together with the recording time for a blank recordable disc If a recordable disc is loaded the approximate remaining recording time for that disc is also shown Note that if the On Screen Display setting see On Screen Display on page 96 is Off then this information is not displayed Basic recording from ...

Страница 52: ...REC If you set the recording time in the previous step you can still stop the recording anytime by pressing STOP REC Recording will stop automatically when there is no more space on the HDD DVD or after 12 hours of HDD recording whichever is sooner Simultaneous recording and playback A feature called Chase Play makes it possible to watch a recording in progress DVD or HDD from the start of the rec...

Страница 53: ...p the recorder Use REC MODE to set the recording quality See Setting the picture quality recording time on page 51 for detailed information Press HDD to record to the hard disk drive or DVD to record to a DVD 4 Press REC when you re ready to start recording The recorder will only start recording from the DV IN jack if there is a valid signal Recording will also pause if the signal is interrupted d...

Страница 54: ...ble DVD respectively 6 Find the place on the camcorder tape that you want to start recording from For best results pause playback at the point from which you want to record Depending on your camcorder you can use this recorder s remote to control the camcorder using the and buttons 7 Use the buttons to select Start Rec and press ENTER Recording is automatically paused if the recorder detects no si...

Страница 55: ...ou can t edit or record anything else on that disc However the finalization on a DVD RW disc maybe undone see Undo Finalize on page 88 for how to do this A VR mode disc can still be recorded and edited on this recorder even after finalizing 1 Load the disc you want to finalize Make sure that the recorder is stopped before proceeding 2 Press HOME MENU and select Disc Setup 3 Select Finalize 4 Selec...

Страница 56: ... a DVD RW disc will erase everything recorded on it Make sure there is nothing on the disc that you want to keep You may not be able to re initialize a DVD RW disc in a different format if it was originally initialized on an older DVD recorder Once initialized for VR mode recording you can t re initialize a DVD R back to Video mode 1 Press HOME MENU and select Disc Setup 2 Select Initialize 3 Sele...

Страница 57: ...ut DualDisc playback A DualDisc is a new two sided disc one side of which contains DVD content video audio etc while the other side contains non DVD content such as digital audio material The non DVD audio side of the disc is not compliant with the CD Audio specification and therefore may not play It is possible that when loading or ejecting a DualDisc the opposite side to that being played will b...

Страница 58: ...ure displayed for a title see Set Thumbnail on page 79 4 To play the highlighted title press ENTER You can also select Play from the command menu options Tip Use the time search feature to find a particular point on a DVD or within a title on the HDD See Search Mode on page 61 for more information Changing the display style of the Disc Navigator You can choose to display titles in the Disc Navigat...

Страница 59: ... while the disc is stopped Disc Navigator HDD 11 29 MON 7 00PM 11 29Mon 7 00PM 2ch SP 2h00m 1 0G 1 2 3 7 4 Titles Remain HDD SP NEW first All Genres 10Titles 30h30m 1 12 3 FRI 8 00PM 12 3FRI 8 00PM 9ch SP 2h00m 1 0G 12 2 THU 10 00PM 12 2THU 10 00PM 7ch SP 1h00m 1 0G 11 29 MON 7 00PM 11 29MON 7 00PM 2ch SP 1h00m 1 0G 12 3 FRI 11 00PM 12 3FRI 11 00PM 4ch SP 2h00m 1 0G 4 Titles Sort order Recent Firs...

Страница 60: ...ning DVDs Analog and digital sound is output when scanning DVDs with Dolby Digital or Linear PCM sound on forward SCAN 1 Linear PCM is output from the optical digital output Except during chase playback and simultaneous recording playback No sound is output when using other scan speeds No sound is output when scanning from the HDD except on forward SCAN 1 Linear PCM is output from the optical digi...

Страница 61: ... menu screen You can also access the Play Mode menu from the Home Menu press HOME MENU 2 Use the and ENTER to navigate To exit the Play Mode menu press HOME MENU or PLAY MODE Search Mode The Search Mode feature lets you start playback from a specified point in a disc by time2 or by title chapter folder track number 1 Select Search Mode from the Play Mode menu 2 Select one of the search options Not...

Страница 62: ...ts of the loop must be in the same title 4 To resume normal playback select Off from the A B Repeat menu You can also press CLEAR to cancel A B Repeat play if no menu OSD such as the Play Mode menu is displayed Repeat play There are various repeat play options depending on the kind of disc loaded or if you re using the HDD for playback It s also possible to use repeat play together with program pl...

Страница 63: ... into the program list highlight the step number where you want to insert another step then select a chapter title folder track as usual After pressing ENTER all the subsequent steps move down one To delete a step from the program list highlight the step you want to delete then press CLEAR 4 Repeat step 3 to build up a program list A program list can contain up to 24 titles chapters folders tracks...

Страница 64: ...isc packaging for details of the subtitle options 1 Press SUBTITLE repeatedly to select a subtitle option The current subtitle language is shown on screen and in the front panel display 2 To switch off subtitles press SUBTITLE then CLEAR Switching DVD soundtracks When playing a DVD disc recorded with two or more soundtracks often in different languages you can switch the soundtrack during playback...

Страница 65: ...s playing the same icon appears on screen to let you know that other angles are available this can be switched off if you prefer see Angle Indicator on page 96 To switch the camera angle press ANGLE The angle number is displayed on screen If the disc was paused playback starts again with the new angle Repeat play is canceled if you change the angle while repeat playback is active You can also chan...

Страница 66: ...ith CPRM Ver 1 1 or higher see CPRM on page 50 for more on this Only one instance of a copy once protected title can be added to the Copy List and after it s been copied the title is erased from the HDD it is therefore not possible to copy a locked title that is copy once protected You can identify copy once protected material during playback by displaying disc information on screen If the current...

Страница 67: ...ease use a VR mode disc XP titles cannot be copied to DVD at high speed Copying to the HDD The maximum title length for copying is 12 hours Title name and chapter markers are also copied except when copying from a finalized Video mode disc Thumbnail picture markers and chapter markers for the Disc Navigator are copied but their position in the copy may be slightly changed from the original If some...

Страница 68: ...ppy List Copy Select Recording Format Please select the recording format for the disc HDD DVD VR Mode Video Mode High compatibility mode Must be final ized for playback on other equipment Copying of bilingual broadcasts and copy once protected material is possible Note 1 Widescreen titles recorded at low resolution SEP through LP MN1 15 Video Mode Off or MN1 11 Video Mode On LP MN9 15 recordings w...

Страница 69: ...rding quality see Recording Mode on page 73 Select Input Disc Name if you want to change the disc name Input a name of up to 64 characters for a VR mode disc or 40 characters for a Video mode disc The input method is similar to that of naming titles see Title Name on page 70 Select Finalize if you want to automatically finalize a Video mode DVD after copying 1 Select a title menu style from the fo...

Страница 70: ...rder of titles in the Copy List see page 71 Preview Check the content of a title in the Copy List see page 72 Cancel Exit the Copy List screen without saving any changes Repeat this step for as many titles you have that need editing 8 Press to display the command menu panel 9 Select Next to proceed to the Start Copy screen Select Recording Mode if you want to change the recording quality see Recor...

Страница 71: ... about these options see Editing accuracy on page 77 4 Highlight From then use the playback controls etc to find the start of the section to erase then press ENTER The bar at the bottom of the screen indicates the current play position in the title After pressing ENTER a marker shows the start of the section 5 Highlight To then in the same way find the end of the section to erase then press ENTER ...

Страница 72: ...ove The next title you select will be appended to this one 2 Select Combine from the command menu panel 3 Select the title you want to append to the first then press ENTER This title will effectively move to be added to the end of the first title In the example belowe title 3 will be appended to title 1 4 Select Yes to confirm or No to cancel then press ENTER Chapter Edit The Chapter Edit option g...

Страница 73: ...lect Exit to return to the Copy List screen Recording Mode 1 Select Recording Mode from the command menu panel 2 Use the buttons to select a recording mode for the copy High Speed Copy1 The Copy List is copied at the same recording quality as the original XP SP LP EP SLP SEP MN2 The Copy List is copied at the specified recording quality in real time Note that if you copy at a higher quality settin...

Страница 74: ... the disc tray and load the disc you want to make a back up of then close the disc tray You can only make back up copies of finalized Video mode discs 4 Select Start To see the progress of the back up press DISPLAY You can cancel the back up process by pressing ONE TOUCH COPY for more than one second 5 When the data has been copied press OPEN CLOSE to open the disc tray Take out the disc and load ...

Страница 75: ... make another back up copy or Cancel to finish If you want to make another back up copy return to step 6 above 8 If you don t need to keep the back up data on the HDD you can delete it now Select Yes to delete the data from the HDD select No to keep it you can delete it later if you want to If you decide to leave the back up data on the HDD you can make back up copies to recordable DVD discs anyti...

Страница 76: ... options then Play List You can switch between the HDD and the DVD Disc Navigator screens using the HDD and DVD buttons front panel or remote Titles on the HDD marked with a icon are recently recorded titles that haven t yet been played 3 To exit the Disc Navigator press HOME MENU Note 1 It isn t possible to edit video on DVD RAM discs using this recorder DVD RECORDER RETURN DISC NAVIGATOR HOME ME...

Страница 77: ...you choose will only be accurate to within 0 5 1 second On the other hand these edit points will be preserved if you use high speed copy to make a Video mode DVD HDD genres The large capacity of the HDD means that there may be many hours of video in the recorder To help you organize your HDD video content you can assign different genres to titles There are five genres set initially to FREE1 5 that...

Страница 78: ...erase a title quickly by pressing CLEAR when the title is highlighted Confirm the edit by pressing ENTER Title Name You can give titles new names of up to 64 characters long for VR mode and HDD recordings and up to 40 characters for Video mode recordings 1 Highlight the title you want to name or rename 2 Select Edit Title Name from the command menu panel VR mode Disc Navigator DVD 2h00m 1 0G 1h00m...

Страница 79: ...manually between inputting the two characters 1 lower case ÿ upper case ß Set Thumbnail You can change the thumbnail picture that appears in the Disc Navigator for a title to any frame that appears in that title 1 Highlight the title you want to change the thumbnail picture for 2 Select Edit Set Thumbnail from the command menu panel The thumbnail setting screen appears from which you can find the ...

Страница 80: ...TER After pressing ENTER another marker indicates the end of the section with the section itself marked in red 6 Select Yes to confirm or No to cancel then press ENTER In the thumbnail viewer you can see a few seconds of video either side of the marked section to see how the edit will look When editing VR mode Original content you may not be able to erase very short sections less than five seconds...

Страница 81: ... 99 chapters per HDD title Erase1 Move2 Erase or move chapters Select the chapter you want to erase move and press ENTER Select whether you want to erase or move the chapter Move command only Select the destination for the chapter and press ENTER Combine3 Combine two adjacent chapters into one Highlight the bar divider between two adjacent chapters and press ENTER 5 Select Exit to get back to the ...

Страница 82: ...9 MON 7 00PM 11 29Mon 7 00PM 2ch SP 2h00m 1 0G 1 4 Titles Remain HDD SP All Genres 10Titles 30h30m Recent First 9 8 7 12 3 FRI 8 00PM 12 3FRI 8 00PM 9ch SP 2h00m 1 0G 12 2 THU 10 00PM 12 2THU 10 00PM 7ch SP 1h00m 1 0G 11 29 MON 7 00PM 11 29MON 7 00PM 2ch SP 1h00m 1 0G 12 3 FRI 11 00PM 12 3FRI 11 00PM 4ch SP 2h00m 1 0G 10 Play Erase Edit Multi Mode Genre Name Cancel Title name Erase Section Edit Ch...

Страница 83: ...de Cancel Set Thumbnail Move Combine Chapter Edit Disc Navigator DVD 11 29 MON 7 00PM 11 29Mon 7 00PM 2ch SP 2h00m 1 0G 12 2 THU 10 00PM 12 2Thu 10 00PM 7ch SP 2h00m 1 0G 12 3 FRI 8 00PM 12 3Fri 8 00PM 9ch SP 1h00m 1 0G 12 3 FRI 11 00PM 12 3Fri 11 00PM 9ch SP 1h00m 1 0G 1 2 3 4 4 Titles Remain 10Titles 0h30m DVD VR Mode Play List 11 29 MON 7 00PM 11 29Mon 7 00PM 2ch SP 2h00m 1 0G 1 HDD Disc Naviga...

Страница 84: ... reduced on a VR mode DVD R disc editing is no longer possible This is because information about your edits requires a certain amount of disc space As you edit this information builds up eventually preventing you from editing further Disc Navigator HDD 11 29 MON 7 00PM 11 29Mon 7 00PM 2ch SP 2h00m 1 0G 12 2 THU 10 00PM 12 2Thu 10 00PM 7ch SP 2h00m 1 0G 12 3 FRI 8 00PM 12 3Fri 8 00PM 9ch SP 1h00m 1...

Страница 85: ...the and buttons to display the previous next page of thumbnails 5 Press ENTER or PLAY to start playing a slideshow from the selected thumbnail Use the PREV NEXT buttons to display the previous next picture or the PAUSE button to pause the slideshow Depending on the aspect ratio some pictures may be displayed with black bars top and bottom or left and right Large picture files may take a few second...

Страница 86: ...e the area of the picture displayed 1 During a slideshow use the CHANNEL button to zoom the picture Repeated presses cycle between zoom off 2x zoom and 4x zoom The zoom factor is displayed on screen 2 Use the to move the zoomed area within the picture Rotating an image You can rotate the displayed picture during a slideshow so you can always view pictures the right way up whichever way they were t...

Страница 87: ...APS or small to change to upper or lower case or use the CASE SELECTION buttons You can also use the CLEAR button to delete characters directly press and hold for two seconds to delete the whole name For other remote control key shortcuts see Using the remote key shortcuts to input a name on page 79 For discs formatted on a different DVD recorder you will see only a limited character set Lock Disc...

Страница 88: ...isc cannot be recorded Undo the finalization is displayed use this command to be able to record on the disc using this recorder 1 From the Disc Setup menu select Finalize then Undo Finalize from the finalize options 2 Select Start Optimize HDD You ll see a message appear on screen recommending you optimize the HDD As you record erase and edit recordings the HDD file system gradually becomes fragme...

Страница 89: ...P 4 Press ENTER to select the preset Creating your own set There are three user presets in which you can save your own set of picture quality settings 1 Follow Choosing a preset above and select one of the user presets Memory 1 2 or 3 2 Select Detailed Settings 3 Use the buttons to select the picture quality setting you want to adjust You can adjust the following settings 1 Prog Motion Adjusts the...

Страница 90: ...ory2 user preset 2 Memory3 user preset 3 You can press DISPLAY to see the individual settings for the current preset TV CRT PDP or Professional 4 Press ENTER to select the preset Creating your own set There are three user presets in which you can save your own set of picture quality settings for disc playback 1 Follow Choosing a preset above and select one of the user presets Memory 1 2 or 3 2 Mov...

Страница 91: ... to adjust Audio DRC Default setting Off When watching Dolby Digital material at low volume it s easy to lose low level sounds completely including some of the dialog Switching on Audio DRC Dynamic Range Control can help by bringing up the low level sounds while controlling high level peaks 1 During playback or when paused press HOME MENU and select Video Audio Adjust 2 Select Audio Adjust 3 Use t...

Страница 92: ...p screens for GUI displays Off Switches off the automatic Help screens for GUI displays Press HELP on the remote to manually display the Help screen Setup Navigator Start Select to start the Setup Navigator See also Switching on and setting up on page 25 Tuner Settings Auto Channel Setting Antenna Select if you receive channels from an antenna It takes a few moments for the auto tuning to complete...

Страница 93: ...ect one of the three settings to use a mix of the two stereo audio tracks Input Level L1 L3 6dB 6dB default 0 dB Adjust the input level separately for each of the external inputs from 6dB to 6dB in steps of 3dB Audio Out Settings Digital Out On Activates the digital audio output Off Deactivates the digital audio output When set to Off all the following Audio Out settings are grayed out Dolby Digit...

Страница 94: ...e On On this setting DVD Video discs whose main audio track is in your default language will play using that language without subtitles Discs whose main audio track is not in your default language but that have a subtitle track in your default language will play the original audio track with subtitles Off Select to play DVD Video discs according to your audio and subtitle language preferences For ...

Страница 95: ...ed every 10 minutes 15 minutes Chapter markers are inserted every 15 minutes DVD RW Auto Init VR Mode Blank DVD RW discs are initialized for VR mode recording when loaded into the recorder for the first time Video Mode Blank DVD RW discs are initialized for Video mode recording HDD Recording Format Video Mode Off Recordings made to the HDD are made in VR mode Use this setting if you don t need to ...

Страница 96: ... your password and then set a country area code Only certain discs have parental lock and country code features Check the disc packaging to see what features the disc has If you forget your password you can reset it by resetting the recorder to its factory settings See Resetting the recorder on page 98 Angle Indicator On A camera icon appears on screen during multi angle scenes on a DVD Video disc...

Страница 97: ...h definition television sets are fully compatible with this product and may cause artifacts to be displayed in the picture In case of 525 progressive scan picture problems it is recommended that the user switch the connection to the standard definition output Interlace If there are questions regarding our TV set compatibility with this model please contact our customer service center This recorder...

Страница 98: ...rst one in the list If the maker s name of your TV doesn t appear in the table below you will not be able to use this remote to control your TV 2 Press TV to check that the remote works with your TV If the remote is set up correctly the TV should switch on off If it doesn t and there is another code given for your maker repeat step 1 with a new code Using the TV remote control buttons The table be...

Страница 99: ...f the program are cropped so that the picture fills the whole screen 4 3 16 9 The program appears squashed Set to either 4 3 Letter Box or 4 3 Pan Scan 4 3 Letter Box 4 3 Pan Scan The program is presented correctly on either setting When viewing on a widescreen TV or monitor Screen format of disc Setting Appearance 16 9 16 9 The program is presented in widescreen 4 3 16 9 Your TV will determine ho...

Страница 100: ... with this recorder 1 Compatible with 12x speed recording 2 Compatible with 6x speed recording Note 1 There may be cases where even 2x 4x 6x 8x 16x compatible discs do not copy at full speed High speed copying is not possible when using discs initialized on another recorder DVD disc type Rec mode DVD RW Ver 1 0 1 1 1 DVD R Ver 2 0 DVD RW Ver 1 1 2x 2 DVD R Ver 2 0 4x 3 DVD RW Ver 1 2 4x 3 DVD RW V...

Страница 101: ...t to interlace by pressing and holding the STOP button front panel then pressing PLAY The recorder may be set to progresive scan with an incompatible TV Reset to interlace by pressing and holding the front panel STOP button then pressing PLAY Can t play a disc Check that the disc is not a DVD R RW DVD RAM dual disc DVD CD hybrid disc or other incompatible format disc page 10 Take out the disc and ...

Страница 102: ...ot play recordable DVD discs even when recorded in Video mode and finalized If the disc was recorded in VR mode the other player must be specifically RW compatible in order to play it page 10 Discs recorded with copy once material cannot be played on non CPRM compatible players page 50 During playback the picture is dark or distorted When a copy protected disc is played via a VCR the picture will ...

Страница 103: ... and switch them on playback Yes When HDD Recording Format is set to Video Mode Off see HDD Recording Format on page 95 and SAP is selected as the broadcast audio channel both channels of the broadcast are recorded unless you set the recording mode to LPCM in which case only the channel set using the Dual Mono Recording setting will be recorded see Using the built in TV tuner on page 28 After brie...

Страница 104: ...o control the connected camcorder via the DV IN jack Digital camcorders can usually record audio as stereo 16 bit 48kHz or twin stereo tracks of 12 bit 32kHz This recorder can only record one stereo audio track Set the DV Input setting as required see DV Input on page 93 Audio input to the DV IN jack should be 32 or 48kHz not 44 1kHz Picture disturbance in the recording may occur if the source com...

Страница 105: ...ns MN 1 802 mins 352 x 240 MN 2 720 mins MN 2 720 mins MN 3 600 mins SEP MN 3 600 mins MN 4 480 mins SLP MN 4 480 mins MN 5 420 mins MN 5 420 mins MN 6 360 mins EP MN 6 360 mins 352 x 480 MN 7 300 mins MN 7 300 mins 352 x 480 MN 8 270 mins MN 8 270 mins 480 x 480 MN 9 240 mins LP MN 9 240 mins MN 10 230 mins MN 10 230 mins MN 11 220 mins MN 11 220 mins 544 x 480 MN 12 210 mins MN 12 210 mins 720 x...

Страница 106: ...hatever the STB is tuned to 3 Program the IR controller supplied with your STB to send start stop recording codes for a Pioneer VCR See the manual that came with the STB for how to do this Only the REC and STOP codes have any effect when used with this recorder REC Start recording STOP Stop recording 4 Position the IR controller so that it will control this recorder The IR sensor on the recorder i...

Страница 107: ...y mg 1307 Maori mi 1309 Macedonian mk 1311 Malayalam ml 1312 Mongolian mn 1314 Moldavian mo 1315 Marathi mr 1318 Malay ms 1319 Maltese mt 1320 Burmese my 1325 Nauru na 1401 Nepali ne 1405 Norwegian no 1415 Occitan oc 1503 Oromo om 1513 Oriya or 1518 Panjabi pa 1601 Polish pl 1612 Pashto Pushto ps 1619 Quechua qu 1721 Rhaeto Romance rm 1813 Kirundi rn 1814 Romanian ro 1815 Kinyarwanda rw 1823 Sansk...

Страница 108: ...oneer Service Center Incompatible or unreadable disc The disc loaded is a DVD R RW DVD RAM or some other incompatible disc type This display may also appear if the disc is dirty or damaged Cannot record to a disc that is not CPRM com patible Cannot record this content using Video mode recording The video source is copy once protected Use a VR mode DVD R RW disc with CPRM for recording This content...

Страница 109: ...e the recorder If you can see that a disc is cracked chipped warped or otherwise damaged don t risk using it you could end up damaging the recorder This recorder is designed for use with conventional fully circular discs only Use of shaped discs is not recommended for this product Pioneer disclaims all liability arising in connection with the use of shaped discs Cleaning the pickup lens The DVD re...

Страница 110: ...east two minutes Lastly disconnect the power cord Never lift or move the unit during playback or recording discs rotate at a high speed and may be damaged Glossary Analog audio An electrical signal that directly represents sound Compare this to digital audio which can be an electrical signal but is an indirect representation of sound See also Digital audio Aspect ratio The width of a TV screen rel...

Страница 111: ...Ds and some DVD discs This unit can convert MPEG audio to PCM format for wider compatibility with digital recorders and AV amp receivers See also PCM MPEG video The video format used for Video CDs and DVDs Video CD uses the older MPEG 1 standard while DVD uses the newer and much better quality MPEG 2 standard Optical digital output A jack that outputs digital audio in the form of light pulses Conn...

Страница 112: ...s or registered trademarks of Microsoft Corporation in the United States and or other countries Specifications General System HDD DVD Video DVD R RW Video CD CD CD R RW WMA MP3 JPEG CD DA Power requirements 120 V 60 Hz Power consumption DVR 531H S 43 W DVR 532H S 43 W DVR 533H S 43 W DVR 633H S 46 W Power consumption in standby mode 0 42 W Front panel display off Weight 4 1 kg 9 lb 1 oz Dimensions...

Страница 113: ... Vp p 75 Ω C color Input level 286 mVp p 75 Ω Jacks 4 pin mini DIN S Video output Output 1 2 Y luminance Output level 1 Vp p 75 Ω C color Output level 286 mVp p 75 Ω Jacks 4 pin mini DIN Component video output Output level Y 1 0 Vp p 75 Ω PB PR 0 7 Vp p 75 Ω Jacks RCA jacks Audio input Input 1 3 rear 2 front L R Input level During audio input 2V rms Input impedance more than 22 kΩ Jacks RCA jacks ...

Страница 114: ...th 31 explained 111 output setting 93 DV camcorder connecting 14 20 error messages 104 recording from 53 setting the audio track to record 93 DVD activity display 32 aspect ratios 95 99 backing up 74 compatibility 10 49 100 DVD R vs DVD RW 11 12 49 100 finalizing 12 55 88 initializing 49 88 playback controls for 30 57 65 selecting for playback recording 27 Video mode vs VR mode 11 12 49 77 88 95 E...

Страница 115: ... channels with SAP audio channels 52 TV programs 27 37 51 Video mode vs VR mode 49 Remote control buttons explained 22 23 changing the batteries 10 operating range 10 setting the remote ID 96 setting up for TV control 98 S Subtitles setting preferences for 94 switching during playback 64 T Title defined 112 maximum number recordable 49 maximum recordable length 49 thumbnails 79 95 TV channels auto...

Страница 116: ...ADA INC 300 Allstate Parkway Markham Ontario L3R OP2 Canada TEL 1 877 283 5901 PIONEER EUROPE NV Haven 1087 Keetberglaan 1 B 9120 Melsele Belgium TEL 03 570 05 11 PIONEER ELECTRONICS ASIACENTRE PTE LTD 253 Alexandra Road 04 01 Singapore 159936 TEL 65 6472 7555 PIONEER ELECTRONICS AUSTRALIA PTY LTD 178 184 Boundary Road Braeside Victoria 3195 Australia TEL 03 9586 6300 PIONEER ELECTRONICS DE MEXICO...

Отзывы: