background image

2

Important

READ INSTRUCTIONS —

 All the safety and operating

instructions should be read before the product is
operated.

RETAIN INSTRUCTIONS — 

The safety and operating

instructions should be retained for future reference.

HEED WARNINGS

 — All warnings on the product and

in the operating instructions should be adhered to.

FOLLOW INSTRUCTIONS —

 All operating and use

instructions should be followed.

CLEANING —

 Unplug this product from the wall outlet

before cleaning. The product should be cleaned only
with a polishing cloth or a soft dry cloth. Never clean
with furniture wax, benzine, insecticides or other
volatile liquids since they may corrode the cabinet.

ATTACHMENTS —

 Do not use attachments not

recommended by the product manufacturer as they
may cause hazards.

WATER AND MOISTURE —

 Do not use this product

near water — for example, near a bathtub, wash
bowl, kitchen sink, or laundry tub; in a wet basement;
or near a swimming pool; and the like.

ACCESSORIES —

 Do not place this product on an

unstable cart, stand, tripod, bracket, or table. The
product may fall, causing serious injury to a child or
adult, and serious damage to the product. Use only
with a cart, stand, tripod, bracket, or table
recommended by the manufacturer, or sold with
the product. Any mounting of the product should
follow the manufacturer’s instructions, and should
use a mounting accessory recommended by the
manufacturer.

CART —

 A product and cart combination should be

moved with care. Quick stops, excessive force, and
uneven surfaces may cause the product and cart
combination to overturn.

GROUNDING OR POLARIZATION

÷

If this product is equipped with a polarized alternating
current line plug (a plug having one blade wider than
the other), it will fit into the outlet only one way. This
is a safety feature. If you are unable to insert the plug
fully into the outlet, try reversing the plug. If the plug
should still fail to fit, contact your electrician to
replace your obsolete outlet. Do not defeat the
safety purpose of the polarized plug.

÷

If this product is equipped with a three-wire
grounding type plug, a plug having a third (grounding)
pin, it will only fit into a grounding type power outlet.
This is a safety feature. If you are unable to insert the
plug into the outlet, contact your electrician to
replace your obsolete outlet. Do not defeat the
safety purpose of the grounding type plug.

POWER-CORD PROTECTION —

 Power-supply cords

should be routed so that they are not likely to be
walked on or pinched by items placed upon or
against them, paying particular attention to cords at
plugs, convenience receptacles, and the point where
they exit from the product.

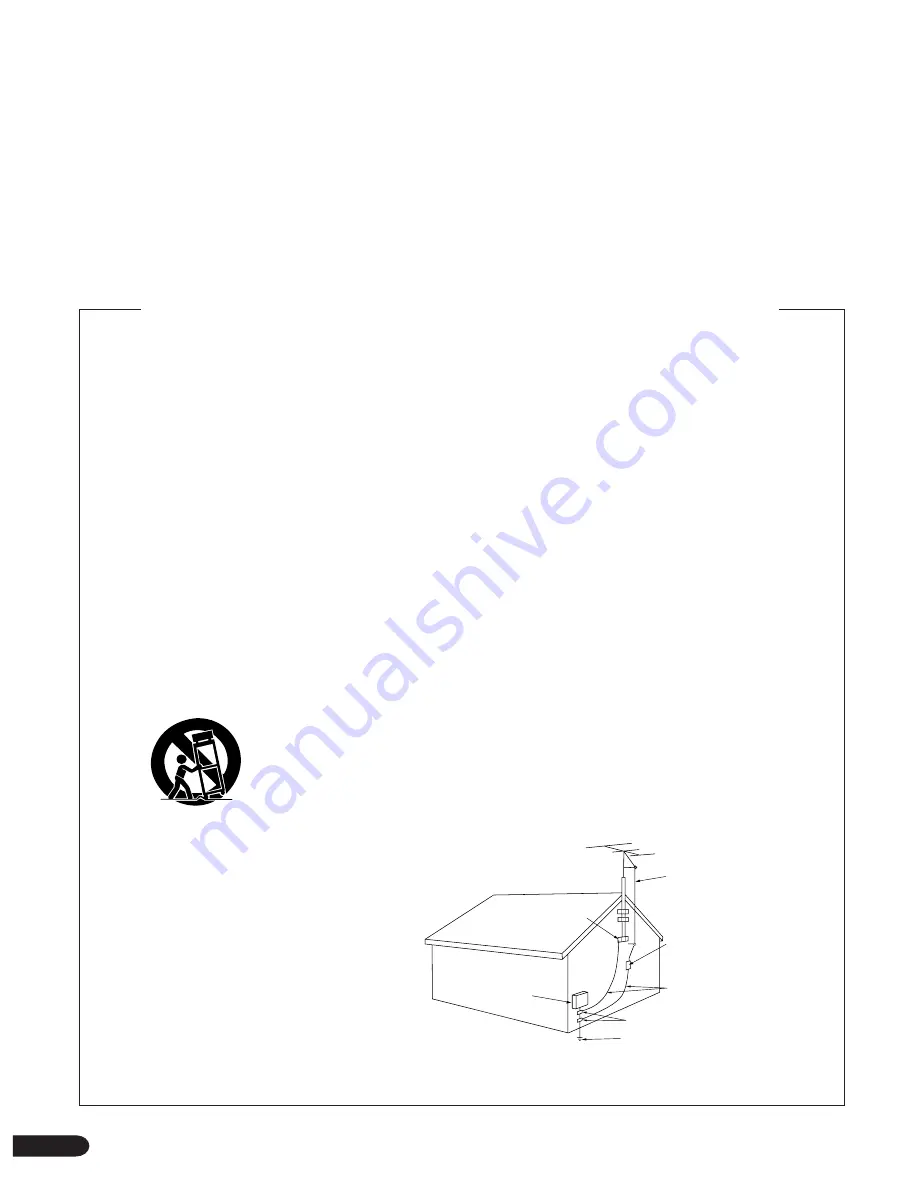
OUTDOOR ANTENNA GROUNDING —

 If an outside

antenna or cable system is connected to the product,
be sure the antenna or cable system is grounded so
as to provide some protection against voltage surges
and built-up static charges. Article 810 of the National
Electrical Code, ANSI/NFPA 70, provides information
with regard to proper grounding of the mast and
supporting structure, grounding of the lead-in wire
to an antenna discharge unit, size of grounding
conductors, location of antenna-discharge unit,
connection to grounding electrodes, and
requirements for the grounding electrode. See Figure
A.

LIGHTNING —

 For added protection for this product

during a lightning storm, or when it is left unattended
and unused for long periods of time, unplug it from
the wall outlet and disconnect the antenna or cable
system. This will prevent damage to the product
due to lightning and power-line surges.

POWER LINES —

 An outside antenna system should

not be located in the vicinity of overhead power lines
or other electric light or power circuits, or where it
can fall into such power lines or circuits. When
installing an outside antenna system, extreme care
should be taken to keep from touching such power
lines or circuits as contact with them might be fatal.

OVERLOADING —

 Do not overload wall outlets,

extension cords, or integral convenience receptacles
as this can result in a risk of fire or electric shock.

OBJECT AND LIQUID ENTRY —

 Never push objects of

any kind into this product through openings as they
may touch dangerous voltage points or short-out
parts that could result in a fire or electric shock.
Never spill liquid of any kind on the product.

SERVICING — 

Do not attempt to service this product

yourself as opening or removing covers may expose
you to dangerous voltage or other hazards. Refer all
servicing to qualified service personnel.

DAMAGE REQUIRING SERVICE — 

Unplug this product

from the wall outlet and refer servicing to qualified
service personnel under the following conditions:

÷

When the power-supply cord or plug is damaged.

÷

If liquid has been spilled, or objects have fallen into
the product.

÷

If the product has been exposed to rain or water.

÷

If the product does not operate normally by following
the operating instructions. Adjust only those controls
that are covered by the operating instructions as an
improper adjustment of other controls may result in
damage and will often require extensive work by a
qualified technician to restore the product to its
normal operation.

÷

If the product has been dropped or damaged in any
way.

÷

When the product exhibits a distinct change in
performance — this indicates a need for service.

REPLACEMENT PARTS —

 When replacement parts

are required, be sure the service technician has used
replacement parts specified by the manufacturer or
have the same characteristics as the original part.
Unauthorized substitutions may result in fire, electric
shock, or other hazards.

SAFETY CHECK —

 Upon completion of any service or

repairs to this product, ask the service technician to
perform safety checks to determine that the product
is in proper operating condition.

WALL OR CEILING MOUNTING —

 The product should

not be mounted to a wall or ceiling.

HEAT — 

The product should be situated away from heat

sources such as radiators, heat registers, stoves, or
other products (including amplifiers) that produce
heat.

IMPORTANT SAFETY INSTRUCTIONS

GROUND
CLAMP

ANTENNA
DISCHARGE UNIT
(NEC SECTION 810-20)

GROUNDING CONDUCTORS
(NEC SECTION 810-21)

GROUND CLAMPS

POWER SERVICE GROUNDING
ELECTRODE SYSTEM
(NEC ART 250, PART H)

ELECTRIC
SERVICE
EQUIPMENT

Fig. A

ANTENNA
LEAD IN
WIRE

NEC — NATIONAL ELECTRICAL CODE

VENTILATION —

 Slots and openings in the cabinet are

provided for ventilation and to ensure reliable
operation of the product and to protect it from
overheating, and these openings must not be
blocked or covered. The openings should never be
blocked by placing the product on a bed, sofa, rug,
or other similar surface. This product should not be
placed in a built-in installation such as a bookcase or
rack unless proper ventilation is provided or the
manufacturer’s instructions have been adhered to.

POWER SOURCES — 

This product should be operated

only from the type of power source indicated on the
marking label. If you are not sure of the type of
power supply to your home, consult your product
dealer or local power company.

LOCATION

 – The appliance should be installed in a

stable location.

NONUSE PERIODS

 – The power cord of the appliance

should be unplugged from the outlet when left un-
used for a long period of time.

Thank you for buying this Pioneer product.
Please read through these operating instructions so you will
know how to operate your model properly. After you have
finished reading the instructions, put them away in a safe
place for future reference.

This player is not suitable for commercial use.

Содержание DVL-V888

Страница 1: ... FUNCTION DVD FUNCTION LOW HIGH KEY CONTROL MIC 2 MIC 1 MIC 2 MIC 1 MIC CONTROL MAX MIN MAX MIN ECHO MAX MIN GUIDE VOCAL MAX MIN STANDBY ON Operating Instructions Mode d emploi DVD LD PLAYER Lecteur de DVD LD DVL V888 First refer to Before using on page 8 and Connecting the Player on pages 66 68 Refer to pages 12 17 for basic playback Refer to pages 28 29 for Karaoke functions Refer pages 6 7 for ...

Страница 2: ...an fall into such power lines or circuits When installing an outside antenna system extreme care should be taken to keep from touching such power lines or circuits as contact with them might be fatal OVERLOADING Do not overload wall outlets extensioncords orintegralconveniencereceptacles as this can result in a risk of fire or electric shock OBJECT AND LIQUID ENTRY Never push objects of any kind i...

Страница 3: ...IE DE COURANT SAUF SI LES LAMES PEUVENT ETRE INSEREES A FOND SANS EN LAISSER AUCUNE PARTIE A DECOUVERT L INTERRUPTEUR D ALIMENTATION EST RACCORDE SECONDAIREMENT ET PAR CONSEQUENT NE SEPARE PAS L APPAREIL DE L ALIMENTATION SECTEUR SUR LA POSITION D ATTENTE WARNING TO PREVENT FIRE OR SHOCK HAZARD DO NOT EXPOSE THIS APPLIANCE TO RAIN OR MOISTURE IMPORTANT NOTICE For U S and Canadian models The serial...

Страница 4: ...establish a safe level Start your volume control at a low setting Slowly increase the sound until you can hear it comfortably and clearly and without distortion Once you have established a comfortable sound level Set the dial and leave it there Taking a minute to do this now will help to prevent hearing damage or loss in the future After all we want you listening for a lifetime We Want You LISTENI...

Страница 5: ...nd Letter Box display formats PBC Video CD Compatibility Ready to play Video CDs Version 2 0 with PBC Play Back Control Two types of playback are possible depending on the disc Power On Demo Display Switching ON the Power On Display provides a wide range of indications To switch to power ON demo display press the power switch while pressing the HI LITE MEDLAY button Press any button to cancel the ...

Страница 6: ... Track 22 Repeat Play 24 Still Frame 25 Karaoke Operation 27 39 Karaoke Entertainment 28 SINGLE PLAY 29 Creating Singing Venue Atmosphere 29 Karaoke with connected extarnal components 29 Adjusting to Create the Desired Sound 30 Echo adjustment 30 Changing performance key 30 Operation is possible with the mic 30 Convinient Function for Practicing Karaoke 31 Guide Vocal 31 DUET MODE CHORUS MODE 32 V...

Страница 7: ...red Camera Angle Multi Angle 50 Viewing Information 51 Quick LD Side Changing Quick Turn 52 Outline of GUI Graphical User Interface Operation 53 Changing Various Settings 60 Setting the Basic Language and Subtitle Language 62 Set Up 65 72 Connecting the Player Connection example 1 To a TV with video input When connecting a cassette deck or other component to the external input 66 Connection exampl...

Страница 8: ...e control for a long period of time over 1 month remove the batteries to avoid possible damage from battery corrosion If battery leakage occurs wipe the battery liquid from the battery compartment then insert new batteries Notes Checking accessories Inserting batteries into the remote control LA S E R D B C M E N U E N T E R A B A B O P E N C L O S E P O W E R A U D IO S U B T IT L E A N G L E D I...

Страница 9: ...rroundings into a warm room or if the temperature of the room rises suddenly When this happens the player s performance will be impaired To prevent this let the player stand in its new surroundings for about an hour before switching it on or make sure that the room temperature rises gradually Condensation may also form during the summer if the player is exposed to the breeze from an air conditione...

Страница 10: ...tes VIDEO CD single Digital audio Digital video MPEG 1 Max 20 minutes VIDEO CD 8 cm 3 in single sided Max 74 minutes Max 20 minutes 12 cm 5 in single sided 8 cm 3 in single sided CD single CD Digital audio max 20 min Audio part Digital audio video max 5 min Video part 12 cm 5 in single sided CDV CDV 12 cm 5 in single sided Digital audio video max 5 min Video part In these operating instructions th...

Страница 11: ...ing DVDs CDs and Video CDs with No PBC 13 Playing Video CDs with PBC 14 Chapter Track Skip Forward Skip Back 16 Stopping Playback Switching Power OFF 17 Continuing Playback from where you Stopped 18 Operating Instructions Basic Operation 11 Karaoke Operation Detailed Operation Setting Set Up Other Information Basic Operation ...

Страница 12: ...0 button The disc table comes out Load a disc Load a single sided disc with the label facing up or load a double sided disc with the label for the desired side facing up using the disc table guide to align the disc Press the PLAY 3 button Playback starts When the A side of a dou ble sided disc has fin ished playing playback of the B side automatically starts 5 STOP PAUSE PLAY Tips Each time you pr...

Страница 13: ...en power is switched OFF to eject the disc table press the OPEN CLOSE button 0 on the front panel Power is automatically switched ON for you and the disc table comes out If you switch power OFF when a disc is loaded just pressing the PLAY 3 button on the front panel or the PLAY 3 button on the remote control automatically switches power ON and starts play of the loaded disc Tips DVDs that do not h...

Страница 14: ... kind of disc Version 1 1 does not feature a re corded PBC signal Video CD with no PBC Version 1 1 Video CD with PBC Version 2 0 Menu display This product enables PBC play using the number ENTER Next Previous 4 and RETURN buttons All operations are possible by remote control Video and audio play is possible with same operations as a CD Using on screen menus enables easy play of interactive softwar...

Страница 15: ...are pressed Example of operation of a disc with PBC Playback Control RETURN Menu operation A Press the RETURN button to move back to the previous menu Each time you press the button you move back a menu If you repeat pressing the button you will eventually return to the first menu B Press the button to move to the next menu or the 4 button to move to the previous menu C Press the PAUSE button to p...

Страница 16: ...once to skip back to the start of the chapter track currently playing Press again to skip back to the start of the previous chapter track Fast forward to a desired location Press the FWD button Fast return to a desired location Press the REV 1 button REV LD G CD G LaserDisk PREV REV NEXT FWD Title 1 Chapter 2 Chapter 1 Chapter 2 Chapter 1 Title 2 2 3 NEXT PREV 2 3 3 NEXT 2 PREV PREV NEXT 2 Chapter...

Страница 17: ...US HI LITE MEDLEY GUIDE MELODY OPEN CLOSE STOP PLAY PAUSE CD VIDEO CD VOCAL PARTNER SCORING SYSTEM ONE TOUCH KARAOKE GUIDE VOCAL VIDEO CD FUNCTION DVD FUNCTION LOW HIGH KEY CONTROL MIC 2 MIC 1 MIC 2 MIC 1 MIC CONTROL MAX MIN MAX MIN ECHO MAX MIN GUIDE VOCAL MAX MIN STANDBY ON STANDBY indicator PAUSE button LASER DBC MENU ENTER A B A B OPEN CLOSE POWER AUDIO SUBTITLE ANGLE DISPLAY RETURN LAST MEMOR...

Страница 18: ...LAY CONDITION KEY CONTROL PROGRAM MODE PAUSE CHP TIME GUIDE VOCAL MELODY VOCAL PARTNER REPEAT REPEAT STOP NEXT PLAYBACK CONTROL DISC SIDE POWER STOP LAST MEMORY Notes If there is a power outage or you disconnect the power cord while the player is operating LAST MEMORY settings cannot be memo rized Resuming play is not possible with CDs During Video CD PBC play P 14 LAST MEMORY play may not be poss...

Страница 19: ...peration Playback by Menu Selection 20 Playing Back CD Graphics 21 Searching for a Desired Video Scene Audio Track Search 22 Repeat Play 24 Still Frame 25 Detailed Operation Detailed Operation 19 Karaoke Operation Detailed Operation Setting Set Up Other Information Basic Operation ...

Страница 20: ...on You can play Video CDs without using menu displays Press the PLAYBACK CONTROL button on the main unit or remote control to switch PBC OFF Depending on the title you can also make a selection using a menu To do this press the MENU button when indications are displayed to call up a menu and select the desired title Press RETURN Pressing the RETURN button during the PBC play shows the menu Press T...

Страница 21: ...nd their display CD graphics discs bear the GRAPHICS mark You can enjoy graph ics when playing discs bearing this mark Notes There should be graphics but If you play CD graphics discs with the graphics mode switched ON and still no graphics are displayed the problem could be due to inappropriate graphics channel setting or because the graphics display is in the wrong position on the screen Refer t...

Страница 22: ...ons When selecting title number 5 press When selecting title number 10 press Press PLAY Playback of the selected title starts 3 3 Search with Menu Press TITLE Operates during play only Press MENU Title menu is displayed May not be displayed with some discs Select a title number using buttons You can also make a direct selection using the number buttons Your selected title soon starts playing Press...

Страница 23: ...wing on screen indications With certain titles there may be no menu display In this case perform the operations described at left STOP MAIN MANU MENU CHAPTER TITLE 1 ENTER EXIT ENTER CHAPTER 0 1 3 RETURN 3 Time Number Search Frame Number Search Press CHP TIME twice With DVDs or LDs that have no chapters time is displayed after pressing the button once Select the desired time number frame number wi...

Страница 24: ...ice during playback of the title you want to repeat With DVDs the title continues playing until the end and then playback starts once more from the beginning of that title With DVDs Repeat play within the same title is possible With CDs and Video CDs the entire disc is repeated With LDs a single side is repeated Repeat play of double sided LDs Press REPEAT three times Both sides are repeated start...

Страница 25: ...PLAYBACK CONTROL DISC SIDE Tip With LDs this operates only with CAV discs Still Frame Still Frame There is no sound when viewing still frames Pause may not be possible with certain discs In this case the mark is displayed With LDs play automatically stops if still frame display continues for 20 minutes Notes PLAY 3 button PAUSE 8 button Viewing a still frame Press PAUSE Press the PAUSE 8 button on...

Страница 26: ...26 26 ...

Страница 27: ...formance key 30 Operation is possible with the mic 30 Convinient Function for Practicing Karaoke 31 Guide Vocal 31 DUET MODE CHORUS MODE 32 VOCAL PARTNER ONE TOUCH KARAOKE 33 SCORING Grades Your Singing Ability 34 Simultaneous Scoring for Two Singers COMPETITION 36 Consecutive Play of Song Highlights HI LITE MEDLEY 37 Reserving a Desired Song 38 One Verse Chorus Play Only One Chorus 39 Sing with P...

Страница 28: ...u can press the OPEN CLOSE button on the remote control to eject open the LD disc table Let s sing Press the POWER button The KARAOKE MODE button lights and the mode becomes KARAOKE Press the KARAOKE MODE button to switch the KARAOKE MODE ON Each time you press the button the setting changes as fol lows When the KARAOKE MODE button lights skip this step Set Mic 1 and Mic 2 volume level knobs to Lo...

Страница 29: ...n the externally connected component Adjust Mic 1 and Mic 2 volume levels to assure there s no howling Let s sing Turn the Mic volume level knob to adjust volume level Adjust overall volume level with the TV or amp Let s sing MAX MIN MAX MIN MIC 1 MIC 2 During PBC play of Video CD with PBC see page 14 after per forming steps through press the Play 3 button and then perform step Note Tips Howling I...

Страница 30: ...ce key Press a KEY CONTROL button Low The key is lowered High The key is raised When you play song to the end or if you press the STOP 7 button during play the key returns to the standard setting However with certain discs this may not happen When displaying a DVD disc menu ECHO MAX MIN Tip Operation is possible with the mic You can operate Key control and Once more You can perform these operation...

Страница 31: ...is output through the right speaker Guide vocal is not output Guide vocal volume adjustment is not possible even when the GUIDE VOCAL indicator is lit If this happens press the GUIDE VOCAL button once more You will then be able to use the GUIDE VOCAL volume level knob Pressing the GUIDE VOCAL button has no effect if the disc you are playing does not have a guide vocal recorded on it it must a mult...

Страница 32: ...el If the disc provides only Guide vocal 1 or 2 switching is between ON and OFF Some discs have Guide vocal 1 and Guide vocal 2 recorded on them The selected vocal changes each time you press the button as follows Duets DUET MODE Enjoy duets with songs on DVD discs bearing the mark Ex With discs on which Guide vocal 1 is male vocal and Guide vocal 2 is fe male vocal you can enjoy duet with male vo...

Страница 33: ...th only multiplex CDs CD Gs Video CDs and externally input tapes With DVDs and LDs Press the ONE TOUCH KARAOKE button To switch OFF continue pressing the button until the indica tor goes out With Video CDs CD Gs CDs and externally input tapes Press the ONE TOUCH KARAOKE button Each time you press the button the mode changes as fol lows To switch OFF continue pressing the button until the indica to...

Страница 34: ...CORING are displayed on the TV screen With LDs and CD Gs the karaoke bird characters score and other indications are displayed in black and white PICK A KARAOKE SONG SCORING HI SCORE 100 SCORING SYSTEM 3 LD G CD G LaserDisk LASER DBC A B A B STANDBY POWER KARAOKE MODE SINGLE PLAY DISC SIDE V NR PBC ONE CHORUS HI LITE MEDLEY GUIDE MELODY OPEN CLOSE STOP PLAY PAUSE CD VIDEO CD VOCAL PARTNER SCORING ...

Страница 35: ...n indications may overlap depending on the disc With LDs and CD Gs the karaoke bird char acters score and other indications are displayed in black and white If you are using a projection TV avoid using SCORING and COMPE TITION for extended periods of time This may lead to vacuum tube burn in With SCORING and COMPETITION you cannot use the surround function SCORING SCORING COMPETITION OFF Tips Note...

Страница 36: ...n LDs only Let s have a singing competition Play starts COMPETITION begins After you have been singing for a minute or so playback indications the karaoke bird characters and scores are displayed on the TV screen Scores start from 5 000 with 100 points added or subtracted at a time With LDs and CD Gs the karaoke bird characters scores and other indications are displayed in black and white Press th...

Страница 37: ...esired song from the beginning During HI LITE MEDLEY play if you press the PLAY 3button the currently playing song starts playing again from the be ginning and HI LITE MEDLEY play is canceled LD G CD G LaserDisk LASER DBC A B A B STANDBY POWER KARAOKE MODE SINGLE PLAY DISC SIDE V NR PBC ONE CHORUS HI LITE MEDLEY GUIDE MELODY OPEN CLOSE STOP PLAY PAUSE CD VIDEO CD VOCAL PARTNER SCORING SYSTEM ONE T...

Страница 38: ...evious reserved song Instead you return to the start of the currently playing song Adjust Mic 1 and 2 volume level Let s sing To stop playback Press the STOP 7 button To confirm reservation details Press the DISPLAY button Press the button once more and the display is switched OFF LASER DBC MENU ENTER A B A B OPEN CLOSE POWER AUDIO SUBTITLE ANGLE DISPLAY RETURN LAST MEMORY TITLE PREV REV FWD CLEAR...

Страница 39: ...e chorus con tinues operating Canceling One chorus Press the ONE CHORUS button ONE CHORUS Lit ONE CHORUS GUIDE MELODY Use this function when enjoying karaoke This is a handy function when practicing a lot of songs You can take advantage of it with DVDs bearing the ONE CHORUS mark on their disc jackets You can also enjoy it with some discs not bearing the mark 2 3 Tip Goes out Sing with Professiona...

Страница 40: ...40 40 ...

Страница 41: ...play position 46 Changing graphics channel 47 Memorizing Settings for Often Viewed DVDs Condition Memory 48 Selecting Languages Multi Language 49 Changing Audio Type 49 Selecting Subtitle Language Multi Language Subtitles 50 Viewing from a Desired Camera Angle Multi Angle 50 Viewing Information 51 Quick LD Side Changing Quick Turn 52 Outline of GUI Graphical User Interface Operation 53 Changing Va...

Страница 42: ...ay appear vertically squeezed If this occurs you can use the Multi Aspect function to achieve a normal picture Multi Aspect Setting for Wide Screen TV Software 4 Select Aspect with 5 Press ENTER Aspect indications are displayed Select the desired mode Pan Scan Letterbox Wide with Multi Aspect Setting for Wide Screen TV Software Select initial setting with MENU ENTER RETURN LAST MEMORY TITLE PREV R...

Страница 43: ... TV Changing Picture Sound Quality and Graphics Settings Each time you press MODE settings change as follows When in the KARAOKE MODE With CDs With DVDs With LDs With Video CDs Tip Note If there is a power outage or the power cord is disconnected while power to the player is ON memorized settings are erased When disconnecting the power cord be sure to press POWER button on the main unit and the re...

Страница 44: ...N Picture quality Provides beautiful images with bright clear colors STANDARD Picture quality Returns you to standard picture and function settings MENU ENTER A B AUDIO SUBTITLE ANGLE DISPLAY RETURN LAST MEMORY TITLE PREV REV FWD PLAY PAUSE NEXT PLAYBACK CONTROL Picture quality may be poor depending on the software and the TV used In this case select the Standard mode Note With DVDs Changing Pictu...

Страница 45: ...ons 3 If you select ON press ENTER CONDITION KEY CONTROL PROGRAM MODE GUIDE VOCAL MELODY VOCAL PARTNER KARAOKE SURROUND OFF STUDIO HALL ARENA D R COMP ON OFF D R COMP ON MIN MAX Switching singing venue atmosphere Changing sound quality D R COMP MENU ENTER RETURN MEMORY TITLE PREV REV FWD PLAY PAUSE NEXT CONTROL ENTER RETURN TITLE PREV REV FWD PLAY PAUSE NEXT ENTER RETURN TITLE PREV REV FWD PLAY PA...

Страница 46: ...display press RETURN on the remote control Tip If graphics are not displayed even if you perform these operations try changing the channel refer to page 47 Note 4 Press ENTER 5 Select display position with the buttons You can select from 18 positions between Normal and Step 17 To return to the normal display position press CLEAR Press ENTER Graphics are displayed in the selected position MENU ENTE...

Страница 47: ...aphics scroll and channel setting return to the initial settings This is to prevent problems such as no display of graphics occurring when a different disc is played To return to the previous display press RETURN on the remote control Tips If graphics are not displayed even if you perform these operations try changing the display position refer to page 46 Note GRAPHICS 04 05 06 07 08 09 10 11 12 1...

Страница 48: ...the first number Press CONDITION during Play When a memorized disc is loaded CONDITION is indicated and previous settings are displayed Erasing memorized settings Load a memorized disc and while CONDITION is indicated press CLEAR The recorded details for that disc are erased C O N D I T I O N i s indicated in the display Memorizing Settings for Often Viewed DVDs Condition Memory Memorizing Setting...

Страница 49: ...AUDIO during playback Selecting Languages Multi Language Changing Audio Type You cannot switch languages if there is only one language recorded on the disc Language number and setting differ with each disc so refer to the disc s instructions Some titles may not enable switching between languages If this happens the mark is displayed Tip Depending on the title you can also make a selection using a ...

Страница 50: ...o do this press the MENU when indications are displayed to call up a menu and select the desired title 2 Press SUBTITLE to select the desired language HELLO SUBTITLE 1 English SUBTITLE 2 Spanish HOLA You can also make your selection from a menu MENU ENTER A B OPEN CLOSE POWER AUDIO SUBTITLE ANGLE DISPLAY RETURN LAST MEMORY TITLE PLAYBACK CONTROL DISC SIDE Press ANGLE during playback ANGLE 1 ANGLE ...

Страница 51: ... 3 51 PLAY Disappear Elapsed time Title number Chapter number LD All remain Remaining time from the current location on the disc playing Total time Total chapter number and total disc play time 2 5 25 A PLAY 3 5 47 A PLAY ALL REMAIN TOTAL TIME 12 51 45 57 59 DIGITAL STEREO Disappear Elapsed Time Chapter number CLV Extended play disc Disc time Elapsed time from start of disc 1 1234 A PLAY 1 3450 A ...

Страница 52: ...nu indications are displayed MENU ENTER RETURN LAST MEMORY TITLE PREV REV FWD PLAY PAUSE NEXT PLAYBACK CONTROL INITIAL 1 OSD SET 2 SAVER 3 B G COLOR 4 QUICK TURN OSD SET MAIN STOP MENU ENTER EXIT NEXT ENTER RETURN Initial setting indications are displayed MENU ENTER RETURN LAST MEMORY TITLE PREV REV FWD PLAY PAUSE NEXT PLAYBACK CONTROL 1 2 NEXT INITIAL 1 OSD SET 2 SAVER 3 B G COLOR 4 QUICK TURN QU...

Страница 53: ...N 1 ON 2 OFF ENTER EXIT ENTER RETURN STOP MAIN MENU B G COLOR ENTER EXIT ENTER RETURN SETUP STOP MAIN SET UP 1 2 OSD SET 1 DISPLAY 2 POSTION DISPLAY ON MENU ENTER EXIT ENTER RETURN STOP MAIN SET UP 2 2 OSD SET 1 DISPLAY 2 POSTION POSITION NORMAL MENU ENTER EXIT ENTER RETURN STOP MAIN SETUP OSD SETUP MENU DISPLAY ENTER EXIT ENTER 1 ON 2 OFF RETURN STOP MAIN SETUP OSD SETUP MENU POSITION 1 WIDE 2 NO...

Страница 54: ...ENTER RETURN 1 2 MENU 1 CHAPTER 2 AUDIO 3 SUBTITLE 4 ANGLE 5 ENTER MAIN STOP MENU ENTER EXIT ENTER RETURN 1 2 MENU 1 CHAPTER 2 AUDIO 3 SUBTITLE 4 ANGLE 5 ENTER ANGLE MAIN STOP MENU ENTER EXIT ENTER RETURN 1 2 MENU TITLE 1 TITLE 1 TITLE 1 1 CHAPTER 2 AUDIO 3 SUBTITLE 4 ANGLE 5 ENTER ENTER MAIN STOP MENU ENTER EXIT ENTER RETURN 1 1 MENU 1 CHAPTER 2 AUDIO 3 SUBTITLE 4 ANGLE 5 ENTER AUDIO English DOLB...

Страница 55: ...2 PCM MENU ENTER EXIT ENTER RETURN MAIN SET UP STOP LANG SET MENU ENTER EXIT ENTER RETURN 2 136 1 AUDIO 2 SUBTITLE 3 AUTO 4 SUBT OFF AUDIO English MAIN STOP OUTPUT MENU ENTER EXIT ENTER RETURN 1 2 1 DIG OUTPUT 2 DOWN SAMP DIG OUTPUT PCM DOLBY DIGITAL 2 2 OUTPUT 1 DIG OUTPUT 2 DOWN SAMP DOWN SAMP 48KHz MAIN STOP MENU ENTER EXIT PREV ENTER ENTER ENTER ENTER ENTER STOP MAIN SETUP LANGUAGE SETUP MENU ...

Страница 56: ...TOP MAIN MENU B G COLOR ENTER EXIT ENTER RETURN SETUP STOP MAIN SET UP 1 2 OSD SET 1 DISPLAY 2 POSITION DISPLAY ON MENU ENTER EXIT NEXT ENTER RETURN STOP MAIN SET UP 1 2 OSD SET 1 DISPLAY 2 POSTION DISPLAY ON MENU ENTER EXIT ENTER RETURN STOP MAIN SETUP OSD SETUP MENU DISPLAY ENTER EXIT ENTER 1 ON 2 OFF RETURN STOP MAIN SETUP OSD SETUP MENU POSITION 1 WIDE 2 NORMAL ENTER EXIT ENTER RETURN STOP MAI...

Страница 57: ... conclusion In the set up menu some items only operate for selection Selection Setting and implementation playback mode is engaged after title or chapter change To go to previous menu screen To go to next menu screen To go to menus setting selected before moving to a new menu will be invalidated Outline of GUI Graphical User Interface Operation Button operation within each menu Button name MENU bu...

Страница 58: ... ON MAIN STOP MENU ENTER EXIT NEXT ENTER RETURN 2 2 3 3 INITIAL 6 LANG SET 7 ASPECT ASPECT WIDE MAIN STOP MENU ENTER EXIT PREV ENTER Audio type Denominator Total number Numerator Number currently selected Item No is selected with button and can be changed with buttouns Will switch above settings to new settings if they were changed Selection item No When selection is made by pressing a digit butto...

Страница 59: ...nt can be selected on discs that include scenes that have been filmed from various angles Completes the setting of changes to the above items In the Title menu screen Titles can be selected and played back Title search In the Menu screen Chapters songs subtitles audio and angles within a title can be selected In the initial setting menu You can perform on screen setting of each function In the out...

Страница 60: ...lar software on a wide TV operation indications may be displayed outside the area of the screen so you can t see them Changing the on screen location of the indications lets you see them even when watching a wide TV is displayed to clearly indicate when the scene playing has various recorded angles Leaving a still image on screen for a prolonged period can result in screen burn This player feature...

Страница 61: ... page 50 part way through a movie Off Basic subtitle language and basic language are those selected The subtitle which is displayed by discs can be selected when the subtitle is set to OFF W AUDIO The selected audio language will be selected S SUBTITLE The selected subtitle language will be selected When watching wide mode software this lets you adjust aspect ratio to suit your TV This shortens th...

Страница 62: ... code upper lower Japanese ja 10 01 English en 05 14 French fr 06 18 German de 04 05 Italian it 09 20 Spanish es 05 19 Dutch nl 14 12 Russian ru 18 21 Chinese zh 26 08 Korean ko 11 15 Greek el 05 12 Afar aa 01 01 Abkhazian ab 01 02 Afrikaans af 01 06 Amharic am 01 13 Arabic ar 01 18 Assamese as 01 19 Aymara ay 01 25 Azerbaijani az 01 26 Bashkir ba 02 01 Belorussian be 02 05 Basic language Basic su...

Страница 63: ...ru na 14 01 Nepali ne 14 05 Norwegian no 14 15 Occitan oc 15 03 Afan Oromo om 15 13 Oriya or 15 18 Panjabi pa 16 01 Language Language Input code Input code code upper lower Polish pl 16 12 Pashto Pushto ps 16 19 Portuguese pt 16 20 Quechua qu 17 21 Rhaeto Romance rm 18 13 Kirundi rn 18 14 Rumanian ro 18 15 Kinyarwanda rw 18 23 Sanskrit sa 19 01 Sindhi sd 19 04 Sango sg 19 07 Serbo Croatian sh 19 0...

Страница 64: ...64 64 ...

Страница 65: ...ications 78 Set Up Other Information Connecting the Player Connection example 1 To a TV with video input 66 Connection example 2 To an amp with Dolby Digital AC 3 inputs 67 Connection example 3 AV amp 68 Names and Functions Front panel 69 Rear panel 70 Display window 71 Remote control 72 65 Karaoke Operation Detailed Operation Setting Set Up Other Information Basic Operation ...

Страница 66: ...t the DVD player either directly to the television or through an A V amplifier Select the appropriate connection for your TV Connecting the Player If your TV has a video input and it is available for use this is the easiest way to hook up the player Follow the instructions in the TV s monitor TV s User s Manual Connection example 1 To a TV with video input VIDEO AUDIO INPUT When connecting a casse...

Страница 67: ...o select PCM DOLBY DIGITAL When shipped from factory PCM DOLBY DIGITAL is selected Digital output of LD analog audio is not possible so also connect this players audio output jack and the amp audio input jack Note indicates the use of separately sold cords Notes Karaoke sound mic sound key control etc is not output as digital sound When using for karaoke Be sure to connect the DVD player s AUDIO O...

Страница 68: ... component bearing the Pioneer Î mark If you use a commercially available cord with mini plugs no resistance to connect this player s control input jack to the control output jack of the component bearing the Î mark you can control the player as though it were a component in a system system control If you connect for system control you cannot operate the player directly by pointing the remote cont...

Страница 69: ...an DVDs DVD CD Video CD disc table P 13 LD OPEN CLOSE button P 12 DVD CD Video CD OPEN CLOSE button P 13 PAUSE button PLAY button GUIDE MELODY button P 39 NOISE REDUCTION button P 14 PLAYBACK CONTROL button P 14 ONE TOUCH KARAOKE button and indicator P 33 SCORING SYSTEM button P 34 36 Disc Side A B button P 12 Disc Side A B indicator STANDBY indicator SINGLE PLAY button P 29 KARAOKE MODE button P ...

Страница 70: ...tching between PCM and PCM output is possible If your amp is not Dolby Digital AC 3 compatible you should switch to PCM output Refer to the chart on the right Names and Functions Performing settings 1Turn amp volume down to MIN 2Load a DVD disc and set to the Stop mode press the MENU button on the remote control Main menu is displayed 3Select the OUTPUT setting with the button on the remote contro...

Страница 71: ...ck mode title type of disc etc as shown below Indicates remaining playback time Indicates Condition Memory operation is being performed Indicates Dolby Digital playback Indicates that title is being displayed Names and Functions Indicates total playback time of side Names and Functions Laser Disc Compact disc CD video DVD Video CD Disc table is opening or is open Disc table is closing Program play...

Страница 72: ...cal Partner button VOCAL PARTNER P 33 Display button DISPLAY P 51 Return button RETURN Play button PLAY 3 Forward button FWD Repeat button REPEAT P 24 Repeat A B button REPEAT A B P 24 Digit buttons 1 9 0 10 Last Memory button LAST MEMORY P 18 Guide Vocal button GUIDE VOCAL P 31 P32 Disk side A B button DISK SIDE P 12 Open close button OPEN CLOSE0 Playback control button PLAYBACK CONTROL P 14 Clea...

Страница 73: ...AY again Remote control The rear panel control input jack on the player is being used You are too far from the player Or the angle between the remote control and the remote control reception window is too large The remote control s batteries are dead Some TVs with wireless remote capability operate incorrectly with this player s remote control Audio Plugs are not pushed in sufficiently or plugs ar...

Страница 74: ... mic Symptom Possible causes Reference page Karaoke operations The GUIDE VOCAL volume knob is set to a low level The mic is not connected to the Mic control jack ONE TOUCH KARAOKE is ON The GUIDE VOCAL volume knob is set to a low level The mic is too close to the speakers These are DVD karaoke disc functions only You can enjoy them with discs bearing the HI LITE MEDLEY and ONE CHORUS marks These f...

Страница 75: ...t for karaoke fun with a more expansive sound and added atmosphere Echo This provides an echo effect LD Laserdisc Depending on the signal recording method used there are two types of Laserdiscs standard discs CAV and extended playing discs CLV CAV CAV disc jackets or labels are marked with Standard disc CAV or Standard Play CLV CLV disc jackets or labels are marked with Extended playing disc CLV o...

Страница 76: ...he length to height ratio of TV screens The ratio of a normal TV is 4 3 while the ratio of a Hi vision TV or wide TV is 16 9 This allows you to enjoy a picture with a wider perspective Parental level This function was suggested by parents Parental level restrictions are restrictions incorporated into scenes that parents do not wish their children to view Condition memory Condition refers to the va...

Страница 77: ...elf possible however not where it is exposed to dust and separated from the amplifier to avoid the heat generated by the amplifier or other audio equipment 7 CAUTION WHEN PLACING THE UNIT IN A STEREO RACK WITH GLASS DOORS Be sure there is ample space between the unit and the glass doors when opening the disc table using the remote control If the disc table opens against strong resistance such as a...

Страница 78: ...output 200 mVrms 1 kHz 20 dB Number of channels 2 Jacks RCA jacks Parental Lock Secret Number Make a record of your secret number in case you forget it Specifications Digital audio characteristics Frequency response 4 Hz to 22 kHz DVD fs 48 kHz 4 Hz to 20 kHz LD CD S N ratio 115 dB EIAJ Dynamic range 97 dB EIAJ Wow and flutter Limit of measurement 0 001 W PEAK or lower EIAJ Other Terminals Optical...

Страница 79: ...79 Karaoke Operation Detailed Operation Setting Set Up Other Information Basic Operation ...

Страница 80: ...da to locate the nearest Pioneer Authorized Service Company Alternatively please contact or ship your defective product freight prepaid to one of the following Factory Service locations closest to you PIONEER ELECTRONICS SERVICE INC CUSTOMER SUPPORT DIVISION P O BOX 1760 LONG BEACH CA 90801 1760 U S A For warranty information please see the Limited Warranty sheet included with your product Please ...

Отзывы: