background image


DV-PT100-S

35

5

6

7

8

5

6

7

8

C

D

F

A

B

E

A

4/4

D8112

MCL4148

D8111

MCL4148

CP8101_2

IMSA-9604S-14F

1

10

11

12

13

14

2

3

4

5

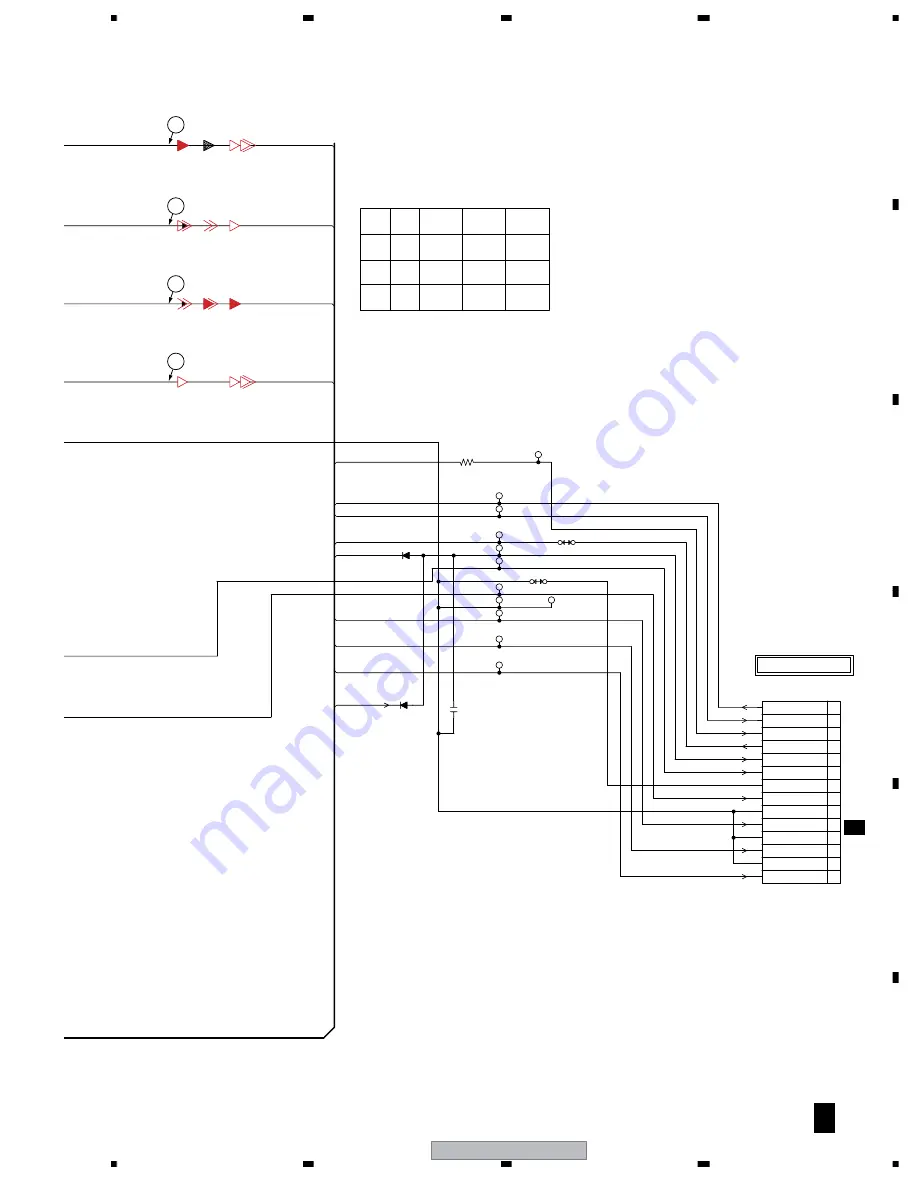
6

7

8

9

C8122

0.001

B

R8101

1K

W824

W826

DURING PLAYBACK.

MEASURED WITH THE DIGITAL TESTER

NOTE:THE DC VOLTAGE EACH PART WAS

JG038

JG040

JG042

JG048

JG035

JG034

JG036

JG030

JG033

JG031

JG037

JG013

DAC_A_VIDEO

DAC_C_VIDEO

DAC_B_VIDEO

DAC_D_DVD_VIDEO

DVD-H

V_SW

DAC_A_VIDEO

RESET

ZERO

R_AUDIO

L_AUDIO

DAC_B_VIDEO

DAC_C_VIDEO

DAC_D_DVD_VIDEO

SYS_MUTE

FROM/TO TUNER/JACK

1

2

3

4

A

B

C

D

B

R

G

CVBS

CVBS

Y

C

C

CVBS CVBS

Y

Y

V

U

U

CVBS

GND

U(B)

GND

V(R)

GND

AUDIO-L

GND

AUDIO-R

ZERO

DVD RESET

Y(G)

V SW

DVD-H

CP8001

B

3/6

5

9

8

10

V

Содержание DV-PT100-S

Страница 1: ...le Belgium PIONEER ELECTRONICS ASIACENTRE PTE LTD 253 Alexandra Road 04 01 Singapore 159936 PIONEER CORPORATION 2004 DV PT100 S REC DV PT100 S RRV3041 DVD PLAYER VCR DV PT100 S THIS MANUAL IS APPLICABLE TO THE FOLLOWING MODEL S AND TYPE S Model Type Power Requirement Region No Remarks DV PT100 S KUXTL AC120V 1 For details refer to Important Check Points for Good Servicing T ZZR OCT 2004 printed in...

Страница 2: ...en not evident from visual inspection nor the protection afforded by them necessarily can be obtained by using replacement components rated for voltage wattage etc Replacement parts which have these special safety characteristics are identified in this Service Manual Electrical components having such features are identified by marking with a on the schematics and on the parts list in this Service ...

Страница 3: ... the product Please check that neither solder debris nor screws remain inside the product 8 There should be no semi broken wires scratches melting etc on the coating of the power cord Damaged power cords may lead to fire accidents so please be sure that there are no damages If you find a damaged power cord please exchange it with a suitable one 9 There should be no spark traces or similar marks on...

Страница 4: ... 3 6 40 3 10 VCR PCB ASSY 4 6 42 3 11 VCR PCB ASSY 5 6 44 3 12 VCR PCB ASSY 6 6 46 3 13 OPERATION PCB ASSY 48 3 14 WAVE FORMS 49 4 PCB CONNECTION DIAGRAM 53 4 1 DVD PCB ASSY 54 4 2 VCR PCB ASSY 58 4 3 OPERATION PCB ASSY 62 4 4 LOADING and SW PCB ASSYS 63 5 PCB PARTS LIST 64 6 ADJUSTMENT 73 6 1 SERVICING FIXTURES AND TOOLS 73 6 2 ADJUSTMENT ITEMS AND NECESSARY ADJUSTMENT POINTS 74 6 3 SERVICE MODE ...

Страница 5: ...OVD 7 Loading System Front Motor 3 Heads Video Head 4Head FM Audio Head 2Head Audio Control Mono Yes Erase Full Track Erase Yes Erase Normal Audio Track Erase No Tape Rec PAL Speed NTSC SP SLP Play PAL NTSC SP LP SLP Fast Forward Rewind Time Approx at 25oC FF 4 50 REW 2 30 with Cassette T 120 Forward Reverse NTSC or PAL M SP LP SLP 3x 5x 7x 9x 9x 15x Picture Search PAL or SECAM Frame Advance Yes S...

Страница 6: ...nes VCR Mode RGB Signal Output Level Audio Signal Input Level Microphone Input Level Line 8 dBm 50k ohm VCR 0dBm 0 775Vrms Output Level Line 8 dBm 1k ohm VCR 0dBm 0 775Vrms 12dBm 1k ohm DVD 20dBFs 0dBFs 2 0Vrms Digital Output Level 0 5 V p p 75 ohm DVD S N Ratio at Weighted 90dB DVD 42dB VCR at SP Harmonic Distortion 1KHz Typical 0 02 1KHz DVD 1 5 1KHz VCR Frequency Response DVD Mode at DVD 4 Hz 2...

Страница 7: ...6 7 8 C D F A B E Accessories Remote control 1 076R0JN020 RF antenna cable 1 06CPL02006 Audio Video cable L 1 2m 1 red white yellow 06CPBA2003 Dry cell batteries 2 AAA R03 Warranty Card Operating Instructions Red White Yellow ...

Страница 8: ...mponent parts indicates the importance of the safety factor of the part Therefore when replacing be sure to use parts of identical designation Screws adjacent to mark on product are used for disassembly For the applying amount of lubricants or glue follow the instructions in this manual In the case of no amount instructions apply as you think it appropriate NOTES 1 2 6 8 10 5 13 12 14 11 3 2 4 9 7...

Страница 9: ...8 4 Gift Box 793WCDC541 5 Pad Flat 795WCA0674 6 Instruction Book Kit English J2E51401A 7 Poly Bag 185x270xT0 04 Y817041000 8 Guarantee Card J2D30902A 9 Pad Type B 795WCAA224 10 Polybag Instruction JB5UD200 11 Remote Control 076R0JN020 12 RF Antenna Cable 06CPL02006 13 Audio Video Cable 06CPBA2003 NSP 14 Dry Cell Battery AAA R03 1412004008 15 Pad Type A 759WCAA223 ...

Страница 10: ... to 2 3 DECK ASSY TOP SECTION 2 4 DECK ASSY BOTTOM SECTION Refer to 2 5 DVD MECHA ASSY 6 5 1 50 50 50 50 19 13 17 12 10 20 8 9 16 2 2 16 1 2 46 42 50 3 43 53 7 20 Adhesive Y113031000 C B A 47 27 27 28 26 47 47 40 49 35 49 54 54 34 52 48 22 37 41 14 2 30 33 31 29 33 47 39 55 51 55 44 51 24 25 32 53 32 53 47 11 11 36 ...

Страница 11: ...r 761WSA0175 24 Plate Tray_Front 712WPBA076 25 Sheet DVD 7235630010 26 Angle Front 761WSAA025 27 Cushion 65TS10 10 8965TS1010 10 x 20 x 25 28 Holder Disc 761WPA0296 29 Holder Deck 701WPA0686 30 Holder Deck 701WPA0751 31 Heat Sink IC A023 763WSAA023 32 Spring Earth 753WUA0065 33 Holder End Sensor 85OP700038 34 Sheet Rating 722631A001 35 Sheet Jack 7230007787 36 Sheet Caution 726000A073 37 Shield CO...

Страница 12: ... Name Mark Grease Y315061000 G 555G AA Y315071000 MG 33 AB Y31D011000 FG 84M AC Y315041000 FL 721 AD Y315141000 G 313Y AE To VCR MT PCB Assy CP102 CONTACT SIDE NON CONTACT SIDE 34 35 42 48 48 29 37 47 5 4 8 23 18 52 52 22 20 19 11 10 26 27 38 24 46 2 3 32 1 9 39 50 51 31 30 36 49 40 41 51 51 16 17 13 14 21 15 7 6 12 33 53 28 25 AA AA AA AA AE AE AE AE AE AE AE AB AB AB AC AE AE AA AB AB AC AD AB A...

Страница 13: ...ension 85OP400492 23 Cap P4 85OP400520 24 Band Tension 85OP400542 25 Connect Tension 85OP400533 26 Arm Brake T 85OP600573 27 Band Brake T 85OP600584 28 Spring Tension 85OP800322 29 Spring Brake T 85OP800360 30 Lever Link 85OP900743 31 Lever Flap 85OP900744 32 Cass Opener 85OP900745 33 Reflector LED 85OP700035 34 Bracket Top 3V 85OP900746 35 Cord Jumper CD1501 122H071704 36 Cord Jumper CD1502 122Y0...

Страница 14: ...ction Check if the correct grease is applied for each position Class Part No Part Name Mark Grease Y315061000 G 555G AA Y315071000 MG 33 AB Y31D011000 FG 84M AC Y315041000 FL 721 AD Y315141000 G 313Y AE 8 6 23 10 2 4 15 16 24 7 3 5 9 13 22 19 18 17 21 1 20 22 22 12 11 14 AA AA AA AD AA AA AA AA AA AA AB AB AB AB AB AB AB AB AB AB AA AA AA AA AA AA AA AA ...

Страница 15: ...85OP200312 8 Lever Clutch 85OP200313 9 Gear Main Loading 85OP300194 10 Lever Tension 85OP400490 11 Cam Pinch Roller 85OP600577 12 Cam Main 85OP600578 13 Rod Main 85OP600579 14 Gear Joint 85OP600582 15 Spring Coupling 85OP800355 16 Spring Ring 85OP800356 17 Holder Capstan 85OP400549 18 Cord Jumper CD1501 122H071704 19 Cord Jumper CD1502 122Y021902 20 Capstan DD Unit M2001 1510S98042 21 Screw 2 6x4 ...

Страница 16: ... PART NAME Y315121000 AA AA AA 8 D E 8 34 9 14 18 21 15 AA AA AA AA 23 20 11 4 3 7 28 6 1 AB AA AB AA 12 PCB610 LOADING MOTOR PCB ASS Y 29 31 CD2302 16 17 33 CD2001 32 10 2 22 30 13 24 5 19 Do not replace the parts Because minute adjustments are needed if this condition is disassembled further more If the repair is needed replace the DVD MECHA ASS Y PCB640 SW PCB ASS Y CD2301 Cannot supply separat...

Страница 17: ...ame main 92P100091A 12 Tray 92P100100A 13 Holder Traverse 92P100109A 14 Gear Pulley 92P100095A 15 Gear Main 92P100096A 16 Gear Middle 92P100108A 17 SW PCB Assy PCB640 A2E220T640 18 Clamper Plate 92P000014A 19 Loader SUB Assy 92SBB0020A 20 Clamper 92P100094A 21 Screw M1 7x3 814011730U 22 Screw M1 7x2 3 814011723U 23 Rack Loading 92P100093A 24 Gear Motor 92P100088A 25 26 27 28 Cord Jumper CD2301 122...

Страница 18: ...ts VCR PCB CD501 OPERATION PCB DVD PCB DVD DECK CD2301 CD2001 CP2601 CP2603 CP2602 CP8101 CD4002 V651 J8003 J8004 J8005 OS651 TU301 OS8001 J8007 J8006 J8008 J8001 CP8001 S501 S502 CP651 CP501 TP101 TP701 TP3001 TP3002 CP103 FE HEAD CP102 AC HEAD CD102 AC IN CD681 CP681 CD8001 CD501 CD2302 ...

Страница 19: ...ND D SPDIF PCM1753DBQR ZR36762PQCG_V REG 3 3V 1 9V DVD AUDIO L DVD AUDIO R 2 2 I CLK I DAT S 24C04BFJ TB 3 3V 1 9V TR FO SPDL SLED S MUTE ADC IN 5 6 7 TRACK FOCUS_PWM SPINDLE SLED_PWM SPDL_SENS Loading Moter Spindle Moter Sled Moter Pick up DEFECT LINK MIRR LDON IC2601 READ CHANNEL ZR36708TQC Moter Driver IC2301 LA6565 CD DVD LD RF A B C D E F HOME TIN SW TOUT SW RFA_SDEN DATA SCLK AAF_CE FE TE PI...

Страница 20: ... AUTO BIAS P R KIL B D PB AMP 3 58M BPF1 DOUBLE LIM FM DEM SUB LPF V I CONV P R Y LPF YNR COMB N L DEEM NC1 Y C MIX SYNC SEP VCA CLAMP 1 2 FBC Chara INS 6dB P R P R V AGC L101 CLAMP EQ AMP LINE AMP MUTE ALC Y C_CS Y C_DATA Y C_CLK H AMP_SW C ROTARY H SW ENV DET COMP DUMMY_V SYNC C SYNC FRONT_V_IN TUNER_V TO_NORMAL_A FROM_NORMAL_A 6 2 3 1 5 Q105 BIAS CTL 11 4 P CON 5V H AMP SW AUDIO MUTE C ROT RF S...

Страница 21: ... AT 5 2V TAB SW 35 REC SAFTY SW RESET 77 1 2 3 IC3003 PST3231NR AT 5V SYSTEM RESET 5 6 EEPROM IC3099 S 24C02BFJ TB Y C DATA 54 Y C CLK 53 Y C_DATA Y C_CLK C SYNC 111 C SYNC SCL SDA COMP 101 COMP SEG5 63 SEG1 VCR LED 47 55 SEG_5 SEG_1 VCR_LED ST SELECT 31 HIFI H SW 106 HIFI ENV 32 ST_SELECT HIFI_H SW HIFI_ENV DET POWER MUTE L 87 POWER_MUTE L IIC_DATA IIC_CLK AUDIO_MUTE H REC_MUTE_H HIFI DEMODULATOR...

Страница 22: ...ON 12V SW Q509 P CON SW Q503 P CON 5V SW Q506 M CON POWER SW Q504 M CON 5V SW AT 12 6V OPERATION DISPLAY TUNER JACK P CON 5V P CON 12V AT 5 2V POWER FAIL VCR POWER ON L AT 5V M CON DVD POWER CTL 32V P CON 5V AT 5 2V SYSCON SYSCON SYSCON TUNER JACK TX CP501 7 UNREG 3 8V P CON 5V 3 RX SPDIF 9 4 11 Q513 POWER FAIL SW Q514 POWER FAIL SW TX RX SYSCON P CON 5V P CON 5V Y C AUDIO CCD HEAD AMP HIFI DEMODU...

Страница 23: ... BS_LED SYSCON 3 2 1 5G SW Q651 SEG10 SW Q652 SEG9 SW Q653 4G SW Q654 SEG8 SW Q655 Q656 Q657 Q658 3G SW Q659 Q660 2G SW Q661 Q662 Q663 Q664 1G SW Q665 SEG7 SW SEG1 SW SEG3 SW SEG2 SW SEG4 SW SEG5 SW SEG6 SW 4G T_SHT_LED SEG9 SEG7 SEG8 SEG5 SEG6 SEG4 3G TV VCR_LED SEG3 2G DUB REC_LED SEG1 SEG2 1G VCR T REC_LED POWER VCR EJECT VCR DVD AT 5 2V DVD LED SW Q666 POWER DVD LED 5 KEY A KEY B 2 1 2 1 5 DVD...

Страница 24: ...OUT SIF OUT AUDIO_MUTE H HIFI_ENV DET IIC_CLK IIC_DATA AUDIO_OUT_R ST_SELECT FRONT_A_IN L FRONT_A_IN R HF2 HF_COM FSC HF1 FROM_NORMAL_A TO_NORMAL_A TUNER JACK SYSCON Y C AUDIO CCD HEAD AMP 46 32 36 P CON 5V INPUT SW AMP AMP OUTPUT SW PNR DEM BLOCK AMP AMP LOGIC 15 DBX NOISE REDUCTION 11 73 74 12 DVD_A_OUT L DVD_A_OUT R POWER 3 5 AT 5 2V 54 P CON 9V ALC ALC MUTE 17 REC_MUTE H AUDIO SIGNAL PB AUDIO ...

Страница 25: ... 2 5 3 Q8005 MUTE SW Q8007 MUTE SW SYS_MUTE Y C VIDEO OUT SW V OUT POWER P CON 5V Vcc RF_CH_SW 2 Q301 MUTE SW CP8001 2 DVD H Y G 1 3 4 V SW AUDIO R 5 6 ZERO DVD RESET DVD_RESET AV SW1 DVD_A_OUT R DVD_A_OUT L SPDIF Q8001 DVD AUDIO DRIVER 8 FSC 2 5 3 DVD AIDIO OUT J8006 2 1 OPTICAL OS8001 AUDIO MUTE Q8008 Q8009 Q8010 Q8011 Q8012 AUDIO AMP IC8001 NJM4580M DVD AIDIO L DVD AIDIO R AUDIO L 8 10 CVBS 12 ...

Страница 26: ... SW DVD H V SW Y G DVD RESET ZERO AUDIO R GND AUDIO L GND V R GND U B GND CVBS SPDIF GND P CON A5V P CON 9V GND M TX RX SPDIF GND A P CON A5V P CON 9V GND M TX RX CP501 LIMIT SW LD LD GND D CLOSE OPEN LOADING MOTOR FG SENSER SW GND SLD SLD SP1 SP1 FFC SLED MOTOR SPINDLE MOTOR 6 5 4 3 2 1 VREF MON DVD NC SW VOL DVD GND DVD LD DVD LD CD VOL CD GND CD MON COM RF C B A D F E VCC GND PDIC F F T T VREF ...

Страница 27: ... FE HEAD HOT FE HEAD GND FE HEAD HOT FFC CD681 2 1 H5002 TM601 COMMAND TRANSMITTER 5 4 3 2 1 5 4 3 2 1 KEY A KEY B GND DVD LED KEY A KEY B GND DVD LED CP3001 HF1 R LD CY VCO CD102 3 2 1 5 4 6 9 8 7 7 6 5 4 3 2 1 FFC 7 6 5 4 3 2 1 CTL CTL FFC CTL CTL AUDIO REC AUDIO PB H5001 AUDIO CONTROL CYLINDER UNIT WHITE RED M101 LOADING MOTOR LM D U OUT D V OUT D W OUT D COM M GND D PG OUT D PG GND EP LP HEAD ...

Страница 28: ...SD_A1 HD9 SD_A2 HA7 SD_A3 SD_A4 HD1 SD_A5 HA6 SD_A6 HD8 SD_A7 HA5 SD_A8 SD_A9 SD_A10 HD0 SD_A11 HA4 SD_D0 RD SD_D1 SD_D2 HA3 SD_D3 HA2 SD_D4 MEMCS0 SD_D5 HA1 SD_D6 SD_D7 HA0 SD_D8 SD_D9 SD_D10 SD_D11 SD_D12 SD_D13 SD_D14 SD_D15 RAMCS0 RAMCS1 RAMRAS RAMCAS SD_BA0 RAMDQM RAMWE RAMCLK SD_A4 SD_A3 SD_A5 SD_A2 SD_A6 SD_A1 SD_A7 SD_A0 SD_A10 SD_A11 RAMCAS SD_D10 SD_D11 SD_D12 SD_D13 SD_D14 SD_D15 SD_A8 ...

Страница 29: ...24C02BFJ TB EEPROM IC 1 2 3 4 L4001 2 2uH 0305 CD4002 CU2B1101 1 10 11 2 3 4 5 6 7 8 9 DUPTD1 RX SYS_MUTE DVD H V_SW DAC_VIDEO_A DAC_VIDEO_C P CON 3 3V DAC_VIDEO_B DAC_VIDEO_D ASDATA0 ABCLK ALRCLK AMCLK MD MC GND ML RESET P CON 5V GND GND 1 8V 3 3V TRAY_OPEN TRAY_CLOSE HOME SPDL_SENS TOUT_SW DUPTD1 TIN_SW DUPRD1 RFA_SDEN RFA_DATA DUPTD0 RFA_SCLK AAF_CE DUPRD0 AAF_FE AAF_TE VR_SEL AAF_PI TRAY_OPEN ...

Страница 30: ...3 HA8 SD_D11 SD_D12 SD_D13 HD5 HA19 SD_D14 SD_D15 RAMCS0 HD12 HA20 RAMCS1 RAMRAS RAMCAS HD4 WR SD_BA0 RAMDQM RAMWE RESET RAMCLK HA0 HA1 HD11 HA2 HA3 HA4 HD3 HA5 HA6 HA7 HD10 HA19 HA8 HA9 HA10 HD2 HA18 HA11 HA12 HA13 HD9 HA17 HA14 HA15 HA16 HD1 HA7 HA17 HA18 HA19 HD8 HA6 HA20 HD0 HD1 HD0 HA5 HD2 HD3 HD4 RD HA4 HD5 HD6 HD7 HA3 HD8 HD9 HD10 MEMCS0 HA2 HD11 HD12 HD13 HA0 HA1 HD14 HD15 MEMCS0 RD WR P C...

Страница 31: ...11 SD_D4 SD_D10 SD_D5 SD_D9 SD_D6 SD_D8 SD_D7 RAMDQM RAMDQM RAMWE RAMCLK RAMCAS RAMRAS RAMCS1 SD_A11 SD_BA0 SD_A9 RAMCS0 SD_A8 SD_A10 SD_A7 SD_A0 SD_A6 SD_A1 SD_A5 SD_A2 SD_A4 SD_A3 VDD DQ0 VDDQ DQ1 DQ2 VSSQ DQ3 DQ4 VDDQ DQ5 VSSQ DQ6 DQ7 VDD LDQM WE CAS RAS CS BA0 BA1 A10 AP A0 A1 A2 A3 VDD VSS DQ15 VSSQ DQ14 DQ13 VDDQ DQ12 DQ11 VSSQ DQ10 DQ9 VDDQ DQ8 VSS NC UDQM CLK CKE NC A11 A9 A8 A7 A6 A5 A4 V...

Страница 32: ...4 7K R2649 100 R2650 4 7K R2653 100 R2651 4 7K R2652 100 R2614 12K 1 R2616 1K R2617 1K R2603 13K 1 R2618 10 B2602 FCM2012H 102T04 B2601 FCM2012H 102T04 JG062 TP22 TP20 TP21 TP19 TP37 TP36 TP27 TP28 TP29 TP30 TP31 JG055 TP34 TP25 JG022 JG023 JG024 TP40 TP10 JG021 TP4 TP6 TP2601 JG053 JG054 JG056 JG019 JG020 TP42 JG061 JG052 JG063 TP5 FNP FNN VR_SEL VR_DVD VR_CD P CON 5V TR TR FO FNN FO FNP DVDPD OP...

Страница 33: ...7K R2335 1 5K R2308 10K R2301 1K R2303 2 2 R2304 2 2 R2323 1 2 R2329 1 2 R2604 27K 1 R2646 2 2K R2309 470 1 R2312 5 6K 1 B2605 FCM2012H 102T04 B2604 FCM2012H 102T04 B2603 FCM2012H 102T04 DURING PLAYBACK MEASURED WITH THE DIGITAL TESTER NOTE THE DC VOLTAGE EACH PART WAS TP35 TP16 TP17 TP15 TP64 TP65 TP69 TP68 TP56 TP55 TP66 TP141 TP24 TP138 TP33 TP45 TP139 TP46 TP140 TP2 TP1 TP18 TP26 TP38 JG057 JG...

Страница 34: ... 12P CH C8124 150P CH C8127 150P CH C8115 12P CH C8110 100P CH C8111 12P CH C8119_1 100 6 3V KA C8121_1 10 25V KA R8113 470 R8112 470 B8103 FCM2012H 102T04 W815 W818 W819 W820 L8103 1uH 0305 L8102 1uH 0305 L8105 1uH 0305 L8104 1uH 0305 DAC_VIDEO_A DAC_VIDEO_A DAC_VIDEO_C DAC_VIDEO_C DAC_VIDEO_B DAC_VIDEO_D P CON 5V RESET DAC_VIDEO_B MC MD ML AMCLK ABCLK ALRCLK ASDATA0 DAC_VIDEO_D V_SW DVD H SYS_MU...

Страница 35: ... DC VOLTAGE EACH PART WAS JG038 JG040 JG042 JG048 JG035 JG034 JG036 JG030 JG033 JG031 JG037 JG013 DAC_A_VIDEO DAC_C_VIDEO DAC_B_VIDEO DAC_D_DVD_VIDEO DVD H V_SW DAC_A_VIDEO RESET ZERO R_AUDIO L_AUDIO DAC_B_VIDEO DAC_C_VIDEO DAC_D_DVD_VIDEO SYS_MUTE FROM TO TUNER JACK 1 2 3 4 A B C D B R G CVBS CVBS Y C C CVBS CVBS Y Y V U U CVBS GND U B GND V R GND AUDIO L GND AUDIO R ZERO DVD RESET Y G V SW DVD H...

Страница 36: ... KTC3875S_Y_RTK AUDIO PB SW W805 W852 W819 W862 W863 Q105 KTA1266 BIAS CTL L102 100uH 0305 1 2 3 4 5 52 53 54 55 56 57 58 59 6 60 61 62 63 64 65 66 67 68 69 7 70 71 72 73 74 75 76 77 78 79 8 80 9 COMP H SW ENV DET H AMP_SW C ROTARY Y C_CS Y C_DATA Y C_CLK AUDIO_MUTE H P CON 5V GND FSC TO_NORMAL_A FROM_NORMAL_A HF1 HF_COM HF2 P CON 5V P CON 5V TO_NORMAL_A CTL CTL P CON 5V V REC_ST H GND HOT TO FULL...

Страница 37: ... DVD_V_OUT DAC_D FRONT_V_IN TU REAR_V_IN Y C_VIDEO_OUT FSC 4FSC 4FSC Y C_CLK Y C_DATA Y C_CS DUMMY_V SYNC V REC_ST H C ROTARY AUDIO_MUTE H CTL CTL H AMP_SW TU REAR_V_IN COMP ENV DET H SW FRONT_V_IN C SYNC DVD_V_OUT DAC_D Y C_VIDEO_OUT C SYNC DUMMY_V SYNC P CON 5V FROM_NORMAL_A FROM TO SYSCON FROM TO TUNER JACK 4 8 0 8 1 1 1 1 1 4 0 2 0 0 2 2 6 2 6 4 8 NC MUTE AUTO BIAS LINE AMP REC FM EQ FM AGC VH...

Страница 38: ...R3056 1K C3033 220 16V YK C3016 47 6 3V KA TP3001 SERVICE W811 W835 W836 X3001 10MHz 100GT01006 MD0 RESET AT 5 2V FWE SEG_10 REC_MUTE_H AT 5V M CON TX RX DVD_POWER_CTL AT 12 6_V P CON 5V AT 5V M CON VCR_POWER_ON L CAP_LIMIT POWER_FAIL AT 5 2V GND MOTOR_GND TV VCR POWER_MUTE L SYS_MUTE AV_SW1 Y C_CS CAP_FG AT 12 6_V RF_CH_SW P CON 5V AUDIO_MUTE H CAP_F R V REC_ST H CAP_LIMIT LDM_CTL CAP_F R AT 12 6...

Страница 39: ... S CURVE TV VCR VCR_LED VIDEO_OUT DVD_LED POWER_MUTE L DVD_POWER_CTL DVD_POWER_CTL VIDEO_MUTE H DVD_RESET SYS_MUTE REM_IN REC_L REEL T VCR_POWER_ON L REC_MUTE_H VIDEO_MUTE H HIFI_ENV DET AT 5 2V HIFI_H SW C SYNC AUDIO_MUTE H SCL SDA POWER_FAIL ST_SELECT AT 5V M CON TAB_SW DVD_LED VCR_LED AFT S CURVE KEY A KEY B HIFI_ENV DET REM_IN ST_SELECT 1G VCR T REC_LED KEY A 2G DUB REC_LED 3G TV VCR_LED KEY B...

Страница 40: ...19 75 R8006 68 R8007 100K R8054 2 2K R8005 220 R8002 3 3K R8004 33K1 4W R8012 470 R8008 470 R8015 100 R8010 68 R8011 100 1 4W R8059 4 7K 1 4W R8056 150 R8032 150 R8017 2 2K R8016 2 2K R8014 100 R8003 1 5K R306 22 R301 33K R304 1K R302 1K R8009 4701 2W C8024 47 16V YK C8005 470 6 3V YK C8011 220 6 3V KA C8015 220 6 3V KA C315 10 25V KA C8022 47 16V YK C8013 10 50V KA C313 10 25V KA Q8001 KTC3875S_Y...

Страница 41: ...62 1000 6 3V YK C8063 1000 6 3V YK C8061 1000 6 3V YK C8034 220 6 3V YK C8036 2 2 50V KA C8037 22 50V KA C8032 4 7 50V KA C8031 4 7 50V KA C8038 22 50V YK C8051 33 50V YK Q8012 KTC3875S_Y_RTK MUTE DET Q8009 KTC3875S_Y_RTK MUTE SW W849 W854 W823 V_SW DVD_Y_VIDEO DAC_A DVD_POWER_CTL DVD_RESET ZERO DVD_V DAC_B DVD_U DAC_C DVD_V_OUT DAC_D DVD_Y_VIDEO DAC_A DVD_U DAC_C DVD_V DAC_B AT 5 2V P CON 5V V_SW...

Страница 42: ...662 180 R672 180 R673 180 R664 820 R669 820 R668 180 R663 180 R665 180 R666 180 R661 820 R670 180 R667 180 R671 820 W802 Q665 KTA1504S_Y_RTK 1G SW Q659 KTA1504S_Y_RTK 3G SW Q654 KTA1504S_Y_RTK 4G SW Q651 KTA1504S_Y_RTK 5G SW Q661 KTA1504S_Y_RTK 2G SW 1G VCR T REC_LED 2G DUB REC_LED 3G TV VCR_LED 5G CS BS_LED 4G VSC_LED SEG_1 SEG_3 SEG_10 SEG_2 SEG_4 SEG_5 SEG_6 SEG_7 SEG_8 SEG_9 KEY A DVD_LED VCR_...

Страница 43: ...ION DIGITAL TRANSISTOR DURING PLAYBACK MEASURED WITH THE DIGITAL TESTER NOTE THE DC VOLTAGE EACH PART WAS C652 100 10V YK R651 1001 4W R659 1 5K R658 1 8K R657 2 7K C653 470 10V YK DVD_LED VCR_LED 1G VCR T REC_LED 2G DUB REC_LED 3G TV VCR_LED 4G VSC_LED 5G CS BS_LED SEG_1 SEG_2 SEG_3 SEG_4 SEG_5 SEG_6 SEG_7 SEG_8 SEG_9 SEG_10 REM_IN KEY B KEY A REM_IN AT 5 2V GND LEM_VCC AT 5 2V GND AT 5 2V KEY A ...

Страница 44: ...V KA C713 4 7 50V KA C726 4 7 50V KA C727 2 2 50V KA C753 4 7 50V KA C750 10 25V KA C759 22 16V KA C756 100 6 3V KA C722 100 16V YK W850 W857 L704 22uH 0305 IC701 LA72670BM L MPB E HI FI DEMODULATOR IC 1 10 1 1 1 2 1 3 1 4 1 5 1 6 1 7 1 8 1 9 2 20 3 4 41 42 43 44 45 46 47 48 49 5 50 51 52 53 54 55 56 57 58 59 6 60 61 62 63 64 65 66 67 68 69 7 70 71 72 73 74 75 76 77 78 79 8 80 9 FSC SIF_OUT P CON ...

Страница 45: ...36 37 38 39 40 AUDIO SIGNAL PB AUDIO SIGNAL REC FRONT_A_IN_R FRONT_A_IN_L SIF_OUT DVD_A_OUT_L DVD_A_OUT_R RF_CONV_A_OUT AUDIO_OUT_L ST_SELECT AUDIO_OUT_R HIFI_H SW SCL SDA P CON 5V FSC FROM_NORMAL_A TO_NORMAL_A HF2 HF_COM HF1 HIFI_ENV DET AT 5 2V P CON 5V P CON 9V GND REC_MUTE_H HIFI_ENV DET HIFI_H SW AUDIO_MUTE H SCL SDA ST_SELECT FROM TO SYSCON FROM TO POWER FROM TO Y C AUDIO CCD HEAD AMP FROM T...

Страница 46: ...1N4005 EIC D506 1N4005 EIC D501 1SS133 D509 RGP10J EIC D504 1SS133 CAUTION DIGITAL TRANSISTOR DURING PLAYBACK MEASURED WITH THE DIGITAL TESTER NOTE THE DC VOLTAGE EACH PART WAS C511 47 200V PK C540 47 200V PK C527 0 001 B C502_1 0 22 275V ECQUL C526_1 0 0022 250V KY C516_1 0 0022 250V KY C509 0 018 M C510 0 022 B C508 0 022 B C515 0 01 500V B C513 220P 2KV R C525 680P 2KV R R549 100K 1 4W R531 10K...

Страница 47: ...FAIL SW Q514 2SC2412K POWER FAIL SW Q510 2SD1207 P CON 12V SW Q503 KTC3209_Y P CON 5V SW W827 W865 W806 W877 W804 W816 W818 Q504 KTA1271_Y M CON 5V SW L505 22uH 0305 MOTOR_GND P CON 5V GND AT 12 6_V P CON 12V TX RX AT 5 2V DVD_POWER_CTL VCR_POWER_ON L POWER_FAIL VCR_POWER_ON L AT 5V M CON AT 12 6_V M_GND P CON 5V GND MOTOR_GND P CON 9V P CON 5V_DH P CON 9V SPDIF 32V DVD_POWER_CTL AT 5 2V P CON 5V ...

Страница 48: ...VQ11L05R REC OTR SW690 EVQ11L05R OPEN CLOSE SW689 EVQ11L05R STOP D685 LTL 1CHEE 002A DVD LED CD681 2H051202 DURING PLAYBACK MEASURED WITH THE DIGITAL TESTER NOTE THE DC VOLTAGE EACH PART WAS R685 13K 1 4W R686 6 8K 1 4W R687 3 9K 1 4W R688 2 7K 1 4W R690 22K 1 4W R689 3 3K 1 4W KEY A KEY B GND DVD LED NC FROM TO OPERATION DISPLAY CP651 B 4 6 OPERATION PCB ASSY A2E514X270 C ...

Страница 49: ...R8113 R_AUDIO V 1V div H 500µsec div 2 IC4005 pin 38 RAM CLK V 500mV div H 200µsec div 7 Foot of R8112 L_AUDIO V 1V div H 500µsec div 3 JG055 OPU RF V 200mV div H 200nsec div 8 W820 DAC_D_DVD_VIDEO V 200mV div H 10µsec div 4 IC2601 pin 52 FNN V 100mV div H 200nsec div 9 W819 DAC_B_VIDEO V 100mV div H 10µsec div 5 W815 DAC_A_VIDEO V 200mV div H 10µsec div 10 W818 DAC_C_VIDEO V 100mV div H 10µsec di...

Страница 50: ...n 2 SW V OUT V 200mV div H 10µsec div 3 TP101 V ENV Playback V 100mV div H 1msec div 8 IC3001 pin 80 OSC2 Power ON V 1V div H 50nsec div 13 Foot of R8030 DVD_A_OUT_R Playback V 100mV div H 500µsec div 4 C123 side FROM_NORMAL_A Playback V 500mV div H 200msec div 9 IC3001 pin 104 CYL_FG PG Playback V 1V div H 500µsec div 14 Foot of R8031 DVD_A_OUT_L Playback V 100mV div H 500µsec div 5 L101 pin 4 HO...

Страница 51: ... Playback V 500mV div H 5µsec div 17 Foot of R724 HIFI_H SW Playback V 2V div H 1msec div 22 Q501 Gate Playback V 5V div H 5µsec div 18 Foot of R716 AUDIO_OUT_R Playback V 200mV div H 500µsec div 19 Foot of R717 AUDIO_OUT_L Playback V 200mV div H 500µsec div 20 IC701 pin 2 RF_CONV_A_OUT Playback V 200mV div H 500µsec div ...

Страница 52: ...DV PT100 S 52 1 2 3 4 1 2 3 4 C D F A B E ...

Страница 53: ...ted on this PCB include all necessary parts for several destinations For further information for respective destinations be sure to check with the schematic diagram 4 View point of PCB diagrams Symbol In PCB Diagrams Symbol In Schematic Diagrams Part Name B C E D D G G S S B C E B C E D G S B C E B C E B C E Transistor Transistor with resistor Field effect transistor Resistor array 3 terminal regu...

Страница 54: ...2608_1 R2601 R2615 Q2601 R2618 R2617 Q2602 D2601 R2620 R2647 Q2603 R2621 R2619 Q2604 C2607 C2606 C2604 C2603 C2605 R2624 R2622 R2623 Q2605 R2643 R2607 R2608 R2644 C2654 C2619 C2620 C2621 C2622 R2652 R2653 R2650 R2651 R2306 R2336 R2635 R2649 C2648 C4007 C4003 C4002 R4052 R4051 R4050 R4049 R4046 C4008 C4039 R4041 IC4001 R4001 R4003 R4004 R4005 C4098 R4023 X4001 R4024 R4057 R4060 R4043 R4022 R4044 R4...

Страница 55: ... C4082 C4077 C4047 C4046 C4045 C4050 R4048 C4041 C4040 IC4005 IC4001 C4037 C4094 C4093 C4098 R4023 R4031 R4035 R4014 R4024 IC4002 W817 C4091 L4001 C4036 C4084_1 IC4003 C4021_1 C4078_1 C4083_1 C4067_1 C4009_1 C4053_1 C4011_1 R4040 C4063_1 C4031 R4070 R4021 R4020 R4019 R4025 R4047 IC8102 R4058 B4010 R4027 R4026 R4071 C8121_1 R4038 R4039 CD4002 CP8101_2 W824 W826 NR4001 NR4002 NR4003 NR4004 NR4005 NR...

Страница 56: ...03 C4099 B4008 R4037 R4036 C4072 C4025 C4024 C4023 C4020 C4019 R4064 R40 C4096 C4028 C407 C408 C4029 C C4026 R4018 R4059 C4004 C4088 C4089 C4090 C4066 C4092 R8101 C4065 C4080 C4097 C4015 C4052 C4012 C4013 C4010 C4014 C4018 C4022 VMD343A DVD PCB ASSY A SIDE B A CP8101_2 CD4002 ...

Страница 57: ...5 B2601 B2602 C2636 C2637 C2638 C2639 R2331 C2311 R2605 R2610 B2603 R2318 R2602 R2604 R2603 C2618 C4001 C4005 C4006 R4045 C4096 C4032 C4027 C4033 C4028 C4079 C4081 C4029 C4030 C4034 C4035 R4012 R4042 R4018 C4004 C4088 C4089 C4090 C4086 C4085 R4016 C4073 C4076 C4075 C4013 C4010 C4074 B4001 B4004 B4003 R2309 R4056 C2658 R2323 C2660 R4002 R2315 C2659 C2635 C2657 R2329 SIDE B A CP2601 CP2603 CP2602 ...

Страница 58: ...651 W105 W177 R105 W109 W137 W136 W119 W130 W128 W122 C123 W201 W134 W127 W125 W123 R305 W142 W141 W166 W167 W158 W156 W154 W152 W083 W W08 R140 W162 W146 W150 R144 W148 W149 W131 W155 W143 W144 W145 W198 W135 W129 W195 W191 C763 C767 C758 C755 C751 R723 C740 W232 C731 R704 C722 W223 C721 W224 C720 C713 R703 C719 R712 C759 R719 C152 C753 C750 C728 C716 C712 C725 C756 C726 C727 C742 W229 W188 C C80...

Страница 59: ... R514 Q503 C530_1 W827 R533 D514 C505_1 L505 D516 R554 C519_1 D515 D513 D527 W818 W816 C501_1 C531 D507 IC501 D522 C522_1 R517 D523 C521 C514 IC502 C506 T501 Q501 HS501 FH502 F501 FH501 S501 S502 C653 CP651 D656 R501 D502 D505 D506 D503 R503 C511 C540 R512 D509 B501 C513 R516 C515 R502 W016 C525 R506 R508 D510 Q502 R505 IC503 C509 R504 W012 D504 D524 R524 D512 D501 C512 Q507 R529 R549 D518 D 5 1 1...

Страница 60: ... R8048 R8049 C8056 C8055 C8054 C8060 Q514 Q513 R552 Q506 R523 C534 R511 Q509 R515 R536 C520 R519 R518 R521 R520 R522 C524 R532 C508 R507 C527 R531 R547 C510 C8028 R8012 R8008 B8002 R8007 C8025 R8006 R8005 Q8001 C8021 B8001 R8054 R8002 R8003 B8003 C8023 Q8008 Q8009 R8021 R8022 Q8010 R8023 Q8011 R8028 R8029 Q8012 R8027 R8026 C8033 R8024 R8025 R8030 R8031 IC8001 R8043 C8043 R8038 C8045 C8048 R8041 R8...

Страница 61: ...62 C3050 R3033 C3053 R8019 R3057 R3006 C8099 C8004 R3044 R3045 R301 C302 C317 C307 R302 C303 C8057 Q101 Q102 R304 Q301 R129 R113 C117 R124 C133 R3009 Q3007 Q3003 C129 R141 R143 C3041 R136 R126 R119 IC3003 IC8005 C3002 IC3099_1 C124 C137 C134 C120 C132 C146 C148 C151 I C 7 0 1 C762 R727 C768 C771 R726 C704 R725 C766 R731 C764 C760 C752 C748 C702 R722 R721 C749 R720 C744 C730 C724 C733 C708 R708 R71...

Страница 62: ... 3 OPERATION PCB ASSY G OPE 4 OPEN CLOSE PLAY STOP REW FF REC DVD 5 4 2 VEDA46A R690 R685 R686 R687 R688 R689 SW690 SW686 SW689 SW685 SW687 SW688 CP681 D685 VEDA46A OPERATION PCB ASSY C CP1701 B CP681 CP1701 CP681 SIDE A SIDE A SIDE B SIDE B C C ...

Страница 63: ...B E 4 4 LOADING and SW PCB ASSYS SW1 CD2302 LOADING MOTOR INSERTED PARTS SOLDER SIDE LOADING MOTOR CHIP MOUNTED PARTS SOLDER SIDE SW SOLDER SIDE BL OR GR YE SW2 CD2301 M2601 M2602 SIDE A SIDE B D E E E D E D CP2603 A CD2302 CP2602 A CD2301 ...

Страница 64: ... Q502 TRANSISTOR SILICON KTC3203 TCAT032034 Q503 TRANSISTOR SILICON KTC3209 TCAT03209Y Q504 TRANSISTOR KTA1271 TAAT012714 Q505 TRANSISTOR 2SD1207 TD3T012070 Q506 TRANSISTOR KRC103SRTK TNAAC05002 Q507 TRANSISTOR SILICON KTC3203 TCAT032034 Q509 TRANSISTOR DTC124EKAT146 TNYJC05001 Q510 TRANSISTOR SILICON 2SD1207 TD3T012070 Q513 TRANSISTOR 2SC2412KT146 T8YJ2412K0 Q514 TRANSISTOR SILICON 2SC2412KT T8YJ...

Страница 65: ...L3003 COIL 12UH 021LA6120J L4001 COIL 2 2UH 02167F2R2J L8001 COIL 0 33UH 021LA6R33M L8002 COIL 0 33UH 021LA6R33M L8102 COIL 1UH 02167F1R0K L8103 COIL 1UH 02167F1R0K L8104 COIL 1UH 02167F1R0K L8105 COIL 1UH 02167F1R0K Mark No Description Part No SWITCHES AND RELAY SW651 SWITCH TACT EVQ21505R 0504101T34 SW652 SWITCH TACT EVQ21505R 0504101T34 SW653 SWITCH TACT EVQ21505R 0504101T34 SW654 SWITCH TACT E...

Страница 66: ... C711 CC 560PF 50V CH CS0PCH4S2J C712 CE 4 7UF 50V E50HU54R7M C713 CE 4 7UF 50V E50HU54R7M Mark No Description Part No C714 CC 0 033UF 25V B CS0PB03L4K C715 CC 1UF 10V B CS0PB0N16K C716 CE 4 7UF 50V E50HU54R7M C717 CC 1UF 10V B CS0PB0N16K C718 CC 0 1UF 25V B CS0PB0315K C719 CE 4 7UF 50V E50HU54R7M C720 CE 10UF 25 V E50HU3100M C721 CE 10UF 25 V E50HU3100M C722 CE 100UF 16V E02LU2101M C723 CC 1UF 10...

Страница 67: ...01UF 50V B CS0PB0413K C3007 CC 0 1UF 25V B CS0PB0315K C3008 CC 0 0047UF 50V B CS0PB04Q3K C3009 CC 0 1UF 25V B CS0PB0315K Mark No Description Part No C3010 CC 0 001UF 50V B CS0PB0413K C3013 CE 22UF 16 V E50HU2220M C3014 CC 180PF 50V CH CS0PCH4G2J C3015 CC 820PF 50V CH CS0PCH4W2J C3016 CE 47UF 6 3V E50HU0470M C3017 CC 0 001UF 50V B CS0PB0413K C3018 CC 150PF 50V CH CS0PCH4E2J C3019 CC 0 1UF 25V B CS0...

Страница 68: ...CH411D C4099 CC 0 01UF 50V B CS0PB0414K C8004 CC 470PF 50V CH CS0PCH4Q2J C8005 CE 470UF 6 3V E02LU0471M Mark No Description Part No C8008 CC 0 0015UF 50V B CS0PB04E3K C8009 CC 0 0015UF 50V B CS0PB04E3K C8010 CE 10UF 25 V E50HU3100M C8011 CE 220UF 6 3V E50HU0221M C8013 CE 10UF 50V E50HU5100M C8014 CC 0 1UF 50V F CS0PF0415Z C8015 CE 220UF 6 3V E50HU0221M C8019 CE 10UF 25 V E50HU3100M C8020 CC 100PF ...

Страница 69: ... 27KOHM 1 16W R803R9273J R516 R FUSE 0 22OHM 1W R63581R22J Mark No Description Part No R517 RC 1KOHM 1 2W R002T2102J R518 RC 150OHM 1 16W R803R9151J R519 RC 1KOHM 1 16W R803R9102J R520 RC 3 3KOHM 1 16W R803R9332F R521 RC 390OHM 1 16W R803R9391J R522 RC 3 3KOHM 1 16W R803R9332F R523 RC 6 8KOHM 1 16W R803R9682J R524 RC 100OHM 1 4W R002T4101J R527 RC 220OHM 1 4W R002T4221J R529 RC 680KOHM 1 4W R002T4...

Страница 70: ... 4 7KOHM 1 16W R803R9472J R2612 RC 4 7KOHM 1 16W R8E3P9472J R2613 RC 4 7KOHM 1 16W R8E3P9472J Mark No Description Part No R2614 RC 12KOHM 1 16W R8E3P9123F R2615 RC 10OHM 1 16W R803R9100J R2616 RC 1KOHM 1 16W R8E3P9102J R2617 RC 1KOHM 1 16W R8E3P9102J R2618 RC 10OHM 1 16W R803R9100J R2619 RC 100OHM 1 16W R803R9101J R2620 RC 4 7KOHM 1 16W R8E3P9472J R2621 RC 100OHM 1 16W R803R9101J R2622 RC 4 7KOHM ...

Страница 71: ... R803R9332J R4064 RC 100OHM 1 16W R803R9101J R4068 RC 100OHM 1 16W R803R9101J R4070 RC 47KOHM 1 16W R803R9473J R4071 RC 150OHM 1 16W R803R9151J Mark No Description Part No R4072 RC 8 2KOHM 1 16W R803R9822J R4073 RC 100OHM 1 16W R803R9101J R8002 RC 3 3KOHM 1 16W R803R9332J R8003 RC 1 5KOHM 1 16W R803R9152J R8004 RC 33KOHM 1 4W R002T4333J R8005 RC 220OHM 1 16W R803R9221J R8006 RC 68OHM 1 16W R803R96...

Страница 72: ...CP3001 CON PCB SIDE TMC J12P B2 06972C0010 CP8001 CON PCB SIDE IMSA 9604S 14C 069J7E0599 CP8101 CON PCB SIDE IMSA 9604S 14F 069J7E0589 F501 FUSE 51MS025L 081PC2R505 FH501 HOLDER FUSE EYF 52BCY 06710T0009 FH502 HOLDER FUSE EYF 52BCY 06710T0009 NR4001 R NETWORK 4D03WGJ0101T5E 110P4101M4 NR4002 R NETWORK 4D03WGJ0101T5E 110P4101M4 NR4003 R NETWORK 4D03WGJ0101T5E 110P4101M4 NR4004 R NETWORK 4D03WGJ0101...

Страница 73: ...m VSR Torque Brake Torque S Reel GGF1509 Post Adjustment Screwdriver Guide Roller Adjustment GGF1510 X Value Adjustment Screwdriver X Value Adjustment GGF1511 Master Plane Reel Disk Heifht Adjustment GGF1512 Reel Disk Height Adjustment Jig Reel Disk Heifht Adjustment GGV1186 Torque Tape VHT 063 Playback Torque Back Tension Torque During Playback PREPARATION FOR SERVICING 1 While pressing the CH DO...

Страница 74: ...BACK TENSION TORQUE DURING PLAYBACK 4 1 4 CONFIRMATION OF VSR TORQUE 5 1 5 CONFIRMATION OF REEL BRAKE TORQUE 1 CONFIRMATION AND ADJUSTMENT 6 2 1 GUIDE ROLLER 7 2 2 CONFIRMATION AND ADJUSTMENT OF AUDIO CONTROL HEAD 8 2 3 TAPE RUNNING ADJUSTMENT X VALUE ADJUSTMENT 9 2 4 CONFIRM HI FI AUDIO Hi Fi model only 2 CONFIRMATION AND ADJUSTMENT OF TAPE RUNNING MECHANISM 10 Electrical Part 1 1 PG SHIFTER 11 V...

Страница 75: ...trical point Replacing TU301 TUNER None None Mechanical point Electrical point Replacing HEAD AUDIO CONTROL CYLINDER UNIT ASSY 6 10 7 Mechanical point Electrical point Replacing IC3099 VCR SIDE EEPROM None 8 9 10 11 Mechanical point Electrical point Replacing IC4007 DVD SIDE EEPROM None None Mechanical point Electrical point Replacing DVD DECK None None Mechanical point Electrical point Replacing ...

Страница 76: ...s VCR mode Playback CH UP STOP 2 sec Adjust the PG SHIFTER automatically Refer to the ELECTRICAL ADJUSTMENT Power Off CH DOWN POWER 2 sec VCR operation mode at no connection of DVD Refer to the PREPARATION FOR SERVICING NOTE Although the DVD is connected the DVD mode cannot be selected Set Condition Set Key Remocon Key Standard Time Operations DVD mode No disc REC OTR 4 2 sec Initialization of the...

Страница 77: ...eset to 0 1 Connect the set to TV Monitor 2 Turn on the POWER and set to the VCR mode 3 Press both CH UP button on the set and the FF button on the set for more than 2 seconds The Fig 1 screen will appear on TV Monitor 4 After the confirmation of using hours turn off the power Fig 1 Initial setting content of MEMORY IC PLAY REC total hours 16 16 16 thousands digit value 16 16 hundreds digit value ...

Страница 78: ...Guide Post 7 7 7 7 7 Replace when rolling becomes abnormal Cylinder Unit 7 Clean the Head 7 Clean Check it and if necessary replace it NOTE After cleaning the heads with isopropyl alcohol do not run a tape until the heads dry completely If the heads are not completely dry and alcohol gets on the tape damage may occur 1 AUDIO CONTROL HEAD Clean the Audio Control Head with the cotton stick soaked by...

Страница 79: ...t to the PLAY mode 2 Adjust the adjusting section for the Tension Arm position so that the Tension Arm top is within the standard line of Main Chassis 3 While turning the S Reel clockwise confirm that the edge of the Tension Arm is located in the position described above USING A CASSETTE TYPE TORQUE TAPE GGV1186 1 After confirmation and adjustment of Tension Post position Refer to item 1 2 load th...

Страница 80: ...ce the parts of the tape running mechanism because of long term usage or failure the confirmation and adjustment are necessary 2 1 GUIDE ROLLER 1 Playback the VHS Alignment Tape GGV1183 Refer to SERVICING FIXTURE AND TOOLS 2 Connect CH 1 of the oscilloscope to TP101 Envelope and CH 2 to TP3002 SW Pulse 3 Press and hold the ATR button on the remote control more than 2 seconds to set tracking to cen...

Страница 81: ...Refer to SERVICING FIXTURE AND TOOLS 7 Press and hold the ATR button on the remote control more than 2 seconds to set tracking to center 8 Set the X Value adjustment driver GGF1510 to the 4 of Fig 2 2 B Adjust X value so that the envelope waveform output becomes maximum Check if the relation between Audio and Envelope waveform becomes 1 or 2 of Fig 2 3 9 Playback the VHS Alignment Tape Refer to SE...

Страница 82: ...ISM ADJUSTMENT PARTS LOCATION GUIDE 9 10 8 7 6 5 4 3 2 1 1 Tension Connect 2 Tension Arm 3 Guide Roller 4 Audio Control Head 5 X value adjustment driver hole 6 P4 Post 7 T Brake Spring 8 T Reel 9 S Reel 10 Adjusting section for the Tension Arm position ...

Страница 83: ...ilicon grease remove all the old silicon grease Old grease may cause damages to the IC and Transistor 1 1 PG SHIFTER CONDITIONS MODE PLAYBACK Input Signal Alignment Tape GGV1183 INSTRUCTIONS 1 Connect CH 1 on the oscilloscope to TP3002 and CH 2 to J8005 2 Playback the alignment tape GGV1183 3 Press and hold the Tracking Auto button on the remote control more than 2 seconds to set tracking to cente...

Страница 84: ...ECTION B C A VCR PCB CD501 OPERATION PCB DVD PCB DVD DECK CD2301 CD2001 CP2601 CP2603 CP2602 CP8101 CD4002 V651 J8003 J8004 J8005 OS651 TU301 OS8001 J8007 J8006 J8008 J8001 CP8001 S501 S502 CP651 CP501 TP101 TP701 TP3001 TP3002 CP103 FE HEAD CP102 AC HEAD CD102 AC IN CD681 CP681 CD8001 CD501 CD2302 ...

Страница 85: ...r make the short circuit on the position as shown Fig 1 using a soldering If you remove the DVD Deck with no soldering the Laser may be damaged When the installation of the DVD Deck Remove all the soldering on the short circuit position after the connection of Pick Up PCB and DVD PCB connector Pick Up PCB Fig 1 Make the short circuit using a soldering ...

Страница 86: ...o select DATA When DATA is selected it will blink 6 Again step through the DATA using Tracking or button until required DATA value has been selected 7 Pressing ENTER will take you back to ADDRESS for further selection if necessary 8 Repeat steps 4 to 7 until all data has been checked 9 When satisfied correct DATA has been entered turn POWER off return to STANDBY MODE to finish DATA input After the...

Страница 87: ...8 5 0 Mode Dealing Directions INCLINED BASE S T UNIT TENSION ARM ASSY S REEL BRAKE TENSION CONNECT S REEL BRAKE T BRAKE ARM T REEL BRAKE PINCH ROLLER BLOCK P5 ARM ASSY TENSION LEVER CLUTCH LEVER LINK UNIT FLAP LEVER UP PRESS CLUTCH ON BRAKE ON BRAKE ON BRAKE ON PRESS PRESS DIRECT T BRAKE LOW MODE SENSOR Output MS 1 High Low High Low MS 2 Revolutional Angle of MAIN CAM Moving Quantity of MAIN ROD m...

Страница 88: ...w by hand to slacken the Video Tape 4 Rotate the Clutch Assy either of the directions to wind the Video Tape in the Cassette Case 5 Repeat the above step 3 4 Then take out the Video Cassette from the Deck Chassis Be careful not to scratch on the tape Fig 1 Fig 2 Capstan DD Unit Main Chassis Front Side Clutch Assy Main Cam Pinch Roller Cam Screw Loading Motor 1 1 Remove the Back Cabinet and TV DVD ...

Страница 89: ...ancelled please follow the steps below 1 Turn Unit ON 2 Press and hold the 7 key on the remote control unit 3 Simultaneously press and hold the STOP key on the front panel 4 Hold both keys for more than 2 seconds 5 The On Screen Display message PASSWORD UNLOCK will appear 6 The 4 digit password has now been cleared 4 DIGIT PASSWORD CANCELLATION ...

Страница 90: ... 2 screws 2 4 Remove the 2 screws 3 5 Disconnect the following connectors CP501 CP8001 6 Remove the DVD Deck in the direction of arrow B 7 Remove the 2 screws 4 8 Remove the DVD PCB Assy in the direction of arrow C 9 Remove the 3 screws 5 10 Remove the Front Angle in the direction of arrow D 1 2 FLAP Refer to Fig 1 2 1 Open Flap to 90 and flex in direction of arrow A at the same time slide in dire...

Страница 91: ...ig 1 4 NOTE Do not remove the cable at the FE Head section The FE Head may be damaged if you remove the cable by force 1 Remove the screw 1 2 Remove the FE Head 3 Move the Cassette Holder Assy to the back side 4 Remove the 2 screws 2 5 Remove the 2 screws 3 6 Disconnect the following connectors CP101 CP102 CP3001 7 Remove the VCR Deck in the direction of arrow Fig 1 5 Fig 1 4 2 2 2 1 3 3 1 3 3 2 2...

Страница 92: ...the Link Unit to the Eject position 2 Unlock the support 1 3 Remove the A side of the Link Unit first then remove the B side 2 5 LINK LEVER FLAP LEVER Refer to Fig 2 5 1 Extend the support 1 2 Remove the Link Lever 3 Remove the Flap Lever Fig 2 1 Fig 2 3 B Fig 2 4 Fig 2 5 1 1 1 1 1 1 2 1 2 2 1 Top Bracket Top Bracket Main Chassis Main Chassis Main Chassis Locker Spring Locker R Locker R Cassette S...

Страница 93: ...d remove the Tension Arm Assy 5 Unlock the support 3 and remove the Tension Connect 6 Float the hook 4 and turn it clockwise then remove the Tension Holder NOTE 1 In case of the Tension Band installation note the direction of the installation Refer to Fig 2 7 C 2 In case of the Tension Band installation install correctly as Fig 2 7 D 3 In case of the Tension Connect installation install as the cir...

Страница 94: ...ection A of S Reel and T Reel Use gloves Refer to Fig 2 9 A Do not adhere the stains on it 5 When you install the reel clean the shaft and grease it FG 84M If you do not grease noise may be heard in FF REW mode 6 After installing the reel adjust the height of the reel Refer to MECHANICAL ADJUSTMENT NOTE 1 In case of the S Reel and T Reel installation check if the correct parts are installed Refer ...

Страница 95: ...e screw 3 2 12 FE HEAD RECORDER ONLY Refer to Fig 2 12 1 Remove the screw 1 2 Remove the FE Head 2 13 AHC ASSY CYLINDER UNIT ASSY Refer to Fig 2 13 1 Unlock the support 1 and remove the AHC Assy 2 Disconnect the following connector CD2001 3 Remove the 3 screws 2 4 Remove the Cylinder Unit Assy NOTE 1 When you install the Cylinder Unit Assy tighten the screws from 1 to 3 in order while pulling the ...

Страница 96: ...hat the each markers are met Refer to Fig 2 15 B 2 16 LOADING GEAR S T UNIT Refer to Fig 2 16 A 1 Remove the E Ring 1 and remove the Main Loading Gear 2 Remove the Main Rod Tension Lever Loading Arm S Unit and Loading Arm T Unit NOTE 1 When you install the Loading Arm S Unit Loading Arm T Unit and Main Loading Gear align each marker Refer to Fig 2 16 B Fig 2 14 Fig 2 15 A Fig 2 15 B Fig 2 16 B 1 1...

Страница 97: ... P4 Cap 2 Unlock the support 1 and remove the Cassette Guide Post 3 Remove the Inclined Base S T Unit 4 Remove the screw 2 5 Remove the LED Reflector NOTE 1 Do not touch the roller of Guide Roller 2 In case of the P4 Cap installation install it with parallel for A and B of Fig 2 18 B 3 In case of the Cassette Guide Post installation install correctly as the circled section of Fig 2 18 C Fig 2 17 A...

Страница 98: ...Minute adjustments are needed if the disassemble is done If the repair is needed except listed parts replace the DVD MECHA ASS Y NOTE 1 2 In case of the Main Chassis Ass y install it from 1 to 4 in order Refer to Fig 3 2 B In case of the Main Chassis Ass y installation hook the wire on the Main Frame Ass y as shown Fig 3 2 C 1 1 2 Main Frame Ass y Main Chassis Ass y 2 Fig 3 2 B 1 2 3 3 4 3 Check L...

Страница 99: ...2 and remove the Pulley Gear Remove the Main Gear Pulley Gear 2 Fig 3 4 A 3 5 CLAMPER ASS Y Refer to Fig 3 5 A Press the Clamper and rotate the Clamper Plate clockwise then unlock the 3 supports 1 Remove the Clamper Plate Clamper Magnet and Clamper 1 2 Clamper Plate Clamper Magnet Fig 3 5 A Fig 3 4 B NOTE 1 In case of the Rack Loading installation do not mesh it to the Main Gear as shown the Fig 3...

Страница 100: ...ety surface for pressing of the insert Feed Motor Motor Gear Fig 3 7 C Switch PCB Ass y Install wire from 1 to 4 in order NOTE 1 2 3 In case of the Motor Gear installation check if the value of the Fig 3 7 B is correct When installing the wire of the Switch PCB Ass y install it correctly as Fig 3 7 C After the assembly of the Main Chassis Ass y hook the wire on the Main Chassis Ass y as shown Fig ...

Страница 101: ...V Inverter K KIL Killer L L Left LED Light Emitting Diode LIMIT AMP Limiter Amplifier LM LDM Loading Motor L LP Long Play L P F Low Pass Filter LUMI Luminance M M Motor MAX Maximum MINI Minimum MIX Mixer mixing MM Monostable Multivibrator MOD Modulator Modulation MPX Multiplexer Multiplex MS SW Mecha State Switch N NC Non Connection NR Noise Reduction O OSC Oscillator OPE Operation P PB Playback P...

Страница 102: ...low cannot be played back in general Even if one of these can be played back it may not be played back correctly If a disc is played back by mistake extensively loud sounds may blow the speakers or may damage the hearing of those in hearing range Do not playback the discs listed below CDG Photo CD CD ROM CD TEXT CD EXTRA VCD SVCD SACD PD CDV DVD ROM DVD RAM DVD R RW DVD audio etc The below DVD Vid...

Страница 103: ... D F A B E 7 9 CLEANING Before shipping out the product be sure to clean the following positions by using the prescribed cleaning tools Position to be cleaned Cleaning tools Pickup lenses Cleaning liquid GEM1004 Cleaning paper GED 008 ...

Страница 104: ..._IN1 I Composite Video input terminal for OSD 18 OSD VCC OSDVCC 5V 19 CV_OUT CV_OUT O Composite Video output with OSD 20 OSD_VSS OSD_VSS Ground 21 4 2 FSC_OUT 4 2 FSC_OUT O 4 FSC pulse 22 4 2 FSC_IN 4 2 FSC_IN I 4 FSC pulse 23 AVSS AVSS Ground 24 AN B VIDEO_ENV I Input terminal of video RF envelope 25 AN A BOT H I Tape start sensor input signal 26 AN 9 EOT H I Tape end sensor input signal 27 AN8 M...

Страница 105: ...DVD communication asynchronous 65 P20 SI1 SI1 RX I Output terminal for DVD communication asynchronous 66 P47 RPTRG SEG6 O LEM LED Module control terminal 67 P46 FTOB SEG7 O LEM LED Module control terminal 68 P45 FTOA SEG8 O LEM LED Module control terminal 69 P44 FTID NC O Not used 70 P43 FTIC NC O Not used 71 P42 FTIB SEG9 O LEM LED Module control terminal 72 P41 FTIA NC O Not used 73 P40 PWM14 SE...

Страница 106: ...3 C ROT R C ROTARY O Color Rotary Control output 100 P84 H AMP SW G H AMP SW O Switching output of Head Amp SW 101 P85 COMP B COMP I Comparison results input of Playback Envelope level on SP LP heads 4 heads 102 P85 EZTTRG CAP_FULL O Output the HIGH during the acceleration force of capstan motor at SLOW mode 103 P87 DPG CYL_SPEED_UP O Output terminal for correct cylinder during SLOW 104 DFG D FG P...

Страница 107: ...L buttons Display window Remote sensor VCR EJECT button OPEN CLOSE button PLAY button VCR DVD mode selector button FF Fast Forward button REW Rewind button REC button DVD COAXIAL DIGITAL AUDIO OUT jack DVD S VIDEO OUT jack DVD VCR common AUDIO L R VIDEO OUT jacks AC power cord DVD AUDIO L R OUT jacks DVD OPTICAL DIGITAL AUDIO OUT jack dust protection cap DVD COMPONENT OUT jacks S VIDEO COMPONENT V...

Страница 108: ...ATV channel display TV channel display Track number display for CD Display for afternoon out in the morning Error display Lights during playback of DVD and CD Flashes in auto resume DVD or CD is temporarily stopped CD DVD VCR 10 00 01H00M00S C 36CH 2CH TRK 002 PM Err 2 VCR recording modes SP or SLP is selected in turn by pressing the REC MODE SPEED repeatedly SP SLP Note Some discs may not playbac...

Страница 109: ...up menu 17 STOP Stops playback or recording 18 PLAY Starts playback 19 PAUSE STILL Pauses recording or playback press again to restart 20 SKIP Skips forward or back chapters 21 INDEX Searches for INDEX marks on a tape 22 REW SEARCH Rewind review playback 23 F FWD SEARCH Fast forward forward search playback 24 MARKER 26 SLOW Starts slow motion playback 27 REC Starts recording 30 AUDIO AUDIO SELECT ...

Страница 110: ... 90 gf cm GGF1507 VSR Torque Brake Torque S Reel T Reel Assy Brake Torque T Reel Assy Dial Torque Gauge 60 600 gf cm GGF1508 VSR Torque Brake Torque S Reel Post Adjustment Screwdriver GGF1509 X Value Adjustment Screwdriver GGF1510 Guide Roller Adjustment X Value Adjustment Mater Plane GGF1511 Reel Disk Height Adjustment Reel Disk Height Adjustment Jig GGF1512 Torque Tape VHT 063 GGV1186 Reel Disk ...

Отзывы: