background image

13

Installation

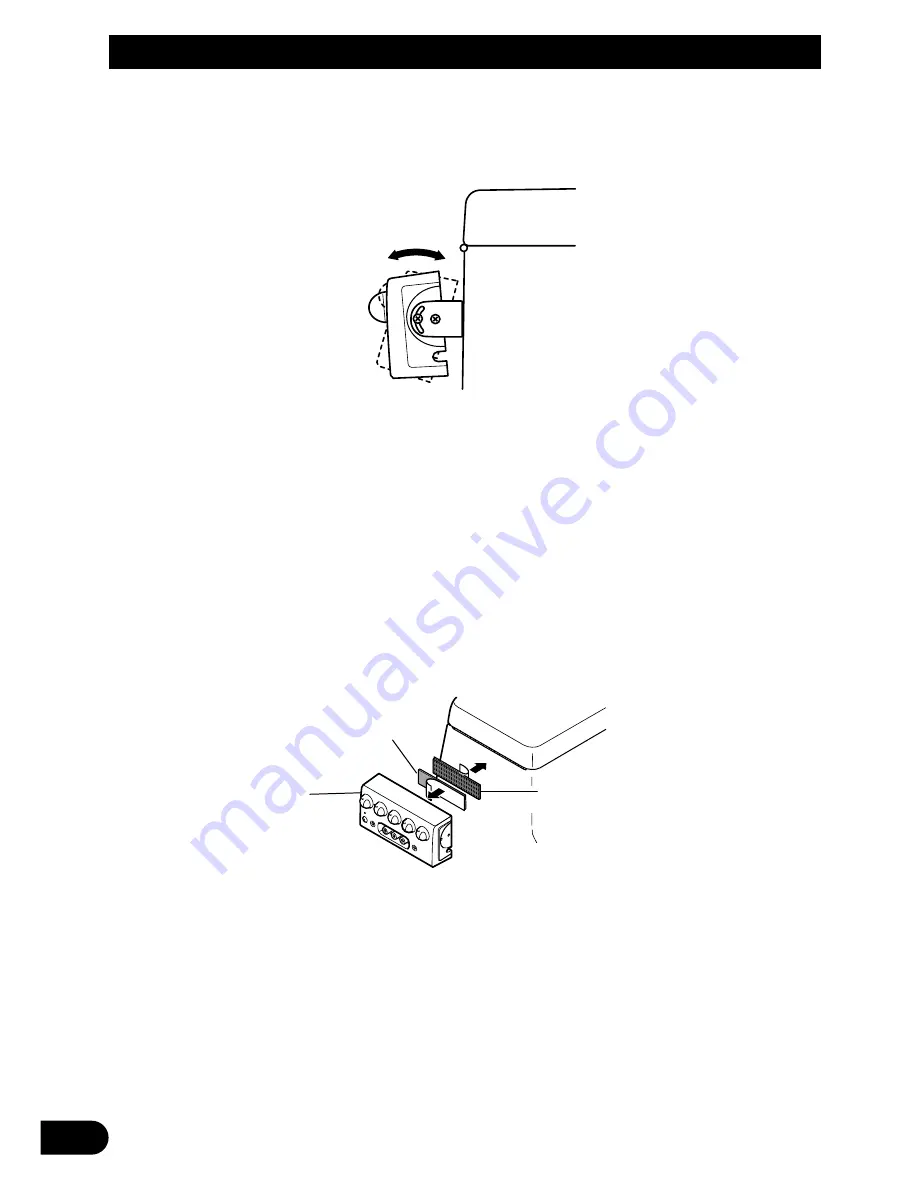
6. Adjust the installation angle of the controller unit.

Adjust the angle for optimal ease of use.

7. Secure the controller unit firmly with the L-fixtures.

Tighten the screws fully.

Note:

• Be careful not to overtighten the screws or tighten them slanted.  An expanded screw hole might

result, disabling attachment of the L-fixtures.

Installation using Velcro tape

Adhere the Velcro tape (hard) (provided) to the back of the controller unit, adhere the
Velcro tape (soft) to the installation location and then install.

Velcro tape
(hard)

Controller unit

Velcro tape
(soft)

Содержание CD-VS33

Страница 1: ...nforms to new cord colors Los colores de los cables de este producto se conforman con un nuevo código de colores Dieses Gerät entspricht den neuen kabelfarben Le code de couleur des câbles utilisé pour ce produit est nouveau Questo prodotto è conforme ai nuovi codici colori Operation Manual CD VS33 Mode d emploi ...

Страница 2: ...onnecting the Power Cord and Controller Unit 4 Connecting the System 1 5 Connecting the System 2 7 Connecting the Audio Video equipment 9 Installation 10 Installing Hide away Unit 10 Installing Controller Unit 11 Part Names And Applications 14 Controller Unit 14 Hide away Unit 15 Specifications 16 ...

Страница 3: ... of time can have an adverse effect on hearing This product complies with the EMC Directives 89 336 EEC 92 31 EEC and CE Marking Directive 93 68 EEC 2 ENGLISH ESPAÑOL DEUTSCH FRANÇAIS ITALIANO NEDERLANDS WARNING Connect the product to a display that cannot be seen by the driver If the display can be installed only where it is visible to the driver use a display that can detect the ON OFF status of...

Страница 4: ...mps or adhesive tape To protect the wiring wrap adhesive tape around them where they lie against metal parts Route and secure all wiring so it cannot touch any moving parts such as the gear shift handbrake and seat rails Do not route wiring in places that get hot such as near the heater outlet If the insulation of the wiring melts or gets torn there is a danger of the wiring short circuiting to th...

Страница 5: ...nal controlled by ignition switch 12V DC ON OFF Black ground To vehicle metal body Hide away unit Controller unit Route the controller unit cord inside the slot groove on the controller unit rear side Do not pull strongly excessively bend or stretch the cord Fuse holder 1 A 3 m 2 m 2 m Controller unit rear side Groove Cord ...

Страница 6: ...5 Connecting the Units Connecting the System 1 Connecting cords with RCA pin plugs sold separately Hide away unit AV OUT 1 3 Connecting cords with RCA pin plugs sold separately AV IN 2 3 ...

Страница 7: ...table video sold separately etc Display Hide away unit Rear Display 2 Hide away unit Rear Display 1 Front AVD W8000 etc AVD W8000 etc Video input Audio input Hide away unit Rear Display 3 AVD W8000 etc Multi DVD player XDV P9 Video output for rear Audio output Video output Rear Audio output Display Display ...

Страница 8: ...7 A Title English Connecting the Units Connecting the System 2 Connecting cords with RCA pin plugs sold separately Hide away unit AV OUT 1 3 Connecting cords with RCA pin plugs sold separately AV IN 2 3 ...

Страница 9: ... XDV P9 Display Hide away unit Rear Display 2 Hide away unit Rear Display 1 Front AVD W8000 etc AVD W8000 etc Video input Audio input Hide away unit Rear Display 3 AVD W8000 etc AVM P9000R Video output for rear Audio output Display Display Audio output Video output Front Display AVX P7000CD etc TV TUNER GEX P7000TV Rear ...

Страница 10: ...r unit Headphones sold separately Headphones sold separately 8mm video vehicle mounted portable video etc Connecting cords with RCA pin plugs sold separately Audio output Video output Connecting cords with RCA pin plugs sold separately 3 5 mini pin plug 3 5 mini pin plug ...

Страница 11: ...it securely so it does not break free while the car is moving and cause injury or an accident If this product is installed under a front seat make sure it does not obstruct seat movement Route all leads and cords carefully around the sliding mechanism so they do not get caught or pinched in the mechanism and cause a short circuit Install the controller in a safe place where it can be easily operat...

Страница 12: ...ble sided tape of the L fixture and adhere to the installation location 1 Attach L fixtures to the controller unit finger tight Keep the screws loose 2 Paste double sided adhesive tape to the intended installation position of the controller unit Note Bend the L fixtures to meet the shape of the intended installation position of the con troller unit L fixture Screw Controller unit Remove release pa...

Страница 13: ...e L fixtures once 4 Press the L fixtures firmly against the intended installation position of the controller unit 5 Attach the controller unit to the L fixtures Keep the screws loose 12 ENGLISH ESPAÑOL DEUTSCH FRANÇAIS ITALIANO NEDERLANDS ...

Страница 14: ...crews fully Note Be careful not to overtighten the screws or tighten them slanted An expanded screw hole might result disabling attachment of the L fixtures Installation using Velcro tape Adhere the Velcro tape hard provided to the back of the controller unit adhere the Velcro tape soft to the installation location and then install Velcro tape hard Controller unit Velcro tape soft ...

Страница 15: ... the AV IN jack 1 3 for each AV OUT jack 1 3 Power indicator power switch The power is turned on or off alternately each time the power switch is pressed The power indi cator lights when the power is on AV IN jacks 1 RCA video input yellow RCA audio input white red Used to connect 8mm video vehicle mounted portable video etc Headphone output jacks The mini pin plug of headphones can be connected t...

Страница 16: ...A input jacks of video and portable video units etc AV OUT jacks 1 3 RCA video output yellow RCA audio output white red Outputs the video and audio signals Multi DVD player vehicle mounted portable video etc connected to the AV IN jack Power Connect the power cord provided Controller connection jack Connect the controller unit provided ...

Страница 17: ...Grounding System Negative Type Max Current Consumption 0 4 A Audio Output Level 1Vp p 75Ω Hide away Unit Dimensions 160 W 28 H 120 D mm Weight 0 53 kg Controller Dimensions 120 W 60 H 32 D mm Weight 0 32 kg Note Specifications and the design are subject to possi ble modification without notice due to improve ments ...

Страница 18: ...able de alimentación y del unidad controlador 4 Conexión del sistema 1 5 Conexión del sistema 2 7 Equipo de audio vídeo 9 Instalación 10 Instalación del unidad oculta alejada 10 Instalación del unidad controlador 11 Nombre de las piezas y aplicaciones 14 Unidad controlador 14 Unidad oculta alejada 15 Especificaciones 16 ...

Страница 19: ... ADVERTENCIA Conecte el producto a una pantalla que no sea visible desde el asiento del conductor Si instala la pantalla en un sitio que sea visible por el conductor escoja una que pueda detectar el estado de aplicación liberación del freno de estacionamiento y asegúrese de instalarla correctamente de manera que funcione siempre conjuntamente con el interrup tor del freno de estacionamiento Para e...

Страница 20: ...esiva Para proteger el cableado envuélvalo con cinta adhesiva donde éstos se apoyan sobre las piezas de metal Coloque y asegure todo el cableado de tal manera que no toque las piezas en movimiento tal como la palanca de cambio de velocidades el freno de mano y los pasamanos de los asientos No coloque el cableado en lugares que se calientan tal como cerca de la salida de un calefactor Si el materia...

Страница 21: ...endido del vehículo 12 V C C ON OFF Negro tierra A la carrocería metálica del vehículo parte metálica Unidad oculta alejada Unidad controlador Porta fusible 1 A Tienda el cable del contro lador dentro de la ranura dis puesta en la parte posterior del controlador No tire del cordón con fuerza y evite doblarlo o atirantarlo excesi vamente 3 m 2 m 2 m Lado trasero del controlador Ranura Cable ...

Страница 22: ...Conectando las unidades Conexión del sistema 1 Cables de conexión con clavjás RCA en venta por separado Unidad oculta alejada AV OUT 1 3 Cables de conexión con clavjás RCA en venta por separado AV IN 2 3 ...

Страница 23: ...talla Unidad oculta alejada Pantalla trasera 2 Unidad oculta alejada Pantalla trasera 1 Parte delantera AVD W8000 etc AVD W8000 etc Entrada de vídeo Entrada de audio Unidad oculta alejada Pantalla trasera 3 AVD W8000 etc Reproductor de Multi DVD XDV P9 Salida de vídeo para la parte trasera Salida de vídeo Salida de audio Salida de audio Parte trasera Pantalla Pantalla ...

Страница 24: ...Conectando las unidades Conexión del sistema 2 Cables de conexión con clavjás RCA en venta por separado Unidad oculta alejada AV OUT 1 3 Cables de conexión con clavjás RCA en venta por separado AV IN 2 3 ...

Страница 25: ...idad oculta alejada Pantalla trasera 1 Parte delantera AVD W8000 etc AVD W8000 etc Entrada de vídeo Entrada de audio Unidad oculta alejada Pantalla trasera 3 AVD W8000 etc Reproductor de Multi DVD XDV P9 Salida de vídeo para la parte trasera Salida de audio Parte trasera Pantalla Pantalla Pantalla delantera AVX P7000CD etc Salida de audio Salida de vídeo Sintonizador de TV GEX P7000TV ...

Страница 26: ...Auriculares en venta por sepa rado Auriculares en venta por sepa rado Vídeo de 8 mm vídeo portátil montado en vehículo etc Cables de conexión con clavjás RCA en venta por separado Salida de audio Salida de vídeo Miniclavija monopolar de 3 5 Miniclavija monopolar de 3 5 ...

Страница 27: ...el automóvil se encuentra en movimiento pudiendo ocasionar lesiones o accidentes Si este producto es instalada debajo de un asiento delantero asegúrese de que no obstruya el movimiento del asiento Disponga todos los cables y conductores cuidadosamente alrededor del mecanismo deslizante de modo que no queden atrapados o aprisionados en el mecanismo a causa de un cortocircuito Instale el unidad cont...

Страница 28: ...or L y péquela en el sitio de instalación 1 Fije los sujetadores L al unidad controlador apretándolos con los dedos Mantenga los tornillos flojos 2 Pegue la cinta adhesiva de doble cara en el sitio de instalación previsto para el unidad controlador Despegar la tira desprendible Nota Doble los sujetadores L para acomodarlos a la forma del lugar de instalación previsto para el unidad controlador Suj...

Страница 29: ... NEDERLANDS 3 Retire los sujetadores del unidad controlador 4 Presione firmemente los sujetadores L contra el sitio de instalación previsto para el unidad controlador 5 Fije el unidad controlador a los sujetadores L Mantenga los tornillos flojos ...

Страница 30: ...los tornillos en exceso o de forma inclinada De lo contrario puede suceder que los agujeros de los tornillos se ensanchen y que no se puedan fijar los sujetadores L Instalación utilizando la cinta velcro Pegue la cinta Velcro rígida suministrada sobre la parte posterior del unidad controlador y la cinta Velcro blanda sobre el sitio de instalación y realice la instalación 13 Instalación Cinta Velcr...

Страница 31: ...3 para cada toma AV OUT 1 3 Indicador de alimentación interruptor de alimentación La unidad se enciende y apaga alternativamente cada vez que presiona el interrup tor de alimentación Al encen der la unidad el indicador de alimentación se ilumina Tomas AV IN 1 Entrada de vídeo RCA amarillo entrada de audio RCA blanco rojo Se utiliza para conectar un vídeo de 8 mm un vídeo portátil montado en el veh...

Страница 32: ...s de vídeo portátiles etc Tomas AV OUT 1 3 Salida de vídeo RCA amarillo Salida de audio RCA blanco rojo Salidas de las señales de audio y vídeo de las unidades Reproductor de Multi DVD vídeo portátil montado en el vehículo etc conectadas a la toma AV IN Alimentación Se utiliza para conectar el cable de alimentación suministrado Toma para conexión del unidad controlador Conecte el unidad contro lad...

Страница 33: ...ón a tierra De tipo negativo Máx consumo de energía 0 4 A Nivel de Salida de Audio 1 Vp p 75 Ω Unidad oculto alejado Dimensiones 160 An 28 Al 120 Pr mm Peso 0 53 kg Unidad controlador Dimensiones 120 An 60 Al 32 Pr mm Peso 0 32 kg Nota Las especificaciones y el diseño están sujetos a posibles modificaciones sin previo aviso debido a mejoramientos ...

Страница 34: ... des Controllers Einheit 4 Anschließen der Geräte 1 5 Anschließen der Geräte 2 7 Anschließen der Audio Video Geräte 9 Einbau 10 Einbauen des Steuerungsgeräts 10 Einbauen des Controllers Einheit 11 Bezeichnung der Teile und ihre Funktionen 14 Controllers Einheit 14 Hideaway Einheit 15 Technische Daten 16 Inhaltsverzeichnis ...

Страница 35: ...kann schädlich für das Gehör sein WARNUNG Schließen Sie das Produkt an ein Display an das nicht vom Fahrer einsehbar ist Falls das Display nur an einer Stelle installiert werden kann wo es vom Fahrer einsehbar ist verwenden Sie ein Display das den EIN AUS Zustand der Feststellbremse erkennen kann und installieren Sie das Display korrekt so dass es immer in Verbindung mit dem Feststellbremsschalter...

Страница 36: ...it Kabelklemmen oder Klebeband Zum Schutz der Kabel umwickeln Sie diese an Berührungsstellen mit Metallteilen mit Klebeband Verlegen und sichern Sie alle Kabel so daß diese keine beweglichen Teile wie z B Schalthebel Handbremse und Sitzschienen berühren können Verlegen Sie Kabel nicht an Stellen die heiß wer den können wie z B in der Nähe des Heizungsauslasses Falls eine Kabelisolierung schmilzt o...

Страница 37: ...rom die mit dem Zündschloß ein und ausgeschaltet wird Schwarz Erdung An die Karosserie Metallteil anschließen Hideaway Einheit Controllers Einheit Sicherungshalter 1 A Führen Sie das Kabel des Controllers durch die Schlitznut auf der Rückseite des Controllers Das Kabel nicht gewaltsam ziehen übermäßig biegen oder dehnen 3 m 2 m 2 m Controller Rückseite Rille Kabel ...

Страница 38: ... Anschließen der Geräte Anschließen der Geräte 1 Verbindungskabel mit RCA Stiftstecker getrennt erhältlich Hideaway Einheit AV OUT 1 3 Verbindungskabel mit RCA Stiftstecker getrennt erhältlich AV IN 2 3 ...

Страница 39: ...etrennt erhältlich u s w Display Hideaway Einheit Hinteres Display 2 Hideaway Einheit Hinteres Display 1 Vorn AVD W8000 u s w Video Eingang Audio Eingang Hideaway Einheit Hinteres Display 3 AVD W8000 u s w Multi DVD player XDV P9 Video Ausgang für hinten Audio Ausgang Video Ausgang Hinten Audio Ausgang Display Display AVD W8000 u s w ...

Страница 40: ... Anschließen der Geräte Anschließen der Geräte 2 Verbindungskabel mit RCA Stiftstecker getrennt erhältlich Hideaway Einheit AV OUT 1 3 Verbindungskabel mit RCA Stiftstecker getrennt erhältlich AV IN 2 3 ...

Страница 41: ... Multi DVD player XDV P9 Display Hideaway Einheit Hinteres Display 2 Hideaway Einheit Hinteres Display 1 Vorn AVD W8000 u s w AVD W8000 u s w Video Eingang Audio Eingang Hideaway Einheit Hinteres Display 3 AVD W8000 u s w AVM P9000R Video Ausgang für hinten Hinten Audio Ausgang Display Display Video Ausgang Audio Ausgang Fernsehtuner GEX P7000TV ...

Страница 42: ... Controllers Einheit Kopfhörer getrennt erhältlich Kopfhörer getrennt erhältlich 8 mm Video Gerät tragbares Bord Videogerät usw Verbindungskabel mit RCA Stiftstecker getrennt erhältlich Video Ausgang Audio Ausgang 3 5 Mini Klinkenstecker 3 5 Mini Klinkenstecker ...

Страница 43: ...r Fahrt nicht lösen und Verletzungen oder einen Unfall verursachen kann Wenn dieses Gerät unter einem Vordersitz installiert wird muß sichergestellt werden daß der Sitz immer noch ohne jegliche Behinderung verschoben werden kann In diesem Fall sind jegliche Kabel sorgfältig so um den Verschiebemechanismus zu verlegen daß sie nicht eingeklemmt wer den und einen Kurzschluß verursachen können Bringen...

Страница 44: ...tigen Klebeband der L Halter ab und bringen Sie diese an der Montagefläche an 1 Die L Halter von Hand am Controllers Einheit anziehen Die Schrauben locker halten 2 Doppelseitiges Klebeband an der vorgesehenen Montagefläche des Controllers Einheit anbringen Hinweis Die L Halter biegen um sie der Form der vorgesehenen Montagefläche des Controllers Einheit anzupassen Schraube Controllers Einheit L Ha...

Страница 45: ...NEDERLANDS 3 Den Controllers Einheit vorübergehend von den L Haltern abnehmen 4 Die L Halter fest gegen die vorgesehene Montagefläche des Controllers Einheit pressen 5 Den Controllers Einheit an den L Haltern anbringen Die Schrauben locker halten ...

Страница 46: ... Achten Sie darauf die Schrauben nicht zu fest oder schief anzuziehen Dies könnte ein Ausreißen der Gewindebohrung zur Folge haben was die Befestigung der L Halter unmöglich macht Installation mit Klettband Bringen Sie das mitgelieferte Klettband hart an der Rückseite des Controllers und das Klettband weich an der Montagefläche an und installieren Sie den Controller Haftstück hart Controllers Einh...

Страница 47: ...de Buchse AV OUT 1 3 Betriebsanzeige Ein Aus Schalter Der Strom wird mit jedem Drücken des Ein Aus Schalters abwechselnd ein und ausgeschaltet Die Betriebsanzeige leuchtet bei eingeschal teter Stromversorgung Kopfhörer Ausgangsbuchsen Der Mini Klinkenstecker eines Kopfhörers kann an die Buchse PHONES A oder PHONES B angeschlossen werden Das Audiosignal von AV OUT 1 wird über den an PHONES A angesc...

Страница 48: ...ragbaren Videogerätes usw verbunden Buchsen AV OUT 1 3 Cinch Video Ausgangsbuchse gelb Cinch Audio Ausgangsbuchsen weiß rot An diesen Buchsen werden die Video und Audiosignale der an den Buchsen AV IN angeschlossenen Geräte Multi DVD player tragbares Bord Videogerät usw ausgegeben Stromeingang Hier wird das mitgelieferte Stromkabel angeschlossen Controller Anschlussbuchse Hier wird der mitgeliefer...

Страница 49: ...sig Erdungssystem Minuspol an Masse Max Leistungsaufnahme 0 4 A Audio Ausgangspegel 1 Vp p 75 Ω Hideaway Einheit Abmessungen 160 B 28 H 120 T mm Gewicht 0 53 kg Controllers Einheit Abmessungen 120 B 60 H 32 T mm Gewicht 0 32 kg Hinweis Technische Änderungen zum Zwecke der Produktverbesserung sind ohne Vorankündigung vorbehalten ...

Страница 50: ... d alimentation et de l unité de commande 4 Connexion du système 1 5 Connexion du système 2 7 Appareils audio vidéo 9 Installation 10 Installation de l appareil 10 Installation de l unité de commande 11 Nom et fonction des commandes 14 Unité de commande 14 Unité dissimulée 15 Spécifications 16 Table des matières ...

Страница 51: ...l à un affichage qui ne peut pas être vu par le conducteur Si l af fichage peut seulement être installé dans un endroit où il est visible par le conducteur utilisez un affichage qui peut détecteur l état en hors service du frein à main et assurez vous de l installer correctement de façon qu il fonctionne en conjugaison avec l inter rupteur du frein à main Pour éviter tout risque d accident et de v...

Страница 52: ...lage entourez le de ruban adhésif aux endroits où il frotte sur des pièces métalliques Faites cheminer les câbles et assurez leur maintien de sorte qu ils ne puissent pas toucher des pièces mobiles telles que le levier de sélection de vitesse le frein de stationnement ou les rails des sièges Veillez à ce que les câbles ne passent pas à proximité d endroits chauds tels que les bouches du chauffage ...

Страница 53: ... la clé de contact 12 V CC Noir masse Fil de masse vers un élément en métal apparent de la voiture Unité dissimulée Unité de commande Porte fusible 1 A Faites passer le cordon du contrôleur dans la rainure située à l arrière du con trôleur Ne le tirez pas trop fort ne le tordez pas ni ne le tendez excessivement Face arrière de l unité de commande 3 m Rainure Cordon 2 m 2 m ...

Страница 54: ...5 Connexion des appareils Connexion du système 1 Câbles de liaison munis de prises RCA vendu séparément Unité dissimulée AV OUT 1 3 Câbles de liaison munis de prises RCA vendu séparément AV IN 2 3 ...

Страница 55: ... séparément etc Affichage Unité dissimulée Affichage arrière 2 Unité dissimulée Affichage arrière 1 Avant AVD W8000 etc AVD W8000 etc Entrée vidéo Entrée audio Unité dissimulée Affichage arrière 3 AVD W8000 etc Lecteur de DVD à chargeur XDV P9 Sortie vidéo pour l arrière Sortie audio Sortie vidéo Arrière Sortie audio Affichage Affichage ...

Страница 56: ...7 Connexion des appareils Connexion du système 2 Câbles de liaison munis de prises RCA vendu séparément Unité dissimulée AV OUT 1 3 Câbles de liaison munis de prises RCA vendu séparément AV IN 2 3 ...

Страница 57: ... Unité dissimulée Affichage arrière 1 Avant AVD W8000 etc AVD W8000 etc Entrée vidéo Entrée audio Unité dissimulée Affichage arrière 3 AVD W8000 etc Lecteur de DVD à chargeur XDV P9 Sortie vidéo pour l arrière Arrière Sortie audio Affichage Affichage Affichage avant AVX P7000CD etc Entrée audio Sortie audio Sortie vidéo Tuner de télévision GEX P7000TV ...

Страница 58: ...éparément Casque d é coute vendu séparément Caméra vidéo 8 mm appareil vidéo portable monté sur véhicule etc Câbles de liaison munis de prises RCA vendu séparément video output Sortie vidéo audio ouput Sortie audio Mini fiche 3 5 Mini fiche 3 5 Connexion des appareils ...

Страница 59: ...e puisse causer ni accident ni blessure pendant la conduite du véhicule Si vous installez l appareil sous le siège avant veillez à ce qu il ne gêne pas le déplacement du siège Faites cheminer les câbles et les conducteurs de manière qu ile ne puissent pas être pincés par le mécanisme de réglage de position du siège ce qui pourrait provoquer un court circuit Installez l unité de commande dans un en...

Страница 60: ...f à double face de la patte de fixation en L et collez la à l emplacement de l installation 1 Attachez les fixations en L à l unité de commande en serrant les vis avec les doigts Ne serrez pas complètement les vis 2 Collez le ruban adhésif à double faces à l endroit où vous souhaitez installer l unité de commande Retirez le papier Remarque Tordez les fixations en L pour qu elles prennent la forme ...

Страница 61: ...EDERLANDS 3 Détachez l unité de commande des fixations en L 4 Appuyez fermement sur les fixations en L dans leur positon d installation de l unité de commande 5 Attachez l unité de commande sur les fixations en L Ne serrez pas complètement les vis ...

Страница 62: ...aites attention de ne pas trop serrer les vis ou de ne pas assez les serrer Des trous agrandis peu vent causer le détachement des fixations en L Installation en utilisant la bande Velcro Collez la bande Velcro dure fournie à l arrière de l unité de commande collez la bande Velcro fournie souple à l emplacement de l installation et fixez l unité Bande Velcro dure Unité de commande Bande Velcro soup...

Страница 63: ...se AV OUT 1 3 Indicateur d alimenta tion Interrupteur d ali mentation Chaque que fois que vous appuyez sur cette touche l appareil est mis alterna tivement sous et hors ten sion L indicateur d ali mentation s allume quand l appareil est sous tension Prises AV IN 1 Entrée vidéo cinch RCA jaune Entrée audio cinch RCA blanc rouge Utilisez ces prises pour connecter une caméra vidéo 8 mm un appareil vi...

Страница 64: ...rises AV OUT 1 3 Sortie vidéo cinch RCA jaune Sortie audio cinch RCA blanc rouge Sort les signaux vidéo et audio lecteur de DVD à chargeur appareil vidéo portable monté sur véhicule etc par les prises AV IN Prise d alimen tation Connectez à cette prise le cordon d alimentation fourni Prise de connection de l unité de commande Connectez à cette prise l unité de commande fournie Nom et fonction des ...

Страница 65: ...e Type négatif Consommation max 0 4 A Niveau de sortie audio 1 Vc c 75 Ω Appareil déporté Dimensions 160 L 28 H 120 P mm Poids 0 53 kg Contrôleur Dimensions 120 L 60 H 32 P mm Poids 0 32 kg Remarque Du fait d améliorations les caractéristiques tech niques et la présentation sont susceptibles de modification sans préavis Spécifications ...

Страница 66: ...mentazione e dell unità di controllo 4 Collegamenti del sistema 1 5 Collegamenti del sistema 2 7 Apparecchiature audio video 9 Installazione 10 Installazione dell unità 10 Installazione dell unità di controllo 11 Nome e funzione dei componenti 14 Unità di controllo 14 Unità nascosta 15 Caratteristiche tecniche 16 ...

Страница 67: ...TENZA Collegare il prodotto a un display che non possa essere visto dal guidatore Se il display può essere installato solo in un posto in cui è visibile dal guidatore usare un display che possa rilevare lo stato ON OFF del freno di parcheggio e fare attenzione a installare il display correttamente in modo che funzioni sempre con l interruttore di freno di parcheggio Per evitare il rischio di un in...

Страница 68: ...ssare i cavi con fermafilo o nastro adesivo Per proteggerli avvolgerli in nastro isolante dove toc cano parti in metallo non verniciate Stendere e fermare tutti i cavi così che non entrino in contatto con parti in movimento ad esempio il cambio il freno a mano ecc Non stenderli in luoghi che si surriscaldano ad esempio vicino allo scappamento L isolamento potrebbe altrimenti fondersi e il cavo pot...

Страница 69: ...N OFF 12 V di c c Nero massa Al telaio parte metallica dell auto mobile Unità nascosta Unità di controllo Führen Sie das Kabel des Controllers durch die Schlitznut auf der Rückseite des Controllers Das Kabel nicht gewaltsam ziehen übermäßig biegen oder dehnen Portafusibili 1A 3 m 2 m 2 m Parte posteriore dell unità di controllo Scanalatura Cavo di alimentazione ...

Страница 70: ...i delle unità Collegamenti del sistema 1 Cavi di collegamento con spine a terminale RCA venduto separatamente Unità nascosta AV OUT 1 3 Cavi di collegamento con spine a terminale RCA venduto separatamente AV IN 2 3 ...

Страница 71: ...ata mente ecc Display Unità nascosta Display posteriore 2 Unità nascosta Display posteriore 1 Lato anteriore AVD W8000 ecc AVD W8000 ecc Ingresso video Ingresso audio Unità nascosta Display posteriore 3 AVD W8000 ecc Lettori multi DVD XDV P9 Uscita video per parte posteriore Uscita audio Uscita video Lato posteriore Uscita audio Display Display ...

Страница 72: ...i delle unità Collegamenti del sistema 2 Cavi di collegamento con spine a terminale RCA venduto separatamente Unità nascosta AV OUT 1 3 Cavi di collegamento con spine a terminale RCA venduto separatamente AV IN 2 3 ...

Страница 73: ...Display Unità nascosta Display posteriore 2 Unità nascosta Display posteriore 1 Lato anteriore AVD W8000 ecc AVD W8000 ecc Ingresso video Ingresso audio Unità nascosta Display posteriore 3 AVD W8000 ecc Lettori multi DVD XDV P9 Uscita video per parte posteriore Lato posteriore Uscita audio Display Display Uscita video Uscita audio Sintonizzatore TV GEX P7000TV ...

Страница 74: ...tà Unità di controllo Cuffie venduto separatamente Cuffie venduto separatamente Videocamera 8 mm videocamera portatile video installata sul vei colo e così via Cavi di collegamento con spine a terminale RCA venduto separatamente Uscita audio Uscita video Minispinotto di 3 5 ...

Страница 75: ... ferite o incidenti Se questo prodotto viene installato sotto il sedile anteriore controllare che non ne ostacoli il movimento Posare tutti i cavi attorno alle rotaie del sedile così che non corra il rischi di rimanere preso da queste e causare un corto circuito Installare l unità di controllo in un punto sicuro nel quale essa possa essere azionata agevolmente dal sedile posteriore Non installare ...

Страница 76: ... presente sulla staffa a L quindi incollare quest ultima nel punto di installazione 1 Installare le parti di montaggio L all unità controller avvitando a mano Lasciare le viti allentate 2 Attaccare il nastro biadesivo alla posizione designata all installazione dell u nità controller Rimuovere la carta di stacco Nota Piegare le parti di montaggio L in modo da adattarle alla posizione designata all ...

Страница 77: ...nciare una volta l unità controller dalle parti di montaggio L 4 Premere saldamente le parti di montaggio L contro la posizione designata all installazione dell unità controller 5 Installare l unità controller alle parti di montaggio L Lasciare le viti allentate ...

Страница 78: ...iti in modo che non siano né allentate né troppo strette La spanatura di un foro filettato potrebbe compromettere l installazione complessiva delle parti di montaggio L Installazione mediante il nastro Velcro Incollare la parte dura del nastro Velcro in dotazione al lato posteriore dell unità di con trollo e quella morbida nel punto di installazione quindi procedere con quest ultima Nastro Velcro ...

Страница 79: ...AV OUT Uscita audio video da 1 a 3 Indicatore e interruttore di alimentazione L alimentazione viene attivata e disattivata ogni volta che si preme l inter ruttore di alimentazione L indicatore di alimen tazione si illumina quando l unità è accesa Prese a jack AV IN 1 Ingresso video RCA giallo Ingresso audio RCA bianco e rosso Queste prese servono per il col legamento di telecamere 8 mm telecamere ...

Страница 80: ...rese a jack AV OUT 1 3 Uscita video RCA giallo Uscita audio RCA bianco e rosso Queste prese emettono i segnali video e audio provenienti dalle apparecchiature Lettori multi DVD telecamere portatili installate sul veicolo e così via collegate alle prese a jack AV IN Alimentazione Collegare a questa presa il cavo di alimentazione in dotazione Presa a jack di collegamento dell unità di controllo Coll...

Страница 81: ... a massa Tipo negativo Consumo massimo di corrente 0 4 A Livello di uscita audio 1 Vp p 75 Ω Apparecchio retraibile Dimensioni 160 L 28 A 120 P mm Peso 0 53 kg Apparecchio di controllo Dimensioni 120 L 60 A 32 P mm Peso 0 32 kg Nota Le caratteristiche tecniche e il disign sono soggetti a possibili modifiche senza preavviso dovute a miglioramenti ...

Страница 82: ...ustralia TEL 03 9586 6300 PIONEER ELECTRONICS OF CANADA INC 300 Allstate Parkway Markham Ontario L3R 0P2 Canada TEL 905 479 4411 PIONEER ELECTRONICS DE MEXICO S A de C V San Lorenzo Num 1009 3er piso Desp 302 Col Del Valle Mexico D F C P 03100 TEL 5 688 52 90 Printed in Japan Imprimé au Japon CZR3210 B E 00C00D0J01 Published by Pioneer Corporation Copyright 2000 by Pioneer Corporation All rights r...

Отзывы: