background image

6

DRC1402-A

Es

6

Instalación y conexiones

Modo de instalación

 

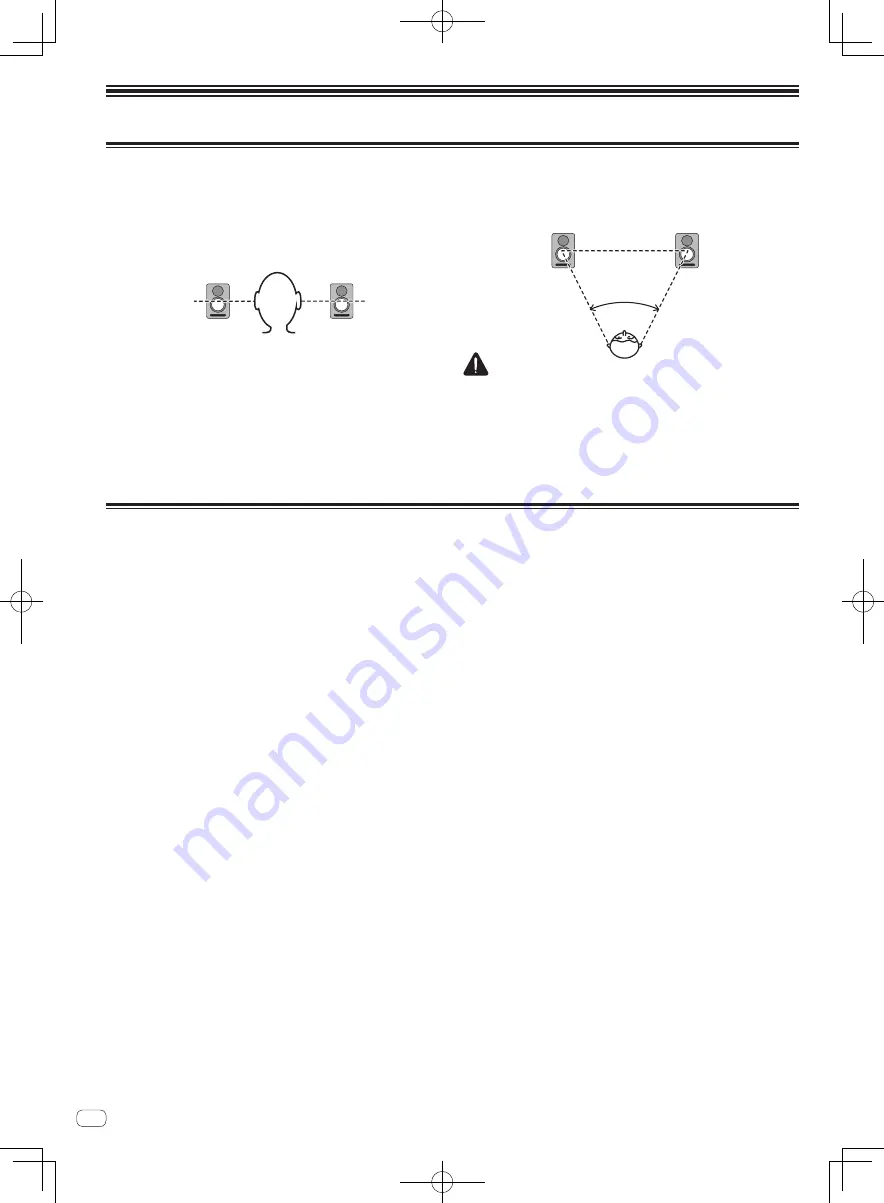
Idealmente, los altavoces deben situarse en ángulos de 30 ° de 

la posición de audición (formando en su conjunto un ángulo 

total de 60 °), y deben girarse hacia adentro para orientarlos 

hacia la posición de audición.

El sonido de reproducción de un altavoz queda ligeramente 

afectado por las condiciones de la sala de audición. Para 

producir las mejores condiciones para la audición, tenga 

debidamente en cuenta las condiciones del lugar de instalación 

antes de comenzar la instalación.

 

Coloque los altavoces al nivel de los oídos.

Conexiones

  Cuando desee realizar o cambiar conexiones, desconecte 

antes la alimentación y desenchufe el cable de alimentación 

de la toma de corriente.

  Lea también sin falta los manuales de instrucciones de los 

otros componentes a los que se proponga conectar estos 

altavoces.

  No enchufe el cable de alimentación hasta haber completado 

todas las demás conexiones.

50 °~  60 °

  Emplee solo el cable de alimentación accesorio 

suministrado.

  No conecte al mismo tiempo el conector XLR INPUT y la toma 

TRS INPUT. 

  Asegúrese de ajustar el nivel de sonido a un nivel adecuado, 

ya que las señales de entrada en el conector XLR INPUT (o la 

toma TRS INPUT) y la toma RCA INPUT se mezclarán, lo que 

afectará al nivel de sonido. 

PRECAUCIÓN

Para conseguir el enfriamiento adecuado, asegúrese de dejar 

espacio suficiente entre los altavoces y las paredes circundantes 

u otros componentes (un mínimo de 30 cm o más por encima, 

detrás y por los lados derecho e izquierdo de cada altavoz). Si 

no se deja espacio suficiente entre el altavoz y las paredes o los 

otros componentes, la temperatura del interior puede subir más 

de la cuenta y ser causa de mal funcionamiento o de averías.

 

Para obtener un efecto estéreo natural, los altavoces derecho 

e izquierdo deben instalarse simétricamente y en posiciones 

equidistantes de la posición de audición.

Содержание BULIT5

Страница 1: ...rmation and services to allow you to use your product in greater comfort Le site de support DJ de Pioneer indiqué ci dessus propose une FAQ des informations sur le logiciel et divers types d informations et de services qui permettent une utilisation plus confortable de ce produit El sitio de asistencia Pioneer DJ mostrado arriba ofrece las preguntas frecuentes información del software y varios otr...

Страница 2: ...eriods of time Refer all servicing to qualified service personnel Servicing is required when the apparatus has been damaged in any way such as power supply cord or plug is damaged liquid has been spilled or objects have fallen into the apparatus the apparatus has been exposed to rain or moisture does not operate normally or has been dropped D3 7 13 69_En 11 12 13 14 VENTILATION CAUTION When instal...

Страница 3: ...e product may expose you to chemicals listed on proposition 65 known to the State of California and other governmental entities to cause cancer and birth defect or other reproductive harm D36 P5_B1_En POWER CORD CAUTION Handle the power cord by the plug Do not pull out the plug by tugging the cord and never touch the power cord when your hands are wet as this could cause a short circuit or electri...

Страница 4: ...period of time for example when on vacation D3 4 2 2 2a _A1_En Do not attach these speakers to the wall or ceiling as they may cause injury in the event of a fall SGK007 _A1_En CAUTION These servicing instructions are for use by qualified service personnel only To reduce the risk of electric shock do not perform any servicing other than that contained in the operating instructions unless you are q...

Страница 5: ...YOUR PRODUCT TO THE COMPANIES at the addresses listed below for repair without advance contact for these companies are not repair locations AMERICA PIONEER ELECTRONICS USA INC P O BOX 1760 LONG BEACH CA 90801 1760 U S A EUROPE PIONEER EUROPE NV EUROPEAN SERVICE DIVISION HAVEN 1087 KEETBERGLAAN 1 B 9120 MELSELE BELGIUM ASEAN PIONEER ELECTRONICS ASIACENTRE PTE LTD SERVICE DEPARTMENT 253 ALEXANDRA RO...

Страница 6: ...ocument Names and Functions of Parts 1 2 3 4 5 6 1 1 inch high resolution soft dome tweeter 2 Illumination POWER indicator Lights up according to whether the power is on or off The indicator does not light up when the speakers are in standby mode 3 Diffuser Improves the directionality and diffusion of high frequency sounds 4 Aramid fiber woofer Light and extremely rigid cone provides the best bass...

Страница 7: ...XLR INPUT connector XLR type balanced input connector The connector s pin array is as follows No 1 Ground No 2 Hot and No 3 Cold 5 TRS INPUT jack Balanced input phone jack CAUTION Do not connect to both the XLR INPUT connector and the TRS INPUT jack at the same time 6 RCA INPUT jack RCA pin type unbalanced input jacks 7 POWER switch Use to turn the power on and off CAUTION Before turning on the po...

Страница 8: ...o not plug in the power cord until all other connections have been completed Use only the furnished accessory power cord 50 60 Do not connect to both the XLR INPUT connector and the TRS INPUT jack at the same time Make sure to set the sound level at an appropriate level as the input signals to the XLR INPUT connector or TRS INPUT jack and RCA INPUT jack will be mixed together affecting the sound l...

Страница 9: ...roperly Turn the LEVEL dial on the rear panel clockwise and turn up the volume Is the power turned on Turn on the POWER switch on the rear panel Is the auto standby function on Turn off the POWER switch on the rear panel once wait a few seconds and then turn it back on Illumination POWER indicator remains turned off Is the power turned on Turn on the POWER switch on the rear panel Is the auto stan...

Страница 10: ...ver 13 cm 5 in cone 15 cm 6 in cone 20 cm 8 in cone Tweeter HF driver 2 5 cm 1 in soft dome Playback response 50 Hz to 20 kHz 45 Hz to 20 kHz 40 Hz to 20 kHz Power unit other Supported voltages 100 V to 120 V 50 Hz to 60 Hz 220 V to 240 V 50 Hz to 60 Hz conversion Power consumption 100 W 140 W 160 W Power consumption during standby mode 0 5 W or less External dimensions W H D 197 mm 77 6 in 301 mm...

Страница 11: ...PLIED WARRANTIES OF MERCHANTABILITY AND FITNESS FOR A PARTICULAR PURPOSE TO A PERIOD NOTTO EXCEEDTHE WARRANTY PERIOD NO WARRANTIES SHALL APPLY AFTERTHE WARRANTY PERIOD SOME STATES DO NOT ALLOW LIMITATIONS ON HOW LONG AN IMPLIED WARRANTY LASTS AND SOME STATES DO NOT ALLOWTHE EXCLUSIONS OR LIMITATIONS OF INCIDENTAL OR CONSEQUENTIAL DAMAGES SOTHE ABOVE LIMITATIONS OR EXCLUSIONS MAY NOT APPLYTOYOU THI...

Страница 12: ...complètement celui ci de sa prise secteur Comme le cordon d alimentation fait office de dispositif de déconnexion du secteur il devra être débranché au niveau de la prise secteur pour que l appareil soit complètement hors tension Par conséquent veillez à installer l appareil de telle manière que son cordon d alimentation puisse être facilement débranché de la prise secteur en cas d accident Pour é...

Страница 13: ...ouïe peut vous jouer des tours Avec le temps votre système auditif peut en effet s adapter à des volumes supérieurs et ce qui vous semble un niveau de confort normal pourrait au contraire être excessif et contribuer à endommager votre ouïe de façon permanente Le réglage de votre matériel à un volume sécuritaire AVANT que votre ouïe s adapte vous permettra de mieux vous protéger CHOISISSEZ UN VOLUM...

Страница 14: ...onctions des éléments 1 2 3 4 5 6 1 Haut parleur d aigus à dôme souple haute résolution de 1 pouce 2 Éclairage indicateur POWER S allume suivant si l appareil est sous tension ou hors tension L indicateur se s allume pas lorsque les enceintes sont en mode Veille 3 Diffuseur Améliore la directivité et la diffusion des sons de haute fréquence 4 Haut parleur de graves en fibres d aramide Cône léger e...

Страница 15: ... L agencement des broches du connecteur est comme suit N 1 Masse N 2 Point chaud et N 3 Point froid 5 Jack TRS INPUT Prise casque d entrée symétrique ATTENTION Ne connectez pas simultanément au connecteur XLR INPUT et au jack TRS INPUT 6 Jack RCA INPUT Prises d entrée asymétrique de type à broche RCA 7 Commutateur POWER Permet de mettre sous tension ou hors tension ATTENTION Avant de mettre l appa...

Страница 16: ...ées Ne branchez pas le cordon d alimentation avant que toutes les autres connexions ne soient terminées 50 60 Utilisez uniquement le cordon d alimentation fourni comme accessoire Ne connectez pas simultanément au connecteur XLR INPUT et au jack TRS INPUT Assurez vous que le niveau sonore est réglé sur un niveau approprié car les signaux d entrée vers le connecteur XLR INPUT ou le jack TRS INPUT et...

Страница 17: ... Tournez la molette LEVEL sur le panneau arrière dans le sens des aiguilles d une montre et augmentez le volume L appareil est il sous tension Activez le commutateur POWER sur le panneau arrière La fonction de veille automatique est elle activée Désactivez le commutateur POWER sur le panneau arrière attendez quelques secondes puis réactivez le L éclairage indicateur POWER reste éteint L appareil e...

Страница 18: ...ss reflex Matériau du caisson MDF Haut parleur de graves pilote de basse fréquence Cône de 13 cm Cône de 15 cm Cône de 20 cm Haut parleur d aigus pilote de haute fréquence Dôme souple de 2 5 cm Réponse en lecture de 50 Hz à 20 kHz de 45 Hz à 20 kHz de 40 Hz à 20 kHz Bloc d alimentation autres Tensions prises en charge Conversion 100 V à 120 V 50 Hz à 60 Hz 220 V à 240 V 50 Hz à 60 Hz Consommation ...

Страница 19: ...ITES DE QUALITÉ MARCHANDE OU D ADAPTATION À UN USAGE PARTICULIER À UNE PÉRIODE N EXCÉDANT PAS LA PÉRIODE DE GARANTIE AUCUNE GARANTIE NE S APPLIQUE APRÈS LA PÉRIODE DE GARANTIE CERTAINS ÉTATS NE PERMETTENT PAS LA LIMITATION DE LA DURÉE D UNE GARANTIE IMPLICITE ET CERTAINS NE PERMETTENT PAS L EXCLUSION OU LA LIMITATION DES DOMMAGES CONSÉCUTIFS OU INDIRECTS LES LIMITATIONS ET EXCLUSIONS ÉTABLIES CI D...

Страница 20: ...OWER de este aparato no corta por completo toda la alimentación de la toma de corriente de CA Puesto que el cable de alimentación hace las funciones de dispositivo de desconexión de la corriente para el aparato para desconectar toda la alimentación del aparato deberá desenchufar el cable de la toma de corriente de CA Por lo tanto asegúrese de instalar el aparato de modo que el cable de alimentació...

Страница 21: ... alimentación deberán ser dispuestos de tal forma que la probabilidad de que sean pisados sea mínima Una cable de alimentación dañado podrá causar incendios o descargas eléctricas Revise el cable de alimentación está dañado solicite el reemplazo del mismo al centro de servicio autorizado PIONEER más cercano o a su distribuidor S002 _A1_Es PRECAUCIÓN Estas instrucciones de servicio son para el uso ...

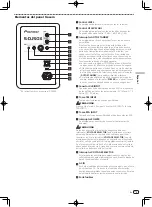
Страница 22: ...ra y funciones de las partes 1 2 3 4 5 6 1 Altavoz de agudos de domo blando de 1 pulgada y alta resolución 2 Iluminación indicador POWER Se enciende dependiendo de si la unidad está encendida o apagada El indicador no se enciende si los altavoces están en el modo de espera 3 Difusor Mejora la direccionabilidad y la difusión de los sonidos de alta frecuencia 4 Altavoz de graves de fibra de aramida ...

Страница 23: ...os segundos 4 Conector XLR INPUT Conector de entrada equilibrada del tipo XLR La disposición de las patillas del conector es la siguiente N º 1 Masa N º 2 Activo y N º 3 Retorno 5 Toma TRS INPUT Toma de auriculares de entrada equilibrada PRECAUCIÓN No conecte al mismo tiempo el conector XLR INPUT y la toma TRS INPUT 6 Toma RCA INPUT Tomas de entrada desequilibrada del tipo de contactos RCA 7 Inter...

Страница 24: ...os altavoces No enchufe el cable de alimentación hasta haber completado todas las demás conexiones 50 60 Emplee solo el cable de alimentación accesorio suministrado No conecte al mismo tiempo el conector XLR INPUT y la toma TRS INPUT Asegúrese de ajustar el nivel de sonido a un nivel adecuado ya que las señales de entrada en el conector XLR INPUT o la toma TRS INPUT y la toma RCA INPUT se mezclará...

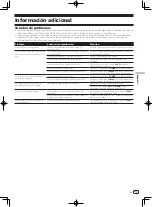
Страница 25: ...conexión Está bien ajustado el volumen del sonido Gire hacia la derecha el control LEVEL del panel trasero y sube el volumen Está conectada la alimentación Encienda el interruptor POWER en el panel trasero Está activada la función de espera automática Apague el interruptor POWER en el panel trasero una vez espere algunos segundos y vuelva a encenderlo La iluminación indicador POWER permanece apaga...

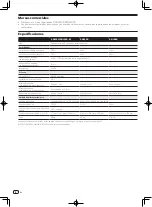
Страница 26: ...Caja acústica Reflejo de graves Material de la caja acústica MDF Altavoz de graves controlador de baja frecuencia Cono de 13 cm Cono de 15 cm Cono de 20 cm Altavoz de agudos controlador de alta frecuencia Domo blando de 2 5 cm Respuesta de reproducción 50 Hz a 20 kHz 45 Hz a 20 kHz 40 Hz a 20 kHz Unidad de alimentación otra Voltajes admitidos Conversión de 100 V a 120 V 50 Hz a 60 Hz 220 V a 240 V...

Страница 27: ...9 DRC1402 A ...

Страница 28: ...o to one of following URLs Pour enregistrer votre produit trouver le service après vente agréé le plus proche et pour acheter des pièces de rechange des modes d emploi ou des accessoires reportez vous aux URL suivantes Para registrar su producto encuentre el centro de servicio autorizado más cercano para adquirir piezas de recambio manuales de instrucciones o accesorios visite uno de los URL sigui...

Отзывы: