background image

5

BDP-LX55

5

6

7

8

5

6

7

8

A

B

C

D

E

F

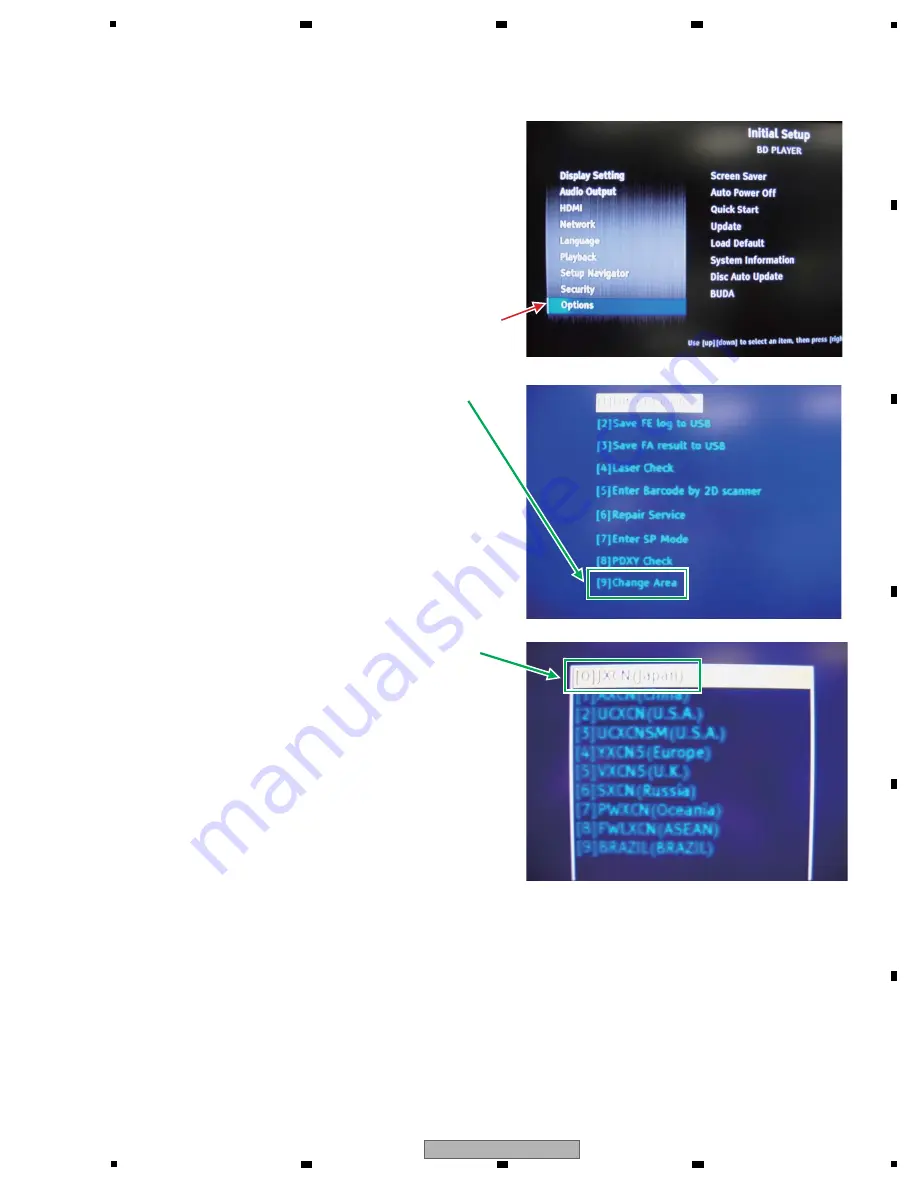
2 With the Initial Setup screen displayed, press the numeric 
   buttons 5, 1, 7, then 7, in that order, on the supplied 
   remote control unit.

Note: Although “Options” is selected in the photo above, 
the cursor is actually on the top option.

3 Select [9] Change Area at the bottom then press the 
   ENTER button.

4 As the destinations [0] to [9] are displayed, 
   select your region by moving the cursor then press the 
   ENTER button. 
   (Example: [0]JXCN [Japan])

5 Turn the unit OFF then back ON again. 
   (Be sure to do this after changing the destination setting.)

Содержание BDP-LX55

Страница 1: ... PTE LTD 253 Alexandra Road 04 01 Singapore 159936 PIONEER CORPORATION 2012 2012 Printed in Japan BDP LX55 RRV4294 Blu ray 3DTM PLAYER BDP LX55 THIS MANUAL IS APPLICABLE TO THE FOLLOWING MODEL S AND TYPE S This service manual should be used together with the following manual s Model Type Power Requirement DVD Region No BD Region No Serial No Remarks BDP LX55 SXCN AC 100 V to 240 V 5 C ER ER RUSSIA...

Страница 2: ...priate Nos indicate the pages and Nos in the service manual for the base model NOTES When ordering resistors first convert resistance values into code form as shown in the following examples Ex 1 When there are 2 effective digits any digit apart from 0 such as 560 ohm and 47k ohm tolerance is shown by J 5 and K 10 Ex 2 When there are 3 effective digits such as in high precision metal film resistor...

Страница 3: ...d the firmware for service of the product Download and store the following 2 files into a USB storage device BDP LX55 series BDP LX55_SP bin DLdiscidentifier txt 1 Press the HOME MENU button to display the HOME MENU screen 2 Move the cursor to Initial Setup then press the ENTER button 3 Move the cursor to Options then press the ENTER button 4 Move the cursor to Update then press the ENTER button ...

Страница 4: ...ayed Here an update file has been found Start update with version Press the ENTER button 7 After updating is completed the product will automatically restart After restarting is finished unplug the USB storage device 2 Changing the Destination Setting 1 Display the HOME MENU screen move the cursor to Initial Setup then press the ENTER button ...

Страница 5: ...hough Options is selected in the photo above the cursor is actually on the top option 3 Select 9 Change Area at the bottom then press the ENTER button 4 As the destinations 0 to 9 are displayed select your region by moving the cursor then press the ENTER button Example 0 JXCN Japan 5 Turn the unit OFF then back ON again Be sure to do this after changing the destination setting ...

Страница 6: ...n Setting is displayed for the Model item destination change has been successfully finished Tip It is recommended to confirm the region code at the same time 4 Press the HOME MENU button to return to the HOME MENU screen 4 Writing the Latest Firmware to the Product 1 Download the latest firmware for the product from the Website specially for service engineers to a USB storage device 2 Perform upda...

Отзывы: