background image

Blue

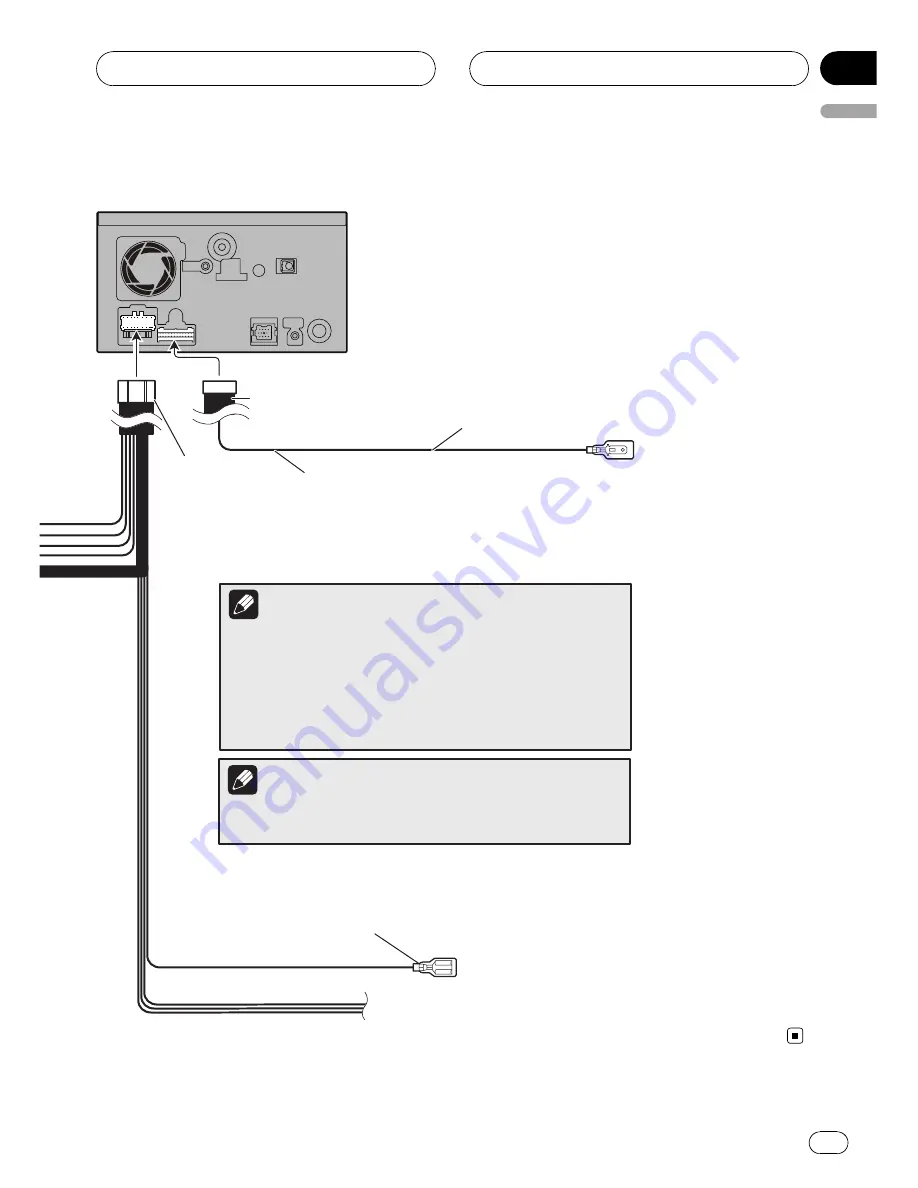
To auto-antenna relay control terminal.
If the vehicle has a glass antenna, connect to the antenna 
booster power control terminal (max. 300 mA 12 V DC).

Power cord

Audio source will be set to mute or attenuate, while the following 
sounds will not be muted or attenuated. For details, see 
“Operation Manual”. 
— voice guidance of the navigation
— incoming Ringtone and incoming voice of the cellular phone 

that is connected to this navigation system via Bluetooth 
wireless technology

Note

The antenna will automatically retract or turn off, yet the timing 
varies depending on the setting. 

Note

Yellow/Black

If you use equipment with a mute 
function, connect that equipment to 
the Audio Mute lead. If not, keep the 
Audio Mute lead free of any 
connections.

The navigation unit

RCA connector

26 cm (10-1/4 in.)

Connecting the System

En

11

English

Section

03

Содержание AVIIC--F7010BT

Страница 1: ...ALLATION MANUAL MANUEL D INSTALLATION FLASH MEMORY MULTIMEDIA AV NAVIGATION RECEIVER RECEPTEUR AV MULTIMEDIA A MEMOIRE FLASH AVEC SYSTEME DE NAVIGATION AVIC F900BT AVIC F700BT AVIC F7010BT English Français ...

Страница 2: ... output 17 When connecting the external video component 17 Using AV1 Input AV1 17 Using AV2 Input AV2 18 When connecting the external unit featuring video source 19 Installation Precautions before installation 20 To guard against electromagnetic interference 20 Before installing 21 Installing this navigation system 21 Installation notes 21 Parts supplied 22 Installation using the screw holes on th...

Страница 3: ...estrictions and advisories currently in force should always take precedence over guidance given by this product Al ways obey current traffic restrictions even if this product provides contrary advice This manual explains how to install this na vigation system in your vehicle Operation of this navigation system is explained in the separate manuals for the navigation system Do not install this produ...

Страница 4: ...icle s inter ior the navigation system should not divert your attention from the safe operation of your vehicle If you experience difficulty in operat ing the system or reading the display please make adjustments while safely parked 6 Please remember to wear your seat belt at all times while operating your vehicle If you are ever in an accident your injuries can be con siderably more severe if you...

Страница 5: ... shift lever Be sure to install this product its cables and wiring away in such a way that they will not obstruct or hinder driving Make sure that the cables and wires are routed and secured so they will not inter fere with or become caught in any of the vehicle s moving parts especially the steering wheel shift lever parking brake sliding seat tracks doors or any of the ve hicle s controls Do not...

Страница 6: ...to black etc Refer to the owner s manual for details on connecting the power amp and other units then make connections accordingly Since a unique BPTL circuit is employed do not directly ground the side of the speaker lead or connect the sides of the speaker leads together Be sure to connect the side of the speaker lead to the side of the speaker lead on this navigation system If the RCA pin jack ...

Страница 7: ...control signal is output through the blue white lead Connect to an external power amp s system remote control term inal max 300 mA 12 V DC The control sig nal is output through the blue white lead even if the audio source is switched off Do not connect this lead to the auto anten na relay control terminal or the antenna booster power control terminal Be sure not to use this lead as the power suppl...

Страница 8: ...in Light gray 2 m 6 ft 7 in Vehicle antenna USB connector Connect either the interface cable for iPod or an appropriate USB storage device 1 1 When connecting your iPod both connections are necessary It is necessary to set AV1 Input in AV Settings to iPod when connecting the iPod For details refer to Operation Manual 1 Blue Black XM tuner e g GEX P920XM sold separately Blue IP BUS cable supplied w...

Страница 9: ...n some countries or states the viewing of images on a display inside a vehicle even by persons other than the driver may be illegal Where such regulations apply they must be obeyed and this product s video source should not be used IP BUS cable supplied with SIRIUS satellite radio tuner IP BUS cable supplied with HD Radio tuner The XM tuner HD Radio tuner and SIRIUS satellite radio tuner will not ...

Страница 10: ...green black leads Yellow To terminal always supplied with power regardless of ignition switch position Red To electric terminal controlled by ignition switch 12 V DC ON OFF Orange White To lighting switch terminal Black ground To vehicle metal body With a 2 speaker system do not connect anything to the speaker leads that are not connected to speakers When a subwoofer is connected to this navigatio...

Страница 11: ... of the navigation incoming Ringtone and incoming voice of the cellular phone that is connected to this navigation system via Bluetooth wireless technology Note The antenna will automatically retract or turn off yet the timing varies depending on the setting Note Yellow Black If you use equipment with a mute function connect that equipment to the Audio Mute lead If not keep the Audio Mute lead fre...

Страница 12: ...o detect the ON OFF status of the parking brake This lead must be connected to the power supply side of the parking brake switch If this connection is made incorrectly or omitted certain functions of your navigation system will be unusable The position of the speed detection circuit and the position of the parking brake switch vary depending on the vehicle model For details consult your authorised...

Страница 13: ... sure to connect this lead Otherwise you cannot switch to rear view camera picture Be sure to use only the supplied extension lead Use of another lead could cause fire smoke and or damage this navigation system Connection method Check the position of your vehicle s backup light the one that lights up when the shift lever is in reverse R and find the backup light lead in the trunk Extension lead fo...

Страница 14: ...ystem control terminal of the power amp max 300 mA 12 V DC RCA connector Subwoofer output SUBWOOFER OUTPUT You can change the RCA output of the subwoofer depending on your subwoofer system Refer to Operation Manual Note 30cm 11 7 8 in Front output FRONT OUTPUT Rear output REAR OUTPUT Connecting the System En 14 Section 03 ...

Страница 15: ...wer amp sold separately Power amp sold separately RCA cables sold separately Front speaker Rear speaker Subwoofer Front speaker Rear speaker Subwoofer Left Right System remote control Connecting the System En 15 English Section 03 ...

Страница 16: ...of the rear view camera images may differ slightly according to whether full screen images are displayed when backing and whether the images are used for checking the rear when the vehicle is moving forward CAUTION Be sure to use only the supplied extension lead Use of another lead could cause fire smoke and or damage this navigation sys tem Extension lead for reverse signal Violet white RCA conne...

Страница 17: ... source while driving This navigation system s rear video output is for connection of a display to enable passengers in the rear seats to watch the video source When connecting the external video component Using AV1 Input AV1 To audio outputs Yellow VIDEO INPUT 20 cm 7 7 8 in RCA connector Red white AUDIO INPUT RCA cables sold separately To video output The navigation unit External component sold ...

Страница 18: ... to set AV2 Input in AV Settings to Video when connecting the external video component For details refer to Operation Manual CAUTION Be sure to use a CD RM10 sold separately for wiring If you use other cables there is a case where wiring position differs images and sounds may be disturbed OK G V R L G R V L L Left audio White R Right audio Red V Video Yellow G Ground Connecting the System En 18 Se...

Страница 19: ... Yellow VIDEO INPUT To video output Black RCA connector IP BUS cable sold separately RCA cable sold separately To T T IP BUS output 20 cm 7 7 8 in It is necessary to set AV1 Input in AV Settings to EXT when connecting the ex ternal unit For details refer to Operation Manual Connecting the System En 19 English Section 03 ...

Страница 20: ...at they will not obstruct or hinder driving Make sure that leads cannot get caught in a door or the sliding mechanism of a seat resulting in a short circuit Please confirm the proper function of your vehicle s other equipment following installation of the navigation system Certain government laws may prohibit or restrict the placement and use of this sys tem in your vehicle Please comply with all ...

Страница 21: ... the dashboard Places that may be splashed by rain for example close to the door Install this navigation system in an area strong enough to bear its weight Choose a position where this navigation system can be firmly installed and install it securely If this navigation system is not securely in stalled the current location of the vehicle cannot be displayed correctly Install the navigation unit ho...

Страница 22: ...t the brack ets screw holes and its screw holes are aligned are fitted and tighten the screws at 3 or 4 locations on each side Use either the binding screws 5 mm 6 mm or flush surface screws 5 mm 6 mm de pending on the shape of the bracket s screw holes If the pawl gets in the way bend it down Dashboard or console Binding screw or flush surface screw Be sure to use the screws supplied with this na...

Страница 23: ...l sheet provided with your system If this is not used the reception sensitivity will be poor Do not cut the accessory metal sheet This would reduce the sensitivity of the GPS an tenna Take care not to pull the antenna lead when removing the GPS antenna The magnet at tached to the antenna is very powerful and the lead may become detached The GPS antenna is installed with a mag net When installing t...

Страница 24: ...e the surface is free of moisture dust grime oil etc before affixing the metal sheet Clamps Use clamps to secure the lead where necessary inside the vehicle The metal sheet contains a strong adhesive which may leave a mark on the surface if it is removed Note Notes When attaching the metal sheet do not cut it into small pieces Some models use window glass that does not allow signals from GPS satel...

Страница 25: ...ry inside the vehicle When routing the lead in from the top of the door When routing the lead in from inside the trunk Waterproof pad Make sure the waterproof pad contacts the top of the rubber packing Rubber packing Make a U shaped loop in the lead on the outside to prevent rainwater from flowing along the lead into the interior of the vehicle Make a U shaped loop in the lead outside the rubber p...

Страница 26: ... Microphone Microphone clip Double sided tape Clamp 5 pcs Mounting on the sun visor 1 Install the microphone in the micro phone clip Microphone Microphone clip 2 Attach the microphone clip to sun visor Microphone clip Clamps Use clamps to secure the lead where necessary inside the vehicle Install the microphone on the sun visor when it is in the up position It cannot recognize the driver s voice i...

Страница 27: ...e clip on the steering column Double sided tape Install the microphone clip on the steering column keeping it away from the steering wheel Clamps Use clamps to secure the lead where necessary in side the vehicle Adjusting the microphone angle The microphone angle can be adjusted by moving forward or backward the microphone clip angle Installation En 27 English Section 04 ...

Страница 28: ...ET button on the navigation unit using a pointed object such as the tip of a pen 4 Make the following settings For details concerning operations refer to Operation Manual 1 Set the language 2 Drive an unobstructed road until the GPS starts receiving the signal normally 3 Make some necessary adjustments Setting the time Setting the units and the date format etc Change other settings as you prefer N...

Страница 29: ...anchement d un appareil vidéo externe 45 Utilisation de Entrée AV1 AV1 45 Utilisation de Entrée AV2 AV2 46 Branchement de l unité externe avec source vidéo 47 Installation Précautions à prendre avant l installation 48 Pour protéger le système de navigation contre les parasites électromagnétiques 49 Avant de procéder à l installation 49 Installation de ce système de navigation 49 Remarques sur l in...

Страница 30: ...restrictions en vigueur en matière de circulation doi vent toujours avoir la priorité sur les indica tions de guidage données par ce produit Respectez toujours le code de la route et les restrictions en matière de circulation même en cas d indication contraire du pro duit Ce manuel explique comment installer le système de navigation dans votre véhicule Le fonctionnement du système de naviga tion e...

Страница 31: ...le 5 Comme tout autre accessoire de l habitacle le système de navigation ne doit pas détour ner votre attention ni nuire à la sécurité de la conduite Si vous éprouvez des difficultés à utiliser le système ou à lire l écran effectuez les réglages nécessaires après vous être garé dans un endroit sûr 6 Veillez à toujours attacher votre ceinture de sécurité sur la route En cas d accident le port de la...

Страница 32: ...ction ou du levier de vitesse Assu rez vous d installer ce produit ses câble et les raccordement de telle façon qu ils n obstrue pas ni gêne la conduite Veillez à ce que la trajectoire des câbles et des fils n interfère pas avec les pièces en mouvement du véhicule Fixez les câbles de manière à les empêcher d être happés par notamment le volant le levier de vi tesse le frein à main les glissières d...

Страница 33: ... le connecteur bleu au port bleu le noir au noir etc Pour raccorder l amplificateur de puis sance à d autres unités veuillez vous repor ter au manuel d utilisation concerné Un circuit BPTL unique étant employé ne reliez pas directement l extrémité du fil conducteur de haut parleur ou ne reliez pas les extrémités des fils conducteurs de haut parleur ensemble Veillez à relier l extrémité du fil cond...

Страница 34: ... le contacteur d allumage est sur marche ACC ON un signal de commande est émis par le biais du fil bleu blanc Rac cordez le à une borne de commande à dis tance du système d amplificateur de puissance externe max 300 mA 12 V CC Le signal de commande est émis par le biais du fil bleu blanc même si la source audio est désactivée Ne connectez pas ce câble au terminal de commande du relais d antenne au...

Страница 35: ...Branchement du système Fr 35 Section Français 03 ...

Страница 36: ...Pod ou un périphérique USB approprié 1 1 Lors de la conexion de votre iPod les deux connexions sont nécessaires Il est nécessaire de régler Entrée AV1 dans Paramètres AV sur iPod lors de la connexion d un iPod Pour en savoir plus reportez vous au Manuel de fonctionnement 1 Bleu Noir Tuner XM déporté par ex GEX P920XM vendu séparément Bleu Câble IP BUS fourni avec le tuner XM déporté Unité de navig...

Страница 37: ...met le raccordement d autres appareils Si l installation concerne le produit seul elle ne doit pas être utilisée Câble d interface USB pour iPod CD IU230V vendu séparément Tuner radio HD par ex GEX P10HD vendu séparément Vers l entree IP BUS Câble IP BUS fourni avec le tuner radio HD Le tuner XM le tuner radio HD et le tuner radio satellite SIRUS ne recevront pas leur service quand vous conduisez ...

Страница 38: ...e rien connecter sur les fils vert et vert noir Jaune A la borne toujours sous tension quelle que soit la position du contacteur d allumage Orange Blanc A la borne du commutateur d éclairage Noir masse A la carrosserie partie métallique du véhicule Haut parleur arrière ou Haut parleur d extrêmes graves 4 Ω Haut parleur arrière ou Haut parleur d extrêmes graves 4 Ω Haut parleur d extrêmes graves 4 ...

Страница 39: ... audio est mise en sourdine ou le son est atténué alors que les sons suivants ne seront pas coupés ni atténués Pour en savoir plus reportez vous au Manuel de fonctionnement guidage vocal de la navigation sonnerie d appel entrant et la voix de l interlocuteur sur le téléphone mobile branché à ce système de navigation via la technologie sans fil Bluetooth Remarque L antenne se rétracte ou s éteint a...

Страница 40: ...ar ce trou Serrez fermement avec une pince à mâchoires pointues Fermez le couvercle AVERTISSEMENT UNE CONNEXION INAPPROPRIEE RISQUE D ENTRAINER DES DOMMAGES SERIEUX OU DES BLESSURES DUES A UN CHOC ELECTRIQUE DES INTERFERENCES AVEC LE FONCTIONNEMENT DU SYSTEME DE FREINAGE ANTIBLOCAGE DU VEHICULE AVEC LA BOITE DE VITESSE AUTOMATIQUE ET AVEC LES INDICATIONS DU COMPTEUR DE VITESSE Vert clair Utilisé p...

Страница 41: ...méra de rétrovisée est sinon impossible ATTENTION Utilisez exclusivement le câble de rallonge fourni Tout autre cordon rallonge risque de provoquer un incendie de la fumée et ou d endommager ce système de navigation Vérifiez la position du feu de recul de votre véhicule celui qui s allume quand le levier de vitesse est mis en marche arrière R et localisez le conducteur du feu de recul dans le coff...

Страница 42: ...t parleur d extrêmes graves Reportez vous au Manuel de fonctionnement Sortie pour haut parleur d extrêmes graves SUBWOOFER OUTPUT 30cm 30cm 28cm 30cm Unité de navigation Connecteur RCA Sortie arrière REAR OUTPUT Sortie avant FRONT OUTPUT A la borne de commande d ensemble de l amplificateur de puissance max 300 mA 12 V c c Bleu blanc Branchement du système Fr 42 Section 03 ...

Страница 43: ...de puissance vendu séparément Amplificateur de puissance vendu séparément Gauche Droite Télécommande d ensemble Haut parleur avant Haut parleur avant Haut parleur arrière Haut parleur arrière Haut parleur d extrêmes graves Haut parleur d extrêmes graves Branchement du système Fr 43 Section Français 03 ...

Страница 44: ...s éloigné qu en réalité Veuillez noter que les bords des images de la caméra de rétrovisée peuvent légèrement dif férer selon que les images plein écran sont af fichées en marche arrière ou que les images sont utilisées pour contrôler ce qui se passe à l arrière du véhicule en marche avant ATTENTION N utilisez que le câble de rallonge fourni L u tilisation d un autre câble peut entraîner un incend...

Страница 45: ...La sortie vidéo arrière de ce système de naviga tion est destinée à la connexion d un écran per mettant aux passagers des sièges arrières de regarder la source vidéo Branchement d un appareil vidéo externe Utilisation de Entrée AV1 AV1 20 cm Aux sorties audio Câble à fiches Cinch RCA vendu séparément Àla sortie vidéo Rouge blanc AUDIO INPUT Jaune VIDEO INPUT Connecteur RCA Unité de navigation Comp...

Страница 46: ...ns Paramètres AV sur Vidéo lors de la connexion d un appareil vidéo extérieur Pour en savoir plus reportez vous au Ma nuel de fonctionnement ATTENTION Veiller à utiliser un CD RM10 vendu séparément pour le câblage En cas d utilisation d autres câ bles il se peut que la position du câblage diffère entraînant des troubles de l image et du son OK G V R L G R V L L Audio gauche Blanc R Audio droite Ro...

Страница 47: ...ent À la sortie vidéo À la sortie IP BUS Unité de navigation Noir Connecteur RCA Unité externe Pioneer vendue séparément Bleu Il est nécessaire de régler Entrée AV1 dans Paramètres AV sur EXT lors de la connexion de l unité externe Pour en sa voir plus reportez vous au Manuel de fonctionnement Branchement du système Fr 47 Section Français 03 ...

Страница 48: ...irection ou du levier de vitesse Assu rez vous d installer ce produit ses câble et les raccordement de telle façon qu ils n obstrue pas ni gêne la conduite Assurez vous qu aucun fil ou conducteur n est coincé dans une porte ou le méca nisme de coulissement d un siège car ceci pourrait provoquer un court circuit Vérifiez le bon fonctionnement des autres équipements du véhicule après l installa tion...

Страница 49: ...nitivement connectez le câblage provisoirement pour vous assurer que les connexions sont cor rectes et que le système fonctionne normalement Installation de ce système de navigation Remarques sur l installation N installez pas ce système de navigation dans un endroit où il risque d être soumis à des températures élevées ou à l humidité Par exemple A proximité du chauffage de la ventila tion ou de ...

Страница 50: ...is à tête plate 5 mm 6 mm 8 pièces Installation en utilisant les trous de vis sur les côtés de cette unité de navigation Fixation de l unité de navigation dans le tiroir de l autoradio Positionnez l unité de navigation de manière à ce que les trous de vis soient alignés avec les trous de vis de la console et serrez 3 ou 4 vis de chaque côté Utilisez les vis de pression 5 mm 6 mm ou les vis à tête ...

Страница 51: ...i vous installez l antenne GPS à l intérieur du véhicule utilisez la plaque métallique fournie avec le système La sensibilité de réception sera faible si elle n est pas utili sée Ne coupez pas la plaque métallique car la sensibilité de l antenne GPS en serait ré duite Ne tirez pas le câble pour déplacer l an tenne Celle ci est fixée à l aide d un aimant très puissant Vous risqueriez d arracher le ...

Страница 52: ...laisser une marque sur la surface après son retrait Plaque métallique Décollez la pellicule protectrice à l arrière Vérifiez que la surface de fixation est bien sèche et qu elle est exempte de poussière d huile etc Serre fils A utiliser pour fixer le fil conducteur aux endroits nécessaires dans le véhicule Remarques Lors de la fixation de la plaque métallique ne la coupez pas en petits morceaux Le...

Страница 53: ...viter l infiltration d eau dans l habitacle Serre fils A utiliser pour fixer le fil conducteur aux endroits nécessaires dans le véhicule Cheminement du fil par l intérieur du coffre Serre fils A utiliser pour fixer le fil conducteur aux endroits nécessaires dans le véhicule Joint caoutchouté Coussin étanche Le coussin étanche doit être en contact avec le rebord supérieur du joint caoutchouté Passe...

Страница 54: ...ce Collier 5 pièces Installation sur le pare soleil 1 Installez le microphone dans l agrafe pour micro Microphone Agrafe pour micro 2 Fixez l agrafe pour micro au pare soleil Agrafe pour micro Colliers Utilisez les colliers pour fixer le câble dans le véhi cule Installez le microphone sur le pare soleil lors qu il est en position relevée La reconnais sance vocale est impossible lorsque le pare sol...

Страница 55: ... la co lonne de direction Bande adhésive à double face Installez l agrafe pour micro sur la colonne de direction à dis tance du volant Colliers Utilisez les colliers pour fixer le câble dans le véhi cule Réglage de l angle du microphone L angle du microphone peut être ajusté en dé plaçant l angle du clip microphone vers l avant ou vers l arrière Installation Fr 55 Section Français 04 ...

Страница 56: ...lo bille par exem ple appuyez sur le bouton RESET de l unité de navigation 4 Faites les réglages suivants Pour en savoir sur leur fonctionnement re portez vous au Manuel de fonctionne ment 1 Réglez la langue 2 Roulez sur une route sans obstacle jusqu à ce que le GPS commence à recevoir le si gnal normalement 3 Réalisez les réglages nécessaires Réglage de l heure Réglages des unités du format de la...

Страница 57: ... Australia TEL 03 9586 6300 PIONEER ELECTRONICS OF CANADA INC 300 Allstate Parkway Markham Ontario L3R 0P2 Canada TEL 1 877 283 5901 TEL 905 479 4411 PIONEER ELECTRONICS DE MEXICO S A de C V Blvd Manuel Avila Camacho 138 10 piso Col Lomas de Chapultepec Mexico D F 11000 TEL 55 9178 4270 先鋒股份有限公司 總公司 台北市中山北路二段44號13樓 電話 02 2521 3588 先鋒電子 香港 有限公司 香港九龍尖沙咀海港城世界商業中心9樓901 6室 電話 0852 2848 6488 Published b...

Отзывы: