background image

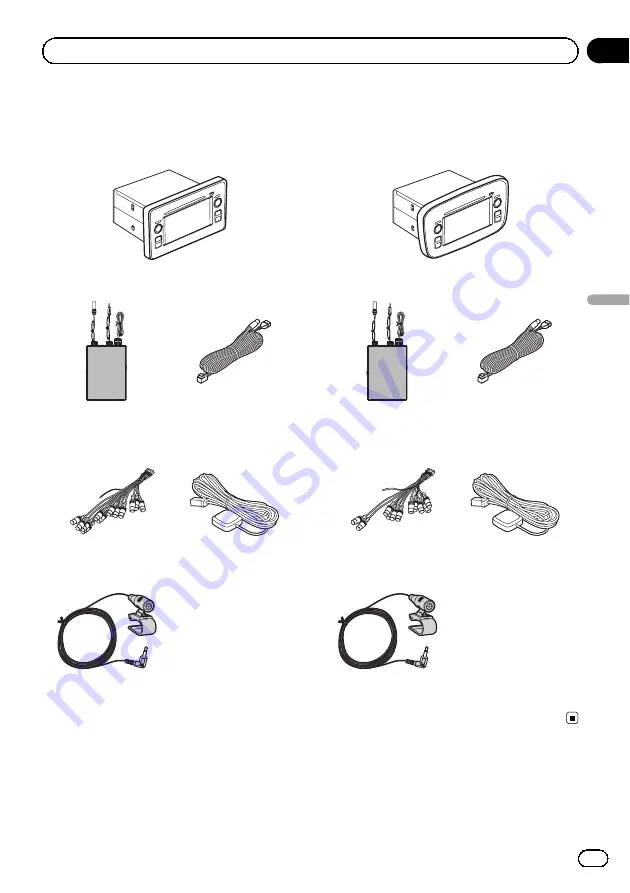
Mitgelieferte Teile

AVIC-F9210BT

Navigationseinheit

RDS-TMC-Tuner

Steckverbinder

zwischen USB und

Mini-Buchse

Cinch-Anschluss

GPS-Antenne

Mikrofon

AVIC-F9220BT

Navigationseinheit

RDS-TMC-Tuner

Steckverbinder

zwischen USB und

Mini-Buchse

Cinch-Anschluss

GPS-Antenne

Mikrofon

De

49

Abschnitt

Deutsch

03

Anschluss des Systems

Содержание AVIC-F9210BT

Страница 1: ...lación independiente se describe parte del proceso de cableado e instalación Gewisse Verkabelungs und Installationsarbeiten sind in der separaten Einbauanleitung beschrieben Certains câblages et procédés d installation sont décrits dans le manuel d installation séparé Alcuni dati di cablaggio e installazione sono descritti nel Manuale d installazione separato Sommige bedradings en installatie info...

Страница 2: ...ar view camera 12 When connecting the external video component 13 Using AV1 Input AV1 13 Using AV2 Input AV2 14 When connecting the rear display 14 When using a rear display connected to rear video output 14 Installation Precautions before installation 15 To guard against electromagnetic interference 15 Before installing 15 Installing the navigation system 16 Installation notes 16 Concealing the m...

Страница 3: ...ic regulations If you ex perience difficulty in operating the system or reading the display park your vehicle in a safe location and apply the handbrake be fore making the necessary adjustments This manual explains how to install this na vigation system in your vehicle However some wiring and installation are described in the separate installation manual Opera tion of this navigation system is exp...

Страница 4: ...d ing the position of your vehicle the distance of objects shown on the screen and compass directions In addition the system has certain limitations including the inability to identify one way streets temporary traffic restrictions and potentially unsafe driving areas Please exercise your own judgement in the light of actual driving conditions 5 As with any accessory in your vehicle s inter ior th...

Страница 5: ... s controls Do not route wires where they will be ex posed to high temperatures If the insula tion heats up wires may become damaged resulting in a short circuit or malfunction and permanent damage to the product Do not cut the GPS aerial cable to shorten it or use an extension to make it longer Altering the aerial cable could result in a short circuit or malfunction Do not shorten any leads If yo...

Страница 6: ...ack on this product will not be used do not remove the caps attached to the end of the connector Notice for the blue white lead When the ignition switch is turned on ACC ON a control signal is output through the blue white lead Connect to an external power amp s system remote control term inal the auto aerial relay control terminal or the aerial booster power control terminal max 300 mA 12 V DC Th...

Страница 7: ...n unit RDS TMC tuner USB and mini jack connector RCA connector GPS aerial Microphone AVIC F9220BT Navigation unit RDS TMC tuner USB and mini jack connector RCA connector GPS aerial Microphone Engb 7 English Section 03 Connecting the system ...

Страница 8: ... voice guidance of the navigation incoming ringtone and incoming voice of the mobile phone that is connected to this navigation system via Bluetooth wireless technology 15 cm Note RCA connector Power cord For connection refer to the wiring and installation manual separately supplied Fuse 10 A Expansion port RDS TMC tuner Vehicle aerial Yellow black If you use an equipment with mute function connec...

Страница 9: ...uch regulations apply they must be obeyed and this product s video source should not be used USB and mini jack connector 2 When connecting your iPod both connections are necessary It is necessary to set AV1 Input in AV System Settings to iPod when connecting the iPod For details refer to Operation Manual 2 USB Interface Cable for iPod CD IU50V sold separately iPod with Dock connector 3 3 For detai...

Страница 10: ...woofer output SUBWOOFER OUTPUT 31 cm Rear output REAR OUTPUT Front output FRONT OUTPUT 15 cm Blue white To system control terminal of the power amp max 300 mA 12 V DC For connection refer to the wiring and installation manual separately supplied Engb 10 Section 03 Connecting the system ...

Страница 11: ...les sold separately Front speaker Rear speaker Subwoofer Front speaker Rear speaker Subwoofer Left Right System remote control You can change the RCA output of the subwoofer depending on your subwoofer system Refer to Operation Manual Note Engb 11 English Section 03 Connecting the system ...

Страница 12: ...s to use this product as an aid to keep an eye on trailers or backing into a tight parking spot Do not use this function for entertainment purposes The object in rear view may appear closer or more distant than in reality Please note that the edges of the rear view camera images may differ slightly according to whether full screen images are displayed when backing and whether the images are used f...

Страница 13: ... separately It is necessary to set AV1 Input in AV Settings to Video when connecting the external video component For details refer to Operation Manual CAUTION Be sure to use a CD RM10 sold separately for wiring If you use other cables there is a case where wiring position differs images and sounds may be disturbed OK G V R L G R V L L Left audio White R Right audio Red V Video Yellow G Earth Engb...

Страница 14: ... Manual When connecting the rear display Navigation unit Rear display with RCA input jacks Yellow REAR MONITOR OUTPUT RCA connector 15 cm RCA cable sold separately To video input When using a rear display connected to rear video output WARNING NEVER install the rear display in a location that enables the driver to watch the video source while driving This navigation system s rear video output is f...

Страница 15: ...owing installation of the navigation system Do not install this navigation system where it may i obstruct the driver s vi sion ii impair the performance of any of the vehicle s operating systems or safety features including airbags hazard lamp buttons or iii impair the driver s ability to safely operate the vehicle Install the navigation system between the driver s seat and front passenger seat so...

Страница 16: ...rizontally on a surface within 0 degrees to 30 degrees tol erance within 5 degrees to the left or right Improper installation of the unit with the surface tilted more than these toler ances increases the potential for errors in the location display and might otherwise cause reduced display performance 30 5 5 When installing to ensure proper heat dis persal when using this unit make sure you leave ...

Страница 17: ...e sheets to hide the metal brackets inside that are visible from the front panel slits Self adhesive sheet 4 pcs 1 Peel the release paper off the sheets 2 Attach the sheets at the top and bot tom on both sides of the panel as illu strated below Engb 17 English Section 04 Installation ...

Страница 18: ...l if reception from the sa tellite is blocked Dashboard Rear shelf When installing the GPS aerial inside the vehicle be sure to use the metal sheet pro vided with your system If this is not used the reception sensitivity will be poor Do not cut the accessory metal sheet This would reduce the sensitivity of the GPS aer ial Take care not to pull the aerial lead when removing the GPS aerial The magne...

Страница 19: ...rial on the metal sheet The GPS aerial is fastened with its magnet The metal sheet contains a strong adhesive which may leave a mark on the surface if it is removed Note Clamps Use separately sold clamps to secure the lead where necessary inside the vehicle GPS aerial Metal sheet Peel off the protective sheet on the rear Make sure the surface is free of moisture dust grime oil etc before affixing ...

Страница 20: ...ophone Microphone clip Double sided tape Mounting on the sun visor 1 Install the microphone in the micro phone clip Microphone clip Microphone 2 Attach the microphone clip to the sun visor Microphone clip Clamps Use separately sold clamps to secure the lead where ne cessary inside the vehicle Install the microphone on the sun visor when it is in the up position It cannot recognise the driver s voi...

Страница 21: ...ded tape Install the microphone on the steering column keeping it away from the steering wheel Clamps Use separately sold clamps to secure the lead where necessary in side the vehicle Adjusting the microphone angle The microphone angle can be adjusted Engb 21 English Section 04 Installation ...

Страница 22: ...a 32 Al conectar el componente de vídeo externo 33 Utilización de Entrada AV1 AV1 33 Utilización de Entrada AV2 AV2 34 Al conectar la pantalla posterior 34 Al usar una pantalla posterior conectada a la salida de vídeo trasera 34 Instalación Precauciones antes de la instalación 35 Para impedir que se produzcan interferencias electromagnéticas 35 Antes de la instalación 36 Instalación del sistema de...

Страница 23: ...das las regula ciones de tráfico existentes Si tiene proble mas al manejar el sistema o al leer la pantalla aparque el vehículo en un lugar seguro y ponga el freno de mano antes de realizar los ajustes necesarios Este manual explica cómo instalar este sis tema de navegación en su vehículo Sin embargo en el manual de instalación inde pendiente se describe parte del proceso de cableado e instalación...

Страница 24: ...gación puede mostrar una información errónea de la posición de su vehículo la dis tancia de los objetos mostrados en la pantalla y las direcciones de la brújula Además el sis tema tiene ciertas limitaciones incluyendo la incapacidad de identificar calles de una direc ción restricciones temporales de tráfico y zonas donde la conducción pueda resultar pe ligrosa Haga uso de su buen juicio en fun ció...

Страница 25: ... cables que vayan a estar some tidos a altas temperaturas Si se calienta el aislamiento los cables pueden resultar dañados y como consecuencia puede producirse un cortocircuito o una avería y el producto puede sufrir un deterioro per manente No corte el cable de la antena GPS para reducir su longitud ni utilice una exten sión para alargarlo La alteración del cable de la antena puede causar un cort...

Страница 26: ...pas del extremo del conector Aviso para el cable conductor azul blanco Al conectar el interruptor de encendido ACC ON se envía una señal de control por el cable azul blanco Conéctelo al ter minal de control remoto del sistema exter no de amplificadores de potencia al terminal de control de relé de la antena automática o al terminal de control de po tencia del amplificador de antena máx 300 mA 12 V...

Страница 27: ...avegación Sintonizador RDS TMC Conector USB y minijack Conector RCA Antena GPS Micrófono AVIC F9220BT Unidad de navegación Sintonizador RDS TMC Conector USB y minijack Conector RCA Antena GPS Micrófono Es 27 Sección Español 03 Conexión del sistema ...

Страница 28: ...ión guía de voz del sistema de navegación timbre entrante y voz entrante del teléfono móvil conectado al sistema de navegación a través de la tecnología inalámbrica Bluetooth 15 cm Conector RCA Cable de alimentación Para el proceso de conexión consulte el manual de cableado e instalación independiente suministrado Unidad de navegación Verde Toma de antena WIRED REMOTE INPUT Consulte el Manual de i...

Страница 29: ... Cuando aplicables se debe obedecer tales reglamentos y no se debe utilizar la fuente de vídeo de este producto Conector USB y minijack 2 Cuando conecte su iPod ambas conexiones son necesarias Al conectar el iPod se debe ajustar Entrada AV1 en Conf sistema AV a iPod Para los detalles consulte el Manual de operación 2 Cable de interfaz USB para iPod CD IU50V se vende por separado iPod con Conector ...

Страница 30: ...graves SUBWOOFER OUTPUT 31 cm Salida trasera REAR OUTPUT Salida delantera FRONT OUTPUT 15 cm Azul blanco Al terminal de control del sistema del amplificador de potencia máx 300 mA 12 V CC Para el proceso de conexión consulte el manual de cableado e instalación independiente suministrado Es 30 Sección 03 Conexión del sistema ...

Страница 31: ...Nota Cables RCA se venden por separado Amplificador de potencia se vende por separado Amplificador de potencia se vende por separado Amplificador de potencia se vende por separado Izquierda Derecha Altavoz delantero Altavoz delantero Altavoz trasero Altavoz trasero Altavoz de graves Altavoz de graves Es 31 Sección Español 03 Conexión del sistema ...

Страница 32: ...ara el uso de este producto como elemento de ayuda en el control de remol ques o al circular marcha atrás en una plaza de estacionamiento estrecha No utilice esta función para fines recreativos El objeto que aparece en la cámara puede pa recer más cercano o más distante de lo que está en realidad Tenga en cuenta que los bordes de las imáge nes que aparecen en la cámara para visión trasera pueden v...

Страница 33: ...parado Al conectar el componente de vídeo exter no se debe ajustar Entrada AV1 en Conf sistema AV a Vídeo Para los detalles consulte el Manual de operación PRECAUCIÓN Utilice un CD RM10 en venta por separado para realizar la conexión Si utiliza otros cables hay un caso en la que la posición de cableado difiere y las imágenes y los sonidos pueden perturbarse OK G V R L G R V L L Audio izquierda Bla...

Страница 34: ...onectar la pantalla posterior 15 cm Unidad de navegación Conector RCA Amarillo REAR MONITOR OUTPUT Cable RCA se vende por separado A la entrada de vídeo Pantalla posterior con tomas de entrada RCA Al usar una pantalla posterior conectada a la salida de vídeo trasera ADVERTENCIA NUNCA instale la pantalla posterior en un punto que permita al conductor ver la fuente de vídeo mientras conduce La salid...

Страница 35: ...nis mo de deslizamiento de un asiento porque puede producirse un cortocircuito Después de instalar el sistema de navega ción compruebe que todos los demás equipos de su vehículo funcionan correc tamente No instale este sistema de navegación en puntos en los que pueda i dificultar la vi sión del conductor ii comprometer el funcionamiento de alguno de los sistemas de seguridad del vehículo como los ...

Страница 36: ...a lo bastante resistente para soportar su peso Elija un lugar donde este sistema de navegación se pueda instalar bien e instálelo de forma segura Si el siste ma de navegación no está bien instalado no se mostrará correctamente la ubicación actual del vehículo Instale la unidad de navegación de forma horizontal sobre una superficie dentro de un margen de tolerancia de 0 grados a 30 grados en un mar...

Страница 37: ...ningún sitio con calor por ejemplo cerca de una salida de calefacción Cómo ocultar los soportes metálicos Para usuarios AVIC F9210BT Utilice las hojas autoadhesivas suministradas para ocultar los soportes de metal interiores que pueden verse desde las hendiduras del panel frontal Hoja autoadhesiva 4 piezas 1 Retire el papel de liberación de las hojas 2 Coloque las hojas en la parte superior e infe...

Страница 38: ...ión desde el satélite queda bloqueada Salpicadero Bandeja trasera Cuando instale la antena GPS en el interior del vehículo asegúrese de utilizar la hoja de metálica proporcionada con su sistema Si ésta no se utiliza la sensibilidad de la re cepción no será apropiada No corte la hoja de metálica suministrada para hacerla más pequeña Esto podría re ducir la sensibilidad de la antena GPS Tenga cuidad...

Страница 39: ...de instrumentos Fije la hoja de metal en una superficie lo más plana posible y donde la antena GPS apunte hacia la ventana Ponga la antena GPS en la hoja de metal La antena GPS se fija medi ante su imán La hoja de metal contiene un adhesivo fuerte que puede dejar una marca en la superficie si se quita Nota Abrazaderas Utilice abrazaderas vendidas separadamente para asegurar el cable en el interior...

Страница 40: ...n del micrófono Instale el micrófono de tal forma que esté correctamente orientado y a la distancia correcta del conductor y resulte fácil reco ger la voz del conductor Asegúrese de conectar el micrófono al sis tema de navegación una vez que el sistema está apagado ACC OFF Partes suministradas Micrófono Clip del micrófono Cinta de doble cara Montaje en el parasol 1 Instale el micrófono en el clip ...

Страница 41: ...plegado hacia arriba No puede recono cer la voz del conductor si el parasol está baja do Instalación en la columna de dirección Monte el micrófono en la columna de dirección Cinta de doble cara Instale el micrófono en la colum na de dirección manteniéndolo alejado del volante Abrazaderas Utilice abrazaderas vendi das separadamente para asegurar el cable en el in terior del vehiculo donde sea neces...

Страница 42: ...Ajuste del ángulo del micrófono Se puede ajustar el angulo del microfono Es 42 Sección 04 Instalación ...

Страница 43: ...ker 52 Beim Anschluss einer Heckkamera 54 Bei Anschluss der externen Videokomponente 55 Gebrauch von AV1 Eingang AV1 55 Gebrauch von AV2 Eingang AV2 56 Bei Anschluss der Heckanzeige 56 Bei Verwendung einer Heckanzeige die an den hinteren Videoausgang angeschlossen ist 56 Einbau Vor der Installation zu beachten 57 Zur Vermeidung elektromagnetischen Rauschens 57 Vor dem Einbau 58 Einbau des Navigati...

Страница 44: ...er all gemeinen Verkehrsregeln abhalten Wenn Sie Probleme beim Betrieb des Systems und Ablesen des Displays haben parken Sie Ihr Fahrzeug an einem sicheren Ort und ziehen Sie die Handbremse an bevor Sie die notwendigen Einstellungen vorneh men Diese Anleitung erklärt den Einbau des Na vigationssystems in Ihren Wagen Gewisse Verkabelungs und Installationsarbeiten sind jedoch in der separaten Einbau...

Страница 45: ... der auf dem Bildschirm angezeigten Objekte und die Kompassrichtung nicht kor rekt anzeigt Darüber hinaus funktioniert das System nur innerhalb bestimmter Grenzen und erkennt z B keine Einbahnstraßen vor übergehende Verkehrsbeschränkungen oder potenziell gefährliche Streckenabschnitte Be urteilen Sie die Verkehrssituation unter Beach tung der herrschenden Bedingungen immer selbst 5 Wie alles ander...

Страница 46: ...er einen dauerhaften Schaden am Produkt verur sachen Die GPS Antennenkabel nicht abschnei den um es zu kürzen oder mit einem Ver längerungskabel verlängern da beides zu einem Kurzschluss oder einer Fehlfunk tion führen kann Kabel sollten grundsätzlich nicht gekürzt werden Durch Kürzen der Kabel kann es eventuell zu einem Versagen der Sicher heitsschaltung kommen Sicherungshal ter Sicherungswiderst...

Страница 47: ... Lautsprecherkabels nicht direkt erden oder die Seiten zwei er Lautsprecherkabel verbinden Die Seite des Lautsprecherkabels muss mit der Seite des Lautsprecherkabels des Navigationssystems verbunden wer den Falls Sie die Cinch Anschlüsse an diesem Produkt nicht nutzen lassen Sie die Schutzkappen an den Anschlüssen aufge setzt Anmerkung zum blau weißen Kabel Wenn der Zündschalter eingeschaltet wird...

Страница 48: ...iolett weiße Kabel ist mit dem Fahrzeugkabel zu verbin den dessen Spannung sich beim Einlegen des Rückwärtsgangs ändert Ohne diesen Anschluss kann der Sensor Fahren in Vor wärts und Rückwärtsrichtung nicht erken nen in welchem Fall die vom Sensor ermittelte Fahrzeugposition unter Umstän den nicht mit der aktuellen Position übereinstimmt De 48 Abschnitt 03 Anschluss des Systems ...

Страница 49: ...Tuner Steckverbinder zwischen USB und Mini Buchse Cinch Anschluss GPS Antenne Mikrofon AVIC F9220BT Navigationseinheit RDS TMC Tuner Steckverbinder zwischen USB und Mini Buchse Cinch Anschluss GPS Antenne Mikrofon De 49 Abschnitt Deutsch 03 Anschluss des Systems ...

Страница 50: ...t werden Einzelheiten siehe Bedienungsanleitung Sprachausgabe des Navigationssystems eingehender Rufton und eingehende Sprachnachrichten des Handys das über Bluetooth Technologie an das Navigationssystem angeschlossen ist 15 cm Cinch Anschluss Netzkabel Anweisungen zum Anschluss siehe separate Verkabelungs und Einbauanleitung Navigationseinheit Grün RDS TMC Tuner Fahrzeugantenne Antennenbuchse WIR...

Страница 51: ... zu Navigationszwecken nie während der Fahrt benutzt werden Die Heckanzeigen sollten so installiert sein dass sie den Fahrer nicht ablenken können In einigen Ländern ist das Betrachten von Bildern auf einem Display im Fahrzeuginnenraum auch durch andere Personen als den Fahrer verboten Wo solche Vorschriften bestehen dürfen die Videofunktionen dieses Produktes nicht benutzt werden GPS Antenne Mikr...

Страница 52: ...BWOOFER OUTPUT 31 cm Ausgang für hinteren Zusatzlautsprecher REAR OUTPUT Ausgang für vorderen Zusatzlautsprecher FRONT OUTPUT 15 cm Blau Weiß Zum Systemsteueranschluss des Leistungsverstärkers max 300 mA 12 V DC Anweisungen zum Anschluss siehe separate Verkabelungs und Einbauanleitung De 52 Abschnitt 03 Anschluss des Systems ...

Страница 53: ...nks Rechts Systemfernbedienung Sie können den Cinch Ausgang des Subwoofers je nach Ihrem Subwoofer System ändern Siehe Bedienungsanleitung Hinweis RCA Kabel separat erhältlich Lautsprecher vorne Lautsprecher hinten Subwoofer Lautsprecher vorne Lautsprecher hinten Subwoofer De 53 Abschnitt Deutsch 03 Anschluss des Systems ...

Страница 54: ... spiegelverkehrt angezeigt wer den Die Heckkamera stellt eine Hilfe dar um den Anhänger im Blick zu behalten oder in eine enge Parklücke zurückzustoßen Benutzen Sie diese Funktion nicht zu Unterhaltungszwek ken Über die Heckkamera angezeigte Gegenstän de können näher oder weiter weg erscheinen als sie wirklich sind Beachten Sie bitte dass die Ränder der Bilder von der Heckkamera leicht abweichen j...

Страница 55: ...lich An Audio Ausgänge Für den Anschluss der externen Videokom ponente muss AV1 Eingang in AV Sy stemeinstellungen auf Video gestellt werden Einzelheiten siehe Bedienungsan leitung VORSICHT Verwenden Sie ein CD RM10 separat erhältlich zur Verkabelung Bei anderen Kabeln können un terschiedliche Belegungen zu Bild und Tonstö rungen führen OK G V R L G R V L L Audio links Weiß R Audio rechts Rot V Vi...

Страница 56: ...luss der Heckanzeige 15 cm Navigationseinheit Cinch Anschluss Gelb REAR MONITOR OUTPUT RCA Kabel separat erhältlich An Videoeingang Heckanzeige mit Cinch Eingangsbuchsen Bei Verwendung einer Heckanzeige die an den hinteren Videoausgang angeschlossen ist WARNUNG Installieren Sie die Heckanzeige NIEMALS so dass der Fahrer während der Fahrt Videos oder Ähnliches sehen kann Dieser hintere Videoausgang...

Страница 57: ...Um die Lenksäule oder den Gangschalthe bel gewickelte Kabel sind extrem gefähr lich Dieses Produkt und seine Kabel so einbauen dass der sichere Betrieb des Fahrzeugs nicht gestört oder behindert wird Vergewissern Sie sich dass sich die Kabel nicht in der Tür oder im Sitzver stellmechanismus verfangen und dadurch einen Kurzschluss auslösen können Vergewissern Sie sich nach dem Einbau des Navigation...

Страница 58: ...e z B auf dem Armaturenbrett Plätze die Regen ausgesetzt sind wie z B in Türnähe oder auf dem Fahrzeugbo den Montieren Sie dieses Navigationssystem an einem Ort der stabil genug ist sein Ge wicht zu tragen Wählen Sie eine Position an der dieses Navigationssystem sicher montiert werden kann und bauen Sie es fest ein Wenn das Navigationssystem nicht fest montiert ist kann der aktuelle Standort des F...

Страница 59: ...gationseinheit nirgends ein wo es heiß ist z B in der Nähe der Heizungsausgänge Verbergen der Metallbügel Für Benutzer des AVIC F9210BT Verdecken Sie die Metallbügel im Inneren die durch die Schlitze der Frontplatte sichtbar sind mit den beiliegenden Selbstklebefolien Selbstklebefolie 4 Stück 1 Ziehen Sie das Schutzpapier von den Folien ab 2 Bringen Sie die Folien wie nachstehend abgebildet oben u...

Страница 60: ...liten gesendeten Signale nicht blockiert werden Armaturenbrett Hutablage Bei der Befestigung der GPS Antenne im Fahrzeuginnenraum unbedingt das mitge lieferte Metallblech verwenden da sich an dernfalls kein guter Empfang erzielen lässt Das Metallblech nicht kleiner schneiden da hierdurch die Empfangsempfindlichkeit der GPS Antenne geschwächt wird Beim Entfernen der GPS Antenne nicht am Antennenkab...

Страница 61: ...uf einer möglichst ebenen Fläche befestigen an der die GPS Antenne zum Fenster gerichtet ist Die GPS Antenne auf dem Metallblech platzieren Die Befesti gung erfolgt durch Magnethaftung GPS Antenne Metallblech Die Schutzfolie an der Unterseite abziehen Vor dem Aufkleben des Metallblechs darauf achten dass die Befestigungsfläche frei von Feuchtigkeit Staub Schmutz Öl usw ist Kabelklemmen Das Mikrofo...

Страница 62: ... des Mikrofons Bauen Sie das Mikrofon so ein dass die Richtung und der Abstand zum Fahrer ideal sind um die Stimme des Fahrers opti mal zu empfangen Schalten Sie das Navigationssystem aus bevor Sie das Mikrofon anschließen ACC OFF Mitgelieferte Teile Mikrofon Mikrofon Clip Doppelseitiges Klebe band Montage an der Sonnenblende 1 Montieren Sie das Mikrofon im Mikro fon Clip Mikrofon Clip Mikrofon De...

Страница 63: ...gerichteten Sonnenblende Bei herunterge klappter Sonnenblende wird die Stimme des Fahrers nicht erkannt Montage auf der Lenksäule Montieren Sie den Mikrofon auf der Lenksäule Doppelseitiges Klebeband Montieren Sie den Mikrofon auf der Lenksäule aber halten Sie ihn weg vom Lenkrad Kabelklemmen Die getrennten erhaltli chen Kabelklemmen im Fahrzeuginnenraum ver legen De 63 Abschnitt Deutsch 04 Einbau...

Страница 64: ...Anpassen des Mikrofonwinkels Der Mikrofonwinkel kann eingestellt werden De 64 Abschnitt 04 Einbau ...

Страница 65: ...sée 76 Branchement d un appareil vidéo externe 77 Utilisation de Entrée AV1 AV1 77 Utilisation de Entrée AV2 AV2 78 Connexion de l écran arrière 78 Utilisation d un écran arrière raccordé à la sortie vidéo arrière 78 Installation Précautions à prendre avant l installation 79 Pour protéger le système de navigation contre les parasites électromagnétiques 79 Avant de procéder à l installation 80 Inst...

Страница 66: ...ntations de la circulation routière en vigueur Si vous éprouvez des difficultés à utiliser le sys tème ou à lire l afficheur stationnez votre véhicule en lieu sûr et serrez le frein à main avant d effectuer les réglages nécessaires Ce manuel explique comment installer le système de navigation dans votre véhicule Cependant certains câblages et procédés d installation sont décrits dans le manuel d i...

Страница 67: ...ystème de navigation peut afficher des informations erro nées à propos de la position de votre véhicule de la distance des objets affichés sur l écran et des directions de la boussole En outre le système comporte certaines limitations telles que l incapacité de signaler les rues à sens unique les restrictions temporaires à la circu lation et les zones où la circulation peut deve nir dangereuse Veu...

Страница 68: ...cule La trajectoire des fils ne doit pas être ex posée à des températures élevées Si l iso lation s échauffe les fils risquent d être endommagés ce qui peut entraîner un court circuit ou un dysfonctionnement et endommager définitivement le produit Ne coupez pas le câble de l antenne GPS et n utilisez pas de prolongateur Une telle modification pourrait provoquer un court circuit ou un dysfonctionne...

Страница 69: ...à l extrémité du connecteur Remarque concernant le câble bleu blanc Lorsque le contacteur d allumage est sur marche ACC ON un signal de commande est émis par le biais du fil bleu blanc Rac cordez le à une borne de commande à dis tance à la prise se commande de relais de l antenne automatique du véhicule ou au terminal de commande d alimentation de l amplificateur d antenne du système d am plificat...

Страница 70: ...igation Tuner RDS TMC Connecteur USB et mini prise Connecteur RCA Antenne GPS Microphone AVIC F9220BT Unité de navigation Tuner RDS TMC Connecteur USB et mini prise Connecteur RCA Antenne GPS Microphone Fr 70 Section 03 Branchement du système ...

Страница 71: ...Fr 71 Section Français 03 Branchement du système ...

Страница 72: ...ent guidage vocal de la navigation Sonnerie d appel entrant et voix de l interlocuteur du téléphone portable qui est connecté à ce système de navigation via la technologie sans fil Bluetooth 15 cm Connecteur RCA Unité de navigation Vert 3 55 m Tuner RDS TMC Prise d antenne WIRED REMOTE INPUT Consultez le manuel d utilisation pour plus de détails sur les adaptateurs de commande à distance vendus sé...

Страница 73: ...vous y conformer et la source vidéo de ce produit ne doit pas être utilisée Connecteur USB et mini prise 2 Lors de la connexion de votre iPod les deux connexions sont nécessaires Il est nécessaire de régler Entrée AV1 dans Paramètres système A V sur iPod lors de la connexion d un iPod Pour en savoir plus reportez vous au Manuel de fonctionnement 2 Câble d interface USB pour iPod CD IU50V vendu sép...

Страница 74: ...d extrêmes graves SUBWOOFER OUTPUT 31 cm Sortie arrière REAR OUTPUT Sortie avant FRONT OUTPUT 15 cm Bleu blanc A la borne de commande d ensemble de l amplificateur de puissance max 300 mA 12 V c c Pour le raccordement reportez vous au manuel de câblage et d installation fourni séparément Fr 74 Section 03 Branchement du système ...

Страница 75: ...nctionnement Remarque Câbles RCA vendus séparément Amplificateur de puissance vendu séparément Amplificateur de puissance vendu séparément Amplificateur de puissance vendu séparément Gauche Droite Haut parleur avant Haut parleur avant Haut parleur arrière Haut parleur arrière Haut parleur d extrêmes graves Haut parleur d extrêmes graves Fr 75 Section Français 03 Branchement du système ...

Страница 76: ...ovisée permet d utiliser ce produit en tant qu aide pour sur veiller une caravane ou pour se garer en mar che arrière dans un emplacement de parking un peu étroit N utilisez pas cette fonction dans un but de divertissement L objet visualisé dans la caméra de rétrovisée peut paraître plus proche ou plus éloigné qu en réalité Veuillez noter que les bords des images de la caméra de rétrovisée peuvent...

Страница 77: ...er Entrée AV1 dans Paramètres système A V sur Vidéo lors de la connexion d un appareil vidéo externe Pour en savoir plus repor tez vous au Manuel de fonctionnement ATTENTION Veiller à utiliser un CD RM10 vendu séparément pour le câblage En cas d utilisation d autres câ bles il se peut que la position du câblage diffère entraînant des troubles de l image et du son OK G V R L G R V L L Audio gauche ...

Страница 78: ...nctionnement Connexion de l écran arrière À l entrée vidéo 15 cm Unité de navigation Connecteur RCA Jaune REAR MONITOR OUTPUT Câble RCA vendu séparément Écran arrière avec prises d entrée RCA Utilisation d un écran arrière raccordé à la sortie vidéo arrière AVERTISSEMENT NE JAMAIS installer l écran arrière à un en droit qui permette au conducteur de regarder la source vidéo en conduisant La sortie...

Страница 79: ... un court circuit Vérifiez le bon fonctionnement des autres équipements du véhicule après l installa tion du système de navigation N installez pas ce système de navigation à un endroit où il risque i d entraver la vi sibilité du conducteur ii de réduire l effi cacité des systèmes de commande des fonctions de sécurité du véhicule y compris les airbags les boutons de commande des feux de détresse ou...

Страница 80: ...zone suffisamment solide pour suppor ter son poids Choisissez un endroit où le système de navigation puisse être fixé de manière sûre et installez le Une mauvaise fixation du système de navigation peut en traîner un dysfonctionnement de la locali sation du véhicule Installez l unité de navigation horizontale ment sur une surface avec une tolérance de 0 degrés à 30 degrés dans une plage de 5 degrés...

Страница 81: ...té de navigation à proximité d une source de chaleur une bouche d air par exemple Dissimuler les supports métalliques Pour les utilisateurs AVIC F9210BT Utilisez les feuillets autocollants fournis pour masquer les supports métalliques à l intérieur qui sont visibles depuis les interstices du pan neau avant Feuillet autocollant 4 pièces 1 Décollez le papier antiadhérent des feuillets 2 Collez les f...

Страница 82: ...nt par l antenne si la récep tion des satellites est gênée Planche de bord Lunette arrière Si vous installez l antenne GPS à l intérieur du véhicule utilisez la plaque métallique fournie avec le système La sensibilité de réception sera faible si elle n est pas utili sée Ne coupez pas la plaque métallique car la sensibilité de l antenne GPS en serait ré duite Ne tirez pas le câble pour déplacer l a...

Страница 83: ... une surface aussi plate que possible située de manière à ce que l antenne GPS soit orientée vers une vitre Posez l antenne GPS sur la plaque métal lique L antenne GPS est immobilisée par son propre aimant Remarque Antenne GPS Plaque métallique Décollez la pellicule protectrice à l arrière Vérifiez que la surface de fixation est bien sèche et qu elle est exempte de poussière d huile etc La plaque ...

Страница 84: ... à l extérieur du véhicule Installation du microphone Installez le microphone à un emplacement permettant une bonne réception de la voix du conducteur Eteignez le système avant de connecter le microphone ACC OFF Pièces fournies Microphone Agrafe pour micro Bande adhésive à double face Installation sur le pare soleil 1 Installez le microphone dans l agrafe pour micro Agrafe pour micro Microphone Fr...

Страница 85: ...on relevée La reconnais sance vocale est impossible lorsque le pare soleil est en position relevée Installation sur la colonne de direction Montez le microphone sur la colonne de direction Bande adhésive à double face Installez le microphone sur la co lonne de direction à distance du volant Serre fils Utilisez des serre fils ven dus separement pour fixer le fil conducteur aux endroits necessaires ...

Страница 86: ...Réglage de l angle du microphone L angle du microphone peut être Fr 86 Section 04 Installation ...

Страница 87: ...a il componente video esterno 99 Uso di Ingresso AV1 AV1 99 Uso di Ingresso AV2 AV2 100 Quando si collega il display posteriore 100 Quando si utilizza un display posteriore collegato a un uscita video posteriore 100 Installazione Precauzioni prima dell installazione 101 Per proteggere l unità di navigazione da disturbi elettromagnetici 101 Prima dell installazione 101 Installazione del sistema di ...

Страница 88: ...mente la segnaletica stradale esistente In caso di difficoltà nell uso del sistema o nella lettura dello schermo per prima cosa arrestare il veicolo in un luogo sicuro innestare il freno di stazionamento e solo allora proce dere con le necessarie regolazioni Questo manuale illustra l installazione del sistema di navigazione nel veicolo Tuttavia alcuni dati di cablaggio e installazione sono descrit...

Страница 89: ... può in alcuni casi visualizzare informazioni errate sulla posi zione del veicolo la distanza degli oggetti mo strati sullo schermo e le direzioni della bussola Inoltre il sistema ha alcuni limiti ine renti come l incapacità di individuare vie a senso unico limitazioni temporanee del traffi co e zone di guida potenzialmente pericolose Usare il proprio giudizio in base alle condizio ni di guida eff...

Страница 90: ...mando del veicolo Non posare i fili lungo percorsi in cui risul tano esposti a temperature elevate Se l i solamento si scalda il filo può danneggiarsi e causare cortocircuiti o malfunzionamenti e danni permanenti al prodotto Non tagliare il cavo dell antenna GPS per accorciarlo e non usare una prolunga per allungarlo Un alterazione del cavo anten na può causare un cortocircuito Non accorciare alcu...

Страница 91: ... jack RCA su questo prodotto non rimuove re i tappi fissati all estremità del connetto re Informazione sul cavetto blu bianco Quando l interruttore di accensione è atti vato ACC ON viene emesso un segnale di controllo attraverso il cavo blu bianco Col legare ad un morsetto di controllo remoto del sistema di un amplificatore esterno la presa a relè dell antenna automatica o la presa dell amplificat...

Страница 92: ...intonizzatore RDS TMC Connettore USB e mini spinotto Connettore RCA Antenna GPS Microfono AVIC F9220BT Unità di navigazione Sintonizzatore RDS TMC Connettore USB e mini spinotto Connettore RCA Antenna GPS Microfono It 92 Sezione 03 Collegamento del sistema ...

Страница 93: ...It 93 Sezione Italiano 03 Collegamento del sistema ...

Страница 94: ...i vedere il Manuale di funzionamento guida vocale della navigazione tono squillo in entrata e voce in entrata del cellulare che è collegato a questo sistema di navigazione tramite tecnologia Bluetooth wireless 15 cm Connettore RCA Unità di navigazione Verde 3 55 m Presa d antenna WIRED REMOTE INPUT Per informazioni sugli adattatori per controllo remoto a filo venduti separatamente si prega di vede...

Страница 95: ... è in vigore è necessario osservarle non usando la sorgente video dell apparecchio Connettore USB e mini spinotto 2 Con l iPod sono necessari entrambi i collegamenti Quando si collega l iPod occorre impostare l opzione Ingresso AV1 di Impostazioni sistema AV su iPod Per maggiori informazioni al riguardo si prega di consultare il Manuale di funzionamento 2 Cavo d interfaccia USB per iPod CD IU50V v...

Страница 96: ...ta subwoofer SUBWOOFER OUTPUT 31 cm Uscita posteriore REAR OUTPUT Uscita anteriore FRONT OUTPUT 15 cm Blu bianco Al morsetto controllo sistema dell amplificatore max 300 mA 12 V CC Per il collegamento vedere il manuale di cablaggio e installazione fornito separatamente It 96 Sezione 03 Collegamento del sistema ...

Страница 97: ...le di funzionamento Nota Cavi RCA venduti separatamente Amplificatore venduto separatamente Amplificatore venduto separatamente Amplificatore venduto separatamente Sinistra Destra Diffusore anteriore Diffusore anteriore Diffusore posteriore Diffusore posteriore Subwoofer Subwoofer It 97 Sezione Italiano 03 Collegamento del sistema ...

Страница 98: ...inata ad utilizzare questo prodotto come un ausilio per mantenere la visione su un ri morchio o parcheggiare in spazi stretti Non usare questa funzione per scopi di intratteni mento L oggetto nella vista posteriore può apparire più vicino o più distante rispetto alla realtà Notare che i bordi delle immagini della teleca mera a vista posteriore possono essere legger mente differenti a seconda che l...

Страница 99: ...l componente video esterno è necessario impostare Ingresso AV1 in Impostazioni sistema AV su Video Per i dettagli vedere il Manuale di funzio namento ATTENZIONE Assicurarsi di usare un CD RM10 venduto sepa ratamente per il cablaggio Se si usano altri cavi vi è la possibilità che la posizione di cablaggio possa variare e che le immagini e i suoni risultino disturbati OK G V R L G R V L L Audio sini...

Страница 100: ...isplay posteriore 15 cm Unità di navigazione Connettore RCA Giallo REAR MONITOR OUTPUT Cavo RCA venduto separatamente All ingresso video Display posteriore con prese d ingresso RCA Quando si utilizza un display posteriore collegato a un uscita video posteriore AVVERTENZA MAI installare il display posteriore in un luogo che permetta al conducente di guarda re la sorgente video mentre guida L uscita...

Страница 101: ...edili causando cortocircuiti Verificare che le altre apparecchiature del veicolo funzionino correttamente dopo aver installato il sistema di navigazione Non installare questo sistema di naviga zione dove può i ostruire la visione del conducente ii compromettere le presta zioni di un qualunque sistema operativo sul veicolo o le funzioni di sicurezza in clusi airbag pulsanti delle luci di emer genza...

Страница 102: ...ò essere installato saldamente e installarlo in ma niera sicura Se questo sistema di naviga zione non è installato correttamente l attuale posizione del veicolo non può es sere visualizzata in maniera corretta Installare l unità di navigazione orizzontal mente su una superficie con una tolleranza tra 0 e 30 gradi entro 5 gradi a destra o a sinistra L installazione non corretta dell u nità con la s...

Страница 103: ...vigazione in luoghi caldi per esempio vicino alla presa di un radiato re Nascondere le staffe metalliche Per gli utenti di AVIC F9210BT Usare i fogli autoadesivi forniti in dotazione per nascondere le staffe metalliche interne vi sibili dalle fessure del pannello frontale Foglio autoadesivo 4 pezzi 1 Rimuovere la pellicola dai fogli 2 Attaccare i fogli nella parte superiore e inferiore su entrambi...

Страница 104: ...ne dal satellite è bloccata Cruscotto Piano portaoggetti posteriore Quando si installa l antenna GPS all inter no del veicolo assicurarsi di usare la lastra metallica in dotazione al sistema Se non se ne fa uso la sensibilità di ricezione è scadente Non tagliare la lastra metallica in dotazio ne Questo riduce la sensibilità dell anten na GPS Fare attenzione a non tirare il cavo dell an tenna quand...

Страница 105: ... superficie più piana possibile dove l antenna GPS sia ri volta verso il finestrino Collocare l antenna GPS sulla lastra metallica L antenna GPS viene trattenuta dal suo magnete Antenna GPS Lastra metallica Togliere il foglio protettivo sul retro Assicurarsi che la superficie sia priva di umidità polvere sporco olio ecc prima di applicare la lastra metallica Morsetti Usare dei morsetti da reperire...

Страница 106: ...fono Installare il microfono in un luogo dove la sua direzione e distanza dal conducente rendano facile il rilevamento della voce del conducente Accertarsi di collegare il microfono al siste ma di navigazione dopo che il sistema si è spento ACC OFF Pezzi in dotazione Microfono Morsetto del microfono Nastro a doppio lato Montaggio sul parasole 1 Installare il microfono nel morsetto del microfono Mo...

Страница 107: ... in posizione alzata Non è in grado di ri conoscere la voce del conducente se è in posi zione abbassata Installazione sulla colonna di sterzo Montare il microfono sulla colonna di sterzo Nastro a doppio lato Installare il microfono sulla co lonna di sterzo tenendolo lonta no dal volante Morsetti Usare dei morsetti da re perire in commercio per fissare il cavo nei punti necessari all interno del ve...

Страница 108: ...Regolazione dell angolazione del microfono L angolo del microfono è regolabile It 108 Sezione 04 Installazione ...

Страница 109: ...tkijkcamera 120 Bij de aansluiting van een extern videocomponent 121 Gebruik van de AV1 Input AV1 121 Gebruik van de AV2 Input AV2 122 Tijdens het aansluiten van het achterdisplay 122 Tijdens het gebruik van een achterdisplay dat op de achtervideo uitgang is aangesloten 122 Inbouwen Voorzorgen voor installatie 123 Voorkomen van elektromagnetische storingen 123 Voor de installatie 124 Inbouwen van ...

Страница 110: ...s het gebruik van het systeem of als u het beeldscherm niet duidelijk kunt lezen dient u uw voertuig te parkeren op een vei lige plek en de handrem aan te trekken voor u de nodige aanpassingen uitvoert In deze handleiding wordt de inbouw van het navigatiesysteem in uw voertuig be schreven Sommige bedradings en instal latie informatie staat echter in de afzonderlijke installatiehandleiding De be di...

Страница 111: ...aatsen die u op het scherm ziet en de kompasrichting Ook heeft het systeem een aantal beperkingen zoals het ontbreken van informatie over een richtingswegen tijdelijke verkeersomleidingen en eventueel gevaarlijke routes Uw eigen be oordelingsvermogen heeft daarom te allen tijde voorrang op de informatie die het sys teem geeft 5 Evenals bij het gebruik van andere accessoi res in uw auto dient u ero...

Страница 112: ...echanis men van het voertuig Laat de draden niet langs plaatsen lopen waar ze blootgesteld worden aan hoge temperaturen Als de isolatie van de dra den erg warm wordt kunnen ze bescha digd raken waardoor er kortsluiting of een storing ontstaat en er mogelijk perma nente beschadiging aan dit product op treedt Maak de GPS antennedraad niet korter en ook niet langer Wijzigen van de antenne draad kan r...

Страница 113: ...iet direct worden geaard en mogen de zijden van de speakerdraden niet met elkaar worden verbonden Zorg ervoor dat zijde van de speakerdraad wordt verbon den met de zijde van de speakerdraad op het navigatiesysteem Indien de RCA aansluiting op dit product niet wordt gebruikt dan mogen de dopjes die aan het einde van de aansluiting zijn bevestigd niet worden verwijderd Opmerking over de blauw witte ...

Страница 114: ... aan op de draad waarvan de span ning verandert wanneer de versnellings hendel in de achteruit wordt gezet Wanneer de draad niet is aangesloten is het mogelijk dat de sensor niet juist detec teert of uw voertuig naar voren achteren rijdt en bestaat de kans dat de voertuigposi tie die gedetecteerd wordt door de sensor niet overeenkomt met de feitelijke positie Nl 114 Hoofdstuk 03 Systeemcomponenten...

Страница 115: ...d RDS TMC tuner USB en ministekker aansluiting RCA connector GPS antenne Microfoon AVIC F9220BT Navigatie eenheid RDS TMC tuner USB en ministekker aansluiting RCA connector GPS antenne Microfoon Nl 115 Hoofdstuk Nederlands 03 Systeemcomponenten aansluiten ...

Страница 116: ...leiding voor details stembegeleiding van de navigatie inkomende beltoon en inkomende stem van de mobiele telefoon die via Bluetooth draadloze technologie op dit navigatiesysteem zijn aangesloten 15 cm RCA connector Stroomsnoer Voor de aansluiting wordt u verwezen naar de afzonderlijke bedradings en installatiehandleiding Navigatie eenheid Groen RDS TMC tuner Antenneaansluiting WIRED REMOTE INPUT R...

Страница 117: ...Waar dergelijke regelgeving van kracht is moet deze worden nageleefd en mag de videoweergave van dit product niet worden gebruikt USB en ministekker aansluiting 2 Wanneer u uw iPod aansluit moeten beide verbindingen worden gemaakt Wanneer de iPod wordt aangesloten moet AV1 Input in Instellingen AV systeem op iPod worden ingesteld Raadpleeg de Bedieningshandleiding voor details 2 USB interfacekabel...

Страница 118: ...tgang SUBWOOFER OUTPUT 31 cm Achteruitgang REAR OUTPUT Vooruitgang FRONT OUTPUT 15 cm Blauw wit Naar de systeemregelklem van de eindversterker max 300 mA 12 V DC Voor de aansluiting wordt u verwezen naar de afzonderlijke bedradings en installatiehandleiding Nl 118 Hoofdstuk 03 Systeemcomponenten aansluiten ...

Страница 119: ...e Bedieningshandleiding Opmerking RCA kabels los verkrijgbaar Eindversterker los verkrijgbaar Eindversterker los verkrijgbaar Eindversterker los verkrijgbaar Links Rechts Voorluidspreker Voorluidspreker Achterluidspreker Achterluidspreker Subwoofer Subwoofer Nl 119 Hoofdstuk Nederlands 03 Systeemcomponenten aansluiten ...

Страница 120: ...gwagens of opleggers in de gaten te houden of om op een kleine plaats in te parkeren Gebruik deze functie niet voor amusementsdoeleinden Het voorwerp dat met de achteruitkijkcamera wordt bekeken kan dichterbij of verder weg lij ken dan in werkelijkheid het geval is Houd er rekening mee dat de randen van de beelden die door de achteruitkijkcamera wor den vastgelegd enigszins afwijkend kunnen zijn a...

Страница 121: ...r er een externe videocomponent wordt aangesloten moet AV1 Input in Instellingen AV systeem op Video worden ingesteld Zie de Bedieningshand leiding voor meer details BELANGRIJK Zorg dat u verbinding maakt met een CD RM10 los verkrijgbaar Wanneer u andere kabels ge bruikt ontstaat de kans op foutieve aansluitingen en verstoord beeld of geluid OK G V R L G R V L L Linkeraudio Wit R Rechteraudio Rood...

Страница 122: ...aansluiten van het achterdisplay 15 cm Navigatie eenheid RCA connector Geel REAR MONITOR OUTPUT RCA kabel los verkrijgbaar Naar video ingang Achterdisplay met RCA tulpstekker ingangsaansluitingen Tijdens het gebruik van een achterdisplay dat op de achtervideo uitgang is aangesloten WAARSCHUWING Plaats het achterdisplay NOOIT zo dat de be stuurder de videobron kan bekijken tijdens het rijden De ach...

Страница 123: ...uivingsmechanisme met eventueel kortsluiting tot gevolg Controleer nadat u het navigatiesysteem heeft ingebouwd of de andere apparatuur in uw auto naar behoren werkt Bouw dit navigatiesysteem niet in op plaatsen waar het i het zicht van de be stuurder kan hinderen ii de werking van een van de bedieningssystemen of veilig heidsvoorzieningen van de auto inclusief airbags en knoppen van waarschuwings...

Страница 124: ...is om het gewicht van het product te dragen Kies een plaats waar dit navigatiesysteem stevig kan worden ge ïnstalleerd en zorg voor een veilige bevesti ging De actuele locatie van het voertuig kan alleen correct worden weergegeven wanneer het navigatiesysteem goed beves tigd is Installeer de navigatie eenheid op een hori zontaal oppervlak binnen een hoek van 0 graden tot 30 graden binnen 5 graden ...

Страница 125: ...rom niet in op een plaats waar deze te warm kan worden bijvoorbeeld naast een radiator De metalen beugels verbergen Voor AVIC F9210BT gebruikers Gebruik de zelfklevende vellen om de metalen beugels binnenin die zichtbaar zijn door de gleuven in het voorpaneel te verbergen Zelfklevend vel 4 st 1 Verwijder de lijmbeschermlaag van de vellen 2 Bevestig de vellen boven en onder aan beide kanten van het...

Страница 126: ...tussen de antenne en de satelliet is Dashboard Hoedenplank Indien u de GPS antenne binnen in de auto aanbrengt gebruik dan het metalen plaatje dat bij het systeem wordt geleverd Als dit plaatje niet gebruikt wordt zal de ont vangstgevoeligheid onbevredigend zijn Maak het bijgeleverde metalen plaatje niet kleiner aangezien dit resulteert in een la gere gevoeligheid van de GPS antenne Trek niet aan ...

Страница 127: ...laatje op een zo hori zontaal mogelijke ondergrond op een plaats waar de GPS antenne de golven door de ruit kan ontvangen Plaats de GPS antenne op het metalen plaatje De GPS antenne heeft een magneet aan de onderzijde Het metalen plaatje bevat een sterk kleefmiddel dat na verwijdering sporen op het oppervlak kan achterlaten Opmerking GPS antenne Metalen plaatje Verwijder het beschermvel aan de ond...

Страница 128: ... auto te bevestigen De microfoon installeren Installeer de microfoon in de juiste richting en op de juiste afstand zodat de microfoon gemakkelijk de stem van de bestuurder kan opvangen Sluit de microfoon aan op het navigatiesys teem nadat het systeem is uitgezet ACC OFF Bijgeleverde accessoires Microfoon Microfoonklem Dubbelzijdig tape Montage op de zonneklep 1 Plaats de microfoon in de microfoon ...

Страница 129: ...oog staat De microfoon kan de stem van de bestuurder niet opvangen wanneer de zonneklep naar beneden is geklapt Installatie op stuurkolom Bevestig de microfoon op de stuurko lom Dubbelzijdig tape Plaats de microfoon op de stuur kolom en houd hem uit de buurt van het stuurwiel Klemmen Gebruik los verkrijgbare klemmen om de draad waar nodig binnenin de auto te bevestigen Nl 129 Hoofdstuk Nederlands ...

Страница 130: ...De hoek van de microfoon aanpassen De hoek van de microfoon kan worden inge steld Nl 130 Hoofdstuk 04 Inbouwen ...

Страница 131: ...Nl 131 Nederlands ...

Страница 132: ...Long Beach California 90801 1540 U S A TEL 800 421 1404 PIONEER EUROPE NV Haven 1087 Keetberglaan 1 B 9120 Melsele Belgium Belgique TEL 0 3 570 05 11 Published by Pioneer Corporation Copyright 2010 by Pioneer Corporation All rights reserved Publié par Pioneer Corporation Copyright 2010 par Pioneer Corporation Tous droits réservés Printed in Thailand Imprimé en Thaïlande CRD4497 A N EU KYTZX 10C000...

Отзывы: