background image

28

Basic Navigation

This section describes basic navigation, such as how to select menu items, using setting your 
destination as an example. There are several methods of setting the destination but, in this 
example, route calculation by specifying address (Address Search) is explained.

Caution

For safety reasons, you cannot use these functions while your vehicle is in 
motion. Stop and put the handbrake on before use.

1

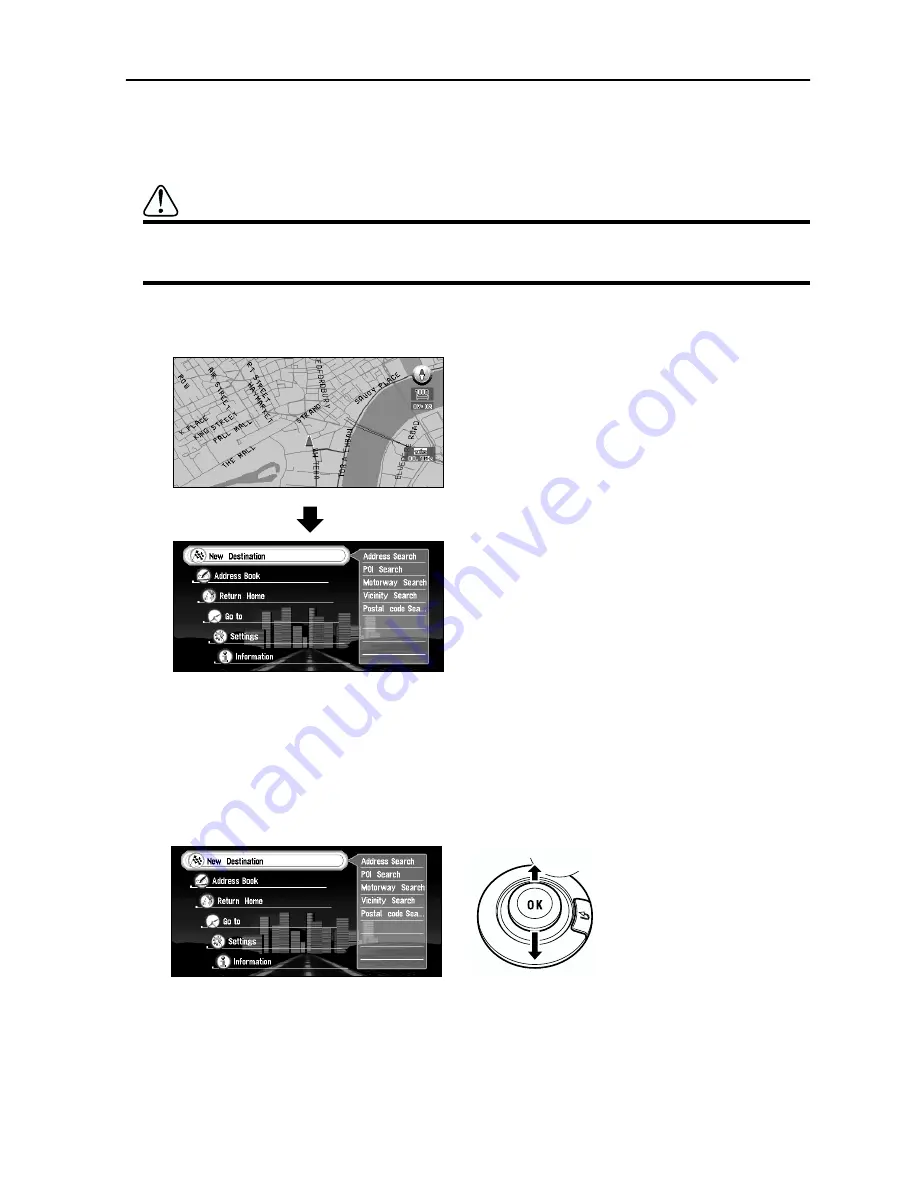
Indicate Main menu.

With the map displayed, press the MENU button.

The Main menu appears. Only “New Destination” is highlighted, and it has different col-
our from the other items. This shows that this item is being selected. On the right-hand 
side of the display, a small list appears. This shows that the item currently being selected 
is further divided into sub-menus.

2

Select the items you want.

Move the joystick up or down. As you move the joystick, the item being highlighted also 
changes. When the item you want is highlighted, click the OK button.

In this example, you want to find your destination, so highlight “New Destination” and 
click the OK button. The menu (submenu) of the items included in “New Destination” 
appears.

Содержание AVIC-8DVD

Страница 1: ...DVD Navigation Unit Operation Manual AVIC 8DVD ENGLISH ...

Страница 2: ......

Страница 3: ...lely for your own personal use or for internal use by your business only on such Pioneer products You shall not copy reverse engineer translate port modify or make derivative works of the Software You shall not loan rent disclose publish sell assign lease sublicense market or otherwise transfer the Software or use it in any manner not expressly authorized by this agreement You shall not derive or ...

Страница 4: ...SES OF ACTION IN THE AGGREGATE INCLUD ING WITHOUT LIMITATION BREACH OF CONTRACT BREACH OF WARRANTY NEGLIGENCE STRICT LIABILITY MISREPRESENTATION AND OTHER TORTS IF PIONEER S WARRANTY DISCLAIMER OR LIMITATION OF LIABILITY SET FORTH IN THIS AGREEMENT SHALL OR FOR ANY REASON WHATSOEVER BE HELD UNENFORCEABLE OR INAPPLICABLE YOU AGREE THAT PIONEER S LIABILITY SHALL NOT EXCEED FIFTY PERCENT 50 OF THE PR...

Страница 5: ...u regarding its subject matter No change in this Agreement shall be effective unless agreed to in writing by Pioneer If any pro vision of this Agreement is declared invalid or unenforceable the remaining provisions of this Agreement shall remain in full force and effect ...

Страница 6: ...eliability fitness for a particular purpose usefulness use or results to be obtained from the NAVTECH Data Disclaimer of Warranty NAVTECH AND ITS LICENSORS INCLUDING THEIR LICEN SORS AND SUPPLIERS DISCLAIM ANY WARRANTIES EXPRESS OR IMPLIED OF QUALITY PERFORMANCE MERCHANTABILITY FITNESS FOR A PARTICULAR PURPOSE OR NON INFRINGEMENT Some States Territories and Countries do not allow certain warranty ...

Страница 7: ...s suppliers assignees subsidiaries affiliated companies and the respective officers directors employees shareholders agents and representatives of each of them free and harmless from and against any liability loss injury including injuries result ing in death demand action cost expense or claim of any kind or character including but not limited to attorney s fees arising out of or in connection wi...

Страница 8: ...5 Setup 1 Getting Ready for the Remote Controller 15 Selecting dipswitches 15 Inserting the batteries to the Remote Controller 16 Setup 2 Getting to Know the Components and What They Do 17 The Remote Controller 17 Microphone 19 Main unit 20 Setup 3 Installing the Program 22 Chapter 2 Basic Operation 25 Switching On and Off 25 Types of Menu 26 Main menu 26 Shortcut menu 27 Basic Navigation 28 How t...

Страница 9: ...ce by Your Navigation System 53 Route guidance by display and voice 53 When receiving traffic information ahead on the set route 54 Checking the Suggested Route 56 Checking the Suggested Route from the Information menu 56 Recalculating the Route to Your Destination 57 Cancelling the Route Guidance 58 Delete the current route and cancel the route guidance 58 Changing your destination 58 Adding Via ...

Страница 10: ...ng PC card data 80 Checking the Navigation Status 81 Checking positioning information by satellite 81 Checking sensor learning status and driving status 82 Checking the connections of leads and installation positions 83 Chapter 6 Customising Your Navigation System 85 Modifying the Default Settings 85 Items Users can Change 86 Route Guidance menu 86 Map Display menu 88 Hardware menu 88 Others menu ...

Страница 11: ...ing errors 100 Handling and Care of the Disc 101 Resetting the System 102 Troubleshooting 103 Messages and how to react to them 106 Route Setting Information 109 Route search specifications 109 Route highlighting 110 Intersection enlargement 110 Tracking 110 About traffic information 110 Copyright 111 Specifications 112 Glossary 113 Display Information 115 ...

Страница 12: ...nditions or traffic restrictions Traffic restrictions and advisories currently in force should always take precedence over guidance given by this product Always obey current traffic restrictions even if this product provides contrary advice Failure to input correct information about the local time may result in the product provid ing improper routing and guidance instructions Never set the volume ...

Страница 13: ...ow enough for outside sounds to be audible Protect this product from moisture Handbrake interlock Certain functions offered by this Navigation System could be dangerous if used while driving To prevent them being used while in motion there is an interlock with your vehicle s handbrake If you attempt to use these functions while driving the message You cannot use this function while driv ing will b...

Страница 14: ...g see Map Display on page 88 The examples in this manual are illustrated using the daytime display When driving at night the colours you see may differ from those shown To use this function the Orange white lead to this unit must be connected correctly Avoiding low battery When using this unit make sure to start your engine first Using this unit without starting the engine will run down the batter...

Страница 15: ...ery with this unit Do not handle the battery with metallic tools Do not store the lithium battery with metallic materials When disposing of used batteries please comply with governmental regulations or envi ronmental public institution s rules that apply in your country area Always check carefully that you are loading the battery with its and poles facing in the proper directions How to remove the...

Страница 16: ... can then come back and read the rest of the chapter later 4 Guidance to Your Destination Before actually setting out toward your chosen destination read this chapter to learn how to interpret the guidance given by your Navigation System 5 Utilising Various Information This chapter provides information about the various information available Read it to learn more about the useful features availabl...

Страница 17: ...n the display used Setting Switch 3 Set Switch 3 depending on the audio equipment used Switches 2 and 4 are not to be used It does not matter whether it is ON or OFF Please set the switches correctly according to the combination of your equipment Please make sure that the setting is correct otherwise the Navigation System will not work prop erly ON This is set if turning this on is recommended for...

Страница 18: ...en batteries of the same size may have dif ferent voltages If the Remote Controller will be out of use for a long period remove the batteries If a battery leaks completely clean any liquid or deposits from the battery compart ment before inserting new batteries The supplied batteries cannot be recharged We recommend using alkaline batteries as replacements When disposing of used batteries please c...

Страница 19: ...Navigation System by speech When a voice command is given you can cycle through possible matches by clicking down this button With the CD SR80 Steering Remote Controller sold separately you can press the BAND but ton and the F button to switch on the operation mode of the Steering Remote Controller When the operation mode is switched on by pressing the BAND button of the Steering Remote Con trolle...

Страница 20: ...roundings 9 MENU button Pressing the MENU button displays a menu of options 10 DETOUR button Press this button to restart route calculation such as calculating a detour If this button is pressed for more than two seconds you can see the information passing roads and driving distance and so on of the route down which you are currently being guided see Chapter 4 Guidance to Your Destination 11 CANCE...

Страница 21: ...on 23 BAND ESC button for audio operation Each button from 17 to 23 has the same function as the ones for Pioneer s Head Unit and so you can operate the Head Unit using the Remote Controller However some buttons become invalid depending on the combination of the models Microphone 1 Microphone After pressing the TALK button to start voice operation this micro phone hears your commands PROGRAM PGM V...

Страница 22: ... 5 PC card ejection button Remove the PC card by pressing this button 6 PC card lock lever This lever is used when you remove the PC card 7 PC card lock lamp The red light goes on when the PC card is inserted and a proper connection is made Setting and removing the disc Insert the disc to the disc slot with the label side up To remove the disc press the disc ejec tion button on the right hand side...

Страница 23: ...d ready for use Removing the PC Card Open the cover on the front of the main unit Slide the PC card lock lever to the right 1 and hold it there Check that the PC card lock lamp has changed to green and then press the PC card ejection button 2 Keep sliding the PC card lock lever to the right until the PC card is removed completely Caution Do not remove the PC card while the PC card lock lamp is red...

Страница 24: ...age English is the default language of the Navigation System If desired you can select another language To keep English move the joystick down to highlight No and click the OK button After this proceed to Step 6 When you want to select another language highlight Yes click the OK button and proceed to the next step 4 Select the language from the list The list of the languages you can use appears Mo...

Страница 25: ... asking to set the clock appears 7 Click the OK button The clock setting display appears 8 Set the clock The time difference between the time originally set in this unit Paris Standard Time and the current location of your vehicle is shown If necessary adjust the time difference Move the joystick to select Hour or Hour and click the OK button to change the time difference by one hour Set the time ...

Страница 26: ...ist of selectable options On and Off appears move the joystick to select On and click the OK button The summer time setting is then turned On 10 Select Done and click the OK button The map of your surroundings appears This completes the setup of your Navigation System Chapter 2 explains the basic operation of your Navigation System To change the language and time later see Chapter 6 Customising Yo...

Страница 27: ...ectly your Navigation System starts up When the password is set After your Navigation System starts and the cautionary message appears you are asked to enter the password Enter your password and select OK and click the OK button You can not enter your password using numeric keypad of the Remote Controller The map of your surroundings appears and you can use your Navigation System For the details o...

Страница 28: ...dress Book Past destinations via points and the list of the registered locations are shown If you select your destination from this menu your route is calculated see Chapters 3 and 5 Return Home Set your home as your destination and your route is calculated see Chapter 3 Go to Set your favourite location such as your workplace as your destination and your route is calculated see Chapter 3 Settings...

Страница 29: ...nation or via point is set with this method some information on the streets around the cross pointer or the area of the house number or POI is picked up Registration Registering the location pointed by cross pointer to Address Book see Chapter 5 Vicinity Search You select a location with cross pointer and POIs Points Of Interest nearby are found see Chapter 3 Information You select a location with...

Страница 30: ... the MENU button The Main menu appears Only New Destination is highlighted and it has different col our from the other items This shows that this item is being selected On the right hand side of the display a small list appears This shows that the item currently being selected is further divided into sub menus 2 Select the items you want Move the joystick up or down As you move the joystick the it...

Страница 31: ...ails of the method of selecting Country see Selecting the country where you want to search on page 42 5 Search the city where your destination is located Enter the name of the city using the text palette To enter the name you select each char acter with the joystick and click the OK button For example enter the name of a city where or near where you live If you enter the first few letters a list o...

Страница 32: ...t Letters you cannot enter are greyed out 3 Space You can enter a space 4 Delete backward Deletes the previous character 5 All delete All the letters entered are deleted When the DELETE button of the Remote Control ler is pressed for more than two seconds all the letters entered can be deleted as well 6 Function button If you highlight this button the functions assigned to each button appear in a ...

Страница 33: ...ayed in sequence If you press different keys while the letter to enter to enter is selected or if you press the OK button on the bottom right of the numeric keypad the selected let ter appears in the text box When the list of the items goes over several screens If the list of the matching city names cannot be displayed within one screen a scroll bar appears on the left hand side of the list to sho...

Страница 34: ...ed your Navigation System starts to calculate a route with that location as your destination When the route is calculated the map of your surroundings appears The street from your cur rent location to your destination turns to green and the route being set is shown If the selected street goes across several cities For example if the selected street goes across three cities the list of these cities...

Страница 35: ... Calculation The route is calculated with the well known point mostly it is the middle point of the street selected previously as your desti nation Cross Street You enter the name of the second street and search for the sur rounding area of its intersection with the first street It is conven ient when there is no house number for your destination or when you cannot enter the house number of the se...

Страница 36: ...rroundings by pressing the NAVI button When the route is not yet set map mode is always displayed but during the route guidance you can switch between Map mode Driver s view Arrow mode and Side arrow mode by clicking the OK button Caution In Driver s view the speed meter is indicated on the screen but this will differ from the actual speed of your vehicle Use the speed meter of your vehicle for co...

Страница 37: ...witches to show the distance and direction to the guidance point Side arrow mode The map of your surroundings is shown on the left and an arrow showing the direction of travel is shown on the right 6 1 2 10 4 9 11 13 5 8 7 3 Normal condition 14 13 12 When approaching an intersection 2 3 4 5 11 1 9 8 7 6 Normal condition 10 14 12 When approaching an intersection ...

Страница 38: ...on 12 Tracking mark The tracking mark shows the route your vehicle has travelled 13 Map of your surroundings 14 Distance to an intersection It is displayed in Arrow mode and Side arrow mode The green bar gets shorter as your vehi cle approaches an intersection Information with the mark appears only when the route is set You can display the current time and estimated time of arrival or travel time ...

Страница 39: ... the joystick of the Remote Controller up and down left and right or diago nally If you move the joystick towards the location you want to see the map moves accord ingly If you press down the joystick while moving the map you can move the map more quickly At this time the cross pointer appears at the centre of the screen Also a line connect ing between the current location and cross pointer appear...

Страница 40: ...ng to the mark If there is another mark near the mark selected you may turn the scale controller up or down to display the information for another mark Information may not be shown for some marks Types of information Name of the registered location Include home and specific location Information of the Points Of Interest POI displayed on the map see Displaying Certain Points Of Interest on the Map ...

Страница 41: ...u desplay the Shortcut menu select Destination and click the OK button t pro ceed to Step 3 3 Switch between multiple items of information by turning the scale controller up or down 4 Click the OK button Route calculation starts When you do not know how to use the Navigation System When you are new to using the Navigation System it may take you a little time to work what to do next After a few sec...

Страница 42: ...40 ...

Страница 43: ...age 58 During the search of your destination if you click the joystick to the left while the triangle mark is displayed on the left hand side of the list you can check the location being selected on the map Some information on traffic regulations by days or time is indicated according to the time when the route calculation is performed Thus it may not correspond with a certain traffic regulation w...

Страница 44: ...ess Search is given as an example 1 From the Main menu select New Destination and then select Address Search 2 Select Country and click the OK button 3 Select the area you want to search and click the OK button When you are returned to the initial display proceed to the searching operation Perform the route calculation of the several route options and select one By combining several searching cond...

Страница 45: ...es to your destination Distance to your destination Condition of route calculation About the route condition When two conditions is mixed as Shortest Avoid Motorway the quickest route to your destination while avoiding a motorway is shown To return to the initial display from the Route Profile display or the Route List display press the BACK button Shortest Calculate a route with the fastest dista...

Страница 46: ...oute profile is shown after a route calculation In addition when a long distance route is calculated your Navigation System may not be able to list all the roads In this case the remaining roads will be shown in the list as you drive on ...

Страница 47: ...on page 68 Also you can change the registered information later When your favourite location is not registered Go to is displayed on menu Once you register the location it changes to favourite location name Selecting your Destination from the Address Book Destinations and via points you have searched before or registered locations are stored in the Address Book By simply selecting your destination...

Страница 48: ...the following item 5 Select the street from the list and click the OK button If there are several streets with the same name the list of areas that the specified streets go through may appear In this case select the area where your destination is located and click the OK button to proceed to the next step Nationwide Select when you do not know the city names of your destination Proceed to the step...

Страница 49: ... the streets run is shown If the selected street goes across several cities the list for selecting the area in which your destination is located is shown Quick Route Cal Calculation The route is calculated with the well known point mostly it is the middle point of the street selected previously as your destination Cross Street You enter the name of the second street and search for the surround ing...

Страница 50: ...reet name appears 4 Enter the first street name and click the OK button The list of the streets matching the name entered appears 5 Select the street and click the OK button The display for entering house number appears 6 Select Cross Street and click the OK button The display for entering the name of the second street appears 7 Enter the second street name The list of the matching streets appears...

Страница 51: ...city you want from the list and click the OK button The list of POI categories appears 4 Select the category and click the OK button POI are divided into several categories Select one and click the OK button to proceed to the next step A list of more detailed subcategories appears if you click the OK button If you do not know which category the POI you want to search is in select All Cate gory If ...

Страница 52: ...er on the map Use it to find somewhere to visit during a journey 1 Select New Destination from the Main menu and then select Vicinity Search Click the OK button The list of Points Of Interest categories appears 2 Select the category and click the OK button If you want to search with more detailed categories move the joystick to the left The list of subcategories appears Select the subcategory you ...

Страница 53: ...button The list of the cities around the area corresponding to the selected postal code appears If you move the joystick to the left the map of the area corresponding to the selected postal code appears 4 Search your destination following the instructions from the Step 3 of Searching Your Destination by Address onwards If a city which is set as your destination is located in areas outside the map ...

Страница 54: ...he details see Selecting the country where you want to search on page 42 2 Enter the name of motorway and select OK Then click the OK button The list of the motorways matching the name appears 3 Select the motorway and click the OK button The display for selecting your destination to the entrance or to the exit of the motorway appears 4 Choose Entrance or Exit and click the OK button The list of e...

Страница 55: ...the next turning point Travelling direction Road number of the motorway Via point Your destination If you did not hear the voice guidance properly press the GUIDE button on the Remote Controller to listen to it again Display during the route guidance There are four types of displays available during the route guidance Map mode Driver s view Arrow mode and Side arrow mode You can switch the view by...

Страница 56: ...imated time of arrival or travel time to your destination reappears when you return to the set route When receiving traffic information ahead on the set route This device periodically checks the traffic information on the set route When traffic informa tion is received the message appears on the display and is spoken by the voice guidance Fol low the instructions and select the operation such as s...

Страница 57: ...information manually If you press the GUIDE button on the Remote Controller for more than three seconds you can check traffic information about your route If there is no traffic information about your route the message informing you that no traffic information has been received is shown In this case the message disappears when you click the OK button Yes Detailed information appears No The message...

Страница 58: ... drive through and the driving dis tance of each street can be checked in order 3 Press the NAVI button The map of your surroundings reappears Checking the Suggested Route from the Information menu You can also check the information about the route from the Information menu 1 Select Information from the Main menu and select Route Profile Click the OK button 2 Check the contents on the display 3 Pr...

Страница 59: ...n On this display you can select the following items Route calculation starts if you click the OK button Distance of detour can be selected from 1 2 5 10 20 50 kilometres 1 3 5 10 30 50 miles For details of switching the display between km and mi miles see KM Mile Setting on page 87 Based on the traffic information received from RDS TMC stations you can set the auto matic route calculation for avo...

Страница 60: ...n this screen you can also select the following items Changing your destination If you want to change your destination during the route guidance search the new destination and set the route 1 From Main menu select New Destination and click the OK button 2 Search for the new destination When the location search is completed a message appears asking whether the location is your destination or via po...

Страница 61: ... message appears asking whether you want to set this loca tion as your destination or as a via point 2 Select Via point and click the OK button A list giving your currently set destination and its via points appears 3 Confirm the contents of the list and select Done Click the OK button Route calculation with the specified location as a via point starts if you click the OK but ton On this display y...

Страница 62: ...er need to pass a via point on the set route the via point can be deleted from the list of via points and the route can be recalculated 1 Press the CANCEL ROUTE button on the Remote Controller A message asking whether you want to cancel the route appears 2 Select Yes one and click the OK button The list of via points currently set appears 3 Select the via point you want to delete and click the OK ...

Страница 63: ...61 Chapter 4 Guidance to Your Destination 5 Select Done and click the OK button A new route to your destination via the remaining via points is calculated ...

Страница 64: ... on the map and click the OK button a check mark appears on the right hand side of the selected sub category Select Done and click the OK button to return to the list of POI category 3 When you have finished selecting categories select Done and click the OK button POIs in the selected category appear on the map If you want to set a POI as your destination point to the location with cross pointer a...

Страница 65: ...ations or via points are automatically memorised and stored in the Address Book as Destination History When the number of locations exceeds 100 the oldest location is overwritten automatically Therefore to ensure that a particular location is kept in the Address Book you must register it manually as Registered Locations Information edited as described in Editing a location s information below is a...

Страница 66: ... OK button The details you set are registered and the Address Book menu appears On the map a pin mark appears at the registered location You can change this mark On this display you can select following options In the Address Book you can register up to 98 locations except your home and your favourite location You can also store locations registered in the Address Book on a PC card see Storing the...

Страница 67: ...e OK button and the Address Information menu appears Refer to the item corre sponding to the subsequent operation After finishing the operation the display shown in Step 2 appears You can continue to edit other information items if necessary 1 Name The name can be used as a command for voice operation 2 Address The address is registered when the search was made for the first time Not editable 3 Ph...

Страница 68: ... You cannot change the mark of your home or of your favourite location Selecting sound 1 Select Select Sound and click the OK button 2 After selecting the sound select Done and click the OK button After the selected sound is played a message asks whether you want to set it 3 Select Yes and click the OK button The Address Information menu appears Alternative option Deleting the data in the Address ...

Страница 69: ...y mistake Confirming the location contained in the Address Book on the map You can select a location in the Address Book and display its surroundings on the map 1 Select the location to edit in the Address Book menu and move the joystick to the left 2 Select View Map and click the OK button The map of the selected area and its surroundings appears Delete this item Delete the location selected in S...

Страница 70: ...h on the display When registering your home location select Return Home and click the OK button 2 Search for a location and display a map The search method is the same as that for your destination see Chapter 3 If you select Map Search you can specify the location to register by showing a map 3 Point the cross pointer to the location you want to register and click the OK button A message Is this y...

Страница 71: ...appears and a voice message confirming the pronunciation is played 7 If the pronunciation is correct select Yes and click the OK button A specific place is registered as your favourite location and the Others menu appears Switch to Main menu an item Go to is changed to the item favourite location name Afterwards you can set a route by selecting this item and clicking the OK button During voice ope...

Страница 72: ...ge a registered location appears To change your home location select Return Home and click the OK button 2 Select Change and click the OK button A display for selecting the search method appears See Registering a location above for the next steps Alternative option Delete Select Delete to delete your favourite home location A message asking you to confirm the deletion appears and then select Yes a...

Страница 73: ...assword is set and the Others menu appears When your Navigation System is activated a display for entering your password appears see Switching On and Off on page 25 If you want to change your password at first enter the password that is currently set You cannot enter using the numeric keypad When the display for entering your password appears again enter the new password Once the password is regis...

Страница 74: ...ew Area number in range 1 to 5 A message to specify a search method for a location appears If you register an Area to Avoid after setting a route the message asks whether you want to recalculate the current route Select Yes click the OK button and proceed to the next step 3 Search for a location for registration and display a map The search method is the same as that of searching for your destinat...

Страница 75: ...s For details see Route Setting Information on page 109 Changing or deleting an Area to Avoid You can subsequently change rename delete the Area to Avoid 1 Select Settings in the Main menu then select Route Guidance and Areas to Avoid Click the OK button The list of Areas to Avoid appears 2 Select an area you want to change or delete and click the OK button 3 Select Yes and click the OK button The...

Страница 76: ...affic information of your route If there is no traffic information the message appears saying that no traffic information is received In such a case if you click the OK button the message disappears 2 Select the information you want to see from the list The names of the streets in the place containing the information are displayed alphabeti cally in the list 1 Street name 2 Place name 3 Direction ...

Страница 77: ...ppears 1 Name of the radio station or frequency currently being received and elapsed time since the last reception within 5 minutes green between 5 and 20 min utes red 20 minutes or more not displayed 2 Icon to indicate the presence of traffic information appears only when the scale on the map is under 1 km 3 An arrow to indicate the area of traffic jam displayed only when the scale on the map is ...

Страница 78: ...n name frequency is displayed Alternative option If you want to continue to search for another station repeat this procedure 3 Select Done and click the OK button After switching to a selected radio station a map of your surroundings appears Registering a radio station If you register frequently used stations in advance you can easily tune to one from the list This section describes how to registe...

Страница 79: ...om pre registered radio stations You can pre select up to five radio stations Preset Station From the list of the radio stations you can select the one you want to receive 1 Select Information in the Main menu then select RDS TMC and Recall Preset Station Click the OK button The list of registered radio stations appears This list of broadcasting stations Preset Sta tion cannot be used unless broad...

Страница 80: ... is complete Storing the data of registered locations in the PC card You can select any item registered in the Address Book and store the data in the PC card Data can be stored in the corresponding group A new group can be created However if nothing is registered in Registered Locations in Address Book you cannot use this function This section describes a method of creating a new group and storing...

Страница 81: ...ck the OK button The data of the registered location is stored in the entered group and a map of your sur roundings appears If there is little or no space in the PC card or you have already stored 100 locations in a group a message Memory is full or You cannot store more than 100 items in the same group appears To remedy delete unnecessary data or create a new group Loading data from a PC card Add...

Страница 82: ...group However if there is no data of Registered Locations in the PC card you cannot use this function 1 Select Settings in the Main menu then select PC Card and Delete PC card data Click the OK button 2 Select a group where the location you want to delete is stored and click the OK but ton A list of locations stored in the specified group appears 3 Select a location you want to delete and click th...

Страница 83: ...reen appears 1 Position of a satellite and radio wave reception status The position of a GPS satellite from which currently received data is shown The satel lite used for positioning is shown in orange any other satellites from which data is cur rently being received are shown in yellow and satellites from which data cannot be received are shown in black 2 Longitude and latitude If current positio...

Страница 84: ...igation System can learn the driving status of two types of tyres for summer and winter independently by using the different memories To change memories select Sensor memory and click the OK button Then select Memory 1 or Mem ory 2 which you want to use and click the OK button 4 Learning Status Current driving mode is indicated 5 Degree of learning Learning situations of Distance Right Turn Left T...

Страница 85: ...lation Position The Installation position of the main unit is shown If No good is displayed refer to Installation Manual for the installation position 4 Handbrake When the parking brake is applied On is displayed When the parking brake is released Off is displayed Keep the foot brake on while checking that the parking brake connection works properly 5 Voltage The power supply reference value provi...

Страница 86: ...e signal switches to High or Low Check that it is properly displayed when the selector lever is shifted with the brake pedal depressed if the reversegear signal input lead see Installation Manual is con nected 2 Push the BACK button The previous screen appears ...

Страница 87: ...f each setting is shown on the right Off appears to the right of the Avoid Motorway setting showing that this function is set off 2 Select Avoid Motorway and click the OK button 3 Using the joystick select Off to the right of Avoid Motorway and click the OK button A list of options possible to select under Avoid Motorway appears 4 Using the joystick select On and click the OK button 5 Select Done ...

Страница 88: ...on the system calculates one route only or whether it calculates six route options one of which you select Fastest Shortest This setting controls conditions for calculating a route Avoid Motorway This setting controls conditions for calculating a route Even when the setting of Avoid Motorway is turned On a route using the motorway may be set if your destination is far away Avoid Ferry This setting...

Страница 89: ...h or 50 mile h Average Speed Motorway This setting controls the estimated average speed when driving on a motorway which is used for calculating the Estimated Time of Arrival ETA and travel time to your destination When the KM Mile Setting is set to km select one from 100 km h 120 km h 140 km h or 160 km h When the KM Mile Setting is set to mile select one from 70 mile h 80 mile h 90 mile h or 100...

Страница 90: ...can be set when your Navigation System is combined with the Pioneer Head Unit with a muting function one that has anYellow black lead This setting controls whether the volume of the Head Unit is automatically muted during voice operation Heading Up To ensure that the driving direction always faces up the map automati cally rotates according to the direction of your vehicle North Up The map is alwa...

Страница 91: ...he current location to your destination on the screen is set When moving to the area with different time zone this unit does not automatically change the time display etc for each time zone see Setup 3 Installing the Program on page 22 and change the time setting Password Registering and changing the password see Registering a Password on page 71 Help Menu This setting controls whether if there ar...

Страница 92: ... vehicle and direction displayed on a map Adjust Display Position The display position of the screen of your Navigation System is adjusted To adjust the screen move the joystick up down and left right Adjust to the optimal position making sure that all four corners of the display are visible RDS TMC menu Real Time Reroute Alert This setting controls whether when a traffic jam on the set route is r...

Страница 93: ...of voice operation are as follows The steps are almost the same as when using the Remote Controller With the CD SR80 Steering Remote Controller sold separately you can press the BAND button and the F button to switch on the operation mode of the Steering Remote Controller When the operation mode is switched on by pressing the BAND button of the Steering Remote Controller you can activate voice ope...

Страница 94: ...ce operation features at any time by pressing the NAVI button or pressing the TALK button downwards After you cancel voice operation the map is displayed An example of voice operation When using the voice command it is important to get the timing correct Before speaking you must first wait for the Please make your request message This is followed by a Beep tone to indicate it is now your turn to s...

Страница 95: ...tion System displays the com mand it recognised and the system voice repeats it If a command that you did not intend is recognised press the TALK button or say Next option Other available commands are then shown If you then press the TALK button within 3 seconds yet more commands are shown Repeat this until the command you want to use is shown 4 Say Petrol station The map of the nearest petrol sta...

Страница 96: ... returns to the previous page 2 Say the number of the item you want The map of the selected location appears on the display The message Do you want to stop in follows 3 If you want to select this location as your destination say Yes Route calculation starts with the location displayed on the map as your destination If you want to see the maps with other options say Next option If you say No voice ...

Страница 97: ...table distance directly in front of the driver Make sure that you do not need to alter your position or look away from the road ahead when giving voice commands not only is this awkward but it can also compromise driving safety Bear this in mind when choosing where to attach the microphone Pause before giving a command After pressing the TALK button on the Remote Controller pause for a moment afte...

Страница 98: ...96 ...

Страница 99: ...irection with the Gyrosensor and inclina tion of the road with the G sensor The 3D Hybrid Sensor can even calculate changes of altitude and corrects for discrepancies in the dis tance travelled caused by driving along winding roads or up slopes Also the Navigation System learns the driving conditions and stores information in the memory thus as you drive more the precision of the positioning becom...

Страница 100: ...imates gradually increases So after you have driven some distance you can expect your position as shown on the map to show fewer errors If you use chains on your wheels for winter driving or if you put on the spare wheel the errors may appear to suddenly increase because of the increased wheel diameter To pre vent the contamination of previously acquired learning data learning automatically stops ...

Страница 101: ...ne or cellular phone is used near the GPS aerial GPS reception may be lost temporarily Do not cover the GPS aerial with spray paint or car wax because this may block the reception of GPS signals Snow buildup can also degrade the signals so keep the aerial clear If for any reason GPS signals cannot be received learning and error correction are not possible If GPS positioning has been operating for ...

Страница 102: ... or exit a multi storey car park or similar with a spiral layout If your vehicle is turned on a turntable or similar If your vehicle s wheels spin such as on a rough track or in snow If you put on chains or change your tyres for some of a different size If trees or other obstacles block the GPS signals for a considerable period If you drive very slowly or in a start and stop manner as in a traffic...

Страница 103: ...ds Precautions for storage Keep your disc away from direct sunlight sources of heat and sources of dust Store the disc in its protective case to provide greater protection against warping Ambient conditions for playing disc Ambient conditions can affect the behaviour of discs and the operation of the system Vibrations caused by driving may sometimes interrupt the reading of data from the disc caus...

Страница 104: ...this unit in your vehicle If there appear to be problems with the operation of the system If there are problems with the display Using the reset button The reset button is recessed in the front of the main unit to prevent accidental use You can see it in the top right corner of the front panel Insert a pointed implement such as a ballpoint pen into the small hole and push Reset button ...

Страница 105: ...ning by dead reckoning on page 97 5 Setting of attachment direction lever is wrong 6 Main unit is installed with extreme angle exceeding the limitation of the installation angle Solutions 1 Check the GPS signal reception using GPS Status see Checking positioning information by satellite on page 81 and the position of the GPS aerial if necessary or continue driving until reception improves 2 Check ...

Страница 106: ...low Possible causes The volume setting is low Solutions Check the volume setting on the display or turn the volume up according to Hardware Volume see Hardware Volume on page 88 and or turn up the volume on the display The Remote Controller fails to work Possible causes 1 The batteries are low 2 The batteries have been inserted incorrectly 3 The Remote Controller is pointing at the floor or a seat...

Страница 107: ...Park your vehicle at a safe place and cut the engine off Turn the ignition key back to Acc off Then start the engine again and turn the power to the main unit back on If this does not solve the problem press the reset button on the main unit ...

Страница 108: ...ter checking please re boot the system When If the Navigation unit does not receive the vehicle speed pulse What to do Consult your Pioneer dealer 4 Speed pulse wire is not connected Please be sure to connect the system to the speed pulse wire Accuracy is not fully ensured without speed pulse When The speed signal input pink lead wire of the power wire is not connected What to do To operate with 3...

Страница 109: ...hange the destination to a location that is closer and divide up the route 9 You cannot set more via points Please delete current via point and re enter to set new via point When If you try to set more than five via points What to do Add the next via point after arriving at your first via point Or after deleting an unnecessary via point add a new via point 10 Your journey cannot avoid the specifie...

Страница 110: ...ou cannot pronounce was entered during password registration What to do Enter a word that you can pronounce 16 An error has occurred Please note the following error code and power off When In the case of a system failure What to do Note down the error code shown on the screen turn off the power and then contact your nearest Pioneer service facility 17 Player overheating Discontinue until temperatu...

Страница 111: ...along the way If you try to select a point on a motorway as a destination a location on a nearby road such as below the motorway may be chosen instead During voice guidance turns and junctions from motorway are automatically announced However if you pass junctions turns and other guide points in rapid succession some may not be announced Incorrect guidance may be given at motorway junctions if the...

Страница 112: ...aching the intersection is shown as UP Thus if you approach the intersection in a straight line the current location mark will come onto the map from the bottom of the display If the road curves into the intersection the current location mark will enter the intersection from the side If the intersection is approached in a gentle curve the map displayed may differ from the actual road layout Tracki...

Страница 113: ...r of Her Maj esty s Stationary Office Crown Copyright 1995 Italy La Banca Dati Italiana é stata prodotta usando quale riferimento anche cartographia numerica ed al tratto prodotta e fornita dalla Regione Toscana Portugal Source IgeoE Portugal Spain Información geográfica propiedad del CNIG Sweden Based upon electronic data National Land Survey Sweden Switzerland Topografische Grundlage Bundesamt f...

Страница 114: ...tion frequency 1 575 42 MHz Sensitivity 130 dbm Position update frequency Approx once per second Common Max output impedance 1Vp p 75Ω Maximum current consumption 2 0 A Power source DC 14 4V 10 8 15 1V allowed Ground type Negative type GPS aerial Aerial Micro strip flat aerial right handed helical polarization Aerial cable 5 0 m Dimensions Main unit 200 W 52 H 209 D mm GPS aerial 46 W 46 H 13 D mm...

Страница 115: ... a variety of pur poses Guidance mode The mode in which guidance is given as you drive to your destination the system automatically switches to this mode as soon as a route has been set Guidance point These are important landmarks along your route generally intersections The next way point along your route is indicated on the map by the yellow flag icon Home location Your registered home location ...

Страница 116: ...It is highlighted in bright green on the map Tracking Marks on the map indicating the route you have travelled Via Point A location that you choose to visit before your destination a journey can be built up from multiple via points and the destination Voice guidance The giving of directions by a recorded voice while in guidance mode Voice recognition The technology that allows the system to unders...

Страница 117: ...gs Information Address Search P 28 46 POI Search P 49 Motorway Search P 52 Postal code Search P 51 Vicinity Search P 50 Address Book operation menu Information Edit P 65 Registration P 63 Delete This Item P 67 Delete All Destinations P 67 Delete All Address Book P 67 View Map P 67 Last Destination P 63 Registered Location P 63 Destination History P 63 ...

Страница 118: ...d P 87 KM Mile Setting P 87 Zoom Map of Intersection P 87 Average Speed Motorway P 87 Average Speed General Road P 87 Guidance Voice P 87 Route Guidance menu 2 Map Orientation P 88 Map Display P 88 Tracking Display P 88 Map Display menu Hardware Volume P 88 Monitor Type P 88 Hardware menu Demo Mode P 88 Mute on Voice Recognition P 88 Mute on Voice Guidance P 89 British Summer Time P 23 89 Current ...

Страница 119: ...Reroute Alert P 90 Avoid Traffic Route P 90 RDS TMC menu Store on PC card P 78 Read from PC card P 79 Delete PC card data P 80 Initialize PC card P 78 PC Card menu Route Profile P 56 Location Status P 81 RDS TMC P 74 Overlay POI P 62 GPS Status P 81 3D Calibration Status P 82 Connection Status P 83 Location Status menu View Traffic Information P 74 Recall Preset Station P 77 Manual Station Search ...

Страница 120: ...118 ...

Страница 121: ...119 Appendix ...

Страница 122: ...MEMO Write your registered password here remove this page from the manual and store it in a safe place CAUTION Never leave any note of your password in your vehicle ...

Страница 123: ......

Страница 124: ......

Отзывы: