background image

7

Precautions before installation

CAUTION

Never install this product in places where, or in a manner 
that:


Could injure the driver or passengers if the vehicle 
stops suddenly.


May interfere with the driver’s operation of the 
vehicle, such as on the floor in front of the driver’s 
seat, or close to the steering wheel or shift lever.


To ensure proper installation, be sure to use the 
supplied parts in the manner specified. If any parts 
are not supplied with this product, use compatible 
parts in the manner specified after you have the parts’ 
compatibility checked by your dealer. If parts other 
than supplied or compatible ones are used, they may 
damage internal parts of this product or they may 
work loose and the product may become detached.


Do not install this product where it may (i) obstruct 
the driver’s vision, (ii) impair the performance of any 
of the vehicle’s operating systems or safety features, 
including airbags, hazard lamp buttons or (iii) impair 
the driver’s ability to safely operate the vehicle.


Never install this product in front of or next to the 
place in the dashboard, door, or pillar from which one 
of your vehicle’s airbags would deploy. Please refer 
to your vehicle’s owner’s manual for reference to the 
deployment area of the frontal airbags.

Before installing

  Consult with your nearest dealer if installation requires drill-

ing holes or other modifications of the vehicle.

  Before making a final installation of this product, temporar-

ily connect the wiring to confirm that the connections are 

correct and the system works properly.

Installation notes

  Do not install this product in places subject to high tempera-

tures or humidity, such as:

  Places close to a heater, vent or air conditioner.

  Places exposed to direct sunlight, such as on top of the 

dashboard.

  Places that may be exposed to rain, such as close to the door 

or on the vehicle’s floor.

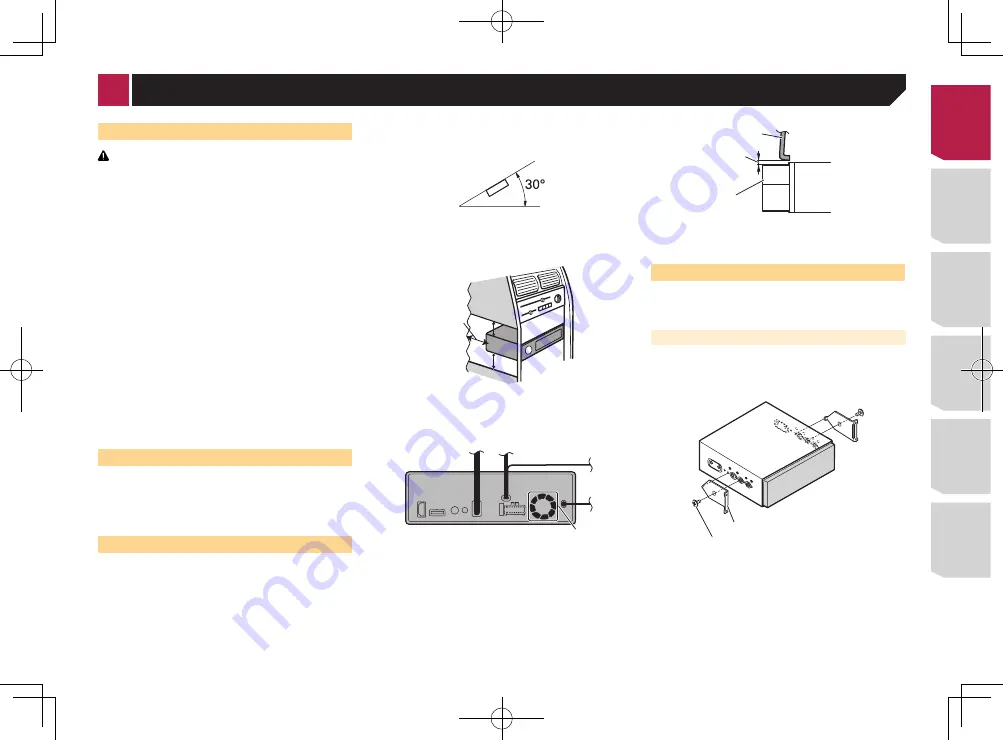
  Install this product horizontally on a surface within 0 to 30 

degrees tolerance (within 5 degrees to the left or right). 

Improper installation of the unit with the surface tilted more 

than these tolerances increases the potential for errors in 

the vehicle’s location display, and might otherwise cause 

reduced display performance.

  When installing, to ensure proper heat dispersal when using 

this unit, make sure you leave ample space behind the rear 

panel and wrap any loose cables so they are not blocking the 

vents.

Leave ample 
space

5 cm

5 cm

  The cords must not cover up the area shown in the figure 

below. This is necessary to allow the amplifiers to radiate 

freely.

1

1

  Do not cover this area.

  Make sure you leave enough gap between the dashboard 

and the LCD panel of this unit so the LCD panel can be 

opened and closed without contacting with the dashboard.

1

2

3

1

 Dashboard

2

  Leave gap

3

  LCD panel

DIN front/rear-mount

This unit can be properly installed using either front-mount or 

rear-mount installation.

Use commercially available parts when installing.

DIN Front-mount

1  Decide the position of the side brackets.

When installing in a shallow space, change the position of side 

brackets (small).

2

1

1

  Side bracket (small)

2

  Flush surface screw (5 mm × 6 mm)

2  Install the unit into the dashboard.

Insert the mounting sleeve into the dashboard. And then secure 

the mounting sleeve by using a screwdriver to bend the metal 

tabs (90°) into place.

< CRD4828-A >

Installation

 
                                     7

Содержание AVH-X7700BT

Страница 1: ...alación Installationsanleitung Installatiehandleiding AVH X7700BT English Français Italiano Español Deutsch Nederlands CRD4828 A DVD RDS AV RECEIVER AUTORADIO AV RDS LECTEUR DE DVD SINTOLETTORE DVD RDS CON AV RADIO AV RDS CON DVD DVD RDS AV EMPFÄNGER DVD RDS AV ONTVANGER English 1 ...

Страница 2: ...n such so that they will not obstruct or hinder driving Make sure that the cables and wires will not interfere with or become caught in any of the vehicle s moving parts especially the steering wheel shift lever parking brake sliding seat tracks doors or any of the vehicle s controls Do not route wires where they will be exposed to high temperatures If the insulation heats up wires may become dama...

Страница 3: ...ding on the type of vehicle Connect 5 and 6 when Pin 5 is an antenna control type In another type of vehicle never con nect 5 and 6 b Blue white 6 Connect to auto antenna relay control terminal max 300 mA 12 V DC c Blue white Connect to system control terminal of the power amp max 300 mA 12 V DC d Violet white Of the two lead wires connected to the back lamp connect the one in which the voltage ch...

Страница 4: ... 3 2 8 9 9 1 System remote control Connect to Blue white cable 2 Power amp sold separately 3 Connect with RCA cable sold separately 4 To Rear output STD To middle range output NW 5 Rear speaker STD Middle range speaker NW 6 To Front output STD To high range output NW 7 Front speaker STD High range output NW 8 To subwoofer output STD To low range output NW 9 Subwoofer STD Low range speaker NW Chang...

Страница 5: ...AUTION The screen image may appear reversed With the rear view camera you can keep an eye on trailers or back into a tight parking spot Do not use for entertainment purposes Objects in rear view may appear closer or more distant than in reality The image area of full screen images displayed while backing or checking the rear of the vehicle may differ slightly 1 5 7 6 4 2 3 8 1 This product 2 Power...

Страница 6: ...o audio outputs g External video component sold separately The appropriate setting is required to use the external video component For details refer to Operation Manual WARNING NEVER install the rear display in a location that enables the driver to watch the video source while driving This product s rear video output is for connection of a display to enable passengers in the rear seats to watch th...

Страница 7: ... notes Do not install this product in places subject to high tempera tures or humidity such as Places close to a heater vent or air conditioner Places exposed to direct sunlight such as on top of the dashboard Places that may be exposed to rain such as close to the door or on the vehicle s floor Install this product horizontally on a surface within 0 to 30 degrees tolerance within 5 degrees to the...

Страница 8: ...ards to remove the trim ring And then loosen the screws 2 mm 3 mm to remove the mounting sleeve When reattaching the trim ring push the trim ring onto the unit until it clicks If the trim ring is attached upside down the trim ring will not fit properly 1 3 2 1 Mounting sleeve 2 Screw 2 mm 3 mm 3 Trim ring Installing the microphone Install the microphone in a place where its direction and dis tance...

Страница 9: ...e while pressing the tab 1 2 1 Tab 2 Microphone base 2 Mount the microphone on the steering column 2 1 1 Double sided tape 2 Clamps Use separately sold clamps to secure the lead where neces sary inside the vehicle Keeping it away from the steering wheel Adjusting the microphone angle dis s ng es is CRD4828 A Installation 9 ...

Страница 10: ...ce produit ses câbles et les fils de telle façon qu ils n obstruent ni ne gênent la conduite Veillez à ce que la trajectoire des câbles et des fils n interfère pas avec les pièces en mouvement du véhicule Fixez les câbles de manière à les empêcher d être happés par notamment le volant le levier de vitesse le frein à main les glissières de siège les portes ou tout autre élément de commande du véhi ...

Страница 11: ... Orange blanc Vers borne du commutateur d éclairage 9 Noir terre Vers châssis du véhicule métal a Bleu blanc 5 La position de la broche du connecteur ISO diffère en fonc tion du type de véhicule Raccordez 5 et 6 si la Broche 5 est un contrôle de type antenne Dans un autre type de véhicule ne raccordez jamais 5 et 6 b Bleu blanc 6 Raccordement à une borne de contrôle de relais d antenne auto maxi 3...

Страница 12: ...portée et grande portée NW sont générés depuis les fils de haut parleurs quand cette connexion est utilisée 1 3 2 8 9 9 1 Commande à distance du système Raccordement au câble Bleu blanc 2 Amplificateur de puissance vendu séparément 3 Raccordement avec un câble RCA vendu séparément 4 Vers sortie arrière STD Vers sortie moyenne portée NW 5 Haut parleur arrière STD Haut parleur moyenne portée NW 6 Ve...

Страница 13: ...EZ L ENTRÉE UNIQUEMENT POUR LA MARCHE AR RIÈRE OU L IMAGE INVERSÉE DE LA CAMÉRA DE RÉTRO VISÉE TOUTE AUTRE UTILISATION PEUT ENTRAÎNER DES BLESSURES OU DES DOMMAGES ATTENTION L image de l écran peut apparaître inversée Avec la caméra de rétrovisée vous pouvez surveiller une caravane ou vous garer en marche arrière dans un empla cement de stationnement étroit Ne pas utiliser dans un but de divertiss...

Страница 14: ...DIO INPUT b Jaune VIDEO INPUT c Vers jaune d Vers rouge blanc e Vers sortie vidéo f Vers sorties audio g Élément vidéo externe vendu séparément Le réglage approprié est nécessaire pour utiliser l élément vidéo externe Pour en savoir plus consultez le manuel d utilisation AVERTISSEMENT N installez JAMAIS l écran arrière à un endroit où le conducteur pourrait voir la source vidéo pendant la conduite...

Страница 15: ...s connexions sont correctes et que le système fonctionne normalement Remarques sur l installation N installez pas ce produit dans un endroit soumis à des températures élevées ou à l humidité Par exemple À proximité du chauffage de la ventilation ou de la climatisation En plein soleil comme sur le dessus du tableau de bord Endroits susceptibles d être exposés à la pluie près de la portière ou sur l...

Страница 16: ...ord ou console 3 Support de montage radio en usine Dans certains types de véhicules un écart peut se présenter entre l appareil et le tableau de bord Si cela se produit utilisez le cadre fourni pour combler l écart Retirer l appareil Étirez vers l extérieur la partie supérieure et inférieure de l an neau de garniture pour le retirer Puis desserrez les vis 2 mm 3 mm pour retirer le manchon de monta...

Страница 17: ...ssée Installation sur la colonne de direction 1 Retirez la base du microphone de l agrafe pour micro en faisant glisser la base du microphone tout en enfonçant la languette 1 2 1 Languette 2 Base du microphone 2 Montez le microphone sur la colonne de direction 2 1 1 Bande adhésive à double face 2 Serre fils Utilisez des serre fils vendus séparément pour fixer le fil conducteur aux endroits nécessa...

Страница 18: ...liche può causare cortocir cuiti con corrispondenti gravi pericoli I cavi potrebbero costituire una seria fonte di pericolo qualora si attorcigliassero alla colonna dello sterzo o alla leva del cambio L apparecchio i relativi cavi e ogni altro collegamento devono essere sistemati in modo che non ostruiscano o impediscano la guida in sicurezza del veicolo Assicurarsi che i cavi e i fili non interfe...

Страница 19: ... o riserva 6 Rosso 3 Collegare al terminale controllato dall interruttore di accen sione 12 V CC 7 Collegare insieme i cavi dello stesso colore 8 Arancione bianco Al terminale dell interruttore di alimentazione 9 Nero massa Al telaio parte metallica del veicolo a Blu bianco 5 La posizione dei pin del connettore ISO sarà diversa a seconda del tipo di veicolo Collegare 5 e 6 quando il Pin 5 è del ti...

Страница 20: ... posteriori STD o i segnali dei diffusori della gamma medi e alti NW vengono trasmessi dai cavi quando si usa questo collegamento 1 3 2 8 9 9 1 Controllo remoto di sistema Collegare al cavo blu bianco 2 Amplificatore di potenza venduto separatamente 3 Collegare con cavi RCA venduti separatamente 4 All uscita posteriore STD All uscita della gamma medi NW 5 Diffusore posteriore STD Diffusore gamma m...

Страница 21: ...TA SOLO PER LE IMMAGINI CAPOVOLTE O INVERTITE DELLA TELECAMERA DI RETROVISIONE QUAL SIASI ALTRO UTILIZZO PUÒ PROVOCARE LESIONI O DANNI ATTENZIONE L immagine dello schermo può apparire invertita La telecamera di visione posteriore consente di mantenere la visione su un rimorchio o parcheggiare in spazi stretti Non usare questa funzione per scopi di intrattenimento Gli oggetti nella visione posterio...

Страница 22: ...O INPUT b Giallo VIDEO INPUT c A giallo d A rosso bianco e All uscita video f Alle uscite audio g Componente video esterno venduto separatamente Per utilizzare il componente video esterno è necessaria l impostazione adeguata Per maggiore informazioni vedere il Manuale di funzionamento AVVERTENZA Non installare MAI il display posteriore in un luogo che permetta al conducente di guardare la sorgente...

Страница 23: ...getto a temperature elevate o umidità come Posizioni vicine ad un riscaldatore una bocchetta o un condizionatore d aria In luoghi dove batte direttamente il sole come sul cruscotto Posizioni che possono essere esposte alla pioggia come vicino alla portiera o sul pavimento del veicolo Installare il prodotto orizzontalmente su una superficie con una tolleranza tra 0 e 30 gradi entro 5 gradi a destra...

Страница 24: ...terno le parti superiore e inferiore Quindi allentare le viti 2 mm 3 mm per rimuovere la fascetta di montaggio Quando si rimonta la cornice di finitura spingerla nell unità finché non scatta in posizione se la cornice di finitura è fissata capovolta non si monta correttamente 1 3 2 1 Fascetta di montaggio 2 Vite 2 mm 3 mm 3 Cornice di finitura Installazione del microfono Installare il microfono in...

Страница 25: ... 1 2 1 Linguetta 2 Base del microfono 2 Montare il microfono sulla colonna di sterzo 2 1 1 Nastro a doppio lato 2 Morsetti Usare dei morsetti venduti separatamente per fissare il cavo nei punti necessari all interno del veicolo Tenerlo lontano dal volante Regolazione dell angolazione del microfono a e ne se è CRD4828 A Installazione 25 ...

Страница 26: ...les y los hilos no afecten a las piezas móviles del vehículo ni queden atrapados en las mismas especialmente el volante la palanca de cambios el freno de mano los asientos deslizan tes las puertas o cualquier control del vehículo No enrute cables que vayan a estar sometidos a altas temperaturas Si se calienta el aislamiento los cables pueden resultar dañados y como consecuencia puede producirse un...

Страница 27: ...ul blanco 5 La posición del alfiler del conector ISO variará en función del tipo de vehículo Conecte 5 y 6 cuando el Alfiler 5 sea un tipo de control de antena En otro tipo de vehículo no conecte 5 ni 6 b Azul blanco 6 Conéctelo al terminal de control de relé de la antena auto mática máx 300 mA 12 V CC c Azul blanco Conéctelo al terminal de control del amplificador de poten cia del sistema máx 300...

Страница 28: ...TD o las señales del altavoz de rango medio o el altavoz de rango alto NW se emiten desde los cables de altavoz cuando esta conexión está en uso 1 3 2 8 9 9 1 Control remoto del sistema Conéctelo al cable azul blanco 2 Amplificador de potencia se vende por separado 3 Conéctelo al cable RCA se vende por separado 4 A la salida trasera STD A la salida de rango medio NW 5 Altavoz trasero STD Altavoz d...

Страница 29: ...onduce ADVERTENCIA USE LA ENTRADA SOLO PARA LA MARCHA ATRÁS O LA CÁMARA DE RETROVISOR DE IMAGEN ESPECULAR CUAL QUIER OTRO USO PUEDE DERIVAR EN LESIONES O DAÑOS PRECAUCIÓN La imagen en pantalla puede aparecer invertida Con la cámara de retrovisor puede vigilar un remolque o dar marcha atrás para aparcar en un lugar difícil No lo utilice con fines de entretenimiento Si utiliza la vista trasera es po...

Страница 30: ...lanco AUDIO INPUT b Amarillo VIDEO INPUT c Al amarillo d Al rojo blanco e A la salida de vídeo f A salidas de audio g Componente de vídeo externo se vende por separado Para utilizar el componente de vídeo externo se necesita el ajuste pertinente Para los detalles consulte el Manual de operación ADVERTENCIA NO instale nunca la pantalla trasera en un lugar que permita al conductor ver la fuente de v...

Страница 31: ...instalación No instale este producto en lugares en los que pueda estar expuesto a altas temperaturas o a humedad como por ejemplo Lugares cercanos a un calefactor conducto de ventilación o aire acondicionado Lugares expuestos a la luz solar directa tales como el tablero de instrumentos Lugares que pudieran verse expuestos a lluvia como por ejemplo cerca de una puerta o en el suelo del vehículo Ins...

Страница 32: ...el soporte 1 2 3 1 Tornillo 2 Tablero de instrumentos o consola 3 Soporte de montaje de radio de fábrica Es posible que la unidad y el tablero de instrumentos no encajen perfectamente en algunos tipos de vehículos Si esto ocurre utilice el marco suministrado para tapar el hueco Extracción de la unidad Extienda la parte superior y la parte inferior del anillo embe llecedor hacia fuera para extraer ...

Страница 33: ...ctor si el parasol está bajado Instalación en la columna de dirección 1 Desconecte la base del micrófono del clip del mismo deslizándola a la vez que pulsa la lengüeta 1 2 1 Lengüeta 2 Base del micrófono 2 Monte el micrófono en la columna de dirección 2 1 1 Cinta de doble cara 2 Abrazaderas Utilice abrazaderas se venden por separado para fijar el cable en el interior del vehículo donde sea necesar...

Страница 34: ...len beschädigt wird kann ein Kurzschluss auftreten und zu erhebli chen Gefahren führen Es ist extrem gefährlich wenn zugelassen wird dass sich das Kabel um die Lenksäule oder den Schalthe bel wickelt Achten Sie darauf dieses Produkt seine Kabel und die Verdrahtung fernzuhalten damit sie die Fahrt nicht blockieren oder behindern Es muss sichergestellt sein dass die Kabel nicht die Bedienung von bew...

Страница 35: ...euerungsterminal eines externen Leistungsverstärkers zum Auto Antennenrelais Steuerungsterminal oder zum Antennenverstärker Leistungssteuerungsterminal her max 300 mA 12 V Gleichspannung Das Steuersignal wird über die blaue weiße Leitung ausgegeben selbst wenn die Audioquelle abgeschaltet wird Dieses Produkt 1 2 3 4 5 6 7 8 1 Pioneer Navigationssystem Bitte erkundigen Sie sich bei Ihrem Händler be...

Страница 36: ... j Masseseite k Lautsprecherleitungen Weiß Front links oder Hochton links Weiß Schwarz Front links oder Hochton links Grau Front rechts oder Hochton rechts Grau Schwarz Front rechts oder Hochton rechts Grün Heck links oder Mittelton links Grün Schwarz Heck links oder Mittelton links Violett Heck rechts oder Mittelton rechts Violett Schwarz Heck rechts oder Mittelton rechts l ISO Anschluss In einig...

Страница 37: ...4 USB Schnittstellenkabel für iPod iPhone CD IU201V getrennt erhältlich 5 iPhone mit 30 poligem Anschluss Android oder MirrorLink Gerät Anschluss über den USB Anschluss Der Anschluss erfolgt über ein USB Schnittstellenkabel für Android oder MirrorLink Geräte CD MU200 getrennt erhältlich 2 1 4 3 1 USB Port 2 USB Kabel mitgeliefert mit CD MU200 3 USB zu Micro USB Kabel Typ USB A zu Micro USB B mitge...

Страница 38: ...eitiges Display mit Cinch Eingängen 2 An Videoeingang 3 Cinch Kabel separat erhältlich 4 Dieses Produkt 5 Gelb REAR MONITOR OUTPUT 6 AUX Eingang 7 Minibuchse AV Kabel CD RM10 separat erhältlich 8 Gelb 9 Rot Weiß a Rot weiß AUDIO INPUT b Gelb VIDEO INPUT c An Gelb d An Rot Weiß e An Videoausgang f An Audioausgänge g Externe Videokomponente separat erhältlich Die geeignete Einstellung ist zur Nutzun...

Страница 39: ...stem ordnungsgemäß arbeitet Hinweise zur Befestigung Bauen Sie dieses Produkt nicht an einem Ort ein wo eine hohe Temperatur oder Feuchtigkeit herrschen kann wie z B Plätze in der Nähe einer Heizung Lüftung oder Klimaanlage Plätze mit direkter Sonnenbestrahlung wie z B auf dem Armaturenbrett Plätze die Regen ausgesetzt sind wie z B in Türnähe oder auf dem Fahrzeugboden Installieren Sie dieses Prod...

Страница 40: ... Konsole 3 Vorinstallierter Radio Montagebügel In einigen Fahrzeugtypen kann eine Lücke zwischen Gerät und Armaturenbrett auftreten Nutzen Sie in diesem Fall zum Füllen der Lücke den mitgelieferten Rahmen Entfernen des Gerätes Ziehen Sie die obere und die untere Seite des Abdeckrings nach außen um den Abdeckring zu entfernen Lösen Sie dann die Schrauben 2 mm 3 mm zum Entfernen des Montagerahmens B...

Страница 41: ... nach unten geklappt ist Befestigung auf der Lenksäule 1 Lösen Sie den Mikrofonsockel vom Mikrofon Clip indem Sie auf die Zunge drücken und den Mikrofonsockel dabei herausschieben 1 2 1 Zunge 2 Mikrofonsockel 2 Befestigen Sie das Mikrofon auf der Lenksäule 2 1 1 Doppelseitiges Klebeband 2 Kabelklemmen Das Kabel je nach Bedarf mit getrennten erhältlichen Kabelklemmen im Fahrzeuginnenraum sichern Vo...

Страница 42: ...ls en de bedrading zo installeren en wegwerken dat ze de besturing niet kunnen belemmeren of hinderen Zorg ervoor dat de kabels en de bedrading niet in de weg zitten bij of vast kunnen komen in de bewegende onderdelen van het voertuig met name het stuur de versnelling de handrem de rails van de verstelbare stoelen of andere bedieningsorganen van het voer tuig Laat de draden niet langs plaatsen lop...

Страница 43: ...ar aan 8 Oranje wit Voor het verlichten van de schakelterminal 9 Zwart aarding Naar chassis voertuig metaal a Blauw wit 5 De pinpositie van de ISO aansluiting verschilt afhankelijk van het type voertuig Sluit 5 en 6 aan wanneer pin 5 een antennebesturingstype is Sluit nooit 5 en 6 aan in een ander type voertuig b Blauw wit 6 Aansluiten op de bedieningsaansluiting van het relais voor een automatisc...

Страница 44: ...dspreker achter STD of signalen van de luidspreker met middelste bereik en de luidspreker met hoogste bereik NW worden uitgevoerd van de luidsprekerdraden wanneer deze aansluiting in gebruik is 1 3 2 8 9 9 1 Systeem afstandsbediening Aansluiten op de blauw witte kabel 2 Eindversterker los verkrijgbaar 3 Aansluiten met RCA kabel los verkrijgbaar 4 Naar uitvoer achter STD Naar uitvoer middelste bere...

Страница 45: ... ALLEEN VOOR OMGEKEERDE OF GESPIEGELDE BEELDEN VAN DE ACHTERUITKIJKCAMERA ANDER GEBRUIK KAN LETSEL OF SCHADE TOT GEVOLG HEBBEN BELANGRIJK Het beeld op het scherm kan omgekeerd worden weerge geven De achteruitkijkcamera is een hulp om aanhangwagens in de gaten te houden of biedt hulp bij het parkeren Gebruik dit niet voor amusementsdoeleinden Objecten op het beeld van de achteruitkijkcamera kunnen ...

Страница 46: ...UT b Geel VIDEO INPUT c Naar geel d Naar rood wit e Naar video uitgang f Naar audio uitgangen g Externe videocomponent los verkrijgbaar De geschikte instelling is vereist voor het gebruik van de externe videocomponent Raadpleeg de Bedieningshandleiding voor details WAARSCHUWING U mag het achterdisplay NOOIT zodanig plaatsen dat de bestuurder de videobron kan bekijken terwijl hij zij het voertuig b...

Страница 47: ...maken om te kijken of deze correct zijn en alles naar behoren functioneert Opmerkingen betreffende de installatie Installeer dit product niet op plaatsen die kunnen worden blootgesteld aan hoge temperaturen of vocht zoals Dichtbij een radiator luchtopening of airconditioningapparaat Op plaatsen blootgesteld aan direct zonlicht zoals op het dashboard Plaatsen die blootgesteld kunnen worden aan rege...

Страница 48: ...oefga ten in de beugel 1 2 3 1 Schroef 2 Dashboard of console 3 Radiomontagebeugel fabriek In sommige voertuigtypes kan er een tegenstrijdigheid zijn tussen het toestel en het dashboard Gebruik in dat geval het bijgeleverde frame om de opening te vullen Het toestel verwijderen Buig de bovenkant en de onderkant van de afwerkingsrand naar buiten om deze te verwijderen Maak vervolgens de schroeven 2 ...

Страница 49: ... wanneer de zonneklep naar beneden is geklapt Installatie op stuurkolom 1 Maak de microfoonvoet los van de micro foonklem door de microfoonvoet te schuiven terwijl op het lipje wordt gedrukt 1 2 1 Lipje 2 Microfoonvoet 2 Bevestig de microfoon op de stuurkolom 2 1 1 Dubbelzijdig plakband 2 Klemmen Gebruik los verkrijgbare klemmen om de draad waar nodig binnenin de auto te bevestigen Uit de buurt va...

Страница 50: ... C CRD4828 A 50 ...

Страница 51: ... CRD4828 A 51 ...

Страница 52: ...nada TEL 1 877 283 5901 TEL 905 479 4411 PIONEER EUROPE NV Haven 1087 Keetberglaan 1 B 9120 Melsele Belgium Belgique TEL 0 3 570 05 11 PIONEER ELECTRONICS ASIACENTRE PTE LTD 253 Alexandra Road 04 01 Singapore 159936 TEL 65 6472 7555 PIONEER ELECTRONICS AUSTRALIA PTY LTD 5 Arco Lane Heatherton Victoria 3202 Australia TEL 03 9586 6300 PIONEER ELECTRONICS DE MEXICO S A DE C V Blvd Manuel Avila Camach...

Отзывы: