background image

30

lead must be connected to the power supply side of the 

parking brake switch.

a

  Power supply side

b

  Parking brake switch

c

  Ground side

Parking Brake

1  If “Light green” cable is connected to parking 

brake switch, video image on the display will 

be controlled by this function.

2  The monitor displays the black screen with 

warning information to prevent the driver 

watching video contents during driving.
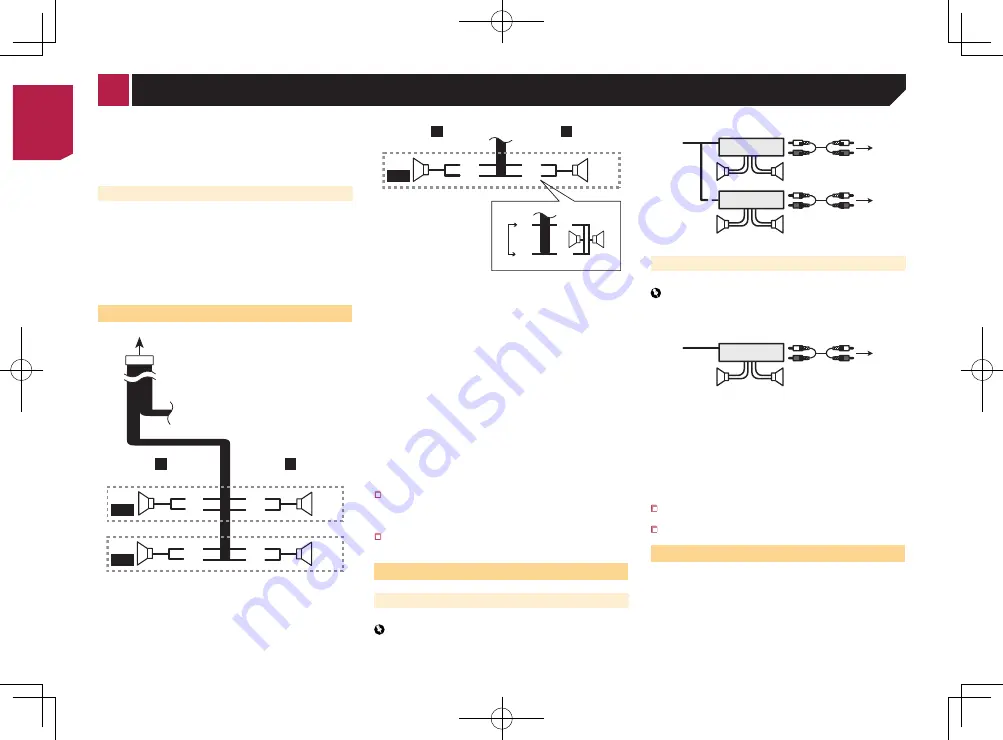
Speaker leads

1

2

 

 


9
a

d
e

7

4

3

5

6

8

b
c

L

R

F

R

Perform these connections when using a subwoofer without the 

optional amplifier.

 


d
e

4

3

f

b
c

L

R

SW

b

c

g

e

d

h

i

1

  To power supply

2

  Power cord

3

 Left

4

 Right

5

  Front speaker

6

  Rear speaker

7

 White

8

 White/black

9

 Gray

a

 Gray/black

b

 Green

c

 Green/black

d

 Violet

e

 Violet/black

f

  Subwoofer (4Ω)

g

  When using a subwoofer of 70W (2Ω), be sure to connect the 

subwoofer to the violet and violet/black leads of this unit. Do 

not connect anything to the green and green/black leads.

h

  Not used.

i

  Subwoofer (4Ω) × 2

  When a subwoofer is connected to this product instead of 

a rear speaker, change the rear output setting in the initial 

setting. The subwoofer output of this product is monaural.


Switching the rear speaker output

 on page 23

  With a two-speaker system, do not connect anything to the 

speaker leads that are not connected to speakers.

Power amp (sold separately)

Without internal amp

Important

The speaker leads are not used when this connection is in 
use.

1

3

2

4

3

6

5

5

7

7

2

1

With internal amp

Important

Front speaker and Rear speaker signals are output from the 
speaker leads when this connection is in use.

1

3

2

4

8

8

1

  System remote control

Connect to Blue/white cable.

2

  Power amp (sold separately)

3

  Connect with RCA cable (sold separately)

4

  To Rear or subwoofer output 

Connect a cable according to the preout setting.

5

  Rear speaker or subwoofer

6

  To Front output

7

  Front speaker

8

 Subwoofer

  You can change the RCA output of the subwoofer depending 

on your subwoofer system.

  The subwoofer output of this product is monaural.

Camera

About rear view camera

When you use the rear view camera, the rear view image is 

automatically switched from the video by moving the shift lever 

to 

REVERSE

 (

R

). 

Camera View

 mode also allows you to check 

what is behind you while driving.

WARNING

USE INPUT ONLY FOR REVERSE OR MIRROR IMAGE REAR 
VIEW CAMERA. OTHER USE MAY RESULT IN INJURY OR 
DAMAGE.

CAUTION

  The screen image may appear reversed.

  With the rear view camera you can keep an eye on 

trailers, or back into a tight parking spot. Do not use for 
entertainment purposes.

  Objects in rear view may appear closer or more distant 

than in reality.

  The image area of full-screen images displayed while 

backing or checking the rear of the vehicle may differ 
slightly.

1

2

3

4

5 6

7

8

1

  Rear view camera (ND-BC6) (sold separately)

2

  To video output

3

  RCA cable (supplied with ND-BC6)

4

  This product

5

  Brown (

R.C IN

)

6

  Power supply

7

  Power cord

8

  Violet/white (

REVERSE-GEAR SIGNAL INPUT

)


Power cord

 on page 29

  Connect only the rear view camera to 

R.C IN

. Do not connect 

any other equipment.

  Some appropriate settings are required to use other view 

cameras.


Setting the rear view camera

 on page 21

< CRB4485-A >

Connection

< CRB4485-A >

 
                         30

Содержание AVH-179DVD

Страница 1: ...Owner s Manual AVH 279BT AVH 179DVD English CRB4485 A DVD RDS AV RECEIVER English 1 ...

Страница 2: ...sed audio files 16 Starting procedure for Disc 17 Starting procedure for USB 17 Selecting files from the file name list 17 Switching the media file type 17 Compressed video files 17 Starting procedure 18 Selecting files from the file name list 18 Still image files 18 Starting procedure 18 Selecting files from the file name list 19 Switching the media file type 19 Setting the slideshow interval 19 ...

Страница 3: ...edia 36 Copyright and trademark notice 38 Bluetooth 38 WMA 39 DivX 39 AAC 39 Using app based connected content 39 Notice regarding video viewing 39 Notice regarding DVD Video viewing 39 Notice regarding MP3 file usage 39 Using the LCD screen correctly 39 Specifications 40 25 25 25 25 26 26 26 26 26 27 27 27 27 27 27 27 28 d 28 28 28 28 28 28 29 29 29 30 30 30 31 32 32 32 32 of 32 32 32 CRB4485 A C...

Страница 4: ...the nearest authorized Pioneer Service Station Do not use this product in this condition because doing so may result in a fire electric shock or other failure If you notice smoke a strange noise or odor from this product or any other abnormal signs on the LCD screen turn off the power immediately and consult your dealer or the nearest authorized Pioneer Service Station Using this product in this c...

Страница 5: ...support section of the Pioneer website for all available software updates Protecting the LCD panel and screen Do not expose the LCD screen to direct sunlight when this product is not used This may result in LCD screen malfunc tion due to the resulting high temperatures When using a cellular phone keep the antenna of the cel lular phone away from the LCD screen to prevent disruption of the video in...

Страница 6: ...st not be exposed to excessive heat such as sunshine fire or the like CAUTION Remove the battery if the remote control is not used for a month or longer There is a danger of explosion if the battery is incorrectly replaced Replace only with the same or equivalent type Do not handle the battery with metallic tools Do not store the battery with metallic objects If the battery leaks wipe the remote c...

Страница 7: ... start from the point where you stopped Touch the key again to stop playback completely 12 FOLDER P CH Selects the next or previous disc or folder Recalls radio station frequencies assigned to preset channel keys Inserting ejecting connecting media CAUTION Do not insert anything other than a disc into the disc loading slot Inserting and ejecting a disc Inserting a disc Insert a disc into the disc ...

Страница 8: ...mat d m y m d y 48 21 6 10 Radio Disc Radio Bluetooth Audio Rear View ON AUX OFF USB Top menu screen Time and date setting screen Setting menu screen Phone menu screen AV source icons Current source By pressing the button on any screen you can display the Top menu screen Su You The an a Se So 1 2 p So 1 1 2 U You dire p C Basic operation CRB4485 A 8 ...

Страница 9: ...1 1 You can change the playback point by dragging the key p This function is not available when the Bluetooth Audio is selected as the AV source Switching the operation panel Switches the operation panel of AV sources This key is not available on all sources Registration and connection of Bluetooth device 279BT Displaying the Bluetooth screen 1 Press 2 Touch and then The Bluetooth screen appears R...

Страница 10: ...igits 4 Touch p The default PIN code is 0000 Displaying the device information 1 Display the Bluetooth screen Displaying the Bluetooth screen on page 9 2 Touch Device Information The device name and address of the Bluetooth device and this product are displayed Clearing the Bluetooth memory p This setting is available only when you stop your vehicle in a safe place and apply the parking brake CAUT...

Страница 11: ...mber in the phone book p The contacts on your phone will be automatically transferred to this product p Visibility of the Bluetooth screen should be on Switching visibility on page 10 1 Display the Phone menu screen Displaying the Phone menu screen on page 11 2 Touch 3 Touch the desired name on the list 4 Touch the phone number you want to dial The dial screen appears and dialing starts 5 Touch to...

Страница 12: ...eed The line of sight distance between this product and your cellular phone must be 10 meters or less when sending and receiving voice and data via Bluetooth technology With some cellular phones the ring sound may not be output from the speakers If private mode is selected on the cellular phone hands free phoning may be disabled Registration and connection Cellular phone operations vary depending ...

Страница 13: ... of sensitivity for FM to Level1 to Level4 for AM Level1 or Level2 p The FM Level4 AM Level2 setting allows reception of only stations with the strongest signals Setting the FM or AM tuning step You can switch the tuning step for FM or AM band p For FM band the seek tuning step is fixed to 50 kHz p The tuning step remains at 50 kHz during manual tuning 1 Turn the source off Source on the Top menu ...

Страница 14: ...erforms slow motion playback Each time you touch it changes the speed in four steps in the following order 1 16 1 8 1 4 1 2 Hides the touch panel keys To display again the keys touch anywhere on the screen 1 Display the Radio settings screen Displaying the Radio settings screen on page 13 2 Touch TA Interrupt to switch On or Off default Receiving news announcements The news can be received from th...

Страница 15: ...itle audio language Switching the subtitle audio language on page 16 p By pressing or you can also skip files chapters forward or backward p By pressing and holding or you can also perform fast reverse or fast forward p If a Video CD with PBC On is being played appears p Changing the wide screen mode Common operations on page 27 You can play a normal music CD Video CD or DVD Video using the built ...

Страница 16: ...17 p By pressing or you can also skip files forward or backward p By pressing and holding or you can perform fast reverse or fast forward You can play compressed audio files stored in a disc or a USB storage device Media compatibility chart on page 37 2 Touch the item to select the search function 3 Touch 0 to 9 to input the desired number p To cancel an input number touch C 4 Touch to start playb...

Страница 17: ...sed audio files ROM 48 21 Stop 9999 99 9999 99 OFF Full 01 Pause 6 10 Abcdefghi Abcdefghi 2 Stops playback 1 Performs frame by frame playback Performs slow motion playback Hides the touch panel keys To display again the keys touch anywhere on the screen Sets a repeat play range or Repeats all files Repeats the current folder Repeats the current file Example Disc HOLD ROM 48 21 Stop 9999 99 9999 99...

Страница 18: ...n search 10 files at a time If the file currently being played is the first or last file in the folder the search is not performed p Changing the wide screen mode Common operations on page 27 You can view still images stored in an USB storage device Media compatibility chart on page 37 Starting procedure 1 Press 2 Plug the USB storage device Plugging and unplugging a USB storage device on page 7 p...

Страница 19: ...ed back Bluetooth 9999 48 21 6 10 Abcdefghi Abcdefghi ABC House Plays files in random order Playback screen 2 Sets a repeat play range Switches between playback and pause Selects a file from the list Selecting files from the file name list on page 19 p By pressing the or button you can also skip files forward or backward p By pressing and hold the or button you can also perform fast reverse or fas...

Страница 20: ...SECAM System settings Displaying the System setting screen 1 Press 2 Touch and then The System setting screen appears Setting the steering wheel control You can set the steering wheel control on the display via a wired remote cable Power cord on page 29 p This setting is available only when you stop your vehicle in a safe place and apply the parking brake p This setting is available when turn all ...

Страница 21: ...ying the System setting screen on page 20 2 Touch Camera Settings 3 Touch Back Camera Input to switch On or Off default Setting the polarity of the rear view camera p This function is available when Back Camera Input is On Setting rear view camera activation on page 21 1 Display the System setting screen Displaying the System setting screen on page 20 2 Touch Camera Settings 3 Touch Camera Polarit...

Страница 22: ...cursor back ward or forward in the 15 minute width The default setting is 18 00 6 00 6 00 PM 6 00 AM When the cursors are placed on the same point the dimmer available time is 0 hours When the cursor for off time setting is placed on the left end and the cursor for on time setting is placed on the right end the dimmer available time is 0 hours When the cursor for on time setting is placed on the l...

Страница 23: ...to adjust the source volume p If you directly touch the area where the cursor can be moved the SLA setting will be changed to the value of the touched point p 4 to 4 is displayed as the source volume is increased or decreased p The default setting is 0 Adjusting loudness This function compensates for deficiencies in the low frequency and high frequency ranges at low volume p This function is not a...

Страница 24: ...this curve the effect is applied to all AV sources Custom2 is an adjusted equalizer curve that you create If you select this curve the effect is applied to all AV sources p The default setting is Todoroki 1 Display the Audio setting screen Displaying the Audio setting screen on page 23 2 Touch Graphic EQ 3 Touch the equalizer you want Customizing the equalizer curves You can adjust the currently s...

Страница 25: ... The setting made here will not be affected even if the audio language is switched during playback using the switch audio languages key Setting the menu language You can set the preferred language in which the menus recorded on a disc are displayed 1 Display the Video Setup screen 2 Touch DVD DivX Setup 3 Touch Menu Language The pop up menu appears 4 Touch the desired language When you select Othe...

Страница 26: ...ayed 4 Touch Registration Code Your 10 digit registration code is displayed p Make a note of the code as you will need it when you deregis ter from a DivX VOD provider Displaying your DivX VOD deregistration code A registration code registered with a deregistration code can be deleted p This setting is available when the selected source is Disc CD Video CD or DVD 1 Display the Video Setup screen 2...

Страница 27: ...h the current time on the screen 2 Touch or to set the correct time and date You can operate the following items Year month date hour minute p You can change the time display format to 12hour default or 24hour p You can change the order of date display format Day month year Month day year Changing the wide screen mode You can set the screen size for the video and JPEG BMP images p The default sett...

Страница 28: ...ble danger It is extremely dangerous to allow cables to become wound around the steering column or shift lever Be sure to install this product its cables and wiring away in such so that they will not obstruct or hinder driving Make sure that the cables and wires will not interfere with or become caught in any of the vehicle s moving parts especially the steering wheel shift lever parking brake sli...

Страница 29: ...he blue white lead When the ignition switch is turned on ACC ON a control signal is output through the blue white lead Connect to an external power amp s system remote control terminal the auto antenna relay control terminal or the antenna booster power control terminal max 300 mA 12 V DC The control signal is output through the blue white lead even if the audio source is switched off This product...

Страница 30: ...tput setting in the initial setting The subwoofer output of this product is monaural Switching the rear speaker output on page 23 With a two speaker system do not connect anything to the speaker leads that are not connected to speakers Power amp sold separately Without internal amp Important The speaker leads are not used when this connection is in use 1 3 2 4 3 6 5 5 7 7 2 1 With internal amp Imp...

Страница 31: ...9 Connect only the rear view camera to R C IN Do not connect any other equipment Some appropriate settings are required to use other view cameras Setting the rear view camera on page 21 External video component and the display 1 2 3 6 7 8 9 3 a b c d e 5 4 1 Rear display with RCA input jacks 2 To video input 3 RCA cables sold separately 4 This product 5 Yellow V OUT 6 AUX input 7 Mini jack AV cabl...

Страница 32: ...duct in places subject to high tempera tures or humidity such as Places close to a heater vent or air conditioner Places exposed to direct sunlight such as on top of the dashboard Places that may be exposed to rain such as close to the door or on the vehicle s floor Install this product horizontally on a surface within 0 to 30 degrees tolerance within 5 degrees to the left or right Improper instal...

Страница 33: ...n CD or DVD playback is not possible The disc is inserted upside down Insert the disc with the label upward The disc is dirty Clean the disc The disc is cracked or otherwise damaged Insert a normal round disc The files on the disc are in an irregular file format Check the file format The disc format cannot be played back Replace the disc The loaded disc is a type this product cannot play Check wha...

Страница 34: ...equently turn the ignition switch to on ACC ON again Error messages When problems occur with this product an error message appears on the display Refer to the table below to identify the problem then take the suggested corrective action If the error persists record the error message and contact your dealer or your nearest Pioneer service center Common AMP Error This product fails to operate or the...

Страница 35: ...rage device and do not use it Turn the ignition switch to OFF then to ACC or ON and then connect a compliant USB storage device Audio Format not supported This type of file is not supported on this product Select a file that can be played Bluetooth Error 10 The power failed for the Bluetooth module of this product Turn the ignition switch to OFF and then to ON If the error message is still display...

Страница 36: ...the manufacturer of media recorders or writing software CD R CD RW discs Unfinalized discs cannot be played back It may not be possible to playback CD R CD RW discs recorded on a music CD recorder or a computer because of disc characteristics scratches or dirt on the disc or dirt scratches or condensation on the lens of the built in drive Playback of discs recorded on a computer may not be pos sib...

Страница 37: ...art General Maximum playback time of audio file stored in the disc 60 h Maximum playback time of audio file stored on an USB stor age device 7 5 h 450 minutes CD R RW File system ISO9660 level 1 ISO9660 level 2 Romeo Joliet UDF 1 02 1 50 2 00 2 01 2 50 Maximum number of folders 300 Maximum number of files 999 Playable file types MP3 WMA AAC WAV DivX MPEG1 MPEG2 MPEG4 DVD R R SL R DL DVD RW File sy...

Страница 38: ...th a short pause between songs avi Format MPEG 4 Compatible video codec MPEG 4 Compatible audio codec Linear PCM LPCM MP3 Maximum resolution 720 pixels x 480 576 pixels Maximum Frame rate 30 fps Files may not be able to be played back depending on the bit rate mp4 Format MPEG 4 Compatible video codec MPEG 4 Compatible audio codec AAC Maximum resolution 720 pixels x 480 576 pixels Maximum Frame rat...

Страница 39: ... the connected Content application s or service by its provider Notice regarding video viewing Remember that use of this system for commercial or public view ing purposes may constitute an infringement on the author s rights as protected by the Copyright Law Notice regarding DVD Video viewing This item incorporates copy protection technology that is pro tected by U S patents and other intellectual...

Страница 40: ...8 dB oct Gain 6 dB to 24 dB Phase Normal Reverse Bass boost Gain 12 dB to 0 dB DVD drive System DVD Video VCD CD MP3 WMA AAC DivX MPEG player Usable discs DVD VIDEO VIDEO CD CD CD R CD RW DVD R DVD RW DVD RDL Region number 5 Signal Format Sampling frequency 32 kHz 44 1 kHz 48 kHz 96 kHz Number of quantization bits 16 bit 20 bit 24 bit linear Frequency response 5 Hz to 44 000 Hz with DVD at samplin...

Страница 41: ...41 ows nly Hz kHz jpe 2 0 W ofile fied Max MHz dB ork Hz Hz dB ork a CRB4485 A 41 ...

Страница 42: ... TEL 905 479 4411 PIONEER EUROPE NV Haven 1087 Keetberglaan 1 B 9120 Melsele Belgium Belgique TEL 0 3 570 05 11 PIONEER ELECTRONICS ASIACENTRE PTE LTD 253 Alexandra Road 04 01 Singapore 159936 TEL 65 6472 7555 PIONEER ELECTRONICS AUSTRALIA PTY LTD 5 Arco Lane Heatherton Victoria 3202 Australia TEL 03 9586 6300 PIONEER ELECTRONICS DE MEXICO S A DE C V Blvd Manuel Avila Camacho 138 10 piso Col Lomas...

Отзывы: