background image


Connecting up

03


20


En


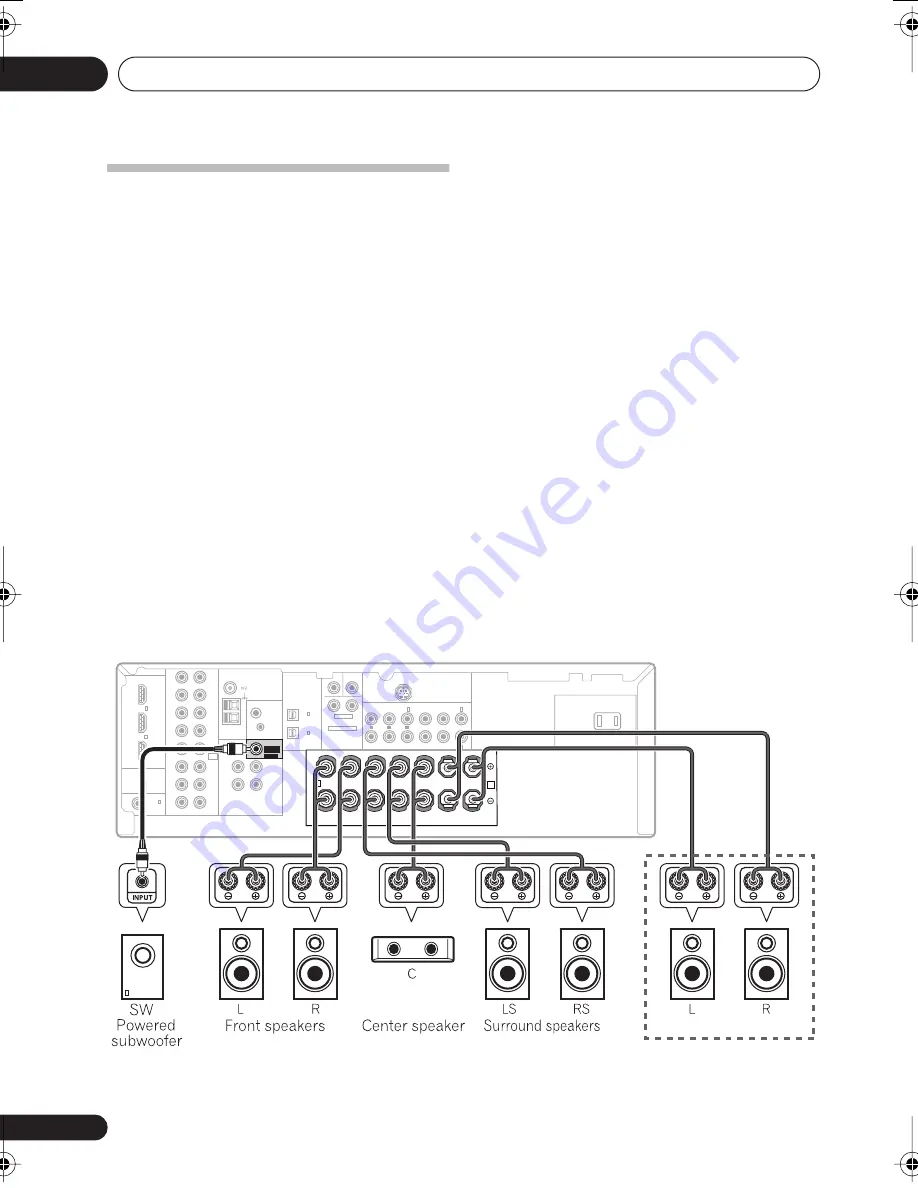
Connecting the speakers


A complete setup of six speakers (including the 
subwoofer) is shown here but everyone’s home 
setup will vary. Simply connect the speakers 
you have in the manner shown below. The 
receiver will work with just two stereo speakers 
(the front speakers in the diagram) but using at 
least three speakers is recommended, and a 
complete setup is best for surround sound. If 
you’re not using a subwoofer, change the front 
speaker setting (see 


Speaker Setting


 on 

page 42) to 


LARGE


.

Make sure you connect the speaker on the 
right to the right terminal and the speaker on 
the left to the left terminal. Also make sure the 
positive and negative (


+


/


) terminals on the 

receiver match those on the speakers. You can 
use speakers with a nominal impedance 
between 6 


 to 16 


 (please see 


Switching the 

speaker impedance


 on page 72 if you plan to 

use speakers with an impedance of less than 
8


). 

You can use the speakers connected to the B 
speaker terminals to listen to stereo playback 
in another room. Make sure to review 


Hints on 

speaker placement


 on page 21 when placing 

the speakers in another room. See 


Switching 

the speaker system


 on page 22 for the listening 

options with this setup.


Be sure to complete all connections before 
connecting this unit to the AC power source.

The illustration shows the VSX-918V, but connections for the VSX-818V are the same.

HDMI

(DVD / BD) IN

IN

R

L

IN

AUX

CD

IN

OUT

DVD / BD

TV
/ SAT

FRONT

  DVD5.1

CH INPUT

IN

IN

DVR
/ VCR

DVR
/ VCR IN

TV
/ SAT IN

DVD
/ BD IN

AM

LOOP

IN

OUT

DIGITAL IN

CEN-

TER

SURROUND

DVD 5.1CH INPUT

SIRIUS IN

AC OUTLET

COMPONENT VIDEO

R

L

SUB

WOOFER

OPT

OPT

(TV / SAT)

(CD)

R

A

FRONT

SURROUND

CENTER

R

L

R

L

L

FM UNBAL

CONTROL

ANTENNA

DVR
/ VCR OUT

MONITOR
OUT

AUDIO

VIDEO

XM

IN

IN

OUT

DIGITAL IN

COAX     

(DVD / BD)

(ASSIGNABLE)

PLAY

CD-R

/ TAPE

/ MD

(ASSIGNABLE)

(ASSIGNABLE)

S
P
E
A
K
E
R
S

1

1

1

2

(TV / SAT) IN

OUT

2

REC

SUB
WOOFER
PREOUT

B

(DVR / VCR) IN

Y

P

B

P

R

MONITOR OUT

(ASSIGNABLE)
3

(DVD / BD) IN 1

(TV / SAT) IN 2

Y

P

B

P

R

HDMI

(DVD / BD) IN

IN

R

L

IN

AUX

CD

IN

OUT

DVD / BD

TV
/ SAT

FRONT

  DVD5.1

CH INPUT

IN

IN

DVR
/ VCR

DVR
/ VCR IN

TV
/ SAT IN

DVD
/ BD IN

AM

LOOP

IN

OUT

DIGITAL IN

CEN-

TER

SURROUND

DVD 5.1CH INPUT

SIRIUS IN

AC OUTLET

COMPONENT VIDEO

R

L

SUB

WOOFER

OPT

OPT

(TV / SAT)

(CD)

R

A

FRONT

SURROUND

CENTER

R

L

R

L

L

FM UNBAL

CONTROL

ANTENNA

DVR
/ VCR OUT

MONITOR
OUT

AUDIO

VIDEO

XM

IN

IN

OUT

DIGITAL IN

COAX     

(DVD / BD)

(ASSIGNABLE)

CD-R

/ TAPE

/ MD

(ASSIGNABLE)

(ASSIGNABLE)

S
P
E
A
K
E
R
S

1

1

1

2

(TV / SAT) IN

OUT

2

SUB
WOOFER
PREOUT

B

(DVR / VCR) IN

Y

P

B

P

R

MONITOR OUT

(ASSIGNABLE)
3

(DVD / BD) IN 1

(TV / SAT) IN 2

Y

P

B

P

R

Speaker system B

VSX-918V

VSX_918_818_KU.book 20 ページ 2008年5月15日 木曜日 午後6時46分

Содержание 918V-K - AV Receiver - Gloss

Страница 1: ...oss or theft Improve product development Your input helps us continue to design products that meet your needs Receive a free Pioneer newsletter Registered customers can opt in to receive a monthly newsletter Receive free tips updates and service bulletins on your new product Operating Instructions Register your product at www pioneerelectronics com US www pioneerelectronics ca Canada ...

Страница 2: ...u Canada D8 10 1 3_EF Information to User Alteration or modifications carried out without appropriate authorization may invalidate the user s right to operate the equipment D8 10 2_En CAUTION This product satisfies FCC regulations when shielded cables and connectors are used to connect the unit to other equipment To prevent electromagnetic interference with electric appliances such as radios and t...

Страница 3: ...BACK NO USER SERVICEABLE PARTS INSIDE REFER SERVICING TO QUALIFIED SERVICE PERSONNEL CAUTION RISK OF ELECTRIC SHOCK DO NOT OPEN IMPORTANT D3 4 2 1 1_En A WARNING To prevent a fire hazard do not place any naked flame sources such as a lighted candle on the equipment D3 4 2 1 7a_A_En VENTILATION CAUTION When installing this unit make sure to leave space around the unit for ventilation to improve hea...

Страница 4: ...Front panel 23 Display 24 Remote control 26 Operating range of remote control 29 05 Listening to your system Auto playback 30 Listening in surround sound 30 Using the Advanced surround effects 31 Listening in stereo 31 Using Front Stage Surround Advance 32 Using Stream Direct 32 Using the Sound Retriever 32 Listening with Acoustic Calibration EQ 33 Using Virtual Surround Back VSB 33 Setting the AV...

Страница 5: ...necting your SIRIUS Connect Tuner 60 Listening to SIRIUS Radio 61 Saving channel presets 61 Using the SIRIUS Menu 62 Using this receiver with a Pioneer flat panel TV 62 Using the SR mode with a Pioneer flat panel TV 63 11 Other Settings The Input Assign menu 64 The Other Setup menu 66 SR Setup for Pioneer flat panel TVs 66 12 Additional information Troubleshooting 67 HDMI 68 Important information ...

Страница 6: ...uce the life or performance of batteries Installing the receiver When installing this unit make sure to put it on a level and stable surface Don t install it on the following places on a color TV the screen may distort near a cassette deck or close to a device that gives off a magnetic field This may interfere with the sound in direct sunlight in damp or wet areas in extremely hot or cold areas in...

Страница 7: ...ceiver 2 Connect your speakers and place them for optimal surround sound See Connecting the speakers on page 20 Where you place the speakers will have a big effect on the sound Place your speakers as shown below for the best surround sound effect Also see Hints on speaker placement on page 21 for more on this 3 Plug in and switch on the receiver followed by your DVD player subwoofer and TV Make su...

Страница 8: ...n the remote control then press the SETUP button An on screen display OSD appears on your TV Use and ENTER on the remote control to navigate through the screens and select menu items Press RETURN to exit the current menu Press SETUP at any time to exit the System Setup menu 1 4 Select Auto MCACC from the System Setup menu then press ENTER Above VSX 918V left and VSX 818V right Try to be as quiet a...

Страница 9: ...8 the Auto MCACC setup will start automatically as shown below A progress report is displayed on screen while the receiver outputs more test tones to determine the optimum receiver settings for channel level speaker distance and Acoustic Calibration EQ Again try to be as quiet as possible while this is happening It may take 3 to 8 minutes 9 The Auto MCACC Setup has finished Select SKIP to go back ...

Страница 10: ...them Some older TVs may interfere with the operation of the microphone If this seems to be happening switch off the TV when doing the Auto MCACC Setup Better sound using Phase Control This receiver s Phase Control feature uses phase correction measures to make sure your sound source arrives at the listening position in phase preventing unwanted distortion and or coloring of the sound see illustrat...

Страница 11: ...cables should be used to connect digital components to this receiver 1 Video cables Standard RCA video cables These cables are the most common type of video connection and are used to connect to the composite video terminals The yellow plugs distinguish them from cables for audio Component video cables Use component video cables to get the best possible color reproduction of your video source The ...

Страница 12: ...TV Use a standard RCA video cable to connect to the composite video jack 4 The illustration shows the VSX 918V but connections for the VSX 818V are the same Note 1 If your DVD player only has an optical digital output you can connect it to the optical input on this receiver using an optical cable When you set up the receiver you ll need to tell the receiver which input you connected the player to ...

Страница 13: ... DIGITAL IN CEN TER SURROUND DVD 5 1CH INPUT R L SUB WOOFER OPT OPT TV SAT CD R A FRONT R L FM UNBAL CONTROL ANTENNA DVR VCR OUT MONITOR OUT AUDIO VIDEO XM IN IN OUT DIGITAL IN COAX DVD BD ASSIGNABLE CD R TAPE MD ASSIGNABLE ASSIGNABLE S P E A K E R S 1 1 1 2 TV SAT IN OUT 2 SUB WOOFER PREOUT M CENTER OUTPUT SUB WOOFER OUTPUT VIDEO OUTPUT SURROUND OUTPUT R L FRONT OUTPUT R L VSX 918V DVD multi chan...

Страница 14: ...ion shows the VSX 918V but connections for the VSX 818V are the same About the WMA9 Pro decoder This unit has an on board Windows Media Audio 9 Professional WMA9 Pro decoder so it is possible to playback WMA9 Pro encoded audio using a coaxial or optical digital connection when connected to a WMA9 Pro compatible player However the connected DVD player set top box etc must be able to output WMA9 Pro...

Страница 15: ...ideo connection 3 If your video component has a digital audio output connect it to a digital input on this receiver The example shows a recorder connected to the DIGITAL OPT 1 CD input 2 The illustration shows the VSX 918V but connections for the VSX 818V are the same Note 1 If your video component also has a component video output you can connect this too See Using the component video jacks on pa...

Страница 16: ...deo inputs on page 65 for more on this 3 Connect the COMPONENT VIDEO MONITOR OUT jacks on this receiver to the component video inputs on your TV or monitor Use a three way component video cable Connecting using HDMI If you have an HDMI or DVI with HDCP equipped component you can connect it to this receiver using a commercially available HDMI cable The HDMI connection transfers uncompressed digital...

Страница 17: ...ge 36 VSX 918V model only Set the HDMI parameter in Setting the AV options on page 35 to THRU THROUGH if you want to hear HDMI audio output from your TV or flat panel TV no sound will be heard from this receiver If the video signal does not appear on your TV or flat panel TV try adjusting the resolution settings on your component or display Note that some components such as video game units have r...

Страница 18: ...onsumption of connected equipment should not exceed 100 W 0 8 A This unit should be disconnected by removing the power plug from the wall socket when not in regular use ex when on vacation Caution Do not connect a TV set monitor heater or similar appliance to this unit s AC outlet Do not connect appliances with high power consumption to the AC outlet in order to avoid overheating and fire risk Thi...

Страница 19: ...e the stand with screws fig c before clipping the loop to the stand Make sure the reception is clear 4 Place the AM antenna on a flat surface and in a direction giving the best reception 5 Connect the FM wire antenna in the same way as the AM loop antenna For best results extend the FM antenna fully and fix to a wall or door frame Don t drape loosely or leave coiled up Using external antennas To i...

Страница 20: ... listening options with this setup Be sure to complete all connections before connecting this unit to the AC power source The illustration shows the VSX 918V but connections for the VSX 818V are the same HDMI DVD BD IN IN R L IN AUX CD IN OUT DVD BD TV SAT FRONT DVD5 1 CHINPUT IN IN DVR VCR DVR VCR IN TV SAT IN DVD BD IN AM LOOP IN OUT DIGITAL IN CEN TER SURROUND DVD 5 1CH INPUT SIRIUS IN AC OUTLE...

Страница 21: ...wing but you should also follow the guidelines on placement that the speaker manufacturer provided with your particular speakers to get the most out of them Place the front left and right speakers at equal distances from the TV When placing speakers near the TV we recommend using magnetically shielded speakers to prevent possible interference such as discoloration of the picture when the TV is swi...

Страница 22: ...ress repeatedly to choose a speaker system option SP A Sound is output from the speakers connected to the A speaker terminals multichannel playback is possible SP B Sound is output from the two speakers connected to speaker system B only stereo playback is possible SP AB Sound is output from speaker system A no sound is output from the Center and the Surround speaker the two speakers in speaker sy...

Страница 23: ...8 or EQ Auto Setup page 40 7 MASTER VOLUME dial 8 AUDIO VIDEO input See Connecting to the front panel video terminal on page 18 9 iPod DIRECT terminal Use to connect your Apple iPod as an audio source page 55 MASTER VOLUME VSX 918V STANDBY ON PHONES DVD DVR TV VIDEO PORTABLE CD CD R iPod FM AM XM SPEAKERS VSB MODE SIGNAL SELECT SOUND RETRIEVER SIRIUS AUX PHASE CONTROL INPUT SELECTOR ADVANCED SURRO...

Страница 24: ... Control page 10 19 ACOUSTIC EQ Press to select an Acoustic Calibration EQ setting page 33 20 Listening mode buttons AUTO SURR STREAM DIRECT Switches between Auto surround mode Auto playback on page 30 and Stream Direct playback Stream Direct playback bypasses the tone controls for the most accurate reproduction of a source page 32 STEREO A L C Switches between stereo playback Auto level control s...

Страница 25: ...Tuner indicators MONO Lights when the mono mode is set using the MPX button STEREO Lights when a stereo FM broadcast is being received in auto stereo mode TUNED Lights when a broadcast is being received 11 Speaker indicators Lights to indicate the current speaker system A and or B page 22 12 Character display 13 ADV SURR Advanced Surround Lights when one of the Advanced Surround modes has been sel...

Страница 26: ... page 30 ADV SURR Switches between the various surround modes page 31 PHASE Press to switch on off Phase Control page 10 ACOUSTIC EQ Press to select an Acoustic Calibration EQ setting page 33 DIALOG Use to make dialog stand out when watching TV or a movie page 35 SOUND RETRIEVER Press to restore CD quality sound to compressed audio sources page 32 MUTE Mutes unmutes the sound CH SEL Press repeated...

Страница 27: ...ing up your surround sound system page 37 Also used to control DVD menus options Use the TUNE buttons can be used to find radio frequencies page 46 and the ST buttons can be used to select preset radio stations page 47 7 Component control buttons The main buttons etc are used to control a component after you have selected it using the MULTI CONTROL buttons The controls above these buttons can be a...

Страница 28: ...Pod controls and the receiver controls page 57 DISC ENTER Use to enter commands for TV or DTV and also use to select a disc in a multi CD player 9 INFO Use to bring up information screens on a digital TV 10 SHIFT Press to access the boxed commands above the buttons on the remote These buttons are marked with an asterisk in this section 11 Remote control LED Lights when a command is sent from the r...

Страница 29: ...ork properly if There are obstacles between the remote control and the receiver s remote sensor Direct sunlight or fluorescent light is shining onto the remote sensor The receiver is located near a device that is emitting infrared rays The receiver is operated simultaneously with another infrared remote control unit DOWN 30 30 7 m 23 ft DOWN DOWN ...

Страница 30: ...tening to a source press STANDARD If the source is Dolby Digital DTS or Dolby Surround encoded the proper decoding format will automatically be selected and shows in the display With two channel sources press STANDARD repeatedly to select from 2 Pro Logic II MOVIE Up to 5 1 channel sound especially suited to movie sources 2 Pro Logic II MUSIC3 Up to 5 1 channel sound especially suited to music sou...

Страница 31: ...nd possibly your subwoofer depending on your speaker settings Dolby Digital and DTS multichannel sources are downmixed to stereo In the Auto level control stereo mode A L C this unit equalizes playback sound levels if each sound level varies with the music source recorded in a portable audio player While listening to a source press STEREO A L C for stereo playback Press repeatedly to switch betwee...

Страница 32: ...l speaker distance as well as with dual mono settings You will hear sources according to the number of channels in the signal For analog sources only Channel Level can be set All other digital processing can not be set Using the Sound Retriever When audio data is removed during the compression process sound quality often suffers from an uneven sound image The Sound Retriever feature employs new DS...

Страница 33: ... surround back channel information for example 5 1 encoded material with emulated 6 1 encoding VSB ON Sometimes the material may sound better in the 5 1 format for which it was originally encoded In this case you can simply switch it off VSB OFF 2 Depending on the input signal and the Listening Mode the Virtual Surround Back mode may not be effective Press VSB MODE front panel to select a virtual ...

Страница 34: ... ENTER TUNE TUNE ST ST ONE TOUCH COPY CH CH RECEIVER INPUT SELECT TV CTRL SOURCE TV DVR SIRIUS AM XM FM CD R CD PORTABLE iPod DVD RECEIVER MULTI CONTROL AUTO DIRECT ADVSURR STEREO A L C STANDARD Setting What it does Option s MIDNIGHTa Allows you to hear effective surround sound of movies at low volumes M L OFF MIDNIGHT LOUDNESSa Used to get good bass and treble from music sources at low volumes LO...

Страница 35: ... this feature when listening to surround sound at low volumes OFF MAX MID Dialog Enhancemente Localizes dialog in the center channel to make it stand out from other background sounds in a TV or movie soundtrack OFF ON Sound Delay VSX 918V model only Some monitors have a slight delay when showing video so the soundtrack will be slightly out of sync with the picture By adding a bit of delay you can ...

Страница 36: ...3 you must select the analog multichannel inputs for surround sound 3 1 Make sure you have set the playback source to the proper output setting For example you might need to set your DVD player to output multichannel analog audio 2 Press DVD 3 Press RECEIVER on the remote control then press SIGNAL SEL to select the multichannel analog inputs DVD 5 1ch shows in the display and the ANALOG indicator ...

Страница 37: ... component video and HDMI inputs see The Input Assign menu on page 64 Other Setup VSX 918V model only Make customized settings to reflect how you are using the receiver see The Other Setup menu on page 66 Manual MCACC speaker setup You can use the settings in the Manual MCACC setup menu to make detailed adjustments when you re more familiar with the system Before making these settings you should h...

Страница 38: ...opying your Acoustic Calibration EQ settings on page 40 EQ CUSTOM1 2 Adjust Make detailed manual adjustments to your custom Acoustic Calibration EQ settings see Setting the Acoustic Calibration EQ manually on page 41 EQ Data Check Check the ALL CH ADJUST FRONT ALIGN and custom settings using the on screen display see Checking your Acoustic Calibration EQ settings on page 42 Fine Channel Level Defa...

Страница 39: ...er pressing ENTER test tones will be output 3 Select each channel in turn and adjust the distance as necessary Use to adjust the delay of the speaker you selected to match the reference speaker The delay is measured in terms of speaker distance from 0 5 feet to 45 0 feet 0 1 m to 13 m Listen to the reference speaker and use it to measure the target channel From the listening position face the two ...

Страница 40: ...rence 2 Wait for the EQ AUTO Setting to finish As the receiver outputs test tones the frequency balance is adjusted automatically for the following settings ALL CH ADJUST A flat setting where all the speakers are set individually so no special weighting is given to any one channel FRONT ALIGN All speakers are set in accordance with the front speaker settings no equalization is applied to the front...

Страница 41: ...d of the test tone will alternate between the left front reference speaker and the target speaker 3 Select the channel s you want and adjust to your liking Use to select the channel Use to select the frequency and to boost or cut the EQ When you re finished go back to the top of the screen and use to select the next channel The front speakers can t be adjusted if you selected FRONT ALIGN The OVER ...

Страница 42: ...igh volume the volume increases to 13dB automatically 1 Select Manual SP Setup then press ENTER 2 Select the setting you want to adjust If you are doing this for the first time you may want to adjust these settings in order Speaker Setting Specify the size and number of speakers you ve connected see below Crossover Network Specify which frequencies will be sent to the subwoofer page 43 Channel Lev...

Страница 43: ...re output from other speakers 3 When you re finished press RETURN You return to the Manual SP Setup menu Tip If you have a subwoofer and like lots of bass it may seem logical to select LARGE for your front speakers and PLUS for the subwoofer This may not however yield the best bass results Depending on the speaker placement of your room you may actually experience a decrease in the amount of bass ...

Страница 44: ...rs The Auto setup will output test tones in the order shown on screen Adjust the level of each speaker as the test tone is emitted 1 5 When you re finished press RETURN You return to the Manual SP Setup menu Tip You can change the channel levels at any time by using CH SEL and LEVEL on the remote control You can set two channel levels one for DVD 5 1CH and one for the listening modes 3 Manual SP S...

Страница 45: ...er delay needed for effective surround sound 1 Select Speaker Distance from the Manual SP Setup menu 2 Adjust the distance of each speaker using You can adjust the distance of each speaker in 0 5 feet increments 3 When you re finished press RETURN You return to the Manual SP Setup menu 3 Manual SP Setup Return a Speaker Setting b Crossover Network c Channel Level d Speaker Distance 3d Speaker Dist...

Страница 46: ...f the tuned or stereo indicators don t light when tuning to an FM station because the signal is weak press the MPX SHIFT 3 button to switch the receiver into mono reception mode This should improve the sound quality and allow you to enjoy the broadcast Tuning directly to a station Sometimes you ll already know the frequency of the station you want to listen to In this case you can simply enter the...

Страница 47: ...ant Choose a name up to four characters long Use the ST buttons to select characters Press ENTER to confirm a character If no character is input a space is input The name is stored when ENTER is pressed after choosing the fourth character Tip To erase a station name simply repeat steps 1 to 3 and input four spaces instead of a name Once you have named a station preset you can press TUNER DISP SHIF...

Страница 48: ...ess SIGNAL SEL to select the input signal corresponding to the source component see page 36 for more on this 3 Prepare the source you want to record Tune to the radio station load the CD video DVD etc 4 Prepare the recorder Insert a blank tape MD video etc into the recording device and set the recording levels Refer to the instructions that came with the recorder if you are unsure how to do this M...

Страница 49: ...ed in the remote However please note that there are cases where only certain functions may be controllable after assigning the proper preset code or the codes for the manufacturer in the remote control will not work for the model that you are using 2 Note You can cancel or exit any of the steps by pressing RECEIVER To go back a step press RETURN After one minute of inactivity the remote automatica...

Страница 50: ... up and listen to a CD on the receiver and then use the remote control to rewind a tape in your VCR while you continue to listen to your CD player When direct function is on any component you select using the MULTI CONTROL buttons will be selected by both the receiver and the remote control When you turn direct function off you can operate the remote control without affecting the receiver 2 1 Whil...

Страница 51: ...Press to switch the component assigned to the TV CTRL button on or off Cable TV Satellite TV TV DTV Switches the DTV on or off DTV INFO Press to get information on DTV programs DTV SHIFT 7 Use to choose the BLUE commands on a DTV menu DTV SHIFT 8 Use to choose the GREEN commands on a DTV menu DTV SHIFT 9 Use to choose the RED commands on a DTV menu DTV SHIFT 0 Use to choose the YELLOW commands on ...

Страница 52: ...LD player Go forward channels channel VCR Pause playback or recording CD MD CD R VCR DVD LD DVR player Cassette deck Start playback CD MD CD R VCR DVD LD DVR player Cassette deck Hold down for fast forward playback CD MD CD R VCR DVD LD DVR player Cassette deck Hold down for fast reverse playback CD MD CD R VCR DVD LD DVR player Cassette deck Stops playback on some models pressing this when the di...

Страница 53: ...eck ENTER RETURN Navigates DVD menu options DVD DVR player ONE TOUCH COPY SHIFT TOP MENU Copies the currently playing title from DVD to HDD or vice versa DVR player GUIDE Displays changes the subtitles on multilingual DVDs DVD DVR player CH SHIFT T EDIT SHIFT RETURN Selects channels VCR DVD DVR player SUBTITLE SHIFT Displays changes the subtitles included in multilingual DVD Video discs DVD DVR pl...

Страница 54: ...ERROLD 701 702 703 704 711 712 713 714 715 716 SA 705 706 708 709 731 ZENITH 707 710 717 PIONEER 700 718 On digital STB Manufacturer Code RCA 201 203 209 SONY 202 557 ECHOSTAR 205 PRIMESTAR 206 BELL 208 TOSHIBA 555 SHARP 554 AIWA 562 563 564 HITACHI 556 JVC 551 552 553 MASPRO 559 560 561 PANASONIC 558 PIONEER 200 210 DTV Manufacturer Code PANASONIC 226 230 JVC 227 TOSHIBA 228 PIONEER 207 229 231 2...

Страница 55: ...e the receiver verifies the connection and retrieves data from the iPod 3 Use the TOP MENU button to display iPod Top menu When the display shows Top Menu you re ready to play music from the iPod 2 If after pressing iPod the display shows No Connection try switching off the receiver and reconnecting the iPod to the receiver Note 1 This system is compatible with the audio of an iPod and iPod nano p...

Страница 56: ...h category list For example you can play all the songs by a particular artist Basic playback controls The following table shows the basic playback controls for your iPod Note 1 Note that non roman characters in the title are displayed as This feature is not available for photos or video clips on your iPod 2 If you re in the song category you can also press ENTER to start playback iPod Top Playlist...

Страница 57: ... XM Radio service 2 Press XM SHIFT FM to switch to the XM Radio input For best reception you may need to move the XM Mini Tuner antenna near a window the southernmost window should produce the best results If after pressing XM the display shows Check XM Tuner try disconnecting the receiver and tuner connections and then plugging them back in If the display shows Upgrade XM Tuner try disconnecting ...

Страница 58: ...This receiver can memorize up to 30 channels stored in three banks or classes A B and C of 10 channels each 1 Select the channel you want to memorize See Selecting channels and browsing by genre above 2 Press T EDIT The display shows a blinking memory class 3 Press CLASS SHIFT 2 to select one of the three classes then press to select the channel preset you want You can also use the number buttons ...

Страница 59: ... sports news talk radio stand up comedy children s and entertainment programming XM is broadcast in superior digital audio quality from coast to coast From rock to reggae from classical to hip hop XM has something for every music fan For U S customers information about XM Radio is available online at www xmradio com For Canadian customers information about XM Canada is online at www xmradio ca XM ...

Страница 60: ...s you will need to activate your SIRIUS Connect tuner 1 1 Connect a SIRIUS Connect tuner to the SIRIUS IN jack on the rear of this receiver You will also need to connect the antenna and AC adapter to the Sirius Connect tuner 2 Press SIRIUS SHIFT AM to switch to the SIRIUS input For best reception you may need to move the SIRIUS Connect tuner antenna near a window the southernmost window should pro...

Страница 61: ...er can memorize up to 30 channels stored in three banks or classes A B and C of 10 channels each 1 Select the channel you want to memorize See Selecting channels and browsing by genre above 2 Press T EDIT The display shows a blinking memory class 3 Press CLASS SHIFT 2 to select one of the three classes then press to select the channel preset you want You can also use the number buttons to select a...

Страница 62: ... providing the parental lock password Antenna Aiming Check the strength of satellite and terrestrial reception Password Set Set the parental lock password 3 When you re finished press TOP MENU to return to the reception display Tip You can reset the channel presets Memory Recall Channel Skip Add and Password Set in Resetting the main unit on page 72 Using this receiver with a Pioneer flat panel TV...

Страница 63: ...To switch SR mode on off press RECEIVER then the SR button The front panel display shows SR ON or OFF Note 1 The 3 ringed SR cable from Pioneer is commercially available under the part number ADE7095 Contact the Pioneer Customer Support division for more information on obtaining an SR cable you can also use a commercially available 3 ringed mini phone plug for the connection If you connect to a Pi...

Страница 64: ...l equipment is hooked up to which terminal so the buttons on the remote correspond to what you have hooked up 1 Select Digital Input from the Input Assign menu 2 Select the number of the digital input to which you ve connected the digital component The numbers correspond with the numbers beside the inputs on the rear of the receiver 3 Select the component that corresponds with the one you connecte...

Страница 65: ...after assigning an input 4 When you re finished press RETURN You return to the Input Assign menu Assigning the HDMI inputs Default settings HDMI 1 DVD HDMI 2 TV If you used HDMI to connect your video equipment you must tell the receiver which input terminal s you have used so that you see the proper video signal when you select the input source 1 Select HDMI Input from the Input Assign menu 2 Sele...

Страница 66: ...panel TV DVD BD or another function below the volume on the flat panel TV is muted so only sound from the receiver is heard 5 Assign any input source connected to the flat panel TV to the corresponding input number This matches the receiver s input source with a numbered video input on the flat panel TV For example assign DVD BD to input 2 if you have connected your DVD video output to video input...

Страница 67: ...ing off Press SPEAKERS to select the proper speaker set see Switching the speaker system on page 22 Press SIGNAL SELECT to select the proper input signal see Choosing the input signal on page 36 No image is output when a function is selected Make sure the component is connected correctly refer to Connecting up on page 11 Select the correct component use the input select buttons Check Assigning the...

Страница 68: ...ent the output of loud noise from your speakers Everything seems to be set up correctly but the playback sound is odd Check that the positive negative speaker terminals on the receiver are matched with the corresponding terminals on the speakers see Connecting the speakers on page 20 There seems to be a time lag between the speakers and the output of the subwoofer See Automatically setting up for ...

Страница 69: ...etting for your component OSD does not appear The OSD will not appear if you have connected using the HDMI output to your TV Use component or composite connections when setting up the system No sound or sound suddenly ceases If you ve made separate connections for audio make sure you have assigned the analog digital jack s to the corresponding HDMI input for the component See Assigning the HDMI in...

Страница 70: ...Replace the XM antenna if the cable is damaged Loading The XM Mini Tuner is acquiring audio or program information from the XM satellite signal This message can also occur in weak XM signal conditions This message should disappear in a few seconds in good signal conditions If you see this message often reposition the XM antenna to get better signal reception No Signal The XM Mini Tuner is not rece...

Страница 71: ...r On again If the message reappears contact XM Listener Care and explain the issue that you re experiencing and the corrective actions you ve tried XM Power Error A short circuit occurring in the antenna or surrounding antenna cable Make sure that there is nothing unusual with the antenna or antenna cable Switch the power off then back on again Symptom Cause Action Symptom Cause Action Antenna Err...

Страница 72: ...at 8 Ω or more Specifications Amplifier section Continuous power output stereo Front 95 W 20 Hz to 20 kHz THD 0 2 8 Ω 1 Rated power output surround 20 Hz to 20 kHz THD 0 06 8 Ω Front 95 W per channel Center 95 W Surround 95 W per channel Rated power output surround 1 kHz THD 0 05 8 Ω Front 120 W per channel Center 120 W Surround 120 W per channel Audio section Input Sensitivity Impedance AUX CD CD...

Страница 73: ... 30 Hz to 15 kHz 1 dB Antenna Input DIN 75 Ω unbalanced AM Tuner Section Frequency Range 530 kHz to 1700 kHz Sensitivity IHF Loop antenna 350 µV m Signal to Noise Ratio 50 dB Antenna Loop antenna Other Input Output Section HDMI terminal Input 19 pin x2 Output 19 pin 5 V 55 mA XM connector 4 pin 5 V 370 mA SIRIUS connector 8 pin Miscellaneous Power requirements AC 120 V 60 Hz Power consumption 300 ...

Страница 74: ...g or distortion and most importantly without affecting your sensitive hearing Sound can be deceiving Over time your hearing comfort level adapts to higher volumes of sound So what sounds normal can actually be loud and harmful to your hearing Guard against this by setting your equipment at a safe level BEFORE your hearing adapts To establish a safe level Start your volume control at a low setting ...

Страница 75: ...EWARRANTYPERIOD NOWARRANTIESSHALLAPPLYAFTERTHE WARRANTYPERIOD SOMESTATESDONOTALLOWLIMITATIONSONHOWLONGANIMPLIEDWARRANTYLASTSANDSOMESTATESDONOTALLOWTHEEXCLUSIONS OR LIMITATIONS OF INCIDENTAL OR CONSEQUENTIAL DAMAGES SO THE ABOVE LIMITATIONS OR EXCLUSIONS MAY NOT APPLY TO YOU THIS WARRANTY GIVES YOU SPECIFIC LEGAL RIGHTS AND YOU MAY HAVE OTHER RIGHTS WHICH MAY VARY FROM STATE TO STATE INCANADA EXCEP...

Страница 76: ...z vous adresser à un distributeur autorisé Pioneer du Canada pour obtenir le nom du Centre de Service Autorisé Pioneer le plus près de chez vous Vous pouvez aussi contacter le Service à la clientèle de Pioneer Pioneer Électroniques du Canada Inc Service Clientèle 300 Allstate Parkway Markham Ontario L3R 0P2 1 877 283 5901 905 479 4411 Pour obtenir des renseignements sur la garantie veuillez vous r...

Отзывы: