background image

3

P78. 0000 / 00 / 00 SU

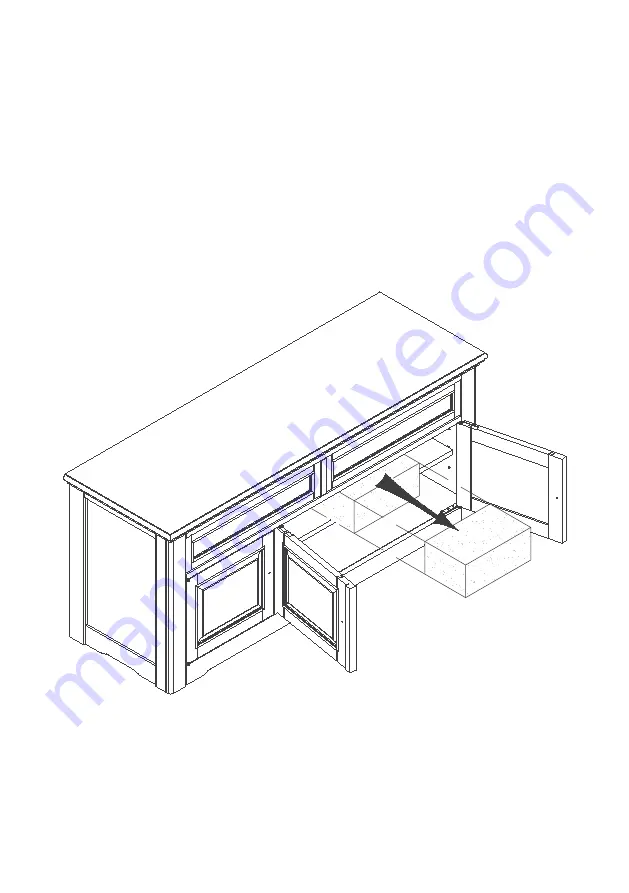
STEP 1

Unpack parts and hardware box

•  Open the cabinet doors and locate the box attached to the shelf. 

•  Carefully cut the strap used to secure the box and remove the box.

• 

Unpack all parts and hardware on a flat, soft surface.

• 

Confirm all parts and hardware are accounted for.  If not, please contact 

customer service as listed on the first page. 

Содержание 1074651

Страница 1: ...78 1 Assembly Instructions For product related questions and support customerservice pikeandmain com 1 888 379 5633 US and Canada Only Monday Friday 9am 5pm PST English French and Spanish IMPORTANT RE...

Страница 2: ...all hardware out of reach of children Two people are recommended for assembly A Phillips screwdriver not included will be needed for assembly Parts List Hardware List Cabinet 1x Leg 2 2x Leg 1 2x Shel...

Страница 3: ...s and locate the box attached to the shelf Carefully cut the strap used to secure the box and remove the box Unpack all parts and hardware on a flat soft surface Confirm all parts and hardware are acc...

Страница 4: ...otch for the shelf is facing inward towards the center of the cabinet Loosely attach the leg B or C using bolt aa lock washer bb flat washer cc and Allen wrench dd Two bolts per leg are necessary Do n...

Страница 5: ...on the legs B and C as shown Loosely attach the shelf D using bolt aa lock washer bb flat washer cc and Allen wrench dd After all bolts are loosely fastened then fully tighten all of the bolts from s...

Страница 6: ...e carefully turn the console right side up Adjust each leveler as necessary until the top is level Ensure all levelers are touching the floor Note the drawing below for adjustable leveler location STE...

Страница 7: ...rside of the shelf Set the screws aside Remove the shelf and set it aside Move the shelf supports to the desired level making sure you place all supports on the same level Place the shelf on the shelf...

Страница 8: ...should be just below the top edge of the console Using two long screws jj fasten the first bracket ff through the drywall and into the stud Attach the cable ee to the bracket ff using cotter pin gg an...

Страница 9: ...her accidents it is best to have a professional repair your furniture To clean and dust the surface use a clean soft cloth If furniture polish is desired test it on a hidden area first Polish is not n...

Страница 10: ...vous avez des questions ou avez besoin de soutien relatif au produit customerservice pikeandmain com 1 888 379 5633 tats Unis et Canada uniquement Du lundi au vendredi de 9 h 17 h HNP anglais fran ai...

Страница 11: ...port e des enfants Il est recommand de se mettre deux pour effectuer l assemblage Tournevis cruciforme n cessaire pour les r glages optionnels non inclus Parts List Hardware List cabinet 1x pied 2 2x...

Страница 12: ...o te fix e l tag re Couper prudemment la sangle s curisant la bo te et enlever la bo te D baller toutes les pi ces et la quincaillerie sur une surface plane et douce S assurer de bien disposer de tout...

Страница 13: ...rs l int rieur vers le centre du cabinet Attacher le pied B ou C sans trop serrer en utilisant le boulon aa la rondelle de blocage bb la rondelle plate cc et la cl Allen dd Deux boulons sont n cessair...

Страница 14: ...mme le montre l image Attacher l tag re D sans trop serrer en utilisant le boulon aa la rondelle de blocage bb la rondelle plate cc et la cl Allen dd Une fois que tous les boulons ont t l g rement fix...

Страница 15: ...mment la console l endroit Ajuster chaque niveleur au besoin jusqu temps que le dessus soit plat S assurer que tous les niveleurs touchent au sol Noter le dessin ci dessous pour l emplacement du nivel...

Страница 16: ...de la face inf rieure de l tag re Mettre les vis de c t Enlever l tag re et la mettre de c t Mettre les supports d tag re au niveau d sir en s assurant qu ils sont tous au m me niveau Mettre l tag re...

Страница 17: ...eur de la console Fixer le premier support ff avec deux vis longues jj travers le mur et dans le poteau Attacher le c ble ee au support ff en utilisant la goupille fendue gg et la goupille de verouill...

Страница 18: ...accidents il est pr f rable de retenir les services d un professionnel pour la r paration de votre meuble Pour nettoyer et pousseter la surface utilisez un linge propre et doux Si un poli meuble est s...

Страница 19: ...ara preguntas y soporte relacionados al producto customerservice pikeandmain com 1 888 379 5633 nicamente Estados Unidos y Canad De lunes a viernes de 9 a m a 5 p m horario del oeste atenci n en ingl...

Страница 20: ...alcance de los ni os Dos personas se recomiendan para el ensamble Se necesita un destornillador Phillips para realizar los ajustes opcionales no se incluye Parts List Hardware List armario 1x pata 2...

Страница 21: ...al estante Corte con cuidado la correa utilizada para asegurar la caja y retire la caja Desempaque todas las piezas y los accesorios sobre una superficie plana y suave Confirme que est n todas las pie...

Страница 22: ...nte quede del lado de adentro hacia el centro del armario Fije la pata B o C sin ajustarla utilizando un tornillo aa una arandela de seguridad bb una arandela plana cc y la llave Allen dd Se necesitan...

Страница 23: ...spondientes de las patas B o C como se muestra Fije el estante D utilizando tornillos aa arandelas de seguridad bb arandelas planas cc y la llave Allen dd Cuando haya fijado sin ajustar todos los torn...

Страница 24: ...cada nivelador seg n sea necesario hasta que la parte superior est nivelada Aseg rese de que todos los niveladores est n en contacto con el suelo Tenga en cuenta la figura que se muestra a continuaci...

Страница 25: ...tante Ponga a un lado los tornillos Retire el estante y p ngalo a un lado Mueva los soportes del estante hacia el nivel deseado y aseg rese de colocar todos los soportes en el mismo nivel Coloque el e...

Страница 26: ...el borde superior de la consola Con dos tornillos largos jj fije el primer soporte ff a trav s del yeso al montante Fije el cable ee al soporte ff utilizando el pasador con cabeza gg y el pasador en R...

Страница 27: ...ional para reparar su mueble Para limpiar y sacudir la superficie use una tela limpia y suave Si prefiere cera para muebles pru bela en una zona escondida primero Cera de muebles no es necesaria No us...

Страница 28: ...28 P78 0000 00 00 SU 40 6 cm 16 in 16 po 91 4 cm 36 in 36 po 121 3 cm 47 75 in 47 75 po Made in Indonesia Fabriqu en Indon sie Hecho en Indonesia...

Отзывы: