


5 Installation
H-811 Hexapod Microrobot
MS235E
Version: 2.4.0
27
Fixing the data transmission cable with connector holder
1.
Attach the connector holder to the HD D-sub 78 connector (m) of the data transmission
cable that is permanently installed on the hexapod:
a)
Remove both hexagonal nuts from the screws of the connector.
b)
Fix the connector to the connector holder with the screws.
2.
Drill two M6 threaded holes into the underlying surface for mounting with M6x30
screws:
−
Pay attention to the arrangement of the two mounting holes in the connector
holder, see dimensional drawing (p. 72).
−
Put the connector holder on the underlying surface so that the data transmission
cable that is permanently installed to the hexapod, is
not
moved in your application
and is
not
subject to tensile stress.
3.
Fix the connector holder onto the underlying surface with the screws supplied.
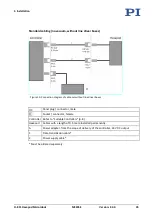
The free side of the connector holder is intended for the connection of a suitable data
transmission cable. Refer to "Connecting the Hexapod to the Controller" (p. 31) for
further information.
5.5
Mounting the Hexapod on a Surface
NOTICE
Impermissible mechanical load!
An impermissible mechanical load can damage the hexapod.
Only hold the hexapod by the base plate.
NOTICE
Warping the base plate!
Incorrect mounting can warp the base plate. A warped base plate reduces the accuracy.
Mount the hexapod onto a flat surface. The recommended flatness of the surface is 20 µm.
Requirements
You have read and understood the general notes on installation (p. 23).
Tools and accessories
Hex key 3.0 and six of the supplied M4x25 screws (p. 9)
Содержание H-811
Страница 8: ......
Страница 26: ......
Страница 46: ......
Страница 60: ......
Страница 77: ...10 Technical Data H 811 Hexapod Microrobot MS235E Version 2 4 0 73 Figure 12 H 811 hexapod I2 I2V S2 models...
Страница 78: ...10 Technical Data 74 Version 2 4 0 MS235E H 811 Hexapod Microrobot Figure 13 H 811 hexapod F2 model...
Страница 92: ......
Страница 96: ......
Страница 98: ......


