


MS242EK 2.1.0 10/2019. 2.0
Page 7 of 8
M O T I O N | P O S I T I O N I N G
4.
If necessary: Do the reference move for the
axis in the
Start up axes
step so that the
electronics know the absolute axis position.
a. Click the corresponding button to start
the reference move:
▪
▪
Ref. switch
: Reference move to the
reference point switch
▪
▪
Neg. limit
: Reference move to the
negative physical limit of the travel
range
▪
▪
Pos. limit
: Reference move to the po-
sitive physical limit of the travel range
b. If a message appears warning that the
servo mode is switched off: Click the
Switch on servo
button to switch the
servo mode on (closed-loop operation).
c. After a successful reference move, click
OK > Close
.
The main window of PIMikroMove opens.
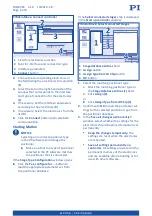
X
Test the motion of the axis several times.
a. Set the step size to a sensible value for
your test motion (
Step size
column,
1
).
b. Click the arrow buttons (
<
and
>
,
2
)
to start motion in the corresponding
direction with the selected step size.
Depending on the drive type and the load,
parameter changes may be necessary for fast,
precision positioning (see manual).
PIMikroMove: Main window
1 Step size
field
2
Arrow buttons
M O T I O N | P O S I T I O N I N G


