9 Mechanical and Optical Considerations
9.2
Adjusting the Back Focus
The back focus of your Photonfocus camera is correctly adjusted in the production of the
camera.
This section describes the procedure to adjust the back focus if you require that because e.g.
you are using a special lens.
1.
Screw a lens strongly into the camera’s C-mount ring.
2.
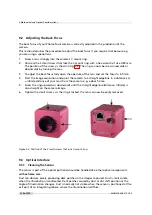
Unscrew the 3 small screws that lock the C-mount ring with a hex-wrench of size 0.89 mm.
The position of the screws is shown in Fig. 9.3. The ring can now be screwn upwards or
downwards by turning the lens.
3.
To adjust the back focus fully open the aperture of the lens and set the focus to infinite.
4.
Start the image acquisition and point the camera to a straight edge/line in a distance x (x
= infinite distance of your lens) from the camera, e.g. a door frame.
5.
Screw the ring upwards or downwards until the straight edge/line (distance: infinite) is
also straight on the camera image.
6.
Tighten the small screws. As the ring is locked, the lens can now be easily removed.
Figure 9.3: Position of the 3 small screws that lock C-mount.ring
9.3
Optical Interface
9.3.1
Cleaning the Sensor
The sensor is part of the optical path and should be handled like other optical components:
with extreme care
.
Dust can obscure pixels, producing dark patches in the images captured. Dust is most visible
when the illumination is collimated. Dark patches caused by dust or dirt shift position as the
angle of illumination changes. Dust is normally not visible when the sensor is positioned at the
exit port of an integrating sphere, where the illumination is diffuse.
112 of 127
MAN075 05/2017 V1.0
Содержание MV1-D2048-3D06 series
Страница 1: ...Photonfocus MV1 D2048 3D06 Camera Series 3D CMOS camera with GigE interface MAN075 05 2017 V1 0...
Страница 10: ...1 Preface 10 of 127 MAN075 05 2017 V1 0...
Страница 12: ...2 Introduction 12 of 127 MAN075 05 2017 V1 0...
Страница 16: ...3 How to get started 3D GigE G2 Figure 3 3 PFInstaller components choice 16 of 127 MAN075 05 2017 V1 0...
Страница 26: ...3 How to get started 3D GigE G2 26 of 127 MAN075 05 2017 V1 0...
Страница 32: ...4 Product Specification 32 of 127 MAN075 05 2017 V1 0...
Страница 66: ...5 Functionality 66 of 127 MAN075 05 2017 V1 0...
Страница 82: ...6 Precautions 82 of 127 MAN075 05 2017 V1 0...
Страница 120: ...12 Support and Repair 120 of 127 MAN075 05 2017 V1 0...
Страница 122: ...13 References 122 of 127 MAN075 05 2017 V1 0...
Страница 127: ...C Revision History Revision Date Changes 1 0 May 2017 First version MAN075 05 2017 V1 0 127 of 127...


