
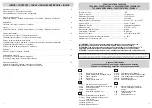

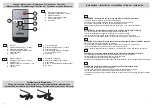


Installazione • Installation • Installation • Einbau • Instalación
I
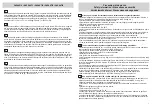
ATTENZIONE: Non installare l’unità in zone che possono ostacolare la visuale.
• Utilizzare esclusivamente le viti fornite nella dotazione.
• Fissare al tetto la piastra metallica, facente funzione da supporto all’unità.
• Rimuovere il tappo della vite, posto sulla parte destra dell’unità.
• Agganciare l’unità alla piastra fissata al tetto mediante le 4 viti fornite nella dotazione.
GB
ATTENTION: Do not install in areas which could compromise the driver’s visibility
• Do not use screws other than those supplied within the package
• Install the metal-plate, supposed to hold the Unit, on the car-ceiling
• Remove the tap covering the screw situated on the right handside of the Unit
• Fix the monitor to the plate mounted on the ceiling, by using the 4 supplied screws.
F
ATTENTION: Eviter d’installer l’unité dans un endroit empêchant la bonne visibilité de conduite
• N’ utiliser que les vis fournies dans la confection
• Fixer la plaque métallique (agissant comme support de l’unité) au ciel de la voiture
• Enlever le bouchon de la vis qui se trouve sur la droite de l’unité
• Fixer l’écran au support installé sur le plafond, en utilisant les 4 vis fournies dans la confection.
D
ACHTUNG: Gerät nicht an Stellen installieren, die die Fahrersicht behindern könnten.
• Die Befestigung ausschließlich mit den mitgelieferten Schrauben vornehmen.
• Metall-Halter, der das Gerät gut abstützt, am Dach anbringen
• Schraubenkappe, rechts auf dem Gerät, abnehmen
• Mittels den 4 beigelegten Schrauben, Bildschirm am Metallstück, auf dem Wagenhimmel, befestigen.
E
ATENCION: No instalar la unidad en un lugar que pueda obstaculizar la visión.
• Utilizar solo los tornillos que se suministran.
• Fijar al paño del techo la plancha metálica que hace de soporte para la unidad.
• Levantar el tapón del tornillo ubicado en la parte derecha de la unidad.
• Enganchar la unidad a la placa metálica fijada en el techo a través de 4 tornillos que se suministran
en dotación.
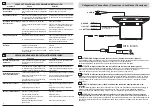
Funzioni telecomando • Remote control functions • Fonctions
télécommande • Fernsteuerungs-Funktionen • Funciones mando a distancia
I
1. Accensione / Spegnimento
2. Selezione Ingressi Video1 / Video 2
3. Regolazione Menù
4. Menù: Luminosità/Contrasto/
Timer/Lingua/Reset
5. Non attivo
1. ON / OFF
2. Select entries for Video 1 / Video 2
3. Access to regulation-Menu
4. Menù: Brightness-Contrast-Timer/
Language/Reset
5. Not active
1. Allumer / éteindre
2. Sélection entrée Vidéo 1 / Vidéo 2
3. Réglage Menù
4. Menù: Luminosité / Contraste / Timer
Langue / Reset
5 Pas actif
1. Ein- / Ausschalten
2. Wahl des Eingangs Video 1 / Video 2
3. Einstellung-Menü
4. Einstellung von Helligkeit / Kontrast
Timer / Sprache / Reset
5. Unbesetzt
1. Encendido / Apagado
2. Seleciona entrada Video1 / Video 2
3. Ajuste Menù
4. Menu: brillo/contraste/timer/lengua/reset
5. No activo
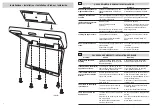
Sostituzione pila telecomando
Changing the reòote control battery • Remplacement batterie télécommande
Auswechseln der batterie der Fernbedienung • Sustitución bateria mando a distancia
CR 2025
GB
F
D
E
7
10
1
2
4
5
3


