background image

7. Working life

60

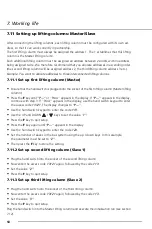
7.13 Install settings (configuration)

Use configuration to install the settings on the lifting column. You can, for example, determine 
the addresses for the interconnected lifting columns. The possible settings are explained in the ta-
ble in 7.14.

7.13.1 Basic configuration procedure

You must first enter an access code via the hand switch keypad and then a 3-digit code before 
you can adjust the desired setting.

The access code must only be entered once and is then fixed until the mains plug is pulled out.

All entries must be made within 5 seconds, because the [lifting column] then quits configuration.

To store a setting, the 

F

 key must be pressed.

Press the F key three times (see section 7.7). If the access code has still not been entered, 

"

PArA" 

appears in the display. 

Enter the access code 

13121

6-key handswitch: Press the keys in this sequence: I - III - I - II - I
8-key remote hand switch: Press the keys in this sequence: 1-3-1-2-1
If the access code has been entered correctly, 

"

P---" 

appears in the display.

Now use the hand switch to enter the 3-digit code (e.g. 

213

 for the height indication) in order 

to install the desired setting.

Install the setting by pressing the 

UP 

and 

DOWN


 / 

 keys.

Press the 

key to store the setting. To quit configuration, press the 

F

 key again or wait for 5 

seconds.

Settings may only be adjusted if the lifting columns are at rest.

Содержание Rose+Krieger RKPowerlift M Memory

Страница 1: ...Memory Synchro 2 EN Assembly Instructions RKPowerlift M Memory Memory Synchro 34 FR Notice d assemblage RKPowerlift M Memory Memory Synchro 66 ES Instrucciones de montaje RKPowerlift M Memory Memory S...

Страница 2: ...7 4 Verwendung Bedienpersonal 4 1 Bestimmungsgem e Verwendung 8 4 2 Vern nftigerweise vorhersehbare Fehlanwendungen 8 4 3 Wer darf diese Hubs ule verwenden montieren und bedienen 8 5 Sicherheit 5 1 Si...

Страница 3: ...Speichertaste ablegen 22 7 8 4 Gespeicherte Position anfahren 22 7 9 Inbetriebnahme der Hubs ule 23 7 9 1 Inbetriebnahme einer einzelnen Hubs ule 23 7 9 2 Inbetriebnahme mehrerer Hubs ulen 24 7 10 Hub...

Страница 4: ...ange wandt und erf llt 1 1 5 1 3 2 1 3 3 1 3 4 1 3 7 1 3 8 4 1 2 3 4 1 3 4 3 2 Ferner wird erkl rt dass die speziellen technischen Unterlagen gem Anhang VII Teil B erstellt wurden Es wird ausdr cklic...

Страница 5: ...h oder in Papierform Die gewerblichen Schutzrechte bleiben hiervon unber hrt Wichtiger Hinweis Die unvollst ndige Maschine darf erst dann in Betrieb genommen werden wenn gegebenenfalls festgestellt wu...

Страница 6: ...bei Gefahren zu vermeiden Ausfallzeiten zu verhindern und die Lebensdauer dieses Produktes zu gew hrleisten bzw zu erh hen Gefahrenhinweise Sicherheitsbestimmungen sowie die Angaben in dieser Montagea...

Страница 7: ...uellen Versionsstand der Hubs ule k nnen nicht geltend gemacht werden Bei Fragen geben Sie bitte die Angaben auf dem Typenschild an Unsere Anschrift RK Rose Krieger GmbH Postfach 1564 32375 Minden Ger...

Страница 8: ...aupunkt Einsatz in R umen mit explosionsf higer Atmosph re nach ATEX Richtlinie Einsatz bei nicht ausreichender Befestigung der Hubs ule Einsatz auf unzureichend sicherem Untergrund Einsatz in Umgebun...

Страница 9: ...rt werden Die allgemeinen nationalen oder betrieblichen Sicherheitsvorschriften sind zu beachten Die Zu st ndigkeiten bei der Verwendung Montage und Bedienung dieser Hubs ule m ssen unmissver st ndlic...

Страница 10: ...eichnete Angaben in dieser Montageanleitung gelten Ihrer besonderen Auf merksamkeit Sie erhalten wichtige Hinweise zu Funktionen Einstellungen und Vorgehensweisen Das Nichtbeachten kann zu Personensch...

Страница 11: ...r der direkt an der S ule angeschlossen wird verfahren Neben dem manuellen Verfahren der Hubs ule k nnen auch Positionen gespeichert und auf Ta stendruck angefahren werden Hubs ule mit interner Steuer...

Страница 12: ...wird die Schutzart IP 30 erreicht Der Einbau der RK SyncFlex Adapterplatten erzielt die Schutzart IP 20 Hubgeschwindigkeit max 8 13 mm s siehe Typenschildetikett Leistung Einbautrafo 75 VA Einschaltd...

Страница 13: ...Befestigen der Hubs ule 2 Anschluss f r Handschalter 3 Netzanschluss 230 V 4 Halter f r Prim rsicherung 5 ausfahrendes Innenprofil 6 Ger testeckdose 230 V AC max 2 5 A nur bei Hubs u len Sonderausf h...

Страница 14: ...d unverz glich dem Verantwortlichen und der RK Rose Krieger GmbH zu melden Die Inbetriebnahme besch digter Hubs ulen ist untersagt F r die Lagerung der Hubs ulen vorgeschriebene Umgebungsbedingungen k...

Страница 15: ...ngebrachten Si cherheitshinweise Der Anwender muss sicherstellen dass bei gestecktem Netzstecker keine Gef hrdung ent steht Die Hubs ule darf bei Benutzung nicht durch Seitenkr fte zu Fall gebracht we...

Страница 16: ...er auch m glich dass durch Fertigungstoleranzen die Hubs ulen im zusammengefahrenen Zustand unter schiedliche H he aufweisen In diesem Fall k nnen bei eini gen Hubs ulen die Endschalter in der H he ju...

Страница 17: ...f gige H henunterschiede von der Tischkonstrukti on ausgeglichen werden k nnen Deshalb ist es sinnvoll wenn die Verbindung zwischen Hub s ule und Tischrahmen ein wenig drehbar gelagert ist oder die Ti...

Страница 18: ...ne Einschraubtiefe betr gt mindestens 20 mm das empfohlene Anzugsmoment 15 Nm Zur sicheren Standfestigkeit ist ein ausreichend dimensionierter Unterbau zur Aufnahme der an gegebenen maximalen Druck un...

Страница 19: ...nen Sie mit dem Handschalter benutzerspezifische Positionen speichern und Einstellungen vornehmen Der Handschalter ist ausschlie lich f r den Gebrauch in geschlossenen R umen zugelassen Beachten Sie d...

Страница 20: ...ung des 8 Tasten Funkhandschalters erfolgt in gleicher Weise wie beim 6 Tasten Handschalter 1 Funktionstaste Ausw hlen und Anzeigen von Einstellungen z B eines Nutzers oder einer Position 2 Hubs ule A...

Страница 21: ...ositionen gefahren werden muss 7 8 1 Positionen speichern Das Speichern einer Position erfolgt in zwei Schritten Im ersten Schritt weist sich der Nutzer ber eine Benutzer ebene zu Im zweiten Schritt w...

Страница 22: ...piel Sie wollen die gespeicherte Position 50 P per Speichertaste anfahren Die Position ist in der Benutzerebene 1 auf der Speichertaste 2 abgelegt Dr cken Sie die Taste F so oft bis im Display die zul...

Страница 23: ...genommen werden Die Hubs ule in der Variante Memory synchro kann sowohl einzeln als auch im Verbund mit mehreren Hubs ulen glei cher Ausf hrung verwendet werden 7 9 1 Inbetriebnahme einer einzelnen Hu...

Страница 24: ...en 7 stecken siehe Kapitel 7 10 1 Setzen Sie die Abschlussstecker in die freie Ab schlussbuchse der jeweils ersten und letzten Hubs u le siehe Kapitel 7 10 1 Stellen Sie die Reihenfolge der Hubs ulen...

Страница 25: ...setzen Stecken Sie nach dem Verbinden der Hubs ulen die Abschlussstecker in die erste und letzte Hubs ule siehe Bild Erst durch das Setzen der Abschlussstecker k nnen die miteinander ver bundenen Hub...

Страница 26: ...d des Handschalters den Zugangscode 13121 ein Die Anzeige wechselt auf P Geben Sie ber das Tastenfeld des Handschalters den Code 113 ein Stellen Sie mit den AUF und AB Tasten den Wert 1 ein Dr cken Si...

Страница 27: ...den Netzstecker ein und warten Sie ca 5 Sekunden Hinweis Im Display des Handschalters erscheint die Softwareversion z B 0217 der an geschlossene S ulentyp z B 20 und In d Lassen Sie die AB Taste los...

Страница 28: ...erung verlassen wird Um eine Einstellung zu speichern muss die Taste F gedr ckt werden Dr cken Sie drei Mal die Taste F siehe Kapitel 7 7 Wenn der Zugangscode noch nicht ein gegeben wurde erscheint im...

Страница 29: ...Steuerungen im Bussystem einstellen 133 Basish he des eingefahrenen Antriebs einstellen Das Display des Handschalters zeigt anschlie end die Basish he an Der Parameter 213 muss zuvor von Prozent auf...

Страница 30: ...dern Eigenm chtige Umbauten oder Ver nderungen der Hubs ule sind aus Sicherheitsgr nden nicht gestattet Sicherheitsrelevante Einrichtungen m ssen regelm ig mindestens einmal pro Jahr auf ihre Vollst n...

Страница 31: ...as Benutzen von ungeeigneten Sicherungen oder das Reparieren von Sicherungen kann einen Brand verursachen zu Verletzungen und zu Unf llen f hren und die Hub s ule besch digen Trennen Sie die Hubs ule...

Страница 32: ...ken Sie ihn nach 30 Sekunden Wartezeit wieder ein Ab Firmware 2 16 Die Fehlermeldung liegt an solange die Unterspannung in der Steuerung erkannt wird E010 W hrend des Betriebes wurde die Anzahl der Hu...

Страница 33: ...mit dem Parameter 123 berein Pr fen Sie die Verbindungskabel und den eingestellten Wert im Parameter 123 Starten Sie anschlie end eine Initialisierungsfahrt an der Master Steuerung E920 nur Slave Ein...

Страница 34: ...tallation instructions language 39 3 4 Copyright 39 4 Use Operators 4 1 Proper use 40 4 2 Reasonably predictable improper use 40 4 3 Who can use install and operate this lifting column 40 5 Safety 5 1...

Страница 35: ...g users 53 7 8 3 Place position on a hot key 54 7 8 4 Drive up to stored position 54 7 9 Commissioning the lifting column 55 7 9 1 Commissioning a single lifting column 55 7 9 2 Commissioning a number...

Страница 36: ...chine Directive 2006 42 EC are applied and met 1 1 5 1 3 2 1 3 3 1 3 4 1 3 7 1 3 8 4 1 2 3 4 1 3 4 3 2 Moreover we declare that the special technical documents have been created according to An nex VI...

Страница 37: ...electronic or paper format The commercial protective rights remain unaffected by this Important note The partially completed machine must only be put into operation once if re quired it has been dete...

Страница 38: ...structions will help you to avoid hazards to prevent down time and to guarantee and increase the working life of this product Notes on hazards safety regulations and the information in these installat...

Страница 39: ...tions to the current version of the lifting column will not be accepted If you have any questions quote the information on the maker s plate Our address RK Rose Krieger GmbH Postfach 1564 32375 Minden...

Страница 40: ...high relative humidity dewpoint Use in rooms with a potentially explosive atmosphere as defined in the ATEX directive Use when the lifting column is not sufficiently fixed Use on an insufficiently fi...

Страница 41: ...ral national and operating safety regulations are to be obeyed Responsibilities for the use installation and operation of this lifting column must be regulated unambiguously and obeyed in order that t...

Страница 42: ...ervant Information in these installation instructions is for your individual attention It provides you with important information on functions settings and procedures Fai lure to obey may lead to pers...

Страница 43: ...itch that is connected directly to the column In addition to manual movement of the lifting column positions can also be stored and driven to at the press of a key Lifting column with internal control...

Страница 44: ...faces achieve the protection class IP 30 Installation of the RK SyncFlex adapter plates achieve the protection class IP 20 Lifting speed max 8 13 mm s see maker s plate Built in transformer power 75 V...

Страница 45: ...r fixing the lifting column 2 Connection for hand switch 3 Mains supply 230V 4 Holder for primary fuse 5 Telescopic inner section 6 Plug 230V AC max 2 5 A only available for special versions of the li...

Страница 46: ...torage is to be reported to the line manager and to RK Rose Krieger GmbH immediately It is forbidden to start up damaged lifting columns The following environmental conditions are laid down for liftin...

Страница 47: ...g co lumn The user must ensure that there is no danger when the mains plug is in position It must not be possible for the lifting column to fall over in use due to lateral forces When designing tables...

Страница 48: ...ght However it is also possible that production tolerances mean that the lifting columns are at different heights in the driven up state In this case the limit switches on some lifting col umns can be...

Страница 49: ...or slight height differences by table design Therefore it is sensible if the connection between lifting column and table frame is supported so that slight rotation is possible or that the table plate...

Страница 50: ...available in the internal and external sections The recommended bolt depth is at least 20 mm and the recommended torque 15 Nm For guaranteed rigidity it is essential to stipulate an adequately dimens...

Страница 51: ...ive lifting columns with the hand switch You can also store user specific positions and perform settings with the hand switch Use of the hand switch is permitted only in sealed rooms Observe the instr...

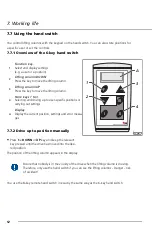
Страница 52: ...key remote hand switch in exactly the same way as the 6 key hand switch 1 Function key Select and display settings e g a user or a position 2 Lifting column DOWN Press the key to move the lifting colu...

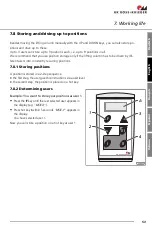
Страница 53: ...be driven by dif ferent users into constantly recurring positions 7 8 1 Storing positions A position is stored in a 2 step sequence In the first step the user gives his instructions via a user level I...

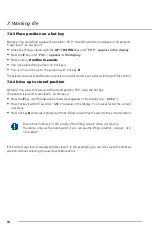
Страница 54: ...o stored position Example You want to drive up to the stored position 50P using the hot key The position is placed in user level 1 on hot key 2 Press the F key until the last selected user level appea...

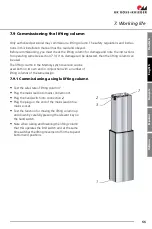
Страница 55: ...n the Memory synchro version can be used both on its own and in conjunction with a number of lifting columns of the same design 7 9 1 Commissioning a single lifting column Test the safe state of lifti...

Страница 56: ...ket 7 see section 7 10 1 Put the termination plug into the free termination socket of the first and last lifting columns in each case see section 7 10 1 Set the column sequence see Section 7 11 Carry...

Страница 57: ...necting the lifting columns plug the termination plugs into the first and last lifting columns see picture Only after fitting the termination plugs can you work with the inter connected lifting column...

Страница 58: ...isplay If P appears in the display continue with step 3 If PArA appears in the display use the hand switch keypad to enter the access code 13121 The display changes to P Use the hand switch keypad to...

Страница 59: ...or about 5 seconds Note The software release e g 0217 the lift column type connected e g 20 and In d appears in the hand switch display Release the DOWN key Press the DOWN key again and keep it presse...

Страница 60: ...ifting column then quits configuration To store a setting the F key must be pressed Press the F key three times see section 7 7 If the access code has still not been entered PArA appears in the displa...

Страница 61: ...bus system 133 Set the base height of the retracted drive The display on the hand switch then shows the base height Parameter 213 must be switched from percentage to milimetre display prior to this 21...

Страница 62: ...must be isolated from the mains first to prevent any risk of injury Independent conversions of or changes to the lifting column are not permitted on safety grounds Safety related devices must be check...

Страница 63: ...o the lifting column until it engages securely 1 2 3 Using unsuitable fuses or repairing fuses can cause a fire lead to injuries and acci dents and damage the lifting column Always isolate the lifting...

Страница 64: ...ait for 30 seconds and plug it back in again From Firmware 2 16 and later The error message stays on while low voltage is still detected in the control unit E010 The number of lifting columns has been...

Страница 65: ...number of slave controls detected does not correspond with the parameter 123 Check the connecting cable and the value set in pa rameter 123 Then start the initialisation run on the master control E920...

Страница 66: ...uteur 71 4 Utilisation Utilisateur 4 1 Utilisation conforme aux instructions 72 4 2 Mauvaise utilisation raisonnablement pr visible 72 4 3 Personnes autoris es utiliser monter et manier cette colonne...

Страница 67: ...che m moire 86 7 8 4 Rejoindre une position enregistr e 86 7 9 Mise en service de la colonne t lescopique 87 7 9 1 Mise en service d une seule colonne t lescopique 87 7 9 2 Mise en service de plusieur...

Страница 68: ...ne 2006 42 EG ont t utilis es et remplies 1 1 5 1 3 2 1 3 3 1 3 4 1 3 7 1 3 8 4 1 2 3 4 1 3 4 3 2 Il a en outre t d clar que les documents techniques sp ciaux ont t cr s conform ment l Annexe VII part...

Страница 69: ...s ac cord au format lectronique ou papier Les droits de propri t industrielle restent inchang s Remarque importante La quasi machine ne doit tre mise en service que lorsqu il a t constat que la machin...

Страница 70: ...es dangers viter les temps morts et garantir ou allonger la dur e de vie de ce produit Les remarques de s curit les dispositions relatives la s curit ainsi que les indications de cette instruction de...

Страница 71: ...ur la non livraison de ver sions ant rieures ou pour les adaptations aux versions actuelles des colonnes t lescopiques En cas de questions merci de toujours nous donner les indications figurant sur la...

Страница 72: ...ilisation dans des locaux risque d explosion selon les directives ATEX Utilisation avec fixation insuffisante de la colonne t lescopique Utilisation sur une surface insuffisamment stable Utilisation d...

Страница 73: ...s curit g n rales nationales ou internes l entreprise doivent tre respect es Les responsabilit s lors de l utilisation du montage ou du maniement de cette colonne t lesco pique doivent tre d finies sa...

Страница 74: ...dans cette notice de montage doivent retenir votre attenti on toute particuli re Elles vous fournissent d importantes remarques sur les fonctionnalit s les r glages et la marche suivre Le non respect...

Страница 75: ...ndes manuelles de la colonne t lescopique des positions peuvent galement tre enregistr es et rappel es par simple pression sur la commande Colonnes t lescopiques avec une commande interne m moire sync...

Страница 76: ...stallation et de pose Le montage des plaques d adaptation RK SyncFlex permet d atteindre le type de protection IP 20 Vitesse de d placement max 8 13 mm voir plaque signal tique Puissance du transforma...

Страница 77: ...ique 2 Branchement pour int rupteur manuel 3 Branchement r seau 230 V 4 Support pour les fusibles primaires 5 Profil int rieur mobil 6 Prise de courant 230 V AC max 2 5 A uniquement dis ponible pour d...

Страница 78: ...s s lors du transport doivent tre imm diatement signal s RK Rose Krieger GmbH La mise en service de colonnes t lescopiques d fectueuses est interdite Conditions environnementales prescrites pour le st...

Страница 79: ...qu il n y aucun de danger lorsqu une prise r seau est branch e La colonne t lescopique en service ne doit pas pouvoir tomber du fait d une force lat rale Lors de la construction de tables etc il est n...

Страница 80: ...le que les colonnes t lescopiques re group es pr sentent des diff rences de niveaux dues aux to l rances constructives Dans ce cas la hauteur des interrupteurs de fin de course de certaines colonnes t...

Страница 81: ...viter les carts de la nor me C est pourquoi il est judicieux que la liaison entre la colonne t lescopique et le plateau de ta ble soit l g rement tournante ou que le plateau de table pr sente une flex...

Страница 82: ...vissage pr conis e est d au moins 20 mm le couple de serrage pr conis est d au moins 15 Nm Il est absolument n cessaire de pr voir un soubassement suffisamment dimensionn pour amor tir les charges ma...

Страница 83: ...plus vous pouvez enregistrer les positions sp cifiques l utilisateur et les param trer avec le commutateur manuel L utilisation du commutateur manuel est autoris e exclusivement dans des lieux ferm s...

Страница 84: ...celle du commuta teur manuel 6 touches 1 Touche de fonction Choix et affichage des param tres ex d un utilisateur ou d une position 2 Colonne t lescopique vers le bas La colonne t lescopique se d plac...

Страница 85: ...tivement par plusieurs utilisateurs 7 8 1 Enregistrer des positions L enregistrement d une position se fait en deux tapes Dans la premi re tape l utilisateur se connecte un niveau d utilisateur Dans l...

Страница 86: ...Vous souhaitez rejoindre la position enregistr e 50 P l aide des touches m moires La position du niveau d utilisateur 1 est d finie sur la touche m moire 2 Appuyez plusieurs fois sur la touche F jusqu...

Страница 87: ...t tre mise en service La colonne t lescopique dans la variante m moire synchro peut tre aussi bien utilis e seule qu en liaison avec plu sieurs colonnes t lescopiques de m me nature 7 9 1 Mise en serv...

Страница 88: ...n bran chant les c bles de liaison dans le bo tier de jonction 7 voir chapitre 7 10 1 Ins rez le connecteur terminal dans la prise terminale libre de la premi re et derni re colonne voir chapitre 7 10...

Страница 89: ...re colonne t lescopique voir image Les colonnes t lescopiques reli es entre elles mais ne peuvent fonctionner ensemble qu apr s la mise en place des prises terminales 3 Etape Param trer les colonnes t...

Страница 90: ...l tape 3 Si l cran affiche PArA entrez le code d acc s 13121 l aide du clavier du commutateur manuel L affichage change et devient P Entrez le code 113 l aide du clavier du commutateur manuel Entrez l...

Страница 91: ...rsion du logiciel ex 0217 le type de colonne branch ex 20 et In d s affichent sur l cran du commutateur manuel Rel chez la touche BAS Appuyez de nouveau sur la touche BAS et maintenez l enfonc jusqu c...

Страница 92: ...rr te Afin d enregistrer le param trage appuyer sur la touche F Appuyez trois fois sur la touche F voir chapitre 7 7 Si le code d acc s n a pas encore t saisi l cran affiche ParA Saisissez le code d a...

Страница 93: ...bus 133 R gler la hauteur de base de l entra nement rentr L cran de la t l commande indique la hauteur de base Le param tre 213 doit d abord tre r gl d affichage en pourcentage millim tre 211 D marrer...

Страница 94: ...e s curit toute transformation arbitraire ou modification de la colonne t lescopique est interdite Les installations relevant de la s curit doivent tre v rifi es r guli rement au moins une fois par an...

Страница 95: ...qu ce qu il s encoche 1 2 3 L utilisation de fusibles inappropri s ou la r paration de fusibles peut provoquer un in cendie des blessures ou des accidents et peut d grader la colonne t lescopique D br...

Страница 96: ...et rebranchez la apr s 30 secondes d attente firmware 2 16 Tant que la sous tension est d tect e dans la commande le message d erreur s affichera E010 Le nombre de colonnes t lesco piques a t modifi...

Страница 97: ...ment Le nombre de commandes esclaves reconnu ne correspond pas au param tre 123 V rifiez le c ble de raccordement et la valeur d finie dans le param tre 123 Lancez ensuite une course d initialisation...

Страница 98: ...taje 103 3 4 Derecho de propiedad intelectual 103 4 Uso Personal de servicio 4 1 Uso conforme a lo prescrito 104 4 2 Usos incorrectos previsibles 104 4 3 Qui n debe utilizar montar y manejar esta colu...

Страница 99: ...tecla de memoria 118 7 8 4 Acceso a una posici n memorizada 118 7 9 Puesta en marcha de la columna elevadora 119 7 9 1 Puesta en marcha de una columna elevadora individual 119 7 9 2 Puesta en marcha d...

Страница 100: ...Se han empleado y cumplido los siguientes requisitos b sicos de la Directiva de M quinas 2006 42 CE 1 1 5 1 3 2 1 3 3 1 3 4 1 3 7 1 3 8 4 1 2 3 4 1 3 4 3 2 M s adelante se explica que la documentaci n...

Страница 101: ...a ent rega se realizar previa consulta en forma electr nica o impresa Los derechos de propiedad industrial permanecen intactos Nota importante la m quina incompleta solo debe ponerse en funcionamiento...

Страница 102: ...e ayudar n a evitar peligros prevenir periodos inactivos y garantizar o bien aumentar la vida til de este producto Los avisos de peligro las normas de seguridad y los datos de estas instrucciones de m...

Страница 103: ...posibilidad de env o de versiones anteriores o sobre adapta ciones a las versiones actuales de la columna elevadora En las consultas indique los datos que se encuentran en la placa identificadora de...

Страница 104: ...el aire punto de roc o Empleo en salas con atm sfera potencialmente explosiva conforme a la Directiva ATEX Uso con columna elevadora insuficientemente fijada Empleo sobre una base poco segura Uso fuer...

Страница 105: ...normas de seguridad generales nacionales o de la empresa Las competencias de uso montaje y manejo de esta columna elevadora deben regularse y respetarse sin equ vocos para que no surjan competencias...

Страница 106: ...on especial atenci n Debe prestar mucha atenci n a los datos de estas instrucciones de montaje que est n se alizados Le proporcionan indicaciones importantes sobre funciones ajustes y procedimientos L...

Страница 107: ...interruptor manual que est directamente conectado a la columna Adem s del ajuste manual de la columna elevadora tambi n se pueden memorizar posiciones y acceder a ellas pulsando un bot n Columna elev...

Страница 108: ...n IP 30 Con la incorporaci n de las placas adaptadoras RK SyncFlex se consigue el tipo de protec ci n IP 20 Velocidad de elevaci n m x 8 13 mm s ver etiqueta de la placa identificadora de tipo Potenci...

Страница 109: ...le vadora 2 Conexi n para el interruptor manual 3 Conexi n de red de 230 V 4 Portafusibles para fusible primario 5 Perfil interior extensible 6 Caja de enchufe 230 V CA m x 2 5 A s lo disponible en co...

Страница 110: ...ransporte y el almacenamiento deben informarse inmediata mente al responsable y a RK Rose Krieger GmbH Se proh be la puesta en marcha de columnas elevadoras da adas Condiciones externas prescritas par...

Страница 111: ...columna elevadora El usuario debe asegurarse de que no resulte peligroso que el enchufe de corriente est conectado Durante el uso la columna elevadora no debe poder tumbarse por fuerzas laterales En...

Страница 112: ...las columnas elevador as tengan diferentes alturas por las tolerancias de fabricaci n cuando est n chocando En este caso en algunas columnas elevadoras se puede ajustar la altura del interruptor de fi...

Страница 113: ...on strucci n de la mesa Por eso resulta conveniente cuando la uni n entre la columna elevadora y el marco de la mesa tiene un apoyo apenas giratorio o la placa de la mesa tiene la flexibilidad necesar...

Страница 114: ...ad de atornillado recomendada es de como m nimo 20 mm y el par de apriete de 15 Nm Para una estabilidad segura es imprescindible contar con una base de tama o adecuado para so portar la fuerzas de pre...

Страница 115: ...r manual Adem s con el interruptor manual se pueden memorizar posiciones espec ficas del usuario y efectuar ajustes S lo se permite el uso del interruptor manual en espacios cerrados Tener en cuenta l...

Страница 116: ...mbrico de 8 teclas es igual al del interruptor manual de 6 teclas 1 Tecla de funci n Seleccionar y mostrar los ajustes por ejemplo de un usuario o de una posici n 2 Columna elevadora ABAJO La columna...

Страница 117: ...elevadora a posiciones recurrentes 7 8 1 Memorizaci n de posiciones La memorizaci n de una posici n se realiza en dos pasos En el primer paso el usuario se autoasigna un nivel de usu ario En el segund...

Страница 118: ...der a la posici n 50 P mediante una tecla de memoria La posici n ha sido asignada a la tecla de memoria 2 en el nivel de usuario 1 Pulse la tecla F varias veces hasta que en el visualizador aparezca e...

Страница 119: ...la variante Memory synchro se puede utilizar individualmente o junto con varias columnas elevadoras del mismo modelo 7 9 1 Puesta en marcha de una columna elevadora individual Verificar la seguridad...

Страница 120: ...r el cap tulo 7 10 1 Introducir los conectores terminales en el borne ter minal libre de la primera y de la ltima columna ele vadora ver el cap tulo 7 10 1 Ajustar el orden de las columnas elevadoras...

Страница 121: ...olumnas elevadoras insertar el conector terminal en la primera y en la ltima columna elevadora ver la imagen Una vez colocado el conector terminal las colum nas elevadoras podr n trabajar conjuntament...

Страница 122: ...ducir el c digo de acceso 13121 con el teclado del interruptor manual El mensaje cambia a P Introducir el c digo 113 con el teclado del interruptor manual Con las teclas de ARRIBA y ABAJO ajustar el v...

Страница 123: ...isualizador del interruptor manual aparece la versi n del software por ejemplo 0217 el tipo de columna conectado por ejemplo 20 y In d Soltar la tecla ABAJO Pulsar nuevamente la tecla ABAJO y mantener...

Страница 124: ...ar la parametrizaci n Para guardar un ajuste se debe pulsar la tecla F Pulsar tres veces la tecla F ver el cap tulo 7 7 Cuando a n no se ha introducido el c digo de acceso en el visualizador aparece P...

Страница 125: ...3 Ajustar la altura base del accionamiento retra do A continuaci n el display del interruptor manual muestra la altura base Previamente debe cambiarse la indicaci n del par metro 213 de porcentajes a...

Страница 126: ...e seguridad se proh ben las reformas o las modificaciones arbitrarias de la columna elevadora Los dispositivos importantes para la seguridad deben comprobarse al menos una vez al a o a fin de verifica...

Страница 127: ...adora hasta que encastre 1 2 3 El uso de fusibles inadecuados o la reparaci n de fusibles pueden ocasionar un incen dio producir lesiones y accidentes y da ar la columna elevadora Desconectar la colum...

Страница 128: ...rlo tras esperar 30 segundos A partir del Firmware 2 16 Los avisos de fallo se ajustan en tanto que el sistema de control reconozca la tensi n baja E010 Se ha modificado la can tidad de columnas ele v...

Страница 129: ...no coincide con el par me tro 123 Revise el cable de conexi n y el valor ajustado en el par metro 123 Ejecute despu s un proce so de inicializaci n en el control maestro E920 s lo slave Un sistema de...

Страница 130: ...montaggio 135 3 4 Diritti 135 4 Utilizzo Personale di servizio 4 1 Utilizzo conforme alla destinazione d uso 136 4 2 Uso scorretto ragionevolmente prevedibile 136 4 3 Utenti montatori e personale di s...

Страница 131: ...ioni sui tasti 150 7 8 4 Avviare le posizioni memorizzate 150 7 9 Messa in servizio delle colonne telescopiche 151 7 9 1 Messa in servizio di una singola colonna telescopica 151 7 9 2 Messa in servizi...

Страница 132: ...2006 41 CE sono applicati e soddis fatti 1 1 5 1 3 2 1 3 3 1 3 4 1 3 7 1 3 8 4 1 2 3 4 1 3 4 3 2 Si dichiara altres che la documentazione tecnica speciale stata redatta come da Allegato VII Par te B...

Страница 133: ...onica o cartacea secondo quanto pattuito Sono fatti salvi i diritti di propriet industriale Avviso importante La quasi macchina pu essere messa in esercizio soltanto se stato accertato che la macchina...

Страница 134: ...ridurre tempi morti aumentare e garantire la durata di questo prodotto Rispettare le indicazioni di pericolo le misure di sicurezza e i dati di queste istruzioni di montaggio senza eccezioni Qualsiasi...

Страница 135: ...tti o altre pretese di fornitura di versioni precedenti o adattamenti alle versioni attuali delle colonne te lescopiche nei confronti di RK Rose Krieger GmbH In caso di domande indicare i dati present...

Страница 136: ...ll aria punto di rugiada Impiego in ambienti con atmosfera esplosiva secondo la direttiva ATEX Impiego con fissaggio inadeguato della colonna telescopica Impiego su fondo non sufficientemente sicuro I...

Страница 137: ...rme di sicurezza generali nazionali o aziendali Le competenze per l utilizzo il montaggio ed il servizio della colonna telescopica devono essere definite chiaramente ed osser vate per evitare incertez...

Страница 138: ...re particolare attenzione ai dati contrassegnati in queste istruzioni di montaggio che contengono dati importanti relativi alle funzioni regolazioni e procedure L inosservanza pu provocare danni alle...

Страница 139: ...ttore manuale collegato direttamente alla colonna telescopica avvia il processo Oltre al meccanismo manuale anche possibile memorizzare posizioni con l avvio premendo sui tasti Colonne telescopiche co...

Страница 140: ...IP 30 Il montaggio delle piastre adattatrici RK SyncFlex consente di ottenere il grado di protezione IP 20 Velocit corsa max 8 13 mm s vedi targhetta tipo Potenza del trasformatore di mon taggio 75 V...

Страница 141: ...he 2 Attacco per l interruttore manuale 3 Alimentazione elettrica 230 V 4 Supporto per sicura primaria 5 Profilo d uscita interno 6 Presa a spina dell utensile 230 V AC max 2 5 A pre sente solo sulle...

Страница 142: ...r GmbH i danni provocati dal trasporto e dall immagazzinaggio E vietata la messa in servizio di colonne telescopiche danneggiate Per l immagazzinaggio delle colonne telescopiche attenersi alle condizi...

Страница 143: ...er la colonna tele scopica L utente deve verificare l assenza di pericolo in caso di spina di collegamento inserita Durante l impiego impedire la caduta della colonna telescopica dovuta a forze agenti...

Страница 144: ...ssibile che colonne telescopiche funzionanti con giuntamente presentino altezze differenti per via delle tolle ranze costruttive in questo caso occorre verificare gli interruttori finali 7 3 3 Allinea...

Страница 145: ...if ferenze di altezza Quindi una piccola rotazione nel raccordo tra colonna telescopica e telaio de lla tavola o un inevitabile flessibilit della piastra della tavola ragionevolmente ammissibile Evita...

Страница 146: ...i fissaggio raccomandata di almeno 20 mm il momento d avviamento di 15Nm Per la stabilit necessario prevedere una sottostruttura sufficientemente dimensionata per sop portare le forze di compressione...

Страница 147: ...le si attivano le colonne telescopiche Inoltre si possono memorizzare posizioni specifiche per l utente e eseguire regolazioni L interruttore manuale ammesso esclusivamente per l impiego in spazi chiu...

Страница 148: ...zza allo stesso modo dell interruttore manuale a 6 ta sti 1 Tasto di funzione Selezione e segnalazione di regolazioni es di un utente o di una posizione 2 Colonna telescopica GIU La colonna telescopic...

Страница 149: ...te le stesse posizioni 7 8 1 Salvare le posizioni Il salvataggio di una posizione avviene in due fasi Nella prima fase occorre registrarsi su un livello utente Nella seconda fase si memorizza la posiz...

Страница 150: ...pio si vuole avviare la posizione memorizzata 50 P con il tasto di memoria La posizione memorizzata per l utente 1 sul tasto di memoria Premere pi volte il tasto F fino a quando sul display non compar...

Страница 151: ...a colonna telescopica La colonna telescopica della variante Memory Synchro pu essere utilizzata singolarmente oppure insieme con pi co lonne telescopiche di uguale esecuzione 7 9 1 Messa in servizio d...

Страница 152: ...gli attacchi 7 vedi capitolo 7 10 1 Inserire la spina di chiusura nella presa libera della prima e dell ultima colonna telescopica vedi capito lo vedi capitolo 7 10 1 Allineare la serie di colonne tel...

Страница 153: ...e telescopiche le spine nella prima e nell ultima co lonna vedi figura Soltanto dopo l inserimento delle spine le colonne telescopiche collegate possono lavorare insieme 3 Fase Regolare le colonne tel...

Страница 154: ...n i tasti dell interruttore manuale il codice d accesso 13121 Il messaggio diventa P Inserire con i tasti dell interruttore manuale il codice 113 Regolare con i tasti SU e GIU il valore 1 Premere il t...

Страница 155: ...ione sul displaydell interruttore manuale compare la versione del software es 0217 del tipo di colonna collegata es 20 e In d Lasciare libero il tasto GIU Premere il tasto GIU e mantenerlo premuto fin...

Страница 156: ...parametraggio li elimina Per memorizzare una regolazione premere il tasto F Premere tre volte il tasto F vedi capitolo 7 7 Quando il codice d accesso non stato ancora immesso compare sul display PArA...

Страница 157: ...nto retratto Successivamente il display del telecomando visualizza l altezza base Il parametro 213 deve essere prima impostato cambiando da visualizzazione percentuale a visua lizzazione millimetrica...

Страница 158: ...o consentite trasformazioni o modifiche della colonna telesco pica di propria iniziativa Le attrezzature utilizzate per la sicurezza devono essere verificate regolarmente almeno una volta l anno nella...

Страница 159: ...ino a al blocco 1 2 3 L utilizzo di fusibili non idonei o la loro riparazione pu provocare incendi ferite ed incidenti e danneggiare le colonne telescopiche Disattivare sempre l alimentazione alla col...

Страница 160: ...sione presente Con Firmware 2 15 staccare la spina di collegamento e riattaccarla dopo 30 sec di attesa Da Firmware 2 16 il messaggio d errore segnalato fino al rilevamento della sottotensione nel com...

Страница 161: ...i slave rico nosciuti non corrisponde al para metro 123 Controllare i cavi di collegamento e il valore registrato nel parametro 123 Infine percorrere l inizializzazione sul comando master E920 solo Sl...

Страница 162: ...7 Cicli di durata 162...

Страница 163: ...Hubs ule M Memory Memory synchro RK Rose Krieger GmbH Postfach 1564 D 32375 Minden Tel 0 571 9335 0 Fax 0 571 9335 119 E mail info rk online de Internet www rk rose krieger com...

Отзывы: