20160126 V3
27
Click
configuration,
a
set
up
table
will
appear,
DHCP
shall
be
ticked.
Set
Host
PC
to
DHCP:
see
below
properties
of
IPV4
:
tick
“Obtain
an
IP
address
automatically
Страница 1: ...th the monitor If you mount the monitor on a wall or shelf use a mounting kit approved by the manufacturer and follows the kit instructions The monitor should be operated with type of power adaptor in...
Страница 2: ...C Driver 12 Install EETI Touch Driver For Touch screen models only 14 IV Control Buttons Connectors 18 V For your safety 21 VI Support timing chart 21 VII USB Hub 22 VIII Power Over Ethernet PoE Power...
Страница 3: ...display resolution 1024 X 768 Simple Ethernet connection include Video Audio and other USB devices Include power over Ethernet for PR PGModels Simple Plug and Play Just attach a keyboard mouse to your...
Страница 4: ...20160126 V3 4 Check accessory Please make sure the entire accessory is included Power Adaptor for Non PoE Model P150PR ER PG EG User guide Driver CD Mini USB to USB A type cable P150PR ER PG EG...
Страница 5: ...llowing modes Basic Extended mode Zero Client With WMS2012 Multipoint 1 Basic Extended Mode or Mirror Mode Ethernet LAN network connection LAN cable LAN cable LAN cable LAN cable LAN cable Host PC Gig...
Страница 6: ...mend Gigabit Switched and ideally having a dedicated switch per each cluster 1 2 Installation Part 1 Windows OS Preparations 1 Run Windows Update and install all available updates 2 Make sure to insta...
Страница 7: ...nts 5 Click Configuration you can set IPv4 to Static IP or DHCP 6 Per each cluster per each P150P E terminal Click Assign to this PC 7 Windows will identify and install USB sound driver 8 A dialog wil...
Страница 8: ...nection will be completed as below 10 At this stage you should be able to see all the assigned monitors in active Windows Desktop mode 11 Start ViewSpan Configuration in the Task Bar Make sure to set...
Страница 9: ...iPoint Server 2012 zero clients can work independently as standalone PC 2 2 Pls visit Microsoft Website for Windows MultiPoint Server 2012 Evaluation to get image and installation guide http www micro...
Страница 10: ...es three drivers for installation Elite USB Server for extended mode SMSC Driver for extended mode EETI Touch Driver For Touch screen models only 1 0 Install Elite Driver USB Server P150PR GR ER EG El...
Страница 11: ...20160126 V3 11 1 2 After installation screen will display as below please press Finish 1 3 Screen will then display as below please choose to restart your computer...
Страница 12: ...20160126 V3 12 2 0 Install SMSC Driver P150PR GR ER EG 2 1 Please press I Accept...
Страница 13: ...60126 V3 13 2 2 Please select and confirm the Language 2 3 Installation start as below installation run automatically and completed with no additional message please restart your computer to complete...
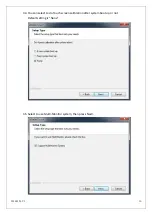
Страница 14: ...6 V3 14 3 0 Install EETI Touch Driver For Touch screen models only P150PR GR ER EG 3 1 Screen display as below please click Next 3 2 Select the set up type don t tick the box if PS2 interface is not r...
Страница 15: ...20160126 V3 15 Click Next 3 3 RS232 interface driver installed is default please click Next...
Страница 16: ...20160126 V3 16 3 4 You can select to do Touch screen calibration after system boot up or not Default setting is None 3 5 Select to use Multi Monitor system then press Next...
Страница 17: ...20160126 V3 17 3 6 Choose destination location default folder location shown as below Press Next 3 7 As Figure shown below please press Next to complete installation...
Страница 18: ...ocedure c After OSD menu is activated press this key can turn off the OSD menu Menu MENU a Press Menu key to activate OSD Menu b This key also means OK Press Up Down key to move the indicator to the d...
Страница 19: ...harpness DOWN key to decrease image sharpness Exit Exit to previous Menu Main Menu H Position Press UP key to shift screen left DOWN key to shift screen right V Position Press UP key to shift picture...
Страница 20: ...tion Mute Exit Man Menu H Position Adjust OSD Menu horizontal position press UP key to shift Menu right DOWN key to shift Menu left OSD V Position Adjust OSD Menu vertical position press UP key to shi...
Страница 21: ...id any danger 2 Please use the power and signal cables correctly when install it 3 In case of notice any abnormal smell or noise please stop operation and call the nearest dealer or service center VI...
Страница 22: ...1 Gigabit DC Bi Data mode A 1 Tx Tx DC TxRx A TxRx A DC 2 Tx Tx DC TxRx A TxRx A DC 3 Rx Rx DC TxRx B TxRx B DC 4 DC unused TxRx C DC TxRx C 5 DC unused TxRx C DC TxRx C 6 Rx Rx DC TxRx B TxRx B DC 7...
Страница 23: ...20160126 V3 23 XI Mechanical dimension...
Страница 24: ...ce when the equipment is operated in a commercial environment This equipment generates uses and can radiate radio frequency energy and if not installed and used in accordance with the instruction manu...
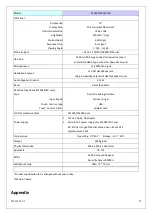
Страница 25: ...rs out Audio Speakers option 2W x2 Reset Reset IP address Resistive Touch Panel P150PR ER only Type Five Wire Analog Resistive Input Mode Stylus or Finger Touch Control type USB Touch Control Driver e...
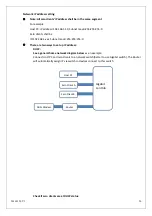
Страница 26: ...xxx Subnet mask 255 255 255 0 There are two ways to set up IP address DHCP See a general home network diagram below as an example Connect Host PC and zero clients to a network switch better to use Gi...
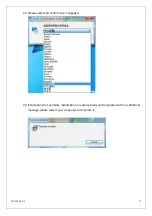
Страница 27: ...20160126 V3 27 Click configuration a set up table will appear DHCP shall be ticked Set Host PC to DHCP see below properties of IPV4 tick Obtain an IP address automatically...
Страница 28: ...28 After all devices IP address has been set up to DHCP the router will assign IP automatically the USB server utility will look like as below Click Assignment to this PC for each client connection w...
Страница 29: ...assign IP If the system is for local use not connect to router to website you may also assign IP manually The IP address shall be in the same segment and Subnet mask shall be the same For example Hos...
Страница 30: ...e11 16 Touch workstation change to Touch screen models 6 Page21 change Structure of OSD settings 7 Page24 Speakers option Build in Speakers Output option 2 W x 2 Note Speakers option is added upon cus...