background image

33

Replacing the Battery

STEP 1

Prepare the 3V Lithium battery(CR2032) for
replacement. Press firmly on the battery cover
and slide in the direction of the arrow.

STEP 2

Remove the old battery and place the new
one in the tray with the "+" side facing up.

STEP 3

Slide the battery cover back into place and
close firmly.

Caution : Dispose of battery
according to your local
environmental regulations.

Important : If you do not replace the new
battery within one minute of taking the old
one out, you have to reset the date and
time. Removing the battery does not affect
the meter's memory or user settings.

Содержание gmate step

Страница 1: ...User sGuide Thank you for purchasing the Gmate System Please read this User s Guide carefully before using to ensure correct use Please keep this User s Guide for your future reference ...

Страница 2: ...sily with simple operation It is small size stylish design and ease of use allows you to take it everywhere It can show all information variously It requires very small volume 0 5uL and display the result in 5 seconds It can measure glucose in whole blood at AST Alternate site testing It can measure glucose concentration when the test strip inserted without changing the code number or using the co...

Страница 3: ...ut the Pedometer 13 Obtaining Blood Drop 15 About Alternate Site Testing 18 Testing Your Blood Glucose 20 Control Solution Testing 24 Reviewing Results 27 Setting the Meter 30 Replacing the Battery 33 Error Messages 34 Troubleshooting 36 Performance Characteristics 37 Caring for System 39 Specifications 41 ...

Страница 4: ...4 About GmateTM System Gmate System includes ...

Страница 5: ...ation date Serial number Lot number In Vitro Diagnostic medical device Manufacturer Authorised representative Symbol for temperature limitation Consult instructions for use Biological risks Contains sufficient for n tests Direct current Separate disposal from other household waste ...

Страница 6: ...the 30 page Setting the Meter to ensure your desired settings are saved Your Gmate meter comes with the time date and year pre set Before using your meter for the first time or if you change the meter battery you should check and set the time and date If you does not set your meter for the first time or after changing the battery you can hear beep 3 times when inserting a test strip There are two ...

Страница 7: ... adjust the parameters in set up mode You can turn the meter off by pressing and holding the M button for 2 seconds Test Strip Port Insert the end of a Gmate test strip here The meter will turn on when you insert the test strip Electrodes The end of the test strip is inserted into the test strip port of the meter with the end facing up Sample Tip The end of the test strip where the blood sample is...

Страница 8: ... Functions of the Parts Side View Back View Strap Hole It is for hand strap or neck strap Battery Cover Slide cover off to replace batteries SET Button Used to enter the set up mode for changing the date and time ...

Страница 9: ... must be replaced Display test results steps measuring status error messages and other informations Results are displayed along with the units of measure Clear AST cap Lancet ejector Sliding barrel Adjustable cap Lancet holder Release button Clear AST cap is an optional accessory Please contact your local distributor ...

Страница 10: ...te System for diagnosis of diabetes without the guidance of healthcare professional for testing on newborns and with arterial blood The Gmate System contains small parts that may be dangerous if swallowed Check the package before starting the measurement Be sure to read user s guide and the test strip insert found in the test strip box carefully before testing Do not make any decision of medical r...

Страница 11: ...re Do not disassemble or modify the meter Do not subject the meter to severe shock drop or step on meter The meter is not waterproof Do not wash it or touch it with wet hands Do not wipe the meter with thinner or abrasive cleaners Avoid the meter being exposed to high temperature high humidity rain and or dust when using or storing the meter Do not test glucose instantly when the meter move to a p...

Страница 12: ... directly Do not press the test strip against your finger This may affect inaccurate aspiration of blood Do not use a test strip that appears damaged or has been used Test strips are for single use only Store test strips in their original vial After you take a test strip out of the vial be sure to use it within three minutes Always use test strips within 3 months 90days after first opening With cl...

Страница 13: ...eck strap around your neck Place the meter in your pocket Do not place the meter in the back pocket of your pants Place the meter in the pocket you hold tightly Place the meter in your bag Place the meter in your pocket or the partition of your bag Wear the meter with neck strap around your neck Use the supplied neck strap and place the meter near your chest Important The meter can count steps onl...

Страница 14: ...s placed in the angle of less than 60 or horizontal to the ground When the meter is placed in the bag that moves irregularly because it hits your foot your belt or the top of your pants When the unit hangs from your belt the top of your pants or a bag When you walk at an inconsistent pace When you use the meter in the place where lots of up and down movements or vibrations take place When you walk...

Страница 15: ...lly with warm water to increase the circulation of the blood into the fingers Dry hands thoroughly until the finger to be pricked is completely dry STEP 2 Unscrew the cap of the lancing device by turning it counter clockwise while holding the base firmly ...

Страница 16: ...rile lancet into the bottom of lancet carrier STEP 4 Twist the cap of the lancet off STEP 5 Put the cap of the lancing device back on and turn it clockwise STEP 6 Hold the tip firmly in one hand then pull out the sliding barrel with the other hand This will cock the lancing device ...

Страница 17: ...ng device firmly against the side of the finger with the cap resting on the finger The harder it is pressed the deeper the puncture Press the release button to take a sample Caution To reduce the chance of infection Make sure to wash the puncture site with soap and water before sampling Do not share a lancet or a lancing device with anyone Always use a new lancet lancets are for single use only Ke...

Страница 18: ...aining a drop of blood from these alternate site testing may be less painful than a fingertip sample Following figure shows the areas where you can test with the Gmate System Avoid moles veins bones and tendons Consult to your healthcare professional before using alternate site testing Upper Arm Forearm Hand Fingertips Thigh Calf ...

Страница 19: ...reness Obtaining a blood sample from alternate sites is different than getting a sample from fingertips After inserting a new sterile lancet into the bottom of lancet carrier put the clear AST cap to the lancing device Place the lancing device on the skin in the chosen site press and hold the lancing device continuously for a few seconds then push the release button to take a sample watch through ...

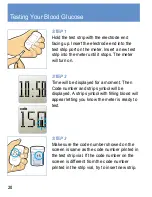
Страница 20: ... turn on STEP 2 Time will be displayed for a moment Then Code number and strip symbol will be displayed A strip symbol with filling blood will appear letting you know the meter is ready to test STEP 3 Make sure the code number showed on the screen is same as the code number printed in the test strip vial If the code number on the screen is different from the code number printed in the strip vial t...

Страница 21: ...er beeps Blood is automatically pulled into the test strip STEP 5 The Meter will now show counting progress during 5 seconds STEP 6 The test result is complete when you hear beeps Your blood glucose test result is shown on the display screen Important The volume of blood sample must be at least 0 5 microliter real size ...

Страница 22: ...automatically after one minute of nonuse When this happens test results are still saved in memory Caution Used test strips and lancets may be considered biohazardous waste in your area Be sure to follow your local regulations for proper disposal STEP 7 To turn your Meter off simply remove the used test strip The Meter turns off automatically Your test result will automatically be stored in memory ...

Страница 23: ... results check your system with control solution See Control Solution Testing page 24 Range of expected results Blood glucose levels will vary depending on food intake medication dosages health stress or exercise Consult your healthcare professional for the target value that is appropriate for you Expected blood glucose levels for non pregnant people without diabetes Fasting Less than 100 mg dL 5 ...

Страница 24: ...u suspect the meter or the test strips are not working properly if you have had repeated unexpected blood glucose results or if your meter is damaged STEP 1 Hold the test strip with the electrode end facing up Insert the electrode end into the test strip port on the meter Insert a new test strip into the meter until it stops The meter will turn on STEP 2 Time will be displayed for a moment Then Co...

Страница 25: ...al If the code number on the screen is different from the code number printed in the strip vial try to insert new strip STEP 4 Shake the control solution vial and remove the cap Gently touch a drop of control solution to the tip of the test strip Hold until the meter beeps STEP 5 The meter will now show counting progress during 5 seconds ...

Страница 26: ...n this range the meter and strips may not be working properly Repeat the control solution test Out of range results may be caused by not following the instructions on this USER S GUIDE expired contaminated or watered down control solution expired or damaged test strip control solution test done outside 20 C to 25 C 68 F to 77 F or a problem with the meter If you continue to get control solution re...

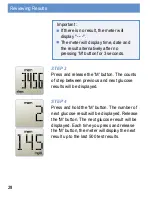
Страница 27: ...of your step STEP 2 To enter review mode In the pedometer mode Press and hold the M button The number of last glucose result will be displayed Release the M button The last glucose result will be displayed Important The meter s display will not change or display steps until after you have walked more than 5 steps The number of your step is reset to zero at every midnight or when pressing SET butto...

Страница 28: ...ber of next glucose result will be displayed Release the M button The next glucose result will be displayed Each time you press and release the M button the meter will display the next result up to the last 500 test results Important If there is no result the meter will display The meter will display time date and the result alternatively after no pressing M button for 3 seconds ...

Страница 29: ... day average shake the meter slowly in the review mode The meter will display 7 day average and 7DAY alternatively Shaking the meter again allows you to scroll forward to 14 and 30 day averages with beep Continue to press the M button to view stored test results STEP 6 The Meter is off if you press and hold M button for 2 seconds ...

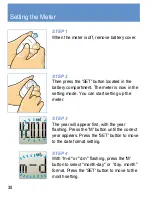
Страница 30: ... correct year appears Press the SET button to move to the date format setting STEP 4 With m d or d m flashing press the M button to select month day or day month format Press the SET button to move to the month setting STEP 2 Then press the SET button located in the battery compartment The meter is now in the setting mode You can start setting up the meter ...

Страница 31: ...y flashing press the M button until the correct day appears Press the SET button to move to the hour setting STEP 7 With the hour flashing press the M button until the correct hour appears The meter displays only the 24 hour time format Press the SET button to move to the minute setting STEP 8 With the minute flashing press the M button until the correct minute appears ...

Страница 32: ...32 Setting the Meter STEP 9 Press the SET button to complete meter set up and turn off the meter ...

Страница 33: ...place the new one in the tray with the side facing up STEP 3 Slide the battery cover back into place and close firmly Caution Dispose of battery according to your local environmental regulations Important If you do not replace the new battery within one minute of taking the old one out you have to reset the date and time Removing the battery does not affect the meter s memory or user settings ...

Страница 34: ...st after the meter and test strip have reached the above temperature range Appears when environmental temperature is ABOVE system operation range System operation range is 10 40 C 50 104 F Repeat the test after the meter and test strip have reached the above temperature range Appear when inserting a used test strip Re test with a new test strip ...

Страница 35: ...eat the test with a new test strip This error message indicates the meter has problem Review the instructions and re test with a new test strip If this messages appears again contact the local dealer Battery is low but you can still perform a few tests Replace the battery as soon as possible Battery is too low to perform a test Replace the battery immediately ...

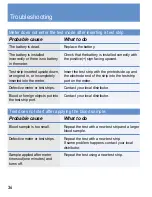
Страница 36: ...led correctly with the positive sign facing upward Insert the test strip with the printed side up and the electrode end of the strip into the test strip port on the meter Contact your local distributor Contact your local distributor Test does not start after applying the blood sample Probable cause Blood sample is too small Defective meter or test strips Sample applied after meter times out one mi...

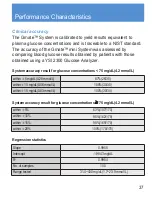
Страница 37: ... within 15 63 107 170 within 20 Regression statistics Slope Intercept R2 0 9955 1 9843 mg dL 0 9954 No of samples 100 Range tested 31 4 430 mg dL 1 7 23 9 mmol L 95 162 170 99 169 170 100 170 170 Clinical accuracy The Gmate System is calibrated to yield results equivalent to plasma glucose concentrations and is traceable to a NIST standard The accuracy of the Gmate mini System was assessed by comp...

Страница 38: ...37 mg dL 13 2 mmol L 394 mg dL 21 9 mmol L 1 2mg dL 0 07mmol L 2 8mg dL 0 16mmol L 2 9mg dL 0 16mmol L 4 3mg dL 0 24mmol L 9 9mg dL 0 55mmol L 3 0 2 7 2 0 1 8 2 5 Total precision 100 control solution tests per glucose level GmateTM STEP System Mean glucose Standard deviation Coefficient of variation 40 mg dL 2 2 mmol L 106 mg dL 5 9 mmol L 322 mg dL 17 9 mmol L 0 8mg dL 0 04mmol L 2 5mg dL 0 14mmo...

Страница 39: ...ial Checking for expiration to strips and control solution Test strips and control solution have expiration dates printed on their vials When you first open a test strip or control solution vial you must record the opening date in the space provided on the label Use all test strips within 3 months after the first opening Caution Do not use the strips or control solution after the expiration date p...

Страница 40: ...t to clean your meter Do not get any liquids dirt dust blood or control solution inside the meter through the test port Cleaning your lancing device and clear AST cap Clean and wipe the outside of the lancing device with a soft cloth dampened with mild soap and water Wash the adjustable cap and clear AST cap with mild soap Do not immerse the lancing device in any liquid ...

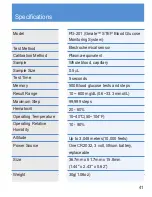
Страница 41: ...mg dL 0 6 33 3 mmol L 99 999 steps 20 60 10 40 C 50 104 F 10 90 Up to 3 048 meters 10 000 feets One CR2032 3 volt lithium battery replaceable 36 7mm x 61 7mm x 15 8mm 1 44 x 2 43 x 0 62 30g 1 06oz Model Test Method Calibration Method Sample Sample Size Test Time Memory Result Range Maximum Step Hematocrit Operating Temperature Operating Relative Humidity Altitude Power Source Size Weight ...

Страница 42: ...io frequency interference at the frequency range and test levels specified in IEC 61000 4 3 The meter has been tested for electromagnetic emissions specified in IEC 61326 Warranty Philosys warrants that your Gmate meter will be free of defects in materials and workmanship for 5 years valid from the date of purchase The warranty extends only to the original purchaser and is not transferable ...

Страница 43: ...43 ...

Страница 44: ...ssels Belgium Tel 32 2 732 59 54 Fax 32 2 732 60 03 Email mail obelis net philosys Co Ltd 827 3 Sangpyeong ri Okgu eup Gunsan si Jeollabuk do Korea Tel 82 63 453 1421 Fax 82 63 453 1423 Email help gmate biz Printed in Korea Rev Date 2014 12 0202R8 ...

Отзывы: